Showing posts with label art teacher. Show all posts

Saturday, May 12, 2012

What the Art Teacher Wore #16

Monday, Seriously??: The last time I wore this dress one of my students asked, "Are you dressed like the Cleaning Lady today?" So this time I decided to jazz it up with a too-big flower and too-many necklaces. flower hair pin: flower from Joann's, hair pin made by me; necklaces: dunno, Target?; dress: Paul and Joe purchased for cheap a million years ago at Urban Outfitters; shoes: Blowfish picked up at TJMaxx
Hello there! Just a little peak at what I decided was appropriate to wear this week. And by "appropriate" I mean "what's clean and not on the floor of my closet". While scooting around on the internet (okay, let's just say it, there is no more "surfing the net" for us ladies, it's just pinteresting. Am I right?), I came upon these amazing works of art. And because I've been shoveling sugary sweets all week in an attempt to stay upright and perky, I thought I'd share with you some drool-worthy delectables that I have decided would complete me. Hope you enjoy!
Isn't this stunning? I love it. Frida Kalho by Alexey Kurbatov.

Flowery sugar cookies? Can I wear them in my hair and grab -n- eat when the mood strikes? Me thinks yes. Bakin' ideas found here.

Too Pink Tuesday: I am in love with this dress. Mostly because a dear friend who used to wear it gifted it to me. I think the color combination is divine. dress: gift from a friend; sweater: Ann Taylor, thrifted; flowers: H & M; shoes: Anthro couple years ago

Is that a key lime pie I spy? Mmmm, my favorite. Cakes and Pies by Wayne Thiebaud

Vintage wedding cakes, so cute! My fave is mini on the jadeite cake stand.

Wild Hair Wednesday: I swear the ends of my hair isn't really that bad. All my photos this week were taken at the end of some very long days at which point my hair was the least of my worries. sweater: thrifted: dress: vintage, thrifted; belt: made by me; shoes: BC

No where near the wonder of this woman, but I thought her color scheme kinda-sorta worked with mine. Wonder Woman by Nicole Charbonnet You should really check out her stuff, it's awesome.

Wait, what? Is this the grown-up version of candy necklaces? Why am I just now hearing about this?!

Thursday, I'd like you better if you had an FRI at the beginning of your name: Don't ask me what I am doing with my mouth in this picture. Possibly talking to myself. That's what too much sugar will do to ya. sweater: ebay; dress: vintage, thrifted; belt: Pinky Otto; necklace: vintage, thrifted; flowers: H & M; amazing owl sandals: Anthro, last year

I thought this wild -n- wacky Hollywood painting completed my look. A giant hovering In -n- Out Burger cup? With frolicking elephant underneath? Sure, why not? Found here.

The only thing that would make this better would be a wig of cotton candiness.

Friday, I've been waiting for you since Wednesday: Seriously, this week was a long one. That way for anyone else? dress: vintage, picked up for 25 pennies at the by-the-pound Goodwill; belt and flower hair clips: made by me; shoes: Frye picked up at Marti and Liz

The dress had the worlds smallest waist. Seriously, it was 10" wide. And I was determined to wear it. So I added this panel of lace in the back which not only extended the too-small waist but also the too-small bust.

The bold colors at the top of this painting reminded me of the bold flower at the top of my head. Bloom by Meredith Pardue.

Mmmm, nothing says delish like jell-o mold desserts, my favorite! (Ha, I kid, I have a fear of all things jell-o-y). Thanks for stopping by!

Read more »

Wednesday, May 9, 2012

DIY: Ceramic Paper Doll Dresses

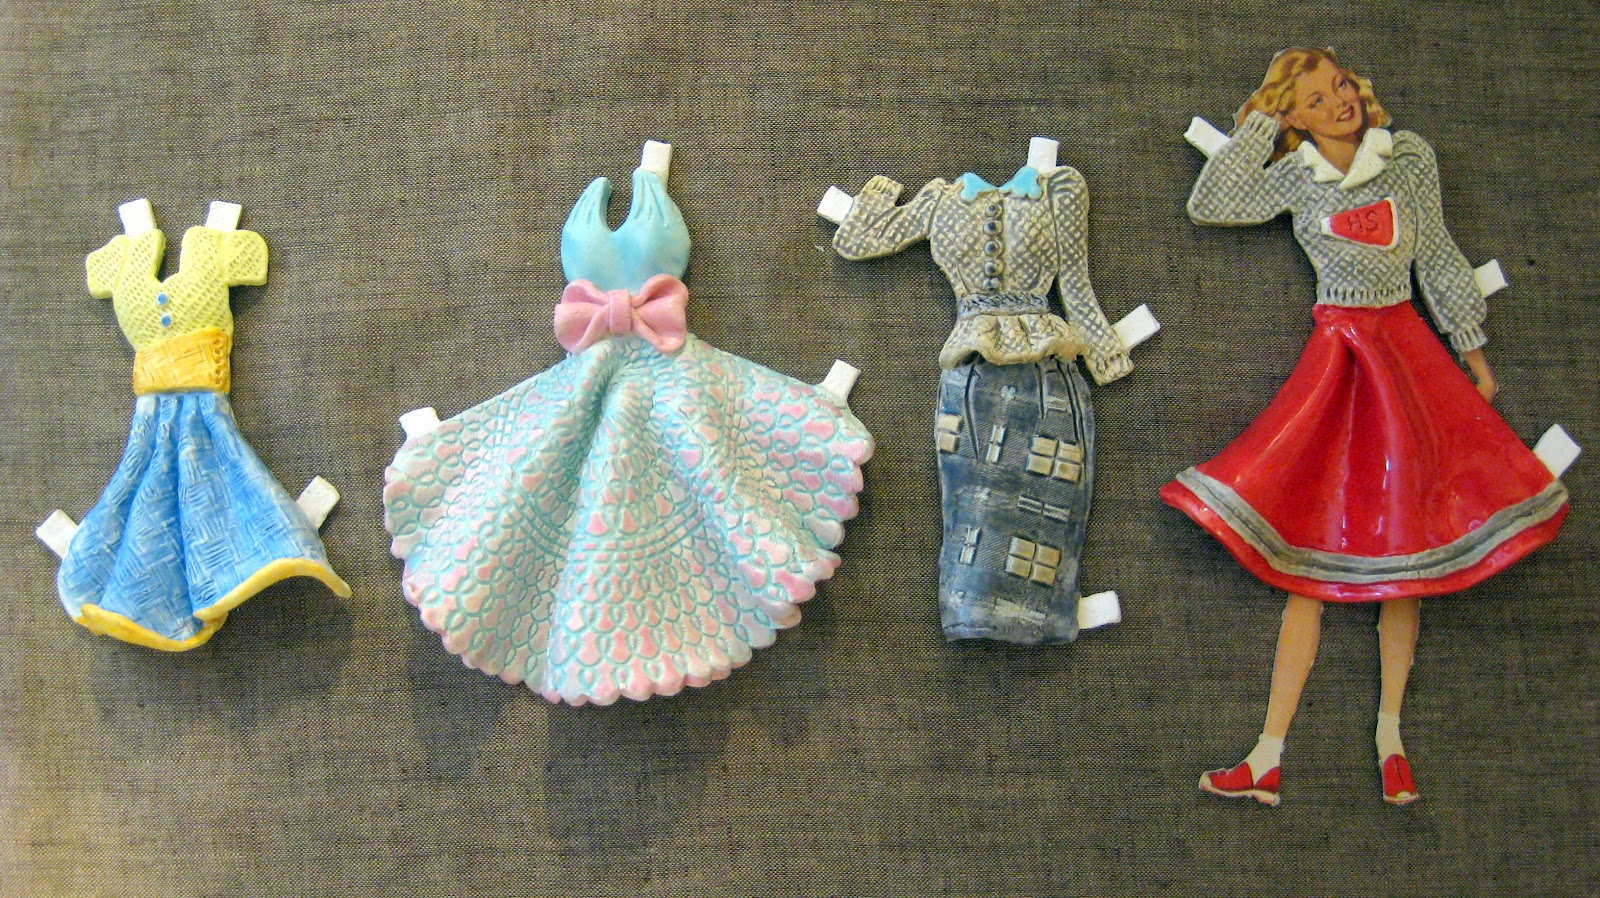
A girl can never have too many dresses, I say. While creating these ceramic dresses, I had a theme in mind for each. Starting from the left, I call these The Debutante, The Librarian, The Lady Who Lunches and The Majorette.
I have a wee bit of a vintage paper doll collection as you might recall here. I just love the sweet illustrations and the beautiful dresses. As a kid, I often resorted to playing with my paper dolls when it became too stinkin' difficult to slide Barbie's tight Calvin Klein-inspired jeans over her sticky rubber legs. I'm pretty sure I was on the verge of getting kid's carpal tunnel, thanks to Mattel. But I digress.
The Summer Picnic, The Prom Date, The Secretary, The Cheerleader
One of my other fave kid toys were my Fashion Plates. Did anyone else have these? I recently found a set on etsy and scooped them up. I loved coming up with my own outfit designs as a kid. Huh, go figure, right?

Both of these interests, vintage paper dolls and dress designing, started me down this latest DIY path: Ceramic Paper Doll Dresses. I had been toying with the idea for a while but not until I found some old photos of my maternal grandmother was I inspired to set to work.
My beautiful grandmother is the girl on the right. I love her widow's peak, olive colored skin and wavy dark hair, none of which I inherited.
I love this photo of my grandmother with her mother and siblings. Her pretty little legs in those too-big shoes, her sweet smile but most of all, that dress. I was determined to sculpt a ceramic version.
Since I've been creating ceramic belts, I've been using tons of different textures for surface design. Among my favorites are doilies, burlap and these polymer clay texture plates sold at craft stores.
To create my little dresses, I first went through my stash of textures. Many of my textures are vintage lace which are perfect for creating little mini-vintage ensembles. For this process, I lay my texture down on my work surface (a wooden board), lay a piece of clay on the texture and use a rolling pin to flatten. Once the clay is flattened to an even surface, I peal the clay off of the texture, turn over and, voila! "fabric" for my dress.
The secret ingredient to working with clay and not having it stick to the rolling pin, your fingers, and everything else? Corn starch. That's the white powder you see on my clay.
I used one of my favorite vintage paper dolls as the model for all of my dresses. She was placed on my textured surface and the dresses were designed around her. This made dealing with proportion a snap and left me able to focus on the fun part, designing her vintage look.
My grandmother's dress. I cannot wait to have it fired and glazed. I would love to know the original color of the dress. My grandmother is no longer with us but maybe her sister will know.
Forming the little details, like the buttons and the ruffle, are my favorite parts about creating these little outfits. Once that's complete, I add the tabs and allow the clay a day or two to dry before a slow fire in the kiln.
My grandmother was also a majorette. My plan is to eventually create the accessories that go with these outfits, like the baton and the knee-high tasseled boots.
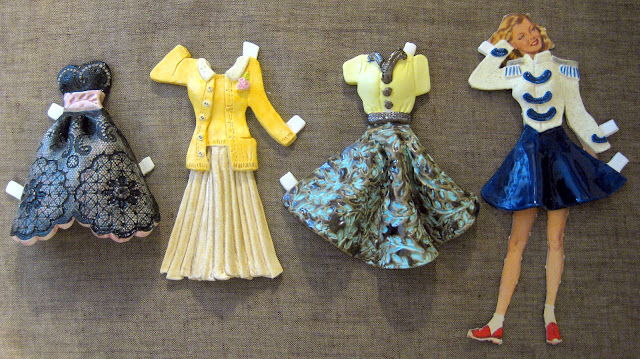
Once the dresses are out of the kiln, the glazing adventure begins. I have a love/hate relationship with glaze as you can never know for certain what you are gonna get. One of my favorite dresses I created was a Dale Evans-inspired cowgirl dress. Sadly the glaze was much too shiny and bright and the dress lost that certain something.
"Oh, what's that, Charlie? You wanna take me to the prom? Golly gee, I dunno. I've already been asked by Timmy, Bobby and Bill!"
I decided what these dresses needed was a satin glaze. So I ordered some here and was much happier with the result.
The Librarian. I designed the skirt of this dress around one I saw my grandmother wearing in a school photo.

My grandmother was never a cheerleader but I just couldn't resist creating a vintage cheer look in my college colors. I'm a hoosier, what can I say?

Okay, so someone needs to go shoe shopping. This dress is easily my favorite.

I attempted to use a tarnished gold metallic glaze on the skirt. Yeah, not what I was expecting.
I'm interested to hear what you think of this little DIY of mine. And now the question is...what do I do with these wee little wonders? I have a couple of ideas but nothing is really lighting my fire, if you know what I mean. What do you think? Frame them? Put them in a shadow box, as a friend suggested? Display them...how?

Thanks for reading, guys! I do hope you have a lovely day. Oh, and the next time Barbie's pants won't go up? Put her in a dress. That's what I do Every Single Day ;).
Read more »

Thursday, May 3, 2012

In the Artroom: The Art History Wall

A Rockin' Trip Thru Art History with...Mona Lisa's Masterpieces.
This week in the art room, I thought I'd share with you the backdrop seen in many of my What-I-Wore-This-Week posts. Every school year, I create a theme of study. The year I created the Art History Wall, our theme was Rockin' Thru Art History. I wore this wacky apron and the kids created guitars and rocked their way through the history of art.  I loved the wall too much at the end of the year to take it down. With the exception of a random piece of art falling off the wall, it's held up well through the years and, more importantly, it's proved to be a valuable educational tool in the art room.
Every art room should have a mascot.
I am fortunate in that I have a very large art room. Once upon a time, my art room was the school library. So it is very long with plenty of former book shelves turned cabinets and storage.
The Wall in total. Narrowing down the history of art to fit my wall was the hardest part.
That being said, I have this very large wall space which seemed to be the perfect canvas for a giant display. I began by jotting down the major movements in art history. From there, I rooted through my mountains of visuals: old calendars, postcards, posters -- even cutting up the art history books I'd hoarded since college, to find just the right images.
In the Beginning...we had rock art, no paper, no scissors.
With my art movements and visuals sorted, I began the writing of the Art History Wall. This proved to be difficult as I had to keep it simple and kid friendly. To add a little  three dimensional pop to the wall, I clued a piece of foam to the back of the purple papers as well as some of the visuals.
If you are interested in creating your own wall, feel free to borrow from mine as much as you like. The following are the movements and their simple descriptions:
Rock Painting: The beginning of art...
Ancient Egypt: tombs, pyramids, mummies, OH MY!
Ancient Greece: athletic people that believed in many gods...
Ancient Rome: expanded Greek art ideas (after conquering them)
Middle Ages: Bible stories were told through art
Early Renaissance: Artists learned to paint realistically
High Renaissance: Michelangleo painted the ceiling of the Sistine Chapel and sculpted David; Leonardo da Vinci sketched inventions and painted the Mona Lisa

Dutch painting: Dutch artists painted portraits, still lives and genre paintings
Romantics and Realists: wanted to show emotion in their art
Impressionists: group of artists that wanted to show color and light
Famous impressionists were Monet, Manet, Renoir, Degas, Cassatt
Post Impressionist: artists that created after the Impressionists and expanded their ideas: van Gogh, Seurat, Cezanne
Modern Art: In modern art, artists realized that the possibilities are endless!
The bulletin board beside the art history wall.

What's the point in having a mascot when you don't get to wear a silly costume? I got this idea from one of the most amazing and inspirational art teachers I know, Debi West. You can read more about her and her students here.
And there you have it! We put the wall in action when we are learning about an artist or a certain movement in art. I'll ask the kids to follow me to the Art History wall so they can visually grasp important periods in art. Thanks for reading!
Read more »

Tuesday, May 1, 2012

DIY: Floral Embroidery

So, do you remember that floral embroidery sneak-peak I shared with you here? Well, I finally finished it! But if you want to read more, you'll have to head over to one of my favorite blogs, The Little Red Squirrel.

Sweet Katie, the creative mind behind The Little Red Squirrel, is on vacation in Paris (I had to photoshop my green-with-envy face) and asked me if I wouldn't mind being a guest blogger for her. I shared with her readers my floral embroidery DIY. I do hope you'll take a look and add her blog to your blog reader, it's fantastic!

And thanks again, Katie, it was a delight. Enjoy your holiday!
Read more »

Saturday, April 28, 2012

What the Art Teacher Wore #14

Floral, Gingham and Dots Monday: This photo was taken as the UPS man drove by, honking and waving at silly me and my tripod. sweater: vintage and thrifted; skirt: Anthropologie, last summer; tights: Target; shoes: Dolls by Nina
Kids, you'll have to forgive me, but I've gone a bit berzerk. Not only did I find some super groovy masterpieces that kinda-sorta coordinate with my ensemble...but I've also found The Missing Link. I'm not talking about some neanderthal-looking dude (though I'm pretty sure that guy was standing behind me in Goodwill yesterday telling his kid to, "Git over hair, nay-ow!"). I mean, The Missing Link to completing my look. I'm adding each to my Christmas, birthday and Arbor Day wishlists (what, you don't get prezzies on Arbor Day?). Thanks for indulging my silliness. Enjoy!
Red, White and Blue Cherries created by the husband and wife team at Just Plain Pix.Cherries are my absolute fave fruit. You?

I really really want a bike. Not to ride or anything. Just to look at. I promise I would look at it every single day. Can I have this one, pretty please?

Surprise! Evaluation Tuesday: Erm, yeah. My dear principal came about 30 seconds before my kids did for my surprise evaluation. No word on how it went. But there was no rolling around on the floor, crying or fit throwing, so that's good. I was on my best behavior. dress, jacket and belt: vintage, thrifted; tights: Target; shoes: Lucky, purchased on the cheap at Marti and Liz

The browns and golds in my outfit reminded me of this painting. Do you recognize it? It's kinda famous. But it's a little difficult for me to see...

Oh, that's better. I just needed my fancy smancy brown and gold cat eye glasses that coordinate with my outfit to help me see. Now I recognize her, it's Mona Lisa by "Vincent da Vinci" (a direct quote from one of my students this week).

Seeing Spots Wednesday: On this day, I just happened to be wearing an apron...which was good because I managed to pour a ton of paint all over it without even noticing. Afterward, one of my kids told me that my name should be "Mrs. Messy". dress: vintage, thrifted; sweater: thrifted; shoes: thrifted and altered by me...I had to add the blue fabric just to keep the shoes on.

Explosion, Roy Lichtenstein ... this is pretty much what my apron looked like after the paint attacked it.

Wonder what the UPS man would say if he saw me in my polka dotted ensemble on the steps of this  red spotted house with the teal blue steps?

Thursday: sweater: Paris Market Vintage for $4! ; dress: Talbots, thrifted; belt and flower: H&M; fishnets: Target; shoes: Indigo by Clarks; kid sunglasses: ebay

Love Angie Lewin's work. She's got a book out of her prints as well.

You see, I won't be riding the bike because I'll be driving this! I really want a vintage car. But hubs has had his share of old cars: a Bronco and a couple of Mustangs and says his days with the oldies are over. Sigh.

Friday, My Love: sweater: Ann Taylor, thrifted; dress: vintage, thrifted; belt: made by me; shoes: BC Shoes

My outfit reminded me of ketchup and mustard. So did this painting by Henri Matisse.

And what better way to handle one's ketchup and mustard than with these incredible gloves. I went through a phase in high school wear I wore sweet lace gloves until my giant man-hands busted out of them. Oh well. One can dream.

Read more »