Showing posts with label ceramics. Show all posts

Sunday, April 3, 2022

Clay Mugs for Kids!

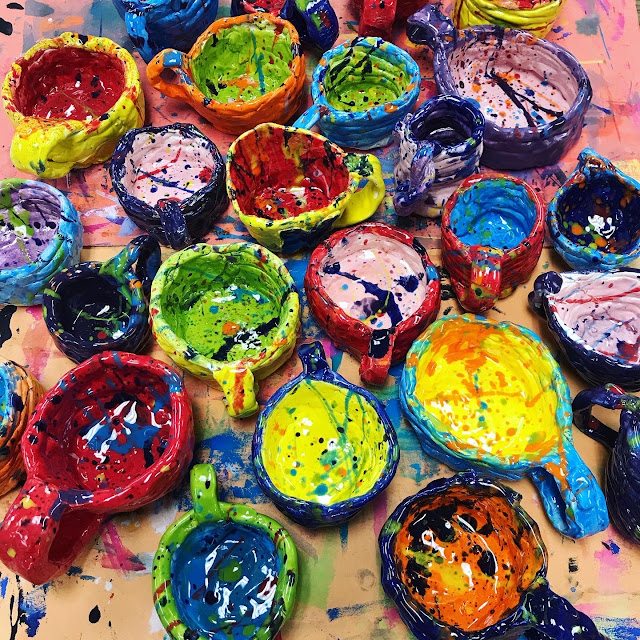
Hi, friends! My students are wrapping up one of the clay projects they created and I thought I'd share. Last year, my first through fourth created clay mugs and it was easily everyone's favorite clay project. When I shared that we were working with clay again, a few weeks ago, their first question was "are we making mugs again?!" I had already planned on it...so they were excited to hear the answer. Once mugs are complete, we celebrate by drinking hot chocolate out of them...so it's a whole lot of fun. 

This year, I created a video to share with them. Because I have 30 minute art classes, I only showed the pinch pot portion and a bit of coil making for the first class. The second class, we did a brief coil making reminder and then watched the portion about creating a handle. The video helped them trouble shoot and get their mugs completed in just two 30 minute classes!
This week, we started glazing! They were told they could use any two colors of glaze, one for the inside and one for the outside. They were to do at least three coats of their chosen colors and not to glaze the bottom. Once complete, they could join me at the splatter glaze station!

When my students were finished glazing, they could help a friend or work on the large banners I created to announce our upcoming art show! 

We used Prang's Creativity Street Tempera Sticks to color these with.
The glaze we used are from two companies and I like them both: Mayco's Stroke and Coat and Amaco's Teacher's Palette. Both are food safe and fire to cone 06.
When introducing clay to your students, you might find this video fun to share:


Read more »

Sunday, December 1, 2019

In the Art Room: All Things Clay!

When I first started teaching, teaching clay was in my curriculum and I FREAKED.THE.FUNK.OUT. I didn't take a single clay class in college and only made a couple of pieces in high school. I managed to melt down a kiln, explode hundreds of pieces and even drop my share of masterpieces. Despite all of that, after teaching art, clay and kiddos for over 20 years now (and having written a book on the topic!), I feel like I can finally share my (semi-limited) wealth of knowledge on all things clay!
While my book was written for children who don't have access to a kiln, many of the projects can be used with kiln fire clay! 
Over the last three weeks, I have shared everything I know about kiln fire clay on my podcast! It's so much...that I had to break the series into three episodes just to squeeze it all in. So, if you'd like to take a listen here, here you go:


But wait, there's more...


AND just a pinch more...


In case you need a visual, as I often do, here's a video of some of the clay tips I mentioned. For the complete blog post, you can visit here. 
 More details on my favorite tools and how I set up for clay in the video and my podcast!
Part 3 of this series is all about glaze and glaze alternatives. If you'd like a video with more, check this one out:
The blog post with more details on glaze can be found here. 
And if you need a visual of the clay projects I mentioned or just some clay project ideas, then check out this post with my very favorite clay projects! Have fun! 
 photo signature_zpsd10b3273.png
Read more »

Monday, January 1, 2018

Field Trip! In the Studio with Becca Jane Koehler

This summer, I had a wonderful chance to meet and hang out with the artist Becca Jane Koehler. I initially met her at our local HUGE craft show where she was a standout (and recognized) for unique pieces. I chatted with her a bit at the show and managed to grab a card...I knew she would be a wonderful artist to share with my students. On my YouTube channel, I have a playlist titled Field Trip! which is where I seek out and interview artists who share their process with me. I've filmed folk artists, painters, ceramicists, printmakers and now, Becca Jane! Here's the video:
I share these videos with my students either as inspiration for an upcoming project...or simply for them to get a peak behind the art makin' curtain. You are more than welcome to use them in your art teacherin' world!
You can see more of Becca Jane's work on her website. Personally, I love following her on IG because she's got a style that I really love. I also think my students will love her work and her process as well. 
Before meeting her, I had no idea that many of her pieces were made with slabs of clay. I can totally see using this method with my students. I'm excited about the idea of creating my own plaster molds to use in the art room. Have y'all ever done that? I'd love to hear details!
In the video, I mention the co-op where Becca Jane creates. It's the Clay Lady Campus and it's simply AMAZING. If you are in Nashville and never been, you gotta go. And if you are ever passing through the area, be sure and drop by, it's worth the trip. The Campus has an art gallery where the artists who create in the space sell their wares. The prices are very reasonable and I always find myself walking out with a bag of ceramic treasures.
While you are there, an artist will pop up and volunteer to give you a tour of the campus. Be sure to take them up on the offer! Becca Jane gave me a tour after our filming and I met so many amazing artists...and got a chance to see their creative space. 
Danielle McDaniel, aka The Clay Lady, is super awesome. I met her years ago and she seriously taught me everything I know about kiln fire clay. Be sure and check her out, even if you are not local...her books and resources are priceless!
I am loving the sgraffito method that Becca Jane uses. I did this method with my students years ago...and now I'm inspired to bring it back. 
Isn't it amazing, watching an artist create? It always looks so easy. Even as a person who creates, I'm always enthralled when I watch others paint, draw, thrown on the wheel. Mostly because I know it's not easy and hasn't come without a lot of work and patience.
Loving that green!
Big thanks to Becca Jane for sharing the magic of her creative process with us!
And, of course, sweet Eleanor! 
 photo signature_zpsd10b3273.png
Read more »

Wednesday, July 26, 2017

Field Trip! A Visit with Audry Deal-McEver

Last year, I started a series of videos titled Field Trip! The purpose of these videos was to take all of my students on a virtual adventure to meet contemporary artists, see their creative spaces and witness them creating. You can check out my playlist of Field Trip! videos here. If you subscribe, you can also stay up-to-date as to when I post a video. I actually have three more Field Trip! videos recorded that I need to edit and upload before sharing them with you and my students. Please feel free to use these (and any of my videos) in your art room...I think all students can benefit from learning about these unique, creative and current working artists. 

I admit, I fell off the wagon HARD last spring when it came to searching out artists, contacting them and filming them. I was starting to feel super overwhelmed with all things art teacherin': the national conference where I presented a couple of times; our school-wide art show which is a beast of an undertaking and our clay unit which we always kick off in the spring. I will also admit this to you...I am very lazy, not consistent, a procrastinator and, did I mention lazy? I'm lazy. One look at Mount Laundry and you would agree.

But knowing just how much my students benefited from these videos, I knew I had to continue creating them. So during the spring, I attended an artisan fair and picked up just about every business card that I saw sitting out. Once home, I researched the artist, looked into their location (Nashville and just a little beyond is ideal) and sent them an email. I got a great response...artists are so giving with their time and willingness to share! The first artist I scheduled to visit is the one and only Audry Deal-McEver
Look at her beautiful home! Audry's studio is right behind her home and it is absolutely stunning, check it out:
When I arrived at Audry's home, she reminded me that we actually met many years ago (we are thinking about 10-12). My brother, who is 10 years my junior, was in a very bad car accident and was in a coma for several weeks. During that time, my administration allowed me to be with him and my family. Audry's mom, an art teacher, stepped in for me. She taught my classes, kept the students creating and made it so I could focus on what was most important. Her daughter, Audry, came in one day and did a wheel throwing demonstration for the students. I still have the photos of that day and share them with the kids when we chat about clay. What a crazy turn of events, right? My brother, by the way, pulled out of the a coma that they said he would not and is now an English teacher on a Native American reservation. 

I'm rambling...here's the video!
I have to tell you...Audry is an INCREDIBLE teacher...because she IS a teacher. She's taught ceramics and photography for the past five years at a local school. She is now taking time off from teaching to focus on her work. However, she does such a wonderful job explaining every element of working with clay that I feel this video would benefit all students, upper elementary on up to college. 
At the start of the video, you'll find her wedging clay. She explains the reasoning behind that and how to do it. Then she moves on to throwing on the wheel...which she makes look incredibly simple. I could only dream to throw a pot on the wheel that didn't end up looking like Patrick from SpongeBob Square Pantalones. 
I love how Audry shares her inspiration...and the origin of paisley! I had to include that in the video, it was new to me. Also, watching an artist work is always hypnotizing and she does her clay carving so quickly. It was fun to watch.
I was thrilled when she explained how a kiln works and the different types of kilns. I know that can help even us art teachers who might not understand how to operate a kiln.
Audry mixes up her own glazes to create the desired color. Her application process was interesting to see. 
And I loved the results so much, I had to have one of her vases in my home. She also gave me a beautiful mug...I know the kids will love to see me gettin' my coffee on with one of her pieces. 
A big THANK YOU! to Audry for allowing me to visit. Be sure to follow her Instagram as she shares videos and photos of her process.
I hope you enjoyed this visit to Audry's studio as much as I did! Until next time...
 photo signature_zpsd10b3273.png
Read more »

Wednesday, May 9, 2012

DIY: Ceramic Paper Doll Dresses

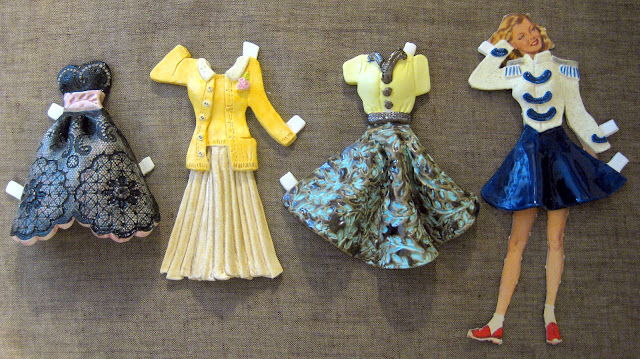
A girl can never have too many dresses, I say. While creating these ceramic dresses, I had a theme in mind for each. Starting from the left, I call these The Debutante, The Librarian, The Lady Who Lunches and The Majorette.
I have a wee bit of a vintage paper doll collection as you might recall here. I just love the sweet illustrations and the beautiful dresses. As a kid, I often resorted to playing with my paper dolls when it became too stinkin' difficult to slide Barbie's tight Calvin Klein-inspired jeans over her sticky rubber legs. I'm pretty sure I was on the verge of getting kid's carpal tunnel, thanks to Mattel. But I digress.
The Summer Picnic, The Prom Date, The Secretary, The Cheerleader
One of my other fave kid toys were my Fashion Plates. Did anyone else have these? I recently found a set on etsy and scooped them up. I loved coming up with my own outfit designs as a kid. Huh, go figure, right?

Both of these interests, vintage paper dolls and dress designing, started me down this latest DIY path: Ceramic Paper Doll Dresses. I had been toying with the idea for a while but not until I found some old photos of my maternal grandmother was I inspired to set to work.
My beautiful grandmother is the girl on the right. I love her widow's peak, olive colored skin and wavy dark hair, none of which I inherited.
I love this photo of my grandmother with her mother and siblings. Her pretty little legs in those too-big shoes, her sweet smile but most of all, that dress. I was determined to sculpt a ceramic version.
Since I've been creating ceramic belts, I've been using tons of different textures for surface design. Among my favorites are doilies, burlap and these polymer clay texture plates sold at craft stores.
To create my little dresses, I first went through my stash of textures. Many of my textures are vintage lace which are perfect for creating little mini-vintage ensembles. For this process, I lay my texture down on my work surface (a wooden board), lay a piece of clay on the texture and use a rolling pin to flatten. Once the clay is flattened to an even surface, I peal the clay off of the texture, turn over and, voila! "fabric" for my dress.
The secret ingredient to working with clay and not having it stick to the rolling pin, your fingers, and everything else? Corn starch. That's the white powder you see on my clay.
I used one of my favorite vintage paper dolls as the model for all of my dresses. She was placed on my textured surface and the dresses were designed around her. This made dealing with proportion a snap and left me able to focus on the fun part, designing her vintage look.
My grandmother's dress. I cannot wait to have it fired and glazed. I would love to know the original color of the dress. My grandmother is no longer with us but maybe her sister will know.
Forming the little details, like the buttons and the ruffle, are my favorite parts about creating these little outfits. Once that's complete, I add the tabs and allow the clay a day or two to dry before a slow fire in the kiln.
My grandmother was also a majorette. My plan is to eventually create the accessories that go with these outfits, like the baton and the knee-high tasseled boots.
Once the dresses are out of the kiln, the glazing adventure begins. I have a love/hate relationship with glaze as you can never know for certain what you are gonna get. One of my favorite dresses I created was a Dale Evans-inspired cowgirl dress. Sadly the glaze was much too shiny and bright and the dress lost that certain something.
"Oh, what's that, Charlie? You wanna take me to the prom? Golly gee, I dunno. I've already been asked by Timmy, Bobby and Bill!"
I decided what these dresses needed was a satin glaze. So I ordered some here and was much happier with the result.
The Librarian. I designed the skirt of this dress around one I saw my grandmother wearing in a school photo.

My grandmother was never a cheerleader but I just couldn't resist creating a vintage cheer look in my college colors. I'm a hoosier, what can I say?

Okay, so someone needs to go shoe shopping. This dress is easily my favorite.

I attempted to use a tarnished gold metallic glaze on the skirt. Yeah, not what I was expecting.
I'm interested to hear what you think of this little DIY of mine. And now the question is...what do I do with these wee little wonders? I have a couple of ideas but nothing is really lighting my fire, if you know what I mean. What do you think? Frame them? Put them in a shadow box, as a friend suggested? Display them...how?

Thanks for reading, guys! I do hope you have a lovely day. Oh, and the next time Barbie's pants won't go up? Put her in a dress. That's what I do Every Single Day ;).
Read more »