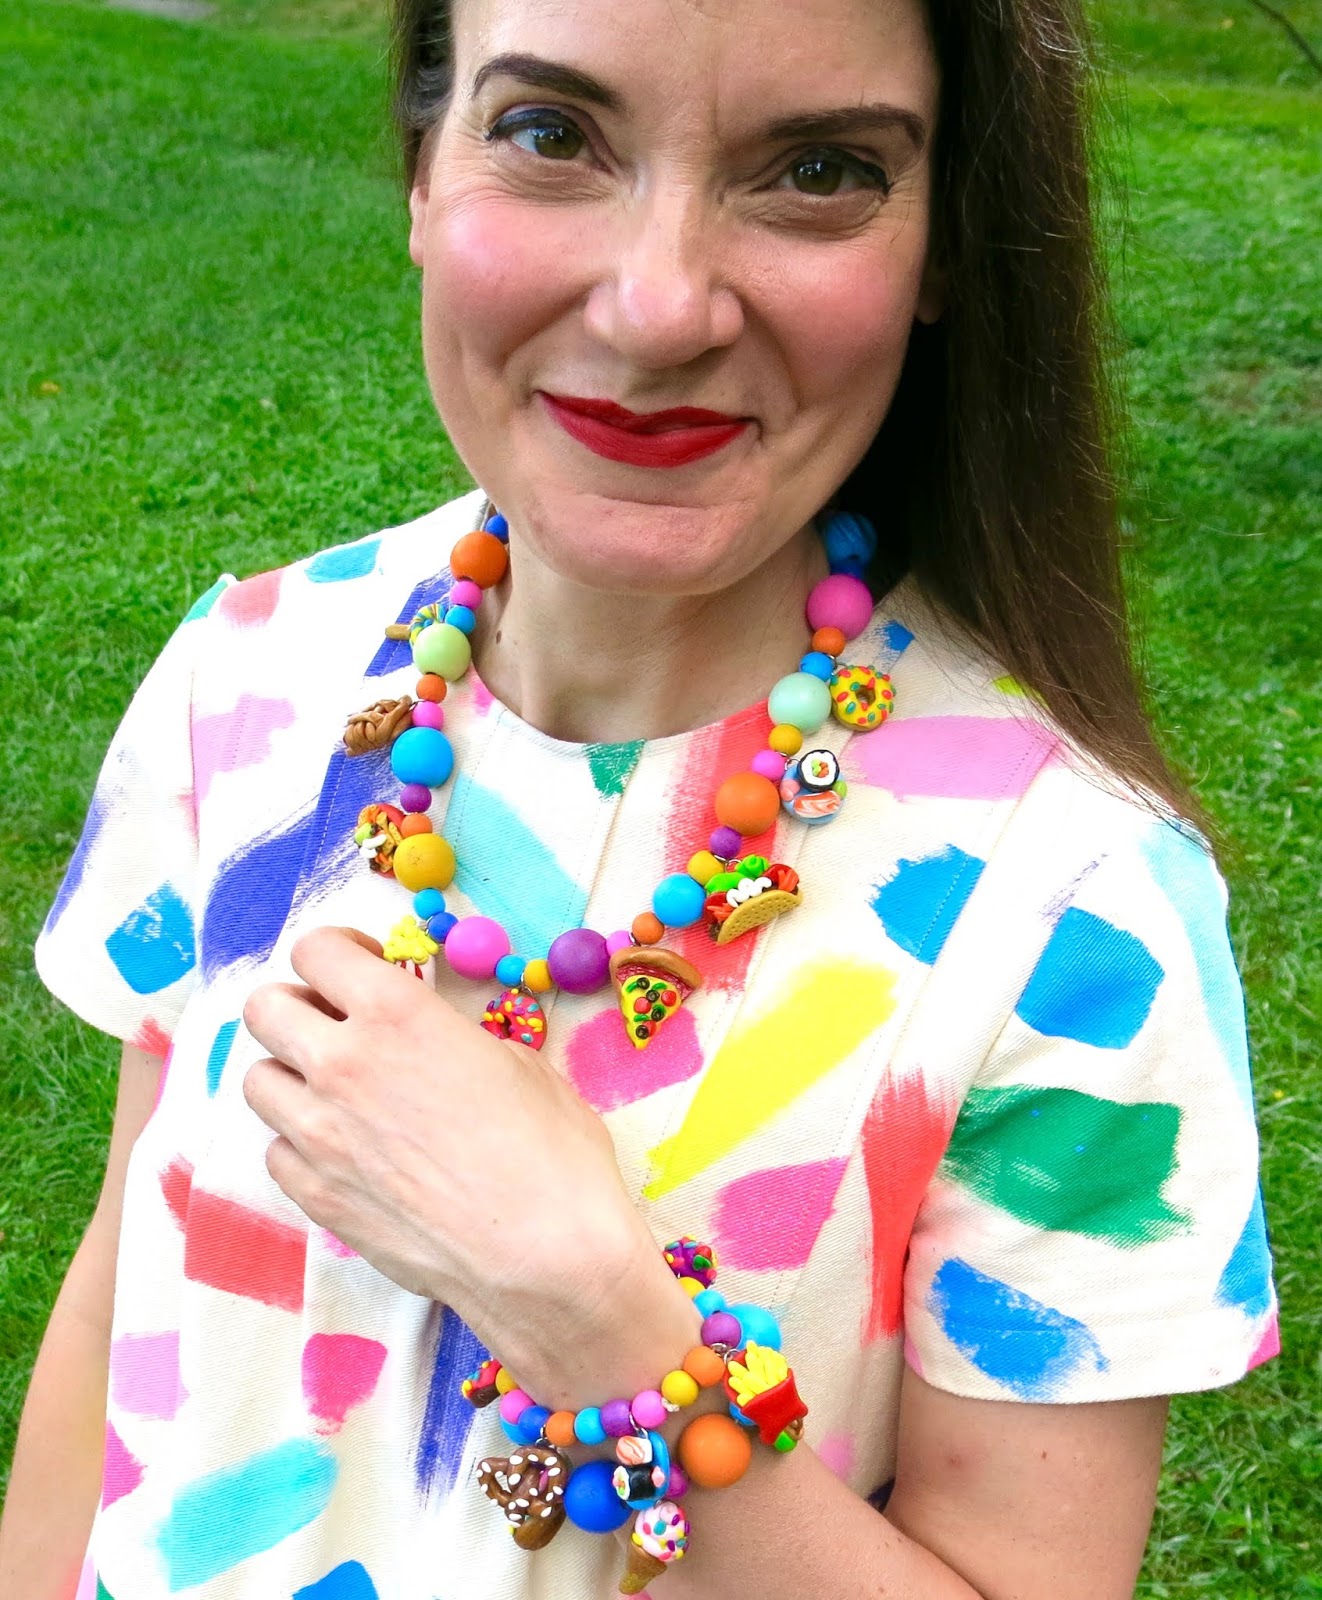
As you might have guessed from my last post, I'm on a bit of a polymer clay bender. I have this habit of going thru phases when working with different art supplies. When I'm needle felting, I needle felt EVERYTHING; when I'm painting the walls of my art room, NOTHING IS SAFE; and when I decide to make miniature snack foods out of clay, watch out!
I've got sushi, pie, popcorn, cupcakes, donuts, pizza, tacos, nachos, pretzels, lollies, pancakes, ice cream, bacon -n- eggs and more! I have to blame some of this on my friends over on Instagram who gave me a TON of ideas for what to sculpt. So many that I ended up with enough charms for not one necklace but also two charm bracelets!
I hope this helps!
Because the grand majority of clothing in my closet is just as busy as this necklace, I decided to pair it with the dress I painted and stitched. Yes, this would be one of the more tame pieces of clothing in my closet. Surprised? I didn't think so.
Wanna make some snack food charms of your own? You totally should! I even made a video tutorial showcasing how to make the tacos, nachos, donuts and sushi! Once you conquer those, you can take on all the snack foods. Here's a little list of supplies:
* Sculptey Clay...or whatever your polymer clay of choice might be. I like the big ole 24 pack of the clay for a wide range of colors. Be sure and use all of the craft store coupons you can find as this stuff ain't cheap. * Jump Rings...that's the little metal circles you'll want to add to your clay piece before popping it in the oven. I just slide mind in the back of the clay, sinking them about half way in. You'll be adding two jump rings per creation...but you'll only need to add one before baking. The other one can be added once the clay is cooled and easier to handle. * Jeweler's Tools...or pliers. You'll need small tools to pry the second jump ring open and add it to the one that is already on the clay. Each charm will need TWO jump rings. If you only use one, then your charms will hang sideways. With the addition of the second one, your charm will hang straight on and be visible to all of your admirers. * Elastic...I use elastic string for my necklaces as I truly hate creating jewelry and working with tiny findings and jump rings. So being able to slide my necklace over my big ole head Candy Necklace style works best for me. * Modpodge...I used that to seal and protect my charms once they were out of the oven and cooled. * Wooden Beads...You can find a variety of wooden beads in the wood department (heh-heh) of your local craft store. I use acrylic paint to add color to mine.
My favorite part of making this necklace was making the charms...obviously. I made so many! I still want to make more. But do I really need ANOTHER snack food jewelry item? Probably.
Some tips about polymer clay: it's weird. Sometimes it can sit out forever and never harden and other times, it becomes like a rock.
They sell a kind of polymer clay softener at the craft store for exactly one million dollars (but seriously, it's ridiculously pricey for the size of the bottle). OR you could simply add just a drop of baby oil to the hardened clay, rework and TA-DA! You are back in business.
Another tidbit: I used to sort and store my clay by color in styrofoam bowls and/or thin plastic containers. When I went back to reuse the clay, it had eaten holes right thru the styrofoam! I shared that on my IG and most folks said they had success keeping their clay in plastic bags or thicker plastic containers. I now store mine in a wooden drawer with dividers. WHO CAN EAT THRU STYROFOAM?! I mean, that stuff isn't even biodegradable!
My students LOVE making food items out of clay. In fact, one of our art shows was a 1950's diner where all of the food was sculpted from clay. I think they would so love making these tiny foods...they have tiny hands, they could handle it, right? (okay, MAYBE on a slightly larger scale!)
You can also find a ton of clay food times in my kid's clay book! Shameless plug, over and out.
By the way, is it one MILLION TRILLION degrees where you are? I went outside to snap these photos and was dripping sweat within the first three minutes. Summer in Tennessee is no joke, y'all.
I need to hit my sewing room and start up on my Back to School ensembles but I so wanna make more charms. I made art supply shoe clips out of this clay a couple years ago but now I think I need a art supply charm necklace too. Oh boy. The polymer clay creatin' journey continues!
Hi. My name is Cassie and I used to blog on the regular.
So sorry for the unintended hiatus, friends! Summer is usually the time I HAVE time for things like blogging, creating and all the rest but THIS summer, the summer that I swore would be calm, quiet and peaceful, has been anything but. Between my epic purge (that has resulted in an indoor yard sale. I'm not kidding. I REFUSE to sit in that heat which means the inside of our downstairs literally looks like a flea market bomb went off. You know...like it always does but this time EVERYTHING IS FOR SALE. And it's going surprisingly well even if I am ready to have my house back), my unexpected voyage (that I keep dropping hints about and can seriously tell you nothing about), a PD that I lead last week and some other random life stuff, it's just been busy. There has also been a TON of fun stuff: hiking every night at Radnor Lake with Mitch, lunching and catching up with friends nearly everyday of the week and...NECKLACE MAKING! So, while busy, it's been a wonderful summer so far.
BUUUUT, all that to say, I've fallen off the bloggin' bus. I'm climbin' back aboard tho. Starting with this here post and DIY video!
Sometimes people ask me, "how do you get so much done?!" Lemme tell you the story behind these beads and then you'll know how I manage to seemingly get so much done. I actually made these Matisse beads about a year ago! I tend to make stuff, not knowing either how I want to finish it off or how to move on to the next step. When I spotted these recently, I knew right away I wanted to make them into a necklace with alternating wooden beads and so I finished it off!
I seriously have so many UFO's (UnFinished Objects) laying around that, when inspired, I suddenly finish them off. And it looks like I'm constantly crankin' out creations. Which I'm not. I'm just FINALLY finishing them. Great. Now the cat's outta the bag!
I ended up with so many beads that I created two necklaces! The supplies I used are: polymer clay, wooden beads, elastic, acrylic paint and jump rings. All found at my local craft store.
And I got lucky a while back at the thrift store and found that amazing Matisse-inspired skirt to match!
Side note: I always bake my polyerclay in my toaster oven. If you do the same, be sure and use a lower temp so they don't burn.
I hope y'all are having a super fun summer and are creating up a storm!
Yay! I made something for my art room! It's been, like, 10 minutes, since I last made something for my most favoritest space, so why not, right?!
I'm currently on an All-Things-Rainbows bender and let's just hope I like it for a VERY long time. It had been YEARS since I'd moved in to my art room (nearly 15!) and I hadn't really changed anything until this year...meaning, I just kept piling poster on top of poster until it was just a cluttered disaster. This past summer, I tore it all down and told myself I was redecorating, rearranging and organizing the entire space. Six months later, I'm STILL in the middle of it all but I can't tell you how excited I am everyday when I walk into my art room. In fact, I've been spending entirely too many Sundays in my art room, sprucing the place up. Now that I've got the revamp bug, I'm looking forward to tackling my home this summer. But, I'm getting off track. Crayola bins!
I was inspired to create these bins after someone shared THESE bins with me:
They sell these online nearly everywhere if you just search Crayola Bin: Bed, Bath and Beyond, Amazon, Target, you name it. However, every place sold them for $14.95...EACH. I was like, surely that can't be right. That's gotta be 15 smackers for three of them? Nope. Each, y'all. There was no way I was gonna shell out that kind of dough even if they are as cute as can be.
On a recent trip to Target, I found these colorful bins for $4 each. I bought one of every color they had (why no yellow and orange, Target?) and decided to make my own.
I created a poster board template and painted each with acrylic paint. Not super sure if that was the best move as the fabric soaked up the paint...it was like painting on a sponge. It was time consuming but I do love them so.
I have the perfect shelf for them in my art room in my fiber arts area. I'm thinking they could hold our fiber arts supplies like small looms, yarn, felt...not super sure yet, but when I find something, I'll have the cutest bins to store 'em in!
When I shared in my Instagram, several folks shared other ideas: use black felt and glue that one; create a screen print with freezer paper; use a Cricket cutter to make the design. All super duper ideas!
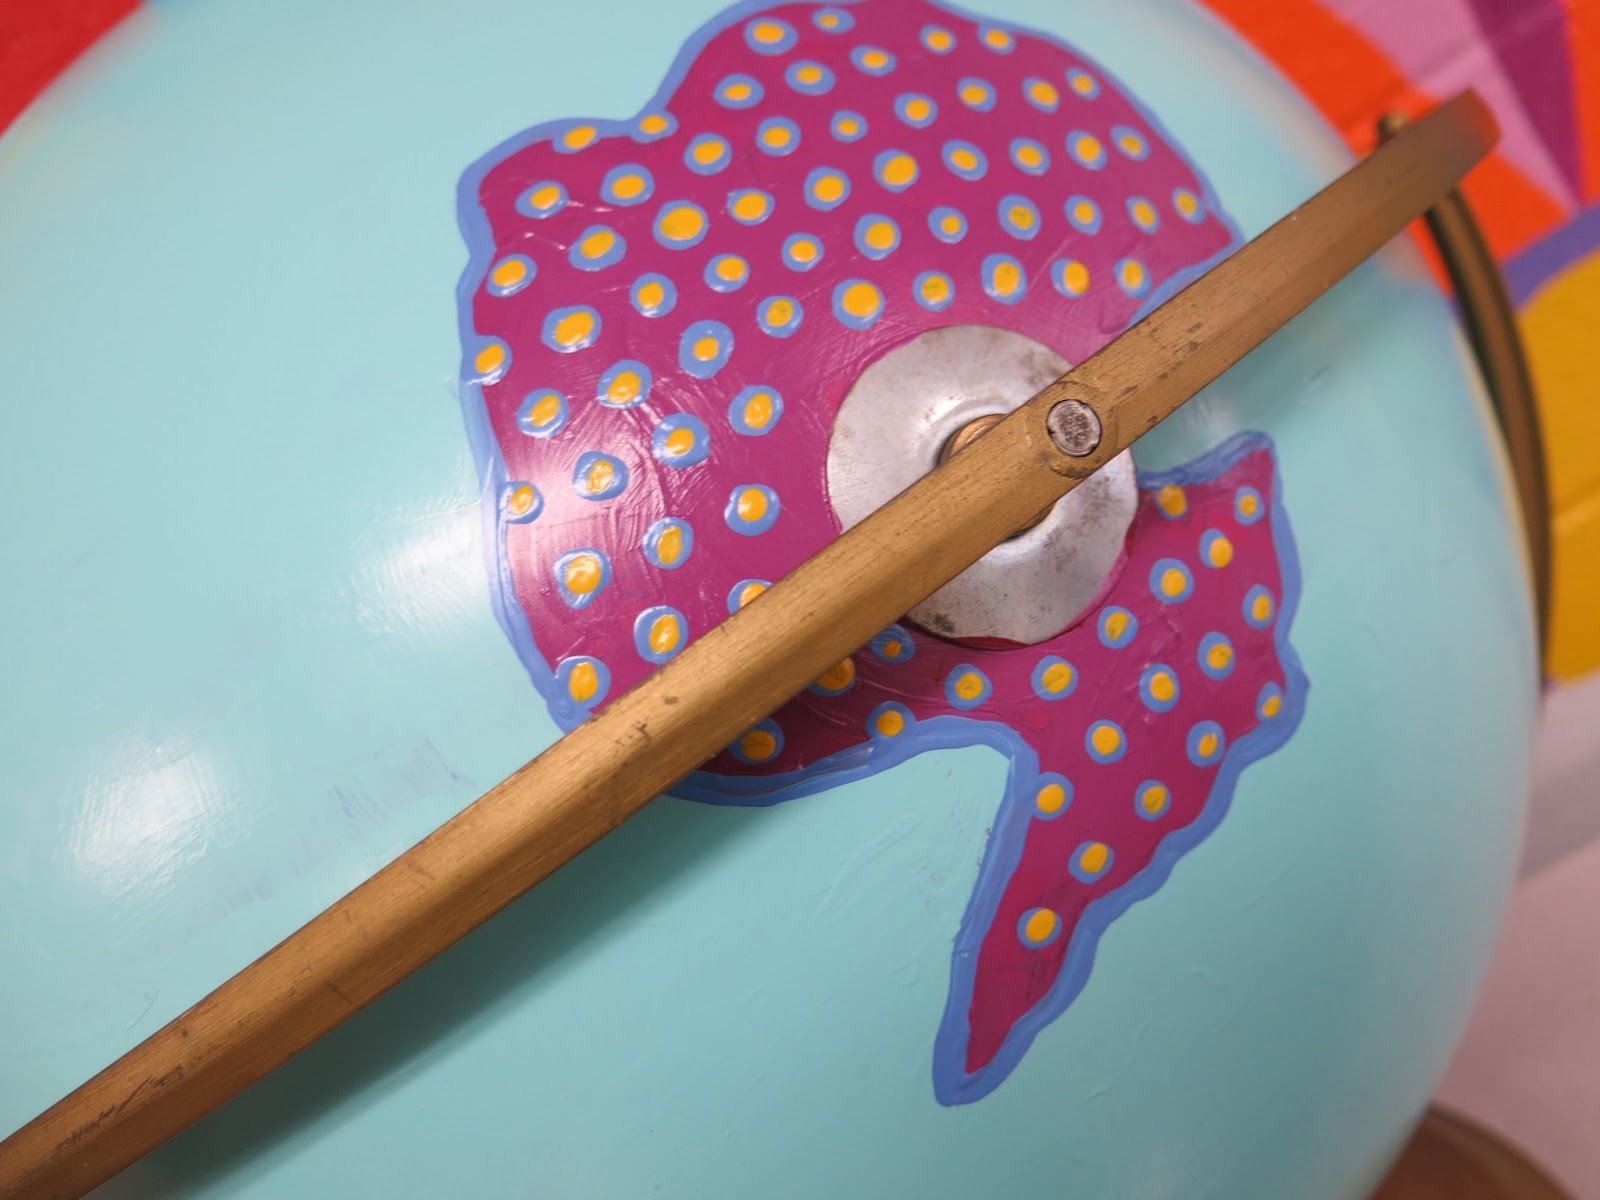
Happy New Year's Eve! If you are a TOTAL homebody/crafty nerd like me, than that means your evening is much like mine: you are in your pj's, enjoying a cup of hot cocoa (of whatever else pleases ya, I'm not here to judge) and you are writing up your New Years Craft-solutions, er Craft-utions (that's my best effort to combine craft and resolutions, in case you didn't catch my drift). One thing that WON'T be on my list for 2018 is a Painted Globe...as I just narrowly completed it today!
If you follow me on IG, then you've been hangin' with me on this journey to turn this trashed globe into treasure. I found it in the trash at school and had to dig it out immediately. It wasn't until I had it back in my art room and added to my collection of globes (why I have so many, I have no idea...it's just that I cannot seem to let them be thrown away!) that I noticed why it had been trashed: it was busted right across the equator.
I took it home and decided to fix it with a large plaster gauze strip...which made it quite unsightly. During my repair stage, I noticed that this globe was pretty dated...and poorly made from plastic. With that in mind, I didn't have much of a problem giving this blog the reboot. I'm a lover of all things vintage and it burns my eyeballs when I see folks "flipping" vintage (i.e. turning treasure into trash, says me). However, this bad boy wasn't very old...just old enough to have countries with incorrect names and a big honkin' crack right through the middle.
Here you can see my plaster strip repair job. I done tole you it wasn't pretty.
If you've been on pinterest for a hot minute than you know that painted globes are pretty hip. Maybe even past tense hip. But I don't care. After a little bit of searching for ideas, I was so inspired, I decided to paint my globe. I used the same wall paint as I had for the walls at school because 1. I still have a ton; 2. I wanted it to match, color-wise; 3. It was more opaque than any other paint I could find.
I decided to paint each of the seven continents and give each a pattern.
I used the planters I painted a while back as my inspiration. I just picked patterns at random.
I love patterns. Like, LOVE-love. Tis the reason you'll rarely find me in a solid color. And if you do, it's paired with a buncha other solid colors thus creating...A PATTERN.
This was such a fun winter break project for me. I've managed to knock out a couple...but sitting in my craft room and painting is my favorite way to end my day. I've got mountains of pattern-y painting projects just waiting for me in that messy space.
Texture is also my BFF. I suppose I could have used paint pens to create the patterns on this globe...but I don't know that they would have given me all this thick-ish texture.
You can kind of see my layers of paint in the photo below.
Now I do have a "normal" globe in my art room as well...for when we need to examine places other than just continents. But I think this will be a fun addition.
Brrr! My heat cut off when I was working a little in my art room today and it felt like Antartica! Or at least that's what 62 degrees feels like to me.
What projects were you working on this winter break?
Thanks for letting me share mine!
We head back this Wednesday for a coupla days of PD and the kids return on Friday. I'm excited to see their happy little faces! Happy New Year, y'all!
I hope all y'all had a wonderful holiday! Ours was super low-key and relaxing. I've been taking time to catch up on projects for the art room...just this week alone, I've managed to start three new projects (and finish zero...no surprise there). While working on my latest project, I decided to film the process and share it with you cuz I'm super stoked: Seat Sacks!
Heaven on Earth, aka the Dollar Tree, had seat sacks or over the chair storage in their education isle recently and I was so stoked. Currently, when my kiddos finish early and only have a few minutes to spare, they LOVE to go and get a dry erase board. However, I don't love the extra milling around the room when it's so close to clean up. However-however, I never wanna see a kid just SITTING in their seat, even if for a few moments, not creating something, anything. So when I saw these seat sacks, I thought they'd be the perfect solution: I could store dry erase boards in there (or, dry erase board SLEEVES with drawing sheets, YES!! More on those in a moment) and that would prevent extra movin' and confusion during cleanup.
Now, as you might know, I'm currently on an art room redo bender and I'm color coordinating EVERYTHING. So, while I was excited about these seat sacks, I was disappointed that the above were my only color options. By the way, you can purchase these in bulk here, if they are not available at your local Dollar Tree. So I went on a quest to find another source for the sacks. Y'all. These guys are COSTLY! Then I got the bright idea to SPRAY PAINT the sacks...so I bought one as a test and, um, no. That did not work. Not. At. All.
The one that was sadly spray painted then became my pattern. I looked at the seat sack closely and realized it's a super simple pattern that requires very few supplies. Here's what I used: * 2 yards of ripstop fabric. Really, 1.5 yards would have been plenty. I chose that kind of nylon fabric because I thought it would be easier to wipe down. * 4 packages of bias tape. I am doing 4 sacks per table and this proved to be the right amount of tape. * Elastic. I used the wider kind. Here are the directions:
Like I said in the video, I did this in assembly line fashion so as to get it done faster. I started by cutting everything out and then set to stitching all the red ones first, then the orange...this way I didn't have to keep changing out my thread and bobbin.
I noticed online that there are a lot of other seat sack tutorials...so be sure to check out your options if you do this. I just went the route I thought was easiest. I don't plan to put anything heavy in these so I'm hoping that they'll be solid enough.
In case you need those measurements again...
I don't know if you noticed in the first photo but you'll see the kind of chairs that I have. These seat sacks fit them perfectly. If you decide to make these, you'll def wanna be certain it will work for your chairs!
Of course I had to add a label! I got these labels made a while back from Dutch Label Shop. It says Art Will Rock You. This is the back
And this is the front! I'll keep you posted on how these work out in my art room. They'll either be a hit or a miss...there never seems to be gray area in my art room!
Do y'all use seat sacks? How so? Love to hear more!
My little assembly line of pocket making. Wish me luck!