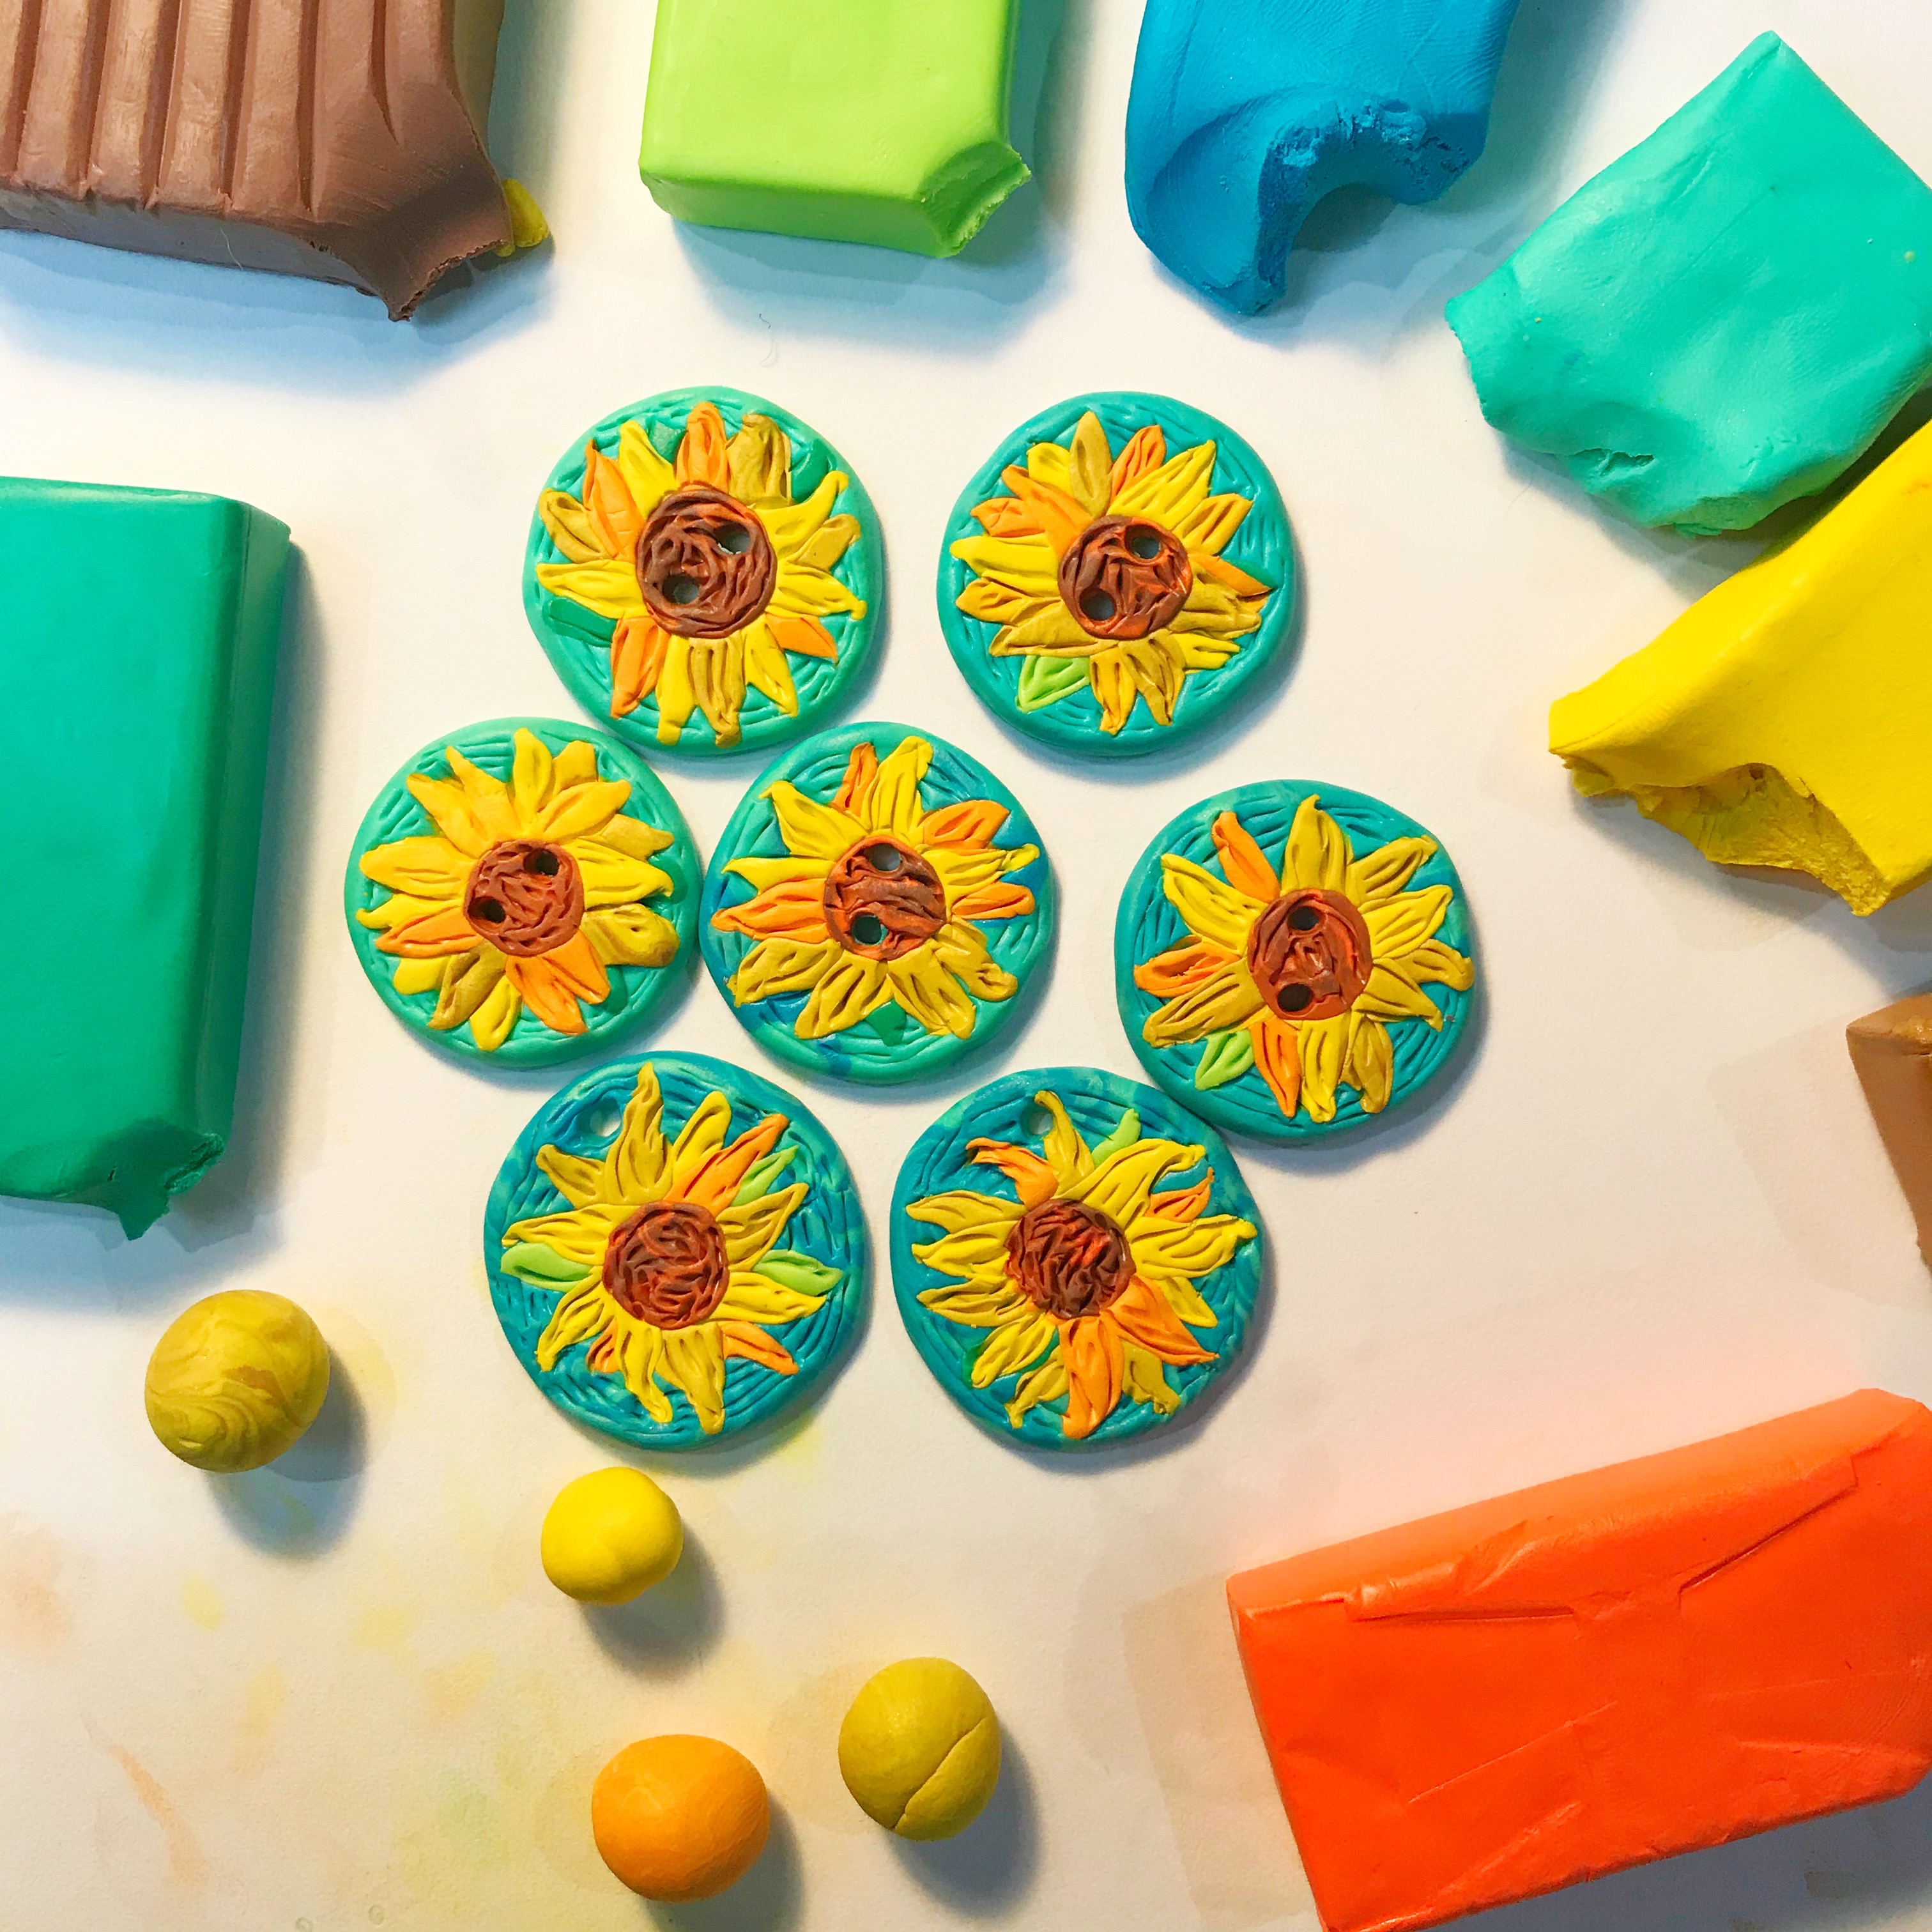
Hi! I scored this amazing sweater recently and while I absolutely loved it, I hated the obnoxious plastic white buttons that were on the sweater. They just stuck out like a sore thumb! So I picked up some polymer clay at the craft store with the idea to create my own. Normally, I buy the 'name brand' polymer clay but this time, I was feeling cheap and decided to give the house brand a try. It was half the price and I have to say...despite the fact that the yellow clay stained my hands a pinch, it worked great! I'm used to stained hands so, no big deal!
I went about creating these factory style and it went pretty quickly. I made a video to share the process in case you need some van Gogh bling in your life. Like, duh. Of course you do.
So easy, right?
Once complete, I just stitched these onto my sweater and added some jump rings and a French hook to the earrings and I was all set in my new upgraded van Gogh sweater!
Not only that but this craft was just the creativity thirst quencher I needed this weekend. Thanks for letting me share, y'all!
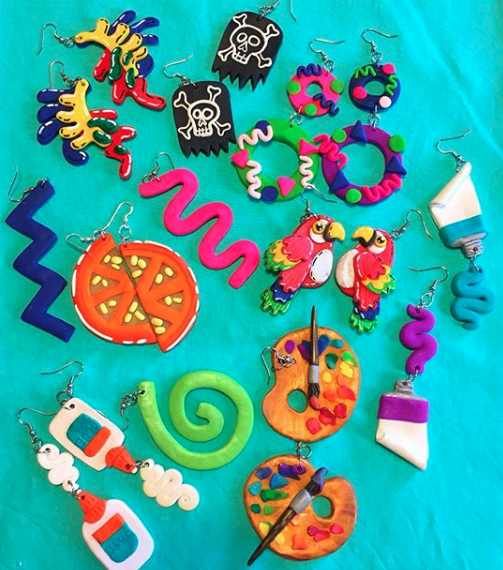
What lengths will you go to in order to avoid unpleasantries? Me, I go to great lengths to dodge sewing. The thing is, I get myself into this sewing pickle every single time. It always starts with the super cute fabric. Currently, I'm in to BIG AND BOLD prints that I usually score at IKEA. Case in point: that bold orange print you see in the background there. I'm currently working on sewing it into a dress but I'm closing in on zipper and hem time and I REALLY don't like zipper and hem time. So, I made earrings to go with my yet to be complete dress!
Polymer clay (I like to use the brand Sculpey) is a clay that comes in a variety of colors and you bake in the oven to harden. I used it a lot in this book. When I wrote that book, I really wanted to include that kind of clay because my students and I love it so much. I keep a stash at home for when I want to work with it because it's so stinkin' fun.
If you are new to polymer clay land, I thought I'd make a little video to walk you through how I made these earrings. Really the only supplies you'll need are the clay, some jump rings, French hook earrings and jewelry tools.
When making polymer clay earrings, just a couple things to remember:
* Polymer clay is self-adhesive. Meaning you don't have to use glue to get the pieces to stick together. Just press and go! * Keep them light! You wouldn't think these would make for heavy earrings but they can if you aren't careful. In fact, the palette ones below, while my fave, are the most heavy and can only be worn for a short while. * Don't put the hole too close to the edge of the design. I learned this the hard way. If you make it too close, the clay just might break when you are sliding the jump rings in. * Don't make the clay too thin. Okay, it's a balance...light enough to be wearable, but not so thin that they break when adding the earrings. * Allow the clay to cool completely. I have noticed that when I take the clay out of the toaster oven, it tends to still be a little bendy. It will harden as it cools. * Bake at a lower temp than suggested if using a toaster oven. I like to use a toaster oven because they heat up faster and require less energy than my oven. That being said, they do tend to bake stuff a lot hotter...and I've burnt my share of polymer creations because of it. For that reason, I'd say bake at 200 for about 5-7 minutes.
My little stash of polymer clay earrings.
I also dig using paint pens on them when they come out of the oven...although I have noticed that the paint does tend to rub off over time.
Howdy, partners in art teacherin' crime! Today I thought I would share the video I created for The Art of Education's online conference last year. This will give you an idea of what their conferences are like if you've never been (read: they're super fun!). My presentation was all about clay projects for the kiln-less. BONUS: you can STILL do all of these projects even if you have a kiln...with some mild modifications to some.
In the video, you'll see just a snippet of some of the ideas from the book. My favorite air dry clays to use are Crayola's Air Dry (I'm not wild about Model Magic but their air dry is good) but my favorite is Amaco's Air Dry clay. I also love Sculpey and Fimo for polymer clay. Making clay is super fun...in the video and in the book, I'll walk you through some recipes.
Now, if that clay video doesn't get you excited to share clay with your kiddos than just do a lil search on my blog. I have A TON of clay videos both here and on my YouTube channel so be sure and check 'em out!
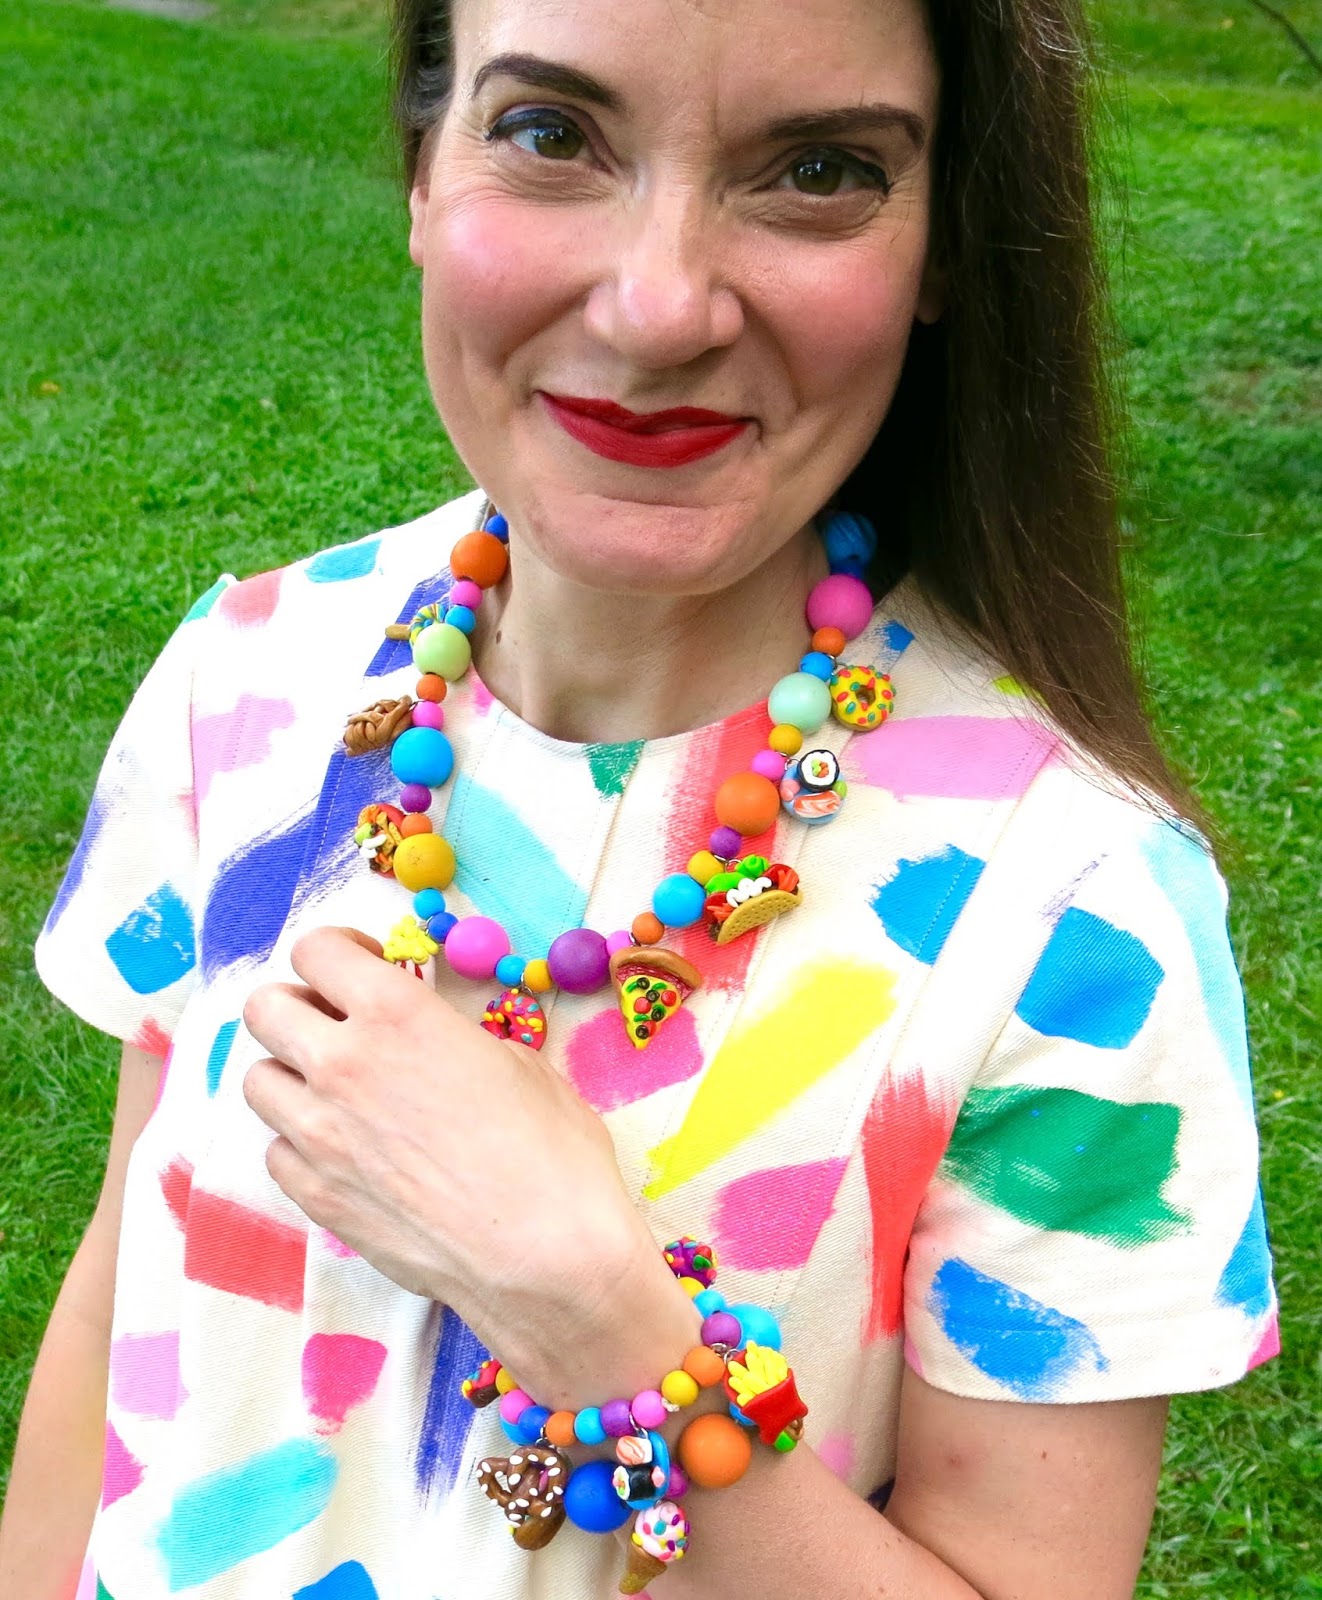
As you might have guessed from my last post, I'm on a bit of a polymer clay bender. I have this habit of going thru phases when working with different art supplies. When I'm needle felting, I needle felt EVERYTHING; when I'm painting the walls of my art room, NOTHING IS SAFE; and when I decide to make miniature snack foods out of clay, watch out!
I've got sushi, pie, popcorn, cupcakes, donuts, pizza, tacos, nachos, pretzels, lollies, pancakes, ice cream, bacon -n- eggs and more! I have to blame some of this on my friends over on Instagram who gave me a TON of ideas for what to sculpt. So many that I ended up with enough charms for not one necklace but also two charm bracelets!
I hope this helps!
Because the grand majority of clothing in my closet is just as busy as this necklace, I decided to pair it with the dress I painted and stitched. Yes, this would be one of the more tame pieces of clothing in my closet. Surprised? I didn't think so.
Wanna make some snack food charms of your own? You totally should! I even made a video tutorial showcasing how to make the tacos, nachos, donuts and sushi! Once you conquer those, you can take on all the snack foods. Here's a little list of supplies:
* Sculptey Clay...or whatever your polymer clay of choice might be. I like the big ole 24 pack of the clay for a wide range of colors. Be sure and use all of the craft store coupons you can find as this stuff ain't cheap. * Jump Rings...that's the little metal circles you'll want to add to your clay piece before popping it in the oven. I just slide mind in the back of the clay, sinking them about half way in. You'll be adding two jump rings per creation...but you'll only need to add one before baking. The other one can be added once the clay is cooled and easier to handle. * Jeweler's Tools...or pliers. You'll need small tools to pry the second jump ring open and add it to the one that is already on the clay. Each charm will need TWO jump rings. If you only use one, then your charms will hang sideways. With the addition of the second one, your charm will hang straight on and be visible to all of your admirers. * Elastic...I use elastic string for my necklaces as I truly hate creating jewelry and working with tiny findings and jump rings. So being able to slide my necklace over my big ole head Candy Necklace style works best for me. * Modpodge...I used that to seal and protect my charms once they were out of the oven and cooled. * Wooden Beads...You can find a variety of wooden beads in the wood department (heh-heh) of your local craft store. I use acrylic paint to add color to mine.
My favorite part of making this necklace was making the charms...obviously. I made so many! I still want to make more. But do I really need ANOTHER snack food jewelry item? Probably.
Some tips about polymer clay: it's weird. Sometimes it can sit out forever and never harden and other times, it becomes like a rock.
They sell a kind of polymer clay softener at the craft store for exactly one million dollars (but seriously, it's ridiculously pricey for the size of the bottle). OR you could simply add just a drop of baby oil to the hardened clay, rework and TA-DA! You are back in business.
Another tidbit: I used to sort and store my clay by color in styrofoam bowls and/or thin plastic containers. When I went back to reuse the clay, it had eaten holes right thru the styrofoam! I shared that on my IG and most folks said they had success keeping their clay in plastic bags or thicker plastic containers. I now store mine in a wooden drawer with dividers. WHO CAN EAT THRU STYROFOAM?! I mean, that stuff isn't even biodegradable!
My students LOVE making food items out of clay. In fact, one of our art shows was a 1950's diner where all of the food was sculpted from clay. I think they would so love making these tiny foods...they have tiny hands, they could handle it, right? (okay, MAYBE on a slightly larger scale!)
You can also find a ton of clay food times in my kid's clay book! Shameless plug, over and out.
By the way, is it one MILLION TRILLION degrees where you are? I went outside to snap these photos and was dripping sweat within the first three minutes. Summer in Tennessee is no joke, y'all.
I need to hit my sewing room and start up on my Back to School ensembles but I so wanna make more charms. I made art supply shoe clips out of this clay a couple years ago but now I think I need a art supply charm necklace too. Oh boy. The polymer clay creatin' journey continues!
Hi. My name is Cassie and I used to blog on the regular.
So sorry for the unintended hiatus, friends! Summer is usually the time I HAVE time for things like blogging, creating and all the rest but THIS summer, the summer that I swore would be calm, quiet and peaceful, has been anything but. Between my epic purge (that has resulted in an indoor yard sale. I'm not kidding. I REFUSE to sit in that heat which means the inside of our downstairs literally looks like a flea market bomb went off. You know...like it always does but this time EVERYTHING IS FOR SALE. And it's going surprisingly well even if I am ready to have my house back), my unexpected voyage (that I keep dropping hints about and can seriously tell you nothing about), a PD that I lead last week and some other random life stuff, it's just been busy. There has also been a TON of fun stuff: hiking every night at Radnor Lake with Mitch, lunching and catching up with friends nearly everyday of the week and...NECKLACE MAKING! So, while busy, it's been a wonderful summer so far.
BUUUUT, all that to say, I've fallen off the bloggin' bus. I'm climbin' back aboard tho. Starting with this here post and DIY video!
Sometimes people ask me, "how do you get so much done?!" Lemme tell you the story behind these beads and then you'll know how I manage to seemingly get so much done. I actually made these Matisse beads about a year ago! I tend to make stuff, not knowing either how I want to finish it off or how to move on to the next step. When I spotted these recently, I knew right away I wanted to make them into a necklace with alternating wooden beads and so I finished it off!
I seriously have so many UFO's (UnFinished Objects) laying around that, when inspired, I suddenly finish them off. And it looks like I'm constantly crankin' out creations. Which I'm not. I'm just FINALLY finishing them. Great. Now the cat's outta the bag!
I ended up with so many beads that I created two necklaces! The supplies I used are: polymer clay, wooden beads, elastic, acrylic paint and jump rings. All found at my local craft store.
And I got lucky a while back at the thrift store and found that amazing Matisse-inspired skirt to match!
Side note: I always bake my polyerclay in my toaster oven. If you do the same, be sure and use a lower temp so they don't burn.
I hope y'all are having a super fun summer and are creating up a storm!