The thing is, I get myself into this sewing pickle every single time. It always starts with the super cute fabric. Currently, I'm in to BIG AND BOLD prints that I usually score at IKEA. Case in point: that bold orange print you see in the background there. I'm currently working on sewing it into a dress but I'm closing in on zipper and hem time and I REALLY don't like zipper and hem time.
So, I made earrings to go with my yet to be complete dress!

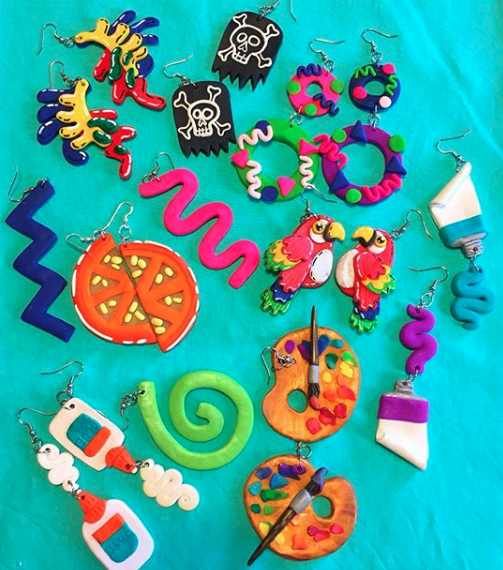
Polymer clay (I like to use the brand Sculpey) is a clay that comes in a variety of colors and you bake in the oven to harden. I used it a lot in this book. When I wrote that book, I really wanted to include that kind of clay because my students and I love it so much. I keep a stash at home for when I want to work with it because it's so stinkin' fun.

* Polymer clay is self-adhesive. Meaning you don't have to use glue to get the pieces to stick together. Just press and go!
* Keep them light! You wouldn't think these would make for heavy earrings but they can if you aren't careful. In fact, the palette ones below, while my fave, are the most heavy and can only be worn for a short while.
* Don't put the hole too close to the edge of the design. I learned this the hard way. If you make it too close, the clay just might break when you are sliding the jump rings in.
* Don't make the clay too thin. Okay, it's a balance...light enough to be wearable, but not so thin that they break when adding the earrings.
* Allow the clay to cool completely. I have noticed that when I take the clay out of the toaster oven, it tends to still be a little bendy. It will harden as it cools.
* Bake at a lower temp than suggested if using a toaster oven. I like to use a toaster oven because they heat up faster and require less energy than my oven. That being said, they do tend to bake stuff a lot hotter...and I've burnt my share of polymer creations because of it. For that reason, I'd say bake at 200 for about 5-7 minutes.