Showing posts with label primary art. Show all posts

Wednesday, July 13, 2016

Art Teacherin' 101: Episode 10

Hello, art teacherin' types! I'm here with you today because those Back-to-School nightmares have already started. All y'all know what I'm talking about: crowded art room full of kids going absolutely bananas while the classroom teacher waits looking at her watch, shaking her head and tapping her foot. You scream, "Hey! Hey, guys!" about a half dozen times to get their attention only to see Susie cut a hunk off Janie's hair with a pair of razor sharp scissors while Billie and Beau crumple up artwork and break crayons over each other's heads. I wake up with cold sweats in a panic: I MUST GET TO SCHOOL AND PREPARE!
I'm here today to tell you this: DON'T DO IT! Enjoy what's left of your summer. You've earned every drop of freedom. However, I know it's hard to enjoy this time off when the dark shadow of back-to-school supplies at Target is looming over you. Well, lemme set your mind at ease. To prepare for the first coupla days of school, you don't need the prettiest art room, the most prepared lessons or plotted out script. All you need to do is remember one simple word:
This word is the perfect acronym for a fool proof back-to-school formula. Check it out:

W = Welcome 
Welcome those kids to your art room with a heartfelt greeting! It will kick your class off right.

E = Entrance
Make sure your students understand how to "make an entrance". Getting your artists into your room in a calm, quick and quiet manner means you have more time to create!

L = Let Them Know Expectations
I have one rule: Be Kind. However, that one rule holds a lotta weight. So this year, I'm creating a short video to share with my students to quickly walk them thru my expectations. This means, I won't leave anything out when I talk to my dozens of art classes!

C = Create!
Make sure there is time to create on that first day! They've sat and listened to rules and procedures all day long...make your room different. Allow them to get messy on that very first day. They will love you for it.

O = Observe
Be like a scientist on a safari. Observe these art makin' creatures to see who needs to be moved, who needs to have access to different supplies, who needs more peer tutoring. Take all of that information in so you can use it in the future.

M = Make Them Feel Special
Everyone responds to love. Show it in a way that both you and your students are comfortable with. For me that means a lot of side hugs. We also use sign language in my art room. Signing "I love you" is one way we show we care about each other.

E = Exit
Making an exit is just as important as an entrance. I have a habit of getting the kids juiced up, it's just my nature. So I'm working on some new procedures to have them leave calmly. Sign language has really been helping in that department!
So there you have it! Instead of worrying away your summer about those first days of school, just breathe and remember WELCOME. Shoot, even paint yourself a sign if you have to. That's what I did!

In other news, as you do plan for the new school year, check out my buddy Laura Lohmann's ART TEACHER PLANNER! What the what?! Where has this been all my life! Now I have no excuse not to get my life together. At least that's what my life coach tells me. Ya'll best check it out. 
 photo signature_zpsd10b3273.png
Read more »

Wednesday, June 29, 2016

Art Teacherin' 101: Episode 9

I recently created this Cursive Writing Dry Erase Board for a couple of reasons: it opens up another activity for my early-finishers and it introduces my students to the fine motorin' fun of cursive handwriting which is no longer apart of our state curriculum. In this Art Teacherin' 101, I'll share with you what options my early finishers have in my art room. I'll also show you how I created this fun and cheap Cursive Writing Dry Erase Board!
Just a little back history about me, I didn't attend an elementary school that offered art. In fact, I didn't have art classes until 7th grade! So my art fix came in the form of those purple ditto sheets with lines and lines of cursive writing practice. I loved getting my kitten mittens on those cool purple worksheets (y'all have to be a person of a certain age to even understand what it is I'm talkin' about!). Sadly, cursive writing was removed from our curriculum a couple of years ago and replaced with keyboarding. KEYBOARDING, Y'ALL. Don't they know the proven benefits to having children write in cursive?! So I'm on an art teacherin' mission to bring it back:
Now, I didn't come up with this idea of cursive writing boards. You can purchase them on several websites. However, the cheapest I've seen them is $6. Picking up those lined boards for a dollar at Target was a great buy. It took me maybe 5 minutes to write up the letters and paint with ModPodge. 
I'll be interested to see how my students take to this new early finisher activity. Many of them are already fascinated with cursive writing and want to learn. I'm kinda thinking that introducing them to calligraphy might be fun as well. I had a set as a kid and it was one of my favorite things. 
What are some of your favorite early finisher activities in your art room? Would you ever give Cursive Writing Dry Erase Boards a go? 

 photo signature_zpsd10b3273.png
Read more »

Monday, June 27, 2016

What the Art Teacher Wore #166: A Feature in Threads Magazine

A while back, I was contacted by Threads magazine about a feature in their magazine. I was beyond flattered and thrilled that this publication, which is for some super serious sewers, thought of crazy ole self-taught-stitcherin' me. Now that this issue of the magazine is no longer available on newsstands (this article is from their April/May issue), I am free to share it here with y'all. 

Now if some of these photos look familiar that's because they were the ones snapped by Nashville Arts magazine for this article! The other dresses were more current creations. For that reason, I boxed 'em up and shipped 'em to Threads magazine so they could take pictures of them. Because the copy is super small, I thought I'd share with you what Stephani L. Miller and I chatted about here. Enjoy!
Cassie Stephens: An Art Teacher Fashions Fabulous Outfits to Inspire Students

Cassie Stephens learned how to sew just a few years ago. Since then, she's graduated from ready-to-wear refashions to attention-grabbing ensembles that she wears to support her art lessons in the classroom. The Nashville, Tennessee, elementary school teacher's motivations is to encourage her 400 students to get interested and learn about art. She makes outfits inspired by artists and cultures to engage her students' interest and show them how art can be applied to life. Cassie has found that wearing something she's created nearly every day is a great way to start conversations with students and spark their creativity. 

Threads talked to Cassie about using sewing as a classroom tool, and how linking her creativity to her teaching fuels her passion for both.


Threads: What first inspired you to sew something for teaching?

Me: I needed an apron to wear while teaching, but all I could find were aprons for chefs. So I stocked up on fabrics from a thrift store and an old pair of jeans. I sewed an apron that looked like I was wearing a shirt and jeans, and I appliquéd a guitar - complete with faux tuning pegs and strings - across the front. I embroidered a patch onto the jeans that read "Art Rocks". I had so much fun creating it that I started sketching more ideas and attempted to bring them to life. Rock Star Apron, here

Threads: What was the first thing you sewed specifically to support a lesson plan?

Me: In the beginning, I was unsure of my sewing skills, so I eased into it by repurposing thrift store clothing. My first masterpiece-inspired dress was based on Katsushika Hokusai's woodcut print, The Great Wave at Kanagawa. I appliquéd the entire scene onto the front of a thrifted white dress. I likened appliqué to collage, and I feel very comfortable with that medium. My students and colleagues responded so well to that dress that I decided to create more. The Great Wave Dress, here

Threads: How do you plan your lessons and outfits?

Me: Here's how my ADHD-fueled mind works: Planning lessons leads to sketch outfits to accompany the lessons. From there, I start scouring the Web for the perfect fabric or media to make my lesson-inspired outfit. Then, I finish lesson planning. It has become an integral part of my teaching method. When I first began teaching, I focused solely on educating my students. I read every book written. I worked tirelessly on my lessons and in my art room, but I stopped creating. And I became very unhappy and even bitter toward teaching. But when I decided to marry my passion for creating with teaching, I became excited about teaching again. I realized the using my ability to create and educate was what art is all about. I became a whole lot happier when I started to connect as many dots as possible in my teaching and creative lives. I need to create to teach and teach to create.

Threads: How do the students respond to your outfits?

Me: My students are very curious about my clothing. Many of them have never seen a sewing machine and are unaware of the concept of making their own clothing. In their world, clothes come from a store, and how they are created never enters their minds. We have many conversations about how my clothing is made. And they'll often come in with an outfit they've altered based on something wacky I have worn.

Threads: How do you translate an art inspiration into a garment?

Me: When an artist has inspired me to design, I think of what medium would best translate their style. For example, when I sewed my Andy Warhol inspired Cambell's Soup Cans dress (here), I knew appliqué would be the best medium. When I wanted to create a dress featuring Claude Monet's Water Lilies (seen here), I thought needle-felting would best showcase his Impressionist style. Sometimes, I get lucky and find fabric featuring an artist work, like a Piet Mondrian print (here). When that happens, I use that fabric to sew a dress.

Threads: How do you hope your students remember you?

Me: I hope they remember how much I love teaching them. I have a sign in my art room that reads, "My job is to love you." I hope I convey that love by my actions, my lessons and my wacky clothes!

Thanks for reading, y'all! 
 photo signature_zpsd10b3273.png
Read more »

Wednesday, June 22, 2016

Art Teacherin' 101: Episode 8

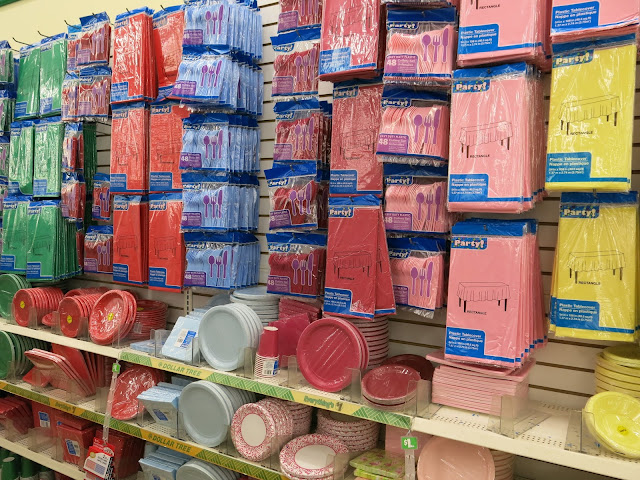
Holy moly, y'all! I have discovered Art Teacher Heaven and it looks like this: 
I know most of you art teacherin' types are familiar with The Dollar Tree and all of it's amazingness but I hardly ever venture inside. Prolly because I don't trust those places that refer to themselves as "dollar"-y when they actually mean dollar$$ (yes, I'm talking about YOU, Target "Dollar" Spot. Smh.) Then the other day, on a whim, I spotted something shiny in the window and tiptoed inside. Two giant bags of dollar-y goodness later, I was CONVINCED that this place was perf and I just had to share my excitement with y'all. So, here's what I picked up for my art room, why and how I plan to put it to use in some crazy creative art making!
Now, like I said, I didn't buy EVERYTHING...but I got really close. Below are somethings that I left behind but I do believe would be useful in any art room. 
This kind of chalk is pretty useless for making art inside...but it would be great for the outdoors (hence the name "sidewalk" chalk). I thought it was a pretty solid amount of chalk for the price. 
If it's one thing that no art teacher can ever have enough of, it's bowls, trays, plates, bins, you get the idea. I loved the sweet patterns on these hard plastic bowls. 
Okay, help me out here. I need these in my art room! I mean, the architectural history in these sand castle building thingies is just too much. I left them behind but I do love them so. 
 Need a cheap still life? How about a Frida Kahlo crown? The Dollah got you covered. 
For those of you that color coordinate your art room, the possibilities were endless. Totally digging the table clothes. 
I have a stash of thank you, birthday and blank cards at school for when I need them. 
I hate putting together puzzles. I'd much rather use the pieces for collage projects or print making! What a fun assortment for on the cheap.
The assortment wasn't huge but what they did have was good: U.S. map, behavior charts, die cut letters and those things I scooped up.
 In my art room, I have a little light that I turn on when it's the kid's turn to chat. Meaning, when I'm giving directions, I don't want to constantly see hands up and be fielding questions. It's disruptive and time consuming. When the light is off, the kids know it's my turn to chat. When it's on, they can ask questions. An alternative to this is an Open/Closed sign. A fellow art teacher told me about it years ago. It's the same concept: Open means they can chat and ask questions; Closed means it's a listening time. 
 Organization for days.
How fun would these mirrors be for self portraits? I don't know if the dudes would dig them but my girls would feel like Cinderella.
Safety googles for when things get a bit STEAM-y in your art room.
I was JUST trying to find these the other day to label somethings and none of my office supply stores had them. Now I know.
Totally digging those flowery trays. Think of all the art supplies those could hold per table!
 I mean, really. There is no reason I shouldn't be able to get organized. The Dollah was reminding me of this on every isle. 
If you have sinks, you need these. I've twice had sinks get backed up because sweet, innocent children (ahem) drop paint brushes down the drain. 
 These would be perfect screens for paper making!
 We use these trays in my room for papier mache and plaster projects. They are also great if you want to do paper marbling. 
 I send my students clay projects home wrapped in newspaper and stuffed in a lunch bag. These are so much cheaper than the ones I pick up at the grocery! Also, foil is wonderful for the leaf relief project you can find on the right hand side of this blog. 
All of my tables have table top trashcans. I totes would have picked these up if I didn't have some 'cans already. 
 I have a couple of these in my art room that get used plenty.
 Wanna organize those paint brushes?
Resealable condiment cups are my jam. These are great for paint, glue, you name it!
So, what did I forget? I'm dying for a reason to go back!
 photo signature_zpsd10b3273.png
Read more »

Wednesday, June 15, 2016

Art Teacherin' 101: Episode 7

So, it's that time of year: End of the School Year De-Clutterin' Season. I thought it might be fun to chat about what items we should save and which we should trash in a lil something I like to call...HOARD IT OR HURL IT?!
Surprisingly, being the well-established hoarder that I am, I'm not opposed to hurling a thing or two. I know I just barely scraped the surface of all the stuff we art teacherin' types acquire. I'd LOVE to hear what you hoard...and what oddities you've been "gifted" that you had to quietly hurl. In fact, just this weekend, an art teacherin' friend told me she was once given styrofoam meat trays for printmaking...that hadn't quite been cleaned completely (that's a LITERAL hurl, y'all). 

So...what's in your closet?
I admit: my closet is kinda like the George Costanza wallet. It has pretty much everything even a hack MacGyver would need to weasel out of any situation. A box full of baby doll heads? Got it. A sack stuffed with Santa Claus beards? You betcha. I ain't proud. I'm just sayin'. 
I try not to open any of my closets in front of my students because it usually just ends up looking like this. It's like I'm opening a portal to Narnia if the Snow Queen was a feature on Hoarders and Narnia was chock full of crap. 
I've always thought: I CAN have all of my crap and much, MUCH more if I just have a place for it. So, once every 7 years, I go completely bananaz and organize, label and tidy everything. But then Fur Realz Cassie returns and messes everything back up again. I'll never be the Mary Poppins of Tidy-Town.
For me, I'll either need to get me a smoke screen like that one (um, genius!) or precede to HURL IT! It's on my summery to do. But so is spending countless hours in pajama-land and it looks like I'm pretty booked solid with that. 

So, whatcha got? And are you gonna Hoard It or Hurl It?

 photo signature_zpsd10b3273.png


Read more »

Monday, June 13, 2016

Art Scouts, Ohio Camp 2016

This weekend, I was a very lucky girl. Not only did I have the chance to spend time with my very favorite art teacherin' friends, Ginger, Laura and Jennifer,  but I also had the opportunity to work alongside them and share our passion: making the teaching of art good ole messy fun! We were super fortunate that so many art teachers decided to join us on this journey for the first ever...
That's right, Art Scouts! On the beautiful campus of Bowling Green State University in Ohio, we met and grew to love some of the nicest, brightest and just plain hilarious art teachers in the world. And I really do mean the whole world as we had friends traveling as far away as Seoul, South Korea, Canada and all corners of the U.S. to grace us with their awesome presence. 
Now we'd warned our Scouts ahead of time that earning those badges wasn't going to be easy (and, yes, in case you are wondering, they did receive super cute badges!). But each and every one of them rose to the challenge...although I do believe Jennifer made mention that "there is no crying in Art Scouts!" once or thrice. 
Speaking of Jennifer, she and I spent two days together sharing just about as much fiber arts and printmaking practices that we could. In preparation, we decked out the tables with all of the goodies our artist friends were to use in their art makerin'. Our fabulous sponsors, listed below, provided some of the supplies our Scouts used to create.
Because we'll be hosting another Scouts in less than a month in beautiful downtown Franklin, Tennessee, you won't find too many spoilers as to what skills the Scouts mastered. Sorry, friends! Badges were earned with blood (like, literally, right Lee Darter?!), sweat (woven sweat bands are on their horizon, y'all) and tears. Oh, wait! Jen said no crying in Art Scouts! Scratch that last one.
What I will say is that we were elbows deep in good ole messy art making fun. As it should be at a professional development, say we Scouts. While working with Jennifer, our Scouts had the opportunity to meet one of the most kind-hearted and loving art teachers. When Jen speaks about her students, you can hear the love she has for them. She reminded us all what precious gifts they are and how fortunate we are to create with them each and every day. She has a true gift of bringing out the most colorful and creative works of art in her students. Her secrets, tips and tricks were shared with the Scouts.  
We were so fortunate to work with some of our favorite brands and companies. This allowed us to share the supplies that we use with our students in our own art rooms. 
During our two day session, our Scouts hung with Jen and I before flipping to hang out with Ginger and Laura for their clay and painting badges. We all had so much to share with our Scouts that it was crunch time the whole time. 
Case in point: the "Working Lunch" written on our schedule. We left that "optional" but all of our Scouts were game to keep on Scoutin'! Don't worry, none of them earned the Starving Artist badge as we were feed very well with catered Mediterranean and gourmet lunches. Oh, and cookies. Warm, fresh outta the oven cookies, y'all. 
The amount of projects our Scouts accomplished will easily carry them through the middle of their school year, at the very least. Because our Scouts teach such a wide age range of students, adaptations were provided to either enhance or scale back lessons.  
Y'all know fibers is my jam, I could talk about that for days!
Just next door, the Scouts were hanging with Ginger and Laura earning their clay and painting badges. We knew they were having a blast because of the wild eruptions of laughter coming from their room. Ginger is our resident Zen mama with her calm, cool and reflective approach to teaching and creating art. On the flip side, Laura is a wild card who keeps us on our toes and rolling in laughs. A good mix, just as troop leaders should be!
Their tables were set with their clay and painting tools of mass creation.
Not only do our scouts have a wide age range but we all come from different situations: cart or classroom; no budget or big budget (wait, WHO HAS THAT?!). Working with clay can be tricky in certain situations but Ginger made sure to provide ceramic clay alternatives.
If you follow her blog, then you know she also creates beautiful murals with her students. The goPro videos of her students working on those murals are truly amazing! Our Scouts had the opportunity to paint a mural that was later used as our Photo Booth backdrop under her guidance.
Laura Lohmann is the Painted Paper Queen! Long before I knew her personally, I'd followed her blog and tried to emulate her painted paper techniques. But, I gotta tell ya, there is NOTHING like learning from the master. She shared her tips and tricks with our Scouts and the projects they created were out of this world. 
But catching her in a rare moment of seriousness is like snapping a photo of Loch Ness, a near impossibility! 
Now, just like any good camp, there were shenanigans aplenty! My Instagram, Twitter and Facebook feed were flooded with some of the funniest and most colorful characters I've seen. 
 Our Scouts truly are the best art teacherin' folks!
I mean, who else would take time out of their summer (or school year, some of them still have WEEKS to go!) to attend a professional development? The dedicated, awesome and fabulous teachers you see here.
 Okay, just a coupla spoilers from social media land...
I truly miss all of our Scouts already! It was like going away to camp.
At the end of our last day, we snapped a ton of photos, shared a lot of hugs and stories. 
We gave away door prizes that were generously donated to our Scouts.
Said our Art Scout Oath, lead by Troop Leader Lohmann.
And maybe shed a couple of good bye tears. So, yes, in the end, there was crying in Art Scouts...but they were happy tears. 

Special thanks to ALL OF OUR SCOUTS for making our weekend such a wonderful one! We loved having each and every one of you and can't wait to see you again!
BIG THANKS TO OUR SPONSORS! Here is a list of who provided some of our supplies that helped make our creating possible. We'd also like to give a virtual high five to Artome for providing everyone with a frame and snacks; the Art of Ed for fabulous swag, door prizes and snacks as well as Square One Art. We have been so fortunate for the Scouts to have such support. 
And, of course, last but definitely not least, we would like to thank BOWLING GREEN STATE UNIVERSITY and (from left to right) Barb, Jordan, Beth, Sara and Tina for being so very fabulous! They made us feel warm and welcome, catered to our every need (as well as our Scouts) and were just the hostesses with the mostesses. We appreciate your hospitality and dedication to the field of art education!

And that's a wrap on Art Scouts at the Ohio Camp, 2016. We are so excited for our Tennessee Camp coming up soon! To keep up with all Art Scouts happenings, follow Scouts on Facebook and Instagram. Until then, happy creating!


 photo signature_zpsd10b3273.png
Read more »