Showing posts sorted by relevance for query Gallery of gratitude. Sort by date Show all posts

Thursday, November 20, 2014

In the Art Room: Our Gallery of Gratitude

 Do you ever get those ideas that come outta no where (usually while you are in the middle of doing something totally unrelated like cleaning the cat's liter box or brushing your teeth. Not at the same time, of course, as that'd be all kinds of nasty). You know, a thought that's like a big ole slap in the face and think to yourself: OMG, that's, like, a decent idea! I might actually be able to do this!

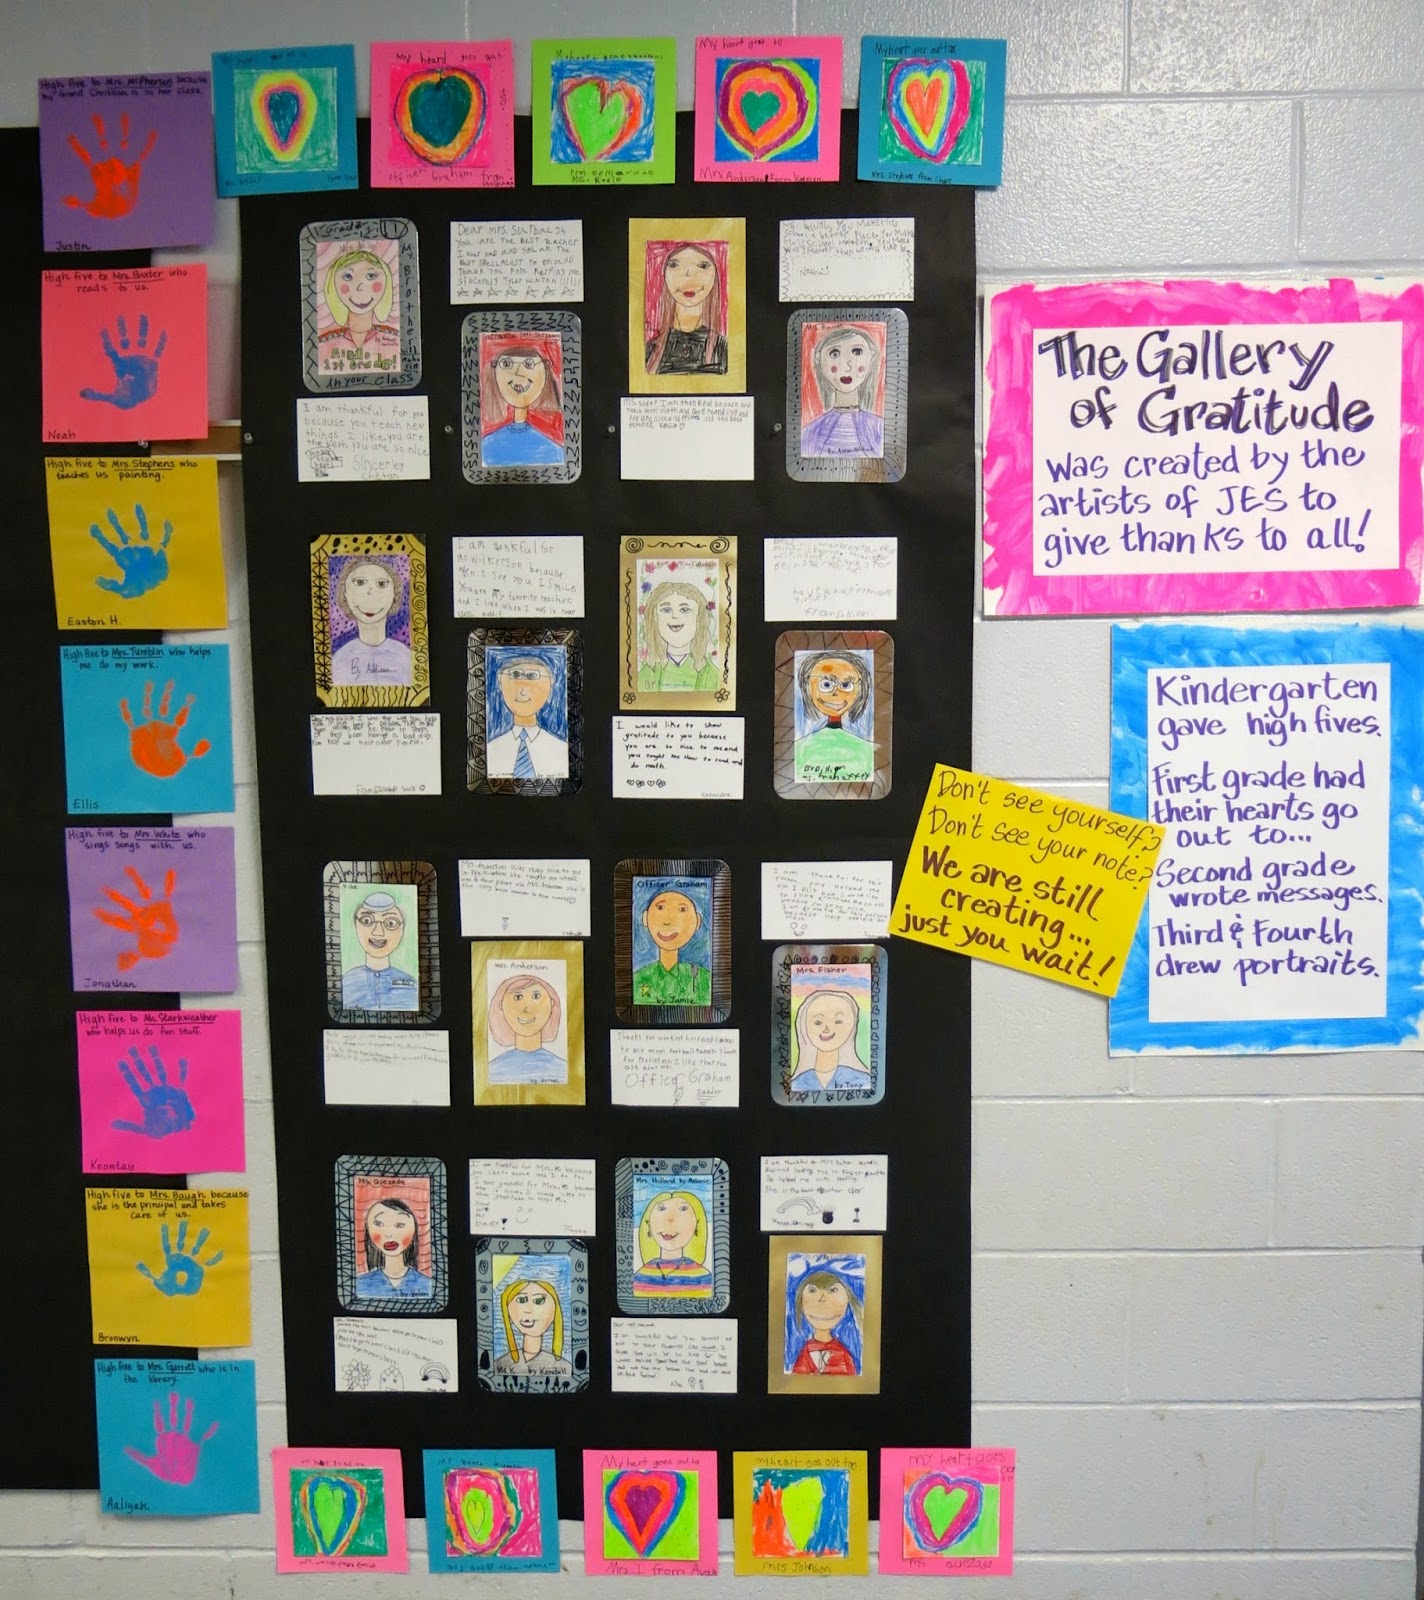
Well, that's pretty much how the idea of creating a Gallery of Gratitude came to me. This past weekend. Which means we busted out this bad boy in a week. Also which is totes a record for me as I currently hold the title of Slowest Art Teacher in the Universe. Not that I'm braggin' or anything, just statin' the facts, ma'am. And mans. 
 Since we are currently doing a Be Nice campaign at our school (we started last week by writing kind notes about each other's artwork. You can read more about that here.), I've decided to have the kids "give nice a try" with a new task each week. This week, I thought it would be great for the kids to show gratitude (which was also our word of the week, see how I did that?) to the folks that help them each and every day. I decided that my third and fourth grade students would draw portraits and write messages of gratitude (as they have an hour and could bust them out); my second grade would also write messages and decorate the frames (they've only got 30 minutes of art time); first grade would create oil pastel hearts and send their heart out to someone special; and kindergarten would create a handprint to give someone in the school a high five. 

With all that in my shockingly small brain, I went to the bookkeeper (one of my fave people, hi, Julie!) Monday morning and asked for a list of everyone that works in the school. I was thinking, eh, this should be easy for the kids. I mean, there's prolly only 45 folks that work in the building. WRONG, y'all! There are 71 super awesome people that teach, administer, parol, clean, cook, nurse and help my students. I realized then that this was gonna be a bigger undertaking then I'd imagined. 
 But the kids jumped right in. For my older students, we talked about gratitude and all the folks that help us at school. Then we chatted about how to draw a portrait. Each student was given a 4" X 6 1/2" piece of paper, a Sharpie and allowed to chose the name of the person they'd like to draw.
 At their tables, I had placed copies of last year's yearbooks (this was a big help, y'all) and a head tracing template. I decided to offer the template to the kids (it was optional) so that they'd feel confident with the head shape and be ready to jump right in to drawing.
 Once the pencil drawing was complete, the kids traced their lines with a thin Sharpie and added color with colored pencils. For most, this took an hour. For some, they had time to also write their message of gratitude.
 Many message of gratitude and picture frames were created by my second grade students. They had only one session of art this week due to our art museum field trip. Again, these kids were allowed to pick a name for whom they'd like to write. 
 While I was gone on my field trip to the local art museum with my second grade students, one of the assistant teachers at my school was my sub. I left her directions on having the first grade classes create these radiating hearts. 
The following art class, I had glued their hearts to a frame and had them write who their heart would go out to. This was great as it only took them 5 minutes and then we could return to our regularly scheduled art-making program.
 On Monday, I had a couple of my kindergarten classes. As they wrapped up their landscape paintings, they came to me for a hand print. As I printed their hand, we chatted about gratitude and I asked just who they'd like to give a high five to. After printing their hands, I jotted down on their paper "High five to Officer Graham for keeping our school safe". Those kindergarteners really had some sweet high fives to give.
 I'm happy to say that we were able to get the gallery (almost) complete and hung today! There are just a couple more messages of gratitude to be written but as it stands, everyone has a portrait on the Gallery of Gratitude wall. Or, walls, I should say. There's actually another wall across from the one above that is full of portraits, high fives and hearts. 
 I knew the kids would be excited to see their drawings and share their notes. What I wasn't expecting was the overwhelming response from those that I work with. Each was thrilled to see their portrait and read the children's comments. Several snapped photos of their portraits on their phones and have requested to take their portrait home. I do believe the kids accomplished our goal of showing gratitude to everyone on our school. Just in time for Thanks-Giving!


 photo signature_zpsd10b3273.png

Sunday, September 29, 2019

In the Art Room: Tiny Gallery of Gratitude

Recently, I shared that my students in fourth grade are working on creating their own Tiny Art Show. Because I was going to be out of school for a couple of days visiting the art teachers in Vermont, I needed a lesson to keep my students engaged. I created this Tiny Gallery of Gratitude sheet for my third and fourth grade students. I hope they enjoyed it (I'll find out tomorrow!) but fingers crossed they did. If you think your student would like it too, here's a link to the FREE PDF. 
I gathered these books for my sub to start the lesson with. They are all wonderful books to introduce the idea of gratitude. Because my sub would be with my students for a couple of days, I asked that she read a book at the start of each class...but I let her decide which ones to read. 
 Here is the sheet I created for my kindergarten through second grade students. (link works, just click on bold sentence!)

As for supplies, I set out pencils, erasers and color pencils for my students to use. I asked that the sub save the work so that we could return to this drawing as a sketch for early finishers. I also want to see what they drew!

If you are interested in other projects that show gratitude, here you go:
 This Gallery of Gratitude lesson was a HUGE hit with the entire school with all creative hands on deck. I cannot recommend doing this lesson enough!
 I recently did an updated version of the Gallery of Gratitude and I love it even more! We used modeling clay and did a bit of writing out the faculty and/or staff member we were grateful for. Lesson here and here
Helping my students understand what gratitude is and how to show it is very important to me. Do you have lessons that you love that help spread gratitude? I'd love to hear about them!

 photo signature_zpsd10b3273.png

Thursday, January 25, 2018

Gallery of Gratitude, Part 1

Hey, y'all! I am so excited with how these kid-created portraits of the faculty and staff at my school are turning out, I thought I'd share. This is just Part 1 of the Gallery of Gratitude posts...I'll be sure and post again once these are on display.

In case you missed the first post about our Gallery of Gratitude, you can check it out here. This idea is not a new one at my school...you can see our Gallery of Gratitude from a couple years ago here
 Two of my fourth grade classes got their portraits complete. They did such a great job and I have so much left over modeling clay that I think I'm going to have them create self portraits next week. They've become pros at this and have really loved creating them. Here's the lesson video I created and used:
Here are the supplies we are using:

* Modeling or plasticine clay. No one brand is better than another. I have just been purchasing whatever is cheap at the craft store.

* Model Magic Glaze. Here's the thing: modeling clay always stays soft. These portraits will be on display for a while in my school...so I knew I'd want them to be protected with a hard varnish. This "glaze" works really well at becoming super hard. I think ModPodge might work pretty good...but this stuff is a lot harder than that. 

* Plates from Hobby Lobby. So our "frames" are actually plates from Hobby Lobby! You can probably find them online. 

* Matte board. I cut ours down into 4" squares.
 Day #1: It took us some time to cover the entire background, create a skin color and add the head, ears, neck and nose. That took us an hour, believe it or not. Chatting about the project and watching the video took some of the time too.
Day #2: We really made progress. Almost all of the kids finished their portraits...some were super close! I thought I'd share what their works in progress look like.
Biggest bit of advice: HAVE PHOTOS! The kids really studied the photos, matching outfits, hairstyles, glasses and more. My sweet buddy the bookkeeper printed off yearbook photos and each student was able to use one as a reference. I plan to hang these photos near the clay creations when on display.
 And now, forgive me while I share a ton of these cute clay portraits!
 When we take these down, they'll be gifted to the teachers, faculty and staff. The kids will also write a message of gratitude about that person to be hung with their portrait. I'll post about that in Part 2!
 In the background, the kids were asked to add something that "said" something about that person. Here's a portrait of a kindergarten teacher. 
 Those are books behind our library assistant!
 And music notes behind our music teacher!
 I am loving the giant earrings and the cherries in this portrait. 
 This teacher plays guitar in his class. The glaze was just put on so it will dry clear, not milky like you see.
 One of our custodians is also our school D.J. Here he is, outside on field day with his baseball cap on backwards spinning records.
 This background, love!
 Incredible attention to detail! This one makes me so happy!
 Artistic license was taken with hair color here and I'm loving it. 

More to come, y'all! I had to share our amazing progress!

 photo signature_zpsd10b3273.png

Saturday, November 5, 2022

3 Fun Art Lessons to Show Gratitude

Over the years, I've done a handful of gratitude style projects that my students have not only enjoyed but really sparked joy around the school. I'm breaking these down from most involved to easiest incase you are uncertain which you'd like to do.

Let's start with my favorite: Gallery of Gratitude Modeling Clay Portraits!
For all the lesson details, you can visit my first blog post where I created a video I shared with my students. This introduced a modeling clay artist as well as walked them through the steps. 
I did this lesson with my fourth grade students. They could choose who to create a portrait of...but, as you can imagine, that got a little tricky. Several students volunteered to create a portrait of a teacher or staff member whom they didn't know well. We talked about how everyone in the school is important, their role in the school and how they make our school better. After the first two 30 minute art classes, we got about this far. 
You can see their completed portraits here, framed in a sparkly Hobby Lobby plate! Students also had to type up why they appreciated the staff member. This was printed on framed paper and hung with the clay piece. Many teachers still have these portraits in their classroom!
This Gallery of Gratitude was created by all of my students, kindergarten through fourth grade. My older students created the portraits while my kindergarten and first graders added the High Fives and the hearts. 
Here was the set up for my students to create their framed portraits. Teachers names were laid out as well as sparkly paper for the frame. 
Like the other project, students had to express their gratitude toward the chosen staff member. 
If you need a shorter lesson or one that is more student-focused, try this Tiny Gallery of Gratitude on for size! You can download it for free right here!
There is even a simplified version for younger students, also free, right here. Have fun!


photo signature_zpsd10b3273.png

Saturday, January 6, 2018

In the Art Room: Gallery of Gratitude Portraits!


After the holidays, with Valentine's Day on our minds, I like to have the kids spread a little love and cheer. I've got lots of lovey-dovey based projects in the works which I'll be sure to share. One project that really spread a whole lotta warm fuzzies was one we did a couple years ago called the Gallery of Gratitude. 
You can read all about it here. This project meant so much to the folks I work with. They were stopping in their tracks, reading the words the kids wrote about them, taking pictures, crying...it was AMAZING. We did it right before Thanksgiving to give thanks. I knew I wanted to do the project again this year...but missed the Thanksgiving deadline. So I thought it would be perfect for the winter...when we could all use some warm fuzziness. However, instead of drawing the portraits like we did previously, I decided we'd change it up a bit.
A while back, an art teacher (whose name I don't recall so I cannot give credit to -- so sorry!!) did modeling clay portraits with her kids and they were SO FUN. She shared the the kids looked at the author/illustrator Barbara Reid. Y'all have to check out Barbara's books and videos, so amazing. After watching her videos, I realized just how easy this would be for my fourth grade students. Here are the supplies we are using:

* Modeling Clay. The brand does not matter! And the stuff is CHEAP! So much cheaper than Sculpey and full of color. I bought some inexpensive variety packs from the craft store.

* Matte board. I used matte board because of the weight of the clay and I wasn't sure if it would warp cardboard. I happen to have a TON of matte board so it came in handy. I cut ours to 4" squares as I wasn't sure if the kids could do large pieces. They could have totally done it!

* Model Magic Clear Glaze. The thing is, modeling clay NEVER EVER dries as it's a combo of wax and oil. However, with a thickish layer of the clear glaze on top, it becomes pretty hard.

* HOBBY LOBBY METALLIC PLATES! Y'all! I saw these at the Hob Lobs a couple months ago and just about fainted. The perfect fancy frame, right?!

*Old school yearbooks. So we could look up the person whose portrait we are making.

* Names. These are the names of folks whose portraits we are making. We'll be doing a portrait of every person who works in our school building. 

Video demo I created for the kiddos: 
We started the project yesterday. We spoke a lot about gratitude, what it means, how to show it. Then I had the kids draw a name of a person who works at our school. I told them that if they were happy with the name they got, they could go to their seats and get started. If they didn't know the person and were interested in trading, they could remain on the floor. The kids remaining on the floor shared who they had and traded. A few kids were allowed to redraw a name if they had no clue who the person was...and I knew kids in my other classes would be happy to create that person's portrait. I did have a couple teacher's kids in the class who we all agreed should have first dibs on their parental units. Everyone was happy with who they were creating.
When I share my videos with my kids, I do not show them the entire video. Instead, I break it up into bits. For example, before we drew names, I had the kids watch the first part of the video about covering the background. Then we drew names and set to work. Thankfully, my heat was working and my art room was SUPER warm. This really helped with the manipulation of the clay. In the video, you'll notices I struggle a little because my heat was not working on the clay was super cold and hard. So crank up that heat for this lesson!
After completing the background, the kids came to the floor and we each announced which person we were creating a portrait of. That was fun and the kids were so excited. This is their last year at my school so many of them shared memories of the person whose portrait they are creating. We then watched the second phase of the video about creating a skin tone and creating the basic shape of the head, neck, ears and nose.
I will say this, a couple of kids made their head shapes super small. So I had those who "got it" go around and help make the heads a little bigger. For my next class, I'm going to have a head shape created out of paper and request that the kids place their clay on top and stretch it to that size...I think this will help make the heads bigger and more consistent in size.
I made sure to write down whose portrait was spoken for so that I could keep track of who we were creating and who still needed a portrait made. We might end up having a handful of extra teachers and staff...and I'll put my early finishers on those.
Here is my teacher example! I'll be certain to share our progress with y'all!
 photo signature_zpsd10b3273.png