Showing posts sorted by relevance for query Paris. Sort by date Show all posts

Saturday, August 25, 2012

In the Art Room: Jes in Paris!

La Tour Eiffel: The Eiffel Tower has got to be the most iconic symbol for Paris and France. Named after the engineer who designed and built the tower, Gustave Eiffel, The Iron Lady was the tallest structure in the world until 1930. That's when our Chrysler Building overshadowed her. The tower was built in 1889 for the entrance of the World's Fair. Do we still have those?
Well, would you look at who is in Paris, France! That's right, our school mascot Jes. In case you aren't in the loop, I created this little stuffed dude to take on my trip to Europe this summer. I snapped photos of him in Germany and the Netherlands with the intent of sharing his adventures with my students in art class. You know, like the concept of Flat Stanley. Only cuter. 

My students are currently creating passports in art class and packing their suitcases (which entails the kids writing an item on a  Post-It and sticking in our paper suitcase. Best one so far? "My family")  Our first stop? Well, if you've seen my art room, you know it's the City of Love.

In preparation for our adventures, I've been doing my homework. So I thought I'd share a little history behind each Parisian monument. I also rediscovered the art of my Favorite-Artists-at-the-Moment: Brothers Jean and Raoul Dufy.

Special thanks to Sophie who traveled with Jes and snapped all of these marvelous photos. And to Sandy, the wonderful parent that put me in touch with Sophie. Merci beaucoup!
 Raoul Dufy was the older and more famous of the two artist brothers. Raoul said:“What I wish to show when I paint is the way I see things with my eyes and in my heart.”  La Tour Eiffel, 1935
The Basilica of the Sacred Heart of Paris or Sacré-Cœur Basilica. This Roman Catholic church sits high on hill of Montmartre, a popular artsy district. Because of it's height, it can often be found in the background of paintings of Paris. In fact, I included it in my own Parisian landscape
L’église Saint-Pierre de Montmartre et le Sacré-Coeur, 1953, Jean Dufy. Both brothers were considered Fauvist painters. The Fauves, which included artists like Henri Matisse, where given their name by an unflattering critic that found their colorful style akin to that of a Wild Beast. These painters loved the term and it is now associated with their bright works.
Notre Dame de Paris translates Our Lady of Paris. This Roman Catholic cathedral suffered some damage during the French Revolution (gah, I just spent entirely too much time reading about that revolution, fascinating!). Thankfully it has been restored and it's one of the best examples of Gothic architecture.
You know those people that take great ideas and totally claim it as their own? Well, you do now. Meet Pablo Picasso. What a guy. Did he ever have a single original thought? Here is he doing is best Dufy brothers impression. Notre Dame de Paris, 1954
Statue Equestre d'Henri IV, Pont Neuf, Paris. Henri IV was one of the most popular of the French kings whose reign lasted from 1589 to 1610. Equestrian statues are quite popular everywhere. I've heard that “when one of the horse’s hooves is raised it indicates that the rider was wounded in battle, when both of the horse’s hooves are up it indicates that the rider was killed in battle and when all four hooves are on the ground, none of the above.” I'll have to do some digging to find out if this is true of Henri IV.
Raoul Dufy's La Vert Galant, 1926
Jes at L'Arc de Triomphe de l'Étoile. Designed by Jean Chalgrin in 1806, this monument honors those who fought and died in the French Revolutionary and Napoleonic Wars.
So it turns out Raoul Dufy was also a textile designer. I can see that. And I see a pin board on his textile designs in my future. I absolutely love this chair, L'Arc de Triomphe, 1933
I know there are some serious mixed reviews of I.M. Pei's pyramid outside the Louvre, but I love it. I.M. Pei also designed the art museum at Indiana University (the best college on the planet...not that I'm biased or anything), so I have a soft spot.
Spring in Paris poster by Raoul Dufy. I was really hoping I'd come upon one of these on my garage and thrifting adventures. No dice.
Don't you just love this sweet photo Sophie captured? She did such an amazing job taking Jes around...I can't thank her enough! Not to mention how excited the kids are to see the photos and hear about his adventuring.
So while Jes is off galavanting around Paris, I'll just sit here and dream. About the sights, the sounds and what I'd wear. This adorable Dufy-inspired number outta do the trick. You can see it and more vintage goodness here, you like.
I hope you enjoyed this little history lesson. Putting this post together helped me learn so much more about Paris. Jes will next be traveling to sweet Katie over at The Little Red Squirrel in the UK! How exciting, thank you, Katie! From there, I'd love for him to travel to Italy...but I have no connections. If you happen to have a contact, I'd love to send Jes that way. Thank you!


Tuesday, November 13, 2012

In the Art Room: Collage Paris

A collage montage. Brought to you by some hard-workin', Parisian-lovin' second grade artists.
 As you know, the kids in my art room have been spending some time in Paris. So you'll have to bear with me as every upcoming project I feature for my "In the Art Room" series, is gonna be something Parisian. You might recall last week was the third graders Printed Paris Project. This week, I present to you the second graders Collage Paris. I'm bringing these to you fresh off the drying rack...be careful, the glue is still wet.
 Paris, day and night.

We began this project shortly after completing our suitcase portfolios and our passports. Interested in creating a collaged landscape (it doesn't have to be Parisian, check out our Egyptian version from last year)? It's a whole lotta fun. You'll need the following:
  •  12" X 18" paper
  •  12" X 6" paper
  •  washable tempra paint (I prefer Crayola because the other stuff is junk. Trust me, I've tried it all.)
  •  texture combs 
  •  construction paper
  •  glue cups and glue brushes (I gave up on glue bottles long ago. They clog and the kids stab 'em with pencils and scissors. Give them a little cup with glue and a small paint brush and you'll never go back to the bottle. The GLUE bottle, that is.)
 We began this project with a lesson on with color and value. The 12" X 18" piece of paper that the kids were given was folded into six sections: three at the top and bottom. On the first day we chatted about creating shades and a gradation. We began right above the middle fold, painting the first section blue and adding a bit of black. Each section above that was to be a darker value. 

The following art class, we chatted about tints. Each section below the middle was to be a lighter value of blue. And, viola! A gradated paper.
 On our third art class, we learned how to mix green and created a textured  piece of paper with our texture comb. Don't have texture combs? You can make them by cutting notches into pieces of cardboard. I did that for years. Then I caved and purchased these plastic doohickeys. And I was like, where have these been all of my life?! I love 'em so much, they tend to make an appearance in just about every one of our art projects.

You know my art classes are 1/2 an hour, right? You've heard me belly-ache about that before. I'm an expert belly-ache-r, if you didn't know. So if it seems like my project is broken down into teeny-tiny bite-sized bits, now you know why.
 The following art class, we chatted about collage which is like French for paper and glue. How perfect! The kids were given the choice of having an evening or day time sky by either having the dark value or the light at the top of their paper.. Most opted for the Midnight in Paris vibe. Once that was decided, they were to tear their green paper diagonally, position the torn part on their paper so it created the River Seine and glue down. 

After a chat about painting clouds (if they are near the horizon line, they should be small and grow larger in size as they approach the top of the page) and stars/moon (with a glance at Vincent van Gogh's Starry Night for a ring-lit look) and the sun (all I ask is no sunglasses, puh-lease!), the wee artists were permitted to make their masterpiece their own.
 Before: plain landscape. After: Parisian Paradise!

 After the completion of our collage landscape, we began our study of the famous structures of Paris. After learning the history behind the Eiffel Tower, the Arc de Triomphe and Notre Dame, we learned how to create them. We chatted about how each was symmetrical and could easily be created with a folded piece of paper. The above and below bulletin boards were on display at the front of the room. This allowed the kids to work on each structure at their own pace.
 As we worked on our structures, we kept them safe in an envelope until each was complete.
 Do you remember that groovy group of college kids I had hanging in my art room earlier this school year? Well, I've got a new group and one of them created this awesome bulletin board to help introduce symmetry and the famous Parisian structures to the kids.
 Of course, no introduction is complete without the help of Jes, our school mascot! A kind French friend snapped these photos of Jes around Paris. Thank you so much, Sophie. This has been a wonderful way to excite the kids about exploring the world.
Gotta love an innovative thinker. One of my students wanted his buildings to "pop out". Recalling our paper collages from kindergarten, he folded feet onto the bottom of his houses and glued it so his structures would stand up. Genius!

Love that crooked row of buildings!
Thanks for joining us on our Collage-Landscape Fantasticness! I hope you enjoyed these masterpieces as much as these artists did creating them. Next up: First Grade Hot Air Balloons over Paris. Stay tuned!

Thursday, January 3, 2013

In the Art Room: Pieces of Paris

Framed masterpieces by my fourth grade artists.
My winter break is quickly coming to an end. It's been a lovely couple of weeks of traveling, crafting and catching up with fam and friends. Come Monday, it's back to reality. And I'm ready. I've missed my little artist buddies and their awesomeness. I snapped these photos of the last of the Parisian-themed projects my fourth graders completed before break. I thought I'd share this lesson with you.
Each 3" square was to be French-themed. This artist did a pretty bang-up job. From the top left to right: Le Sacre Coer, words in French, Notre Dame, the Eiffel Tower, a fleur de lis and more words in French.
If you've been reading this blog since the beginning of the school year, then you are familiar with the Parisian theme with which we started. I painted my windows, the entrance to my classroom and sewed some dresses to get the kids excited about Paris. You can see the French-y works of art by my first graders, second and a couple of projects by my third graders here and here.
From top left to right: French words, the Eiffel Tower, French words, fleur de lis, French words and the Arc de Triomphe.
We began this project at the start of the school year after finishing our passports and suitcase portfolios. I wanted a project that would introduce many different types of media and enhance their drawing skills while teaching all-things-Frenchy. So our first order of business was learning the language. We had the help of Fifi (my smart mouthed pink poodle puppet), a couple of learning-French CDs and google translate. 

On a 8" x 11" sheet of paper, the artist wrote French words or drew mini pictures of famous icons of Paris in water-based marker. Once completed, they chose a handful of their favorite words and drawings to trace over in colorful sharpie markers. They then quickly brushed water over their papers causing the water-based markers to bleed and give a tie-dye effect to the background. Some artists added salt for that snow-flakey effect.

Originally that was gong to be the background for a different project entirely. But when I saw how their paintings were turning out, I decided to go a different route. Teaching is like that, you know? No matter how much planning and trouble-shooting you do, things don't always go according to plan. Which can often be a good thing.
But back to the paintings. We set those aside until the tail end of the project. When we'd finished all of our other little 3" mini-masterpieces, we got them back out, cut 3" squares of our favorite parts of the painting and added them to the final project.
Next up: Metal tooling. I love doing metal tooling with the kids. They learn so much about line, texture and color, if we happen to throw sharpies into the mix. This young artist chose to draw her version of the stained glass window in Notre Dame.
A mini Arc de Triomphe. After our French lesson, we learned all about the famous places of Paris, France. It was easy to pique their interest as they have a close buddy that recently visited all of these places: Jes! The artists were inspired by photos of his adventures in the City of Love.
After that: Scratch art. Dude, my students love scratch art paper. But it's expensive! So doing these wee masterpieces gives them great experience without breaking my art budget.
Le Sacre Coer is like the Where's Waldo in so many paintings of Paris. Because it sits high on Montmartre, it can be seen from all over the city. When chatting about this with the kids, one student said, "Ooooh. I thought that was the White House," to which another replied, "Really? In Paris?" Que eye-rolls, face palms and snickers. "What?! It does kinda look like it." I would have to agree.
Our last little drawing surface was this translucent stained glass paper stuff I'd had in my closet forever. These little drawings were perfect for out 1/2 hour art classes. We kept them in envelopes marked with our names.
Not sure if that's a moat or just a circle of silver encompassing the Notre Dame.
Top left to right: paint palette with fancy background, an artist hard at work, French words, more Frenchy goodness, the Eiffel Tower and Bonjour!
When all of the drawings were complete, we painted the background paper. I gave a quick lesson on color mixing and the use of texture combs. The kids chose a piece of colored construction paper to paint on and texture.
Bon appetit! When asked the chef was holding I was told "stinky fromage." Duh, silly me.
Once our envelopes were stuffed with mini pieces of Paris, the framing commenced. At this point, we were just a pinch over it so I really had to stay on the kids to use their best craftsmanship when framing. I started out with, "I'm so proud of your hard work. Be sure to take the same care when framing..." which quickly turned into "If you don't frame that carefully your evil art teacher will make you redo it." 

New kid looking around the room: "Who's the evil art teacher?"

Veteran kid jerking his head toward me: "That lady."

New kid looking up at me as I change my expression from smiling to Cruella Deville: shivers and gets back to work. 

Bwahahahah!

As you return to work, school, and life in these upcoming days of the brand new year, have fun!

Thursday, December 6, 2012

In the Art Room: Parisian Silhouettes

What better way to say "au revoir" to Paris, France than by hot air balloon? Or hand glider? Or, what the heck, a parachute attached to one's head (that poor dude on the far left kinda makes me giggle).
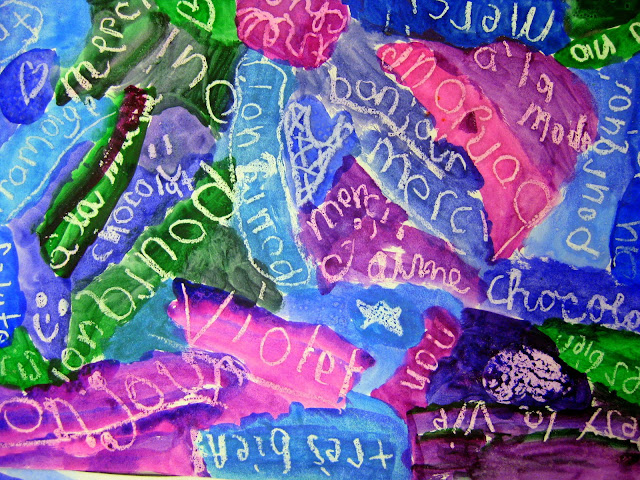
 I'm here to share with you the second Parisian-themed project my totally awesome third grade artists just finished up. We actually began this project at the introduction of our French unit when we were learning how to speak and write in French (you might recall a certain pink poodle named Fifi introduced us to the language of love). If you take a close look at the crayon resist in the background, you'll notice a little of our French vocabulary.
I just now noticed how this incredible artist somehow managed to cut out a tiny person in her hot air balloon. These artists always amaze me.
 But I'm getting a little ahead of myself. Let me tell you how we went about creating our Super Silhouettes:
  1. We began with 12" X 18" heavy stock drawing paper. I learned a long time ago that anything below 60 lbs paper is just junk. We used white oil pastels to write French words all over our papers. We chatted about variety, fonts and threw in a couple drawings of the Eiffel Tower and the Arc de  Triomphe when the writing became too tedious. 
  2. From there we began our water color painting portion of the project. I never really was a fan of watercolor paint with children because I always found the colors to be very, well, watery. And pale. However, when I learned about Crayola's Mixing Sets, I became an overnight watercolor-with-children convert. These are available in most art supply catalogs. Don't want another plastic case of watercolors? Remember, you can purchase individual colors. My favorites in the set are fuschia, turquoise, red-orange and blue-violet.
 3. I did limit the kids to either warm or cool colors with fuschia being the swing color. When introducing watercolor, I demo to the kids how to moisten each color with a drop of water and twirl the brush around in the color on it's tippy-toes like a ballerina (no scooting the brush around on it's bottom and giving it spider legs). I emphasize how the colors should be translucent, not opaque. Painted areas should have a watery appearance, not dry, scratchy brush marks. And, of course, everyone lets out a squeal when they see how the oil pastel resists the watercolor. Much better than a crayon, by the way.
 4. On the second day of Watercolor Wonderland, I introduce a couple of tricks. I demonstrate double dipping the brush, first loading it with one color and then adding a different color to the tip. When the brush is laid on the paper on it's side, it produces a gradation of a couple colors. You can see that best in the word "violet" in the painting above.
5. Another trick is the introduction of salt. When sprinkled on damp paper, it absorbs the paint and produces a beautiful snowflake effect.
 6. Once finished, we had a chat about some of the most famous places in Paris. We also discussed what a silhouette was and brainstormed some ideas of what we could add to a silhouette landscape. I created the above poster so the kids could see some ideas. Symmetry was emphasized.
I love the "Paris" above the Eiffel Tower.
We did have some chats about scale...and decided that large silhouette cut outs would have the appearance of being in the foreground while small cut outs look to be in the background. Unless that happens to be a giant hand glider dude. With super long arms. In which case, that theory is out the window.
A kite?! Genius.
 When I told the kids that we were going to be saying "au revoir" to Paris, France and "guten tag!" to Germany, they seemed sad to go. When one of them asked if I was going to repaint my windows for Germany I believe I said the words, "are you crazy?! No!" To which the questioner replied, "good! Then we aren't really leaving Paris!" 

And that made me pretty happy. Almost as happy as these sweet silhouettes.