Monday, May 6, 2013

In the Art Room: Royal First Graders

 Well hello there, your majesties! Long time, no bloggie'ness. I know you might have been expecting some Parisian photo-heavy post but, to be honest, I'm kinda overwhelmed by just the thought of downloading all two million of the photos that I snapped. And that was of the Eiffel Tower alone! So you're gonna have to wait for the European Vacation Slide Show and check out these amazing first grade self portraits. Cuz they're royally awesome, dude.
 This project involved many mini-lessons as most of my projects do. I just can't seem to do a weaving project or a lesson on symmetry. No, it's gotta be a self-portrait-drawing-, symmetrical-crown-making-, textured-paper-weaving-, analogous-color-mixing-, and pattern-designing- kind of montage.
 Wanna attempt a project that involves that many steps? You sure you can handle this kind of party? Cuz it ain't for the short attention-spanded. But if you and your little friends are up for the challenge, here's how we went about mastering these pieces:
  • Week 1: As you may recall, as it's mentioned every blog post, I only hang out with my wee artist friends 30 minutes, twice a week. So I'm going to break this down by week. Now this lesson was apart of our unit on the United Kingdom. After a chat about their monarchy and a close look at several paintings of royalty of the past, the kids were introduced to the idea that they'd be portraying themselves as kings and queens. This was met with the usual squeals of delight that one only hears when teaching the littles. To start, we used 8 1/2" X 11" sheets of paper, traced a head shape in pencil, added a neck and ears and proceeded to paint using colors that matched our own skin tone. Once those dried, we used oil pastels to create out likeness. That's after a pretty extensive how-to-draw-a-self-portrait chat, of course.
  •  Week 2: Once the oil pastel self-portraits were completed, they were cut out of the small sheet of paper and glued onto a clean sheet of 12" X 18". Once glued down, the kids used mirrors to check out their 'do and painted hair onto their self-portraits. For the boys, hair painting, as we called it, took all of two seconds. But for the ladies, well, let's just say we enjoyed the beauty salon time. During the second half of our weekly art lesson, we used metallic paint to paint and add texture to small 6' X 9' pieces of colorful construction paper.
  • Week 3: With our fancy paper, we created a loom for weaving. To do this, I have the kids fold the paper in half and fold a small crease at the top open edge. We have a mini-math lesson that involves cutting the paper almost in half, making sure to stop at that top crease. We then proceed to cut the paper almost in fourths and then eighths. Once the paper is unfolded, it creates a loom. The following art class was spent weaving on our looms.
  •  Week 4: Crown making! This proved to be a bit hit with the kids...and it also helped me empty out some contents of my storage closet. After cutting out their preferred crown shape (the kids were given three different crown shapes to trace from), they added foamy shapes to create their design. They were informed that they only had two rules to follow: the crowns had to be symmetrical by shape and they could not stack more than three shapes on top of each other. Once complete, crowns were spray painted gold and more foamy shapes could be added on top.
  •  Week 5: We began the process of putting it all together. Crowns were glued atop heads. Weavings were glued under chins. Sleeves were added with rectangles of paper embellished with metallic oil pastels. Fancy collars were coffee filters folded in half with the center circle cut out. And necklaces were created with construction paper and metallic doilies found in my storage closet.
  •  Week 6: Finally, we began to approach light at the end of the tunnel. The kids were given water soluble oil pastels. They were asked to use two analogous colors and create lines that radiated from their self portrait. The following day, water was painted over their line drawings and their masterpieces were complete. Finally.

 I don't know if you noticed, but some of the kids took liberties with the coffee filters, creating fancy sleeves. And some of the ladies added earrings with the metallic doilies. Who am I to deny royalty of their magnificence?
I do believe the kids fave part of this project is when I passed their work back. I called on the kids as "Your Royal Highness" and "His/Her Majesty" to which they always giggled, curtsied or bowed. And who can blame them? After all this hard work, they are most definitely Kings and Queens of the art room. 

Saturday, April 27, 2013

What the Art Teacher Wore #64

She's a Handful Monday: My students are portraying themselves as royalty in their latest self-portrait adventure. When I asked why one "king" appeared to be yelling (complete with angry eyebrows and wide open  mouth), I was informed that "the king is upset because the queen is a real handful." Trying my best to hide my laughter, I had to ask, "A handful of what...?" After some thought I was told "pain". These kids keep me rolling. top: gift from a friend; scarf: Orla Kiely; skirt: vintage, etsy; tights: dunno; shoes: DIY, here; mini beret: DIY; belt: Anthro
Bonjour, ya'll! I hope this week has been a lovely one. It's been pretty busy here in Cassie-land what with art-show-preparations and feeble attempts at art-room-tidying. But that's okay. I do believe I could have handled just about anything this week threw my way knowing that this Sunday I'm heading to...
This and more amazing vintage posters here.
What?! I know, I can't hardly believe it myself. When hubs recently told me we'd be traveling to Germany for a wedding, I asked if we could please include a short trip to Paris. If you've been following this blog for a bit (for which I thank ya), then you know that I began this school year with an introduction to Paris, complete with art room decor and Parisian-themed DIY dresses. I had no idea that the opportunity to travel there would present itself. I'm so excited!
Grannie Tuesday: One of my first grade students told me I was looking "not like Mrs. Stephens" on this particular day. When I asked her what she meant I was told, "You look like a grannie. It's your sweater. It's a sweater for grannies." Thank you but I prefer to call my style Grannie-Chic. sweater: vintage, thrifted; skirt: vintage, etsy; top: gift from my moms-in-law; fishnets: Target; shoes: Softt; headband: Anthro
Image here.
Which is all to explain my Parisian-themed looks for this week. It was fun digging these outfits out of my closet because it reminded me of the very beginning of the school year. The kids were thrilled to see them too and greeted me with many "Bonjour"s...and a couple of "Hola"s. So it looks like we've got some reviewing to do.
Special Blood Vessels Wednesday: One of my kindergarten students informed me that the reason he's so good at art is because he has "special blood vessels that pop!" when he comes to art class. I'm thinkin' this might be gas. Regardless, I thought it was adorable. sweater: thrifted; dress: DIY by me; tights: Target; shoes: vintage, thrifted
Students of mine gave me these sweet earrings at Christmas. Perfect.
Image here.
The funny thing is, I never had a super strong desire to travel to France until we began our study this school year. And after seeing those pictures of Jes all over Paris, the desire to travel there hit me like a stale baguette.
Fancy Dress Thursday: A couple of days ago, a group of my third grade girls informed me that Thursday was Fancy Dress Day. One girl said, "so don't forget to dress fancy, okay?!" At which point a third grade boy said, "why would you tell her that, she dresses fancy [pause to look at my silly outfit of the day] and weird everyday." Really? You had to throw that "weird" in there? sweater: thrifted; belt: Pin Up Girl Clothing; dress: Bernie Dexter; fishnets: Target; shoes and mini beret: DIY
A couple of weeks ago, one of my sweet students drew this picture for me...before she even knew of my plans. I'm totally diggin' those ballet flats!

A high school buddy of mine sent me this adorable brooch for my birthday and I just love it! And, speaking of buddies, on Thursday evening, I blew off some much needed steam with a great couple of girlfriends just shopping, trying on makeup and shoes and eating entirely too much.
Image here.
Oh! And speaking of Jes, since his last update, he's been to England and Iceland! I will certainly share those amazing photos with you soon. He's such a get-about.
And I'm Outta Here Friday: It wasn't until 6:30 pm when I was finally finished with lesson plans and room-tidying that I realized I hadn't snapped a picture for the day. This one goes down as one of the worst. And that stuff in the background? Hundreds of pieces of artwork for our upcoming art show, yay! smock: vintage, etsy; skirt and tights: Target
Image here.
So I'll be taking a wee blogging break as I'm out and about. But I'll be certain to share my adventures once I've returned and recovered from jet lag. Until then, au revoir!


Wednesday, April 24, 2013

In the Art Room: Tree Weaving with Third Grade

Every year I do a weaving project with my students, kindergarten to fourth grade. And when asked at the end of the year what their fave art project in the universe is, weaving always ties first place with clay. 
And who can blame them? Digging ones hands deep into clay or entangled in a bundle of yarn is just about the best feeling ever, says the art teacher. However, I've grown a little tired of the usual weaving project my third grade students create. So when I saw these amazing tree weavings on pinterest, I was inspired to have my students create one of their own.

Stunning, right? And if you know Russian (at least that's what I think it is) then you'll totally understand the directions. I'd click the "translate" button but I guess you gotta know the Russian word for that to make it happen. All kidding aside, the website does an excellent job of demonstrating the process. For headache-free purposes, I decided to forgo the bent twig option and have the students craft their loom from a Chinet plate.
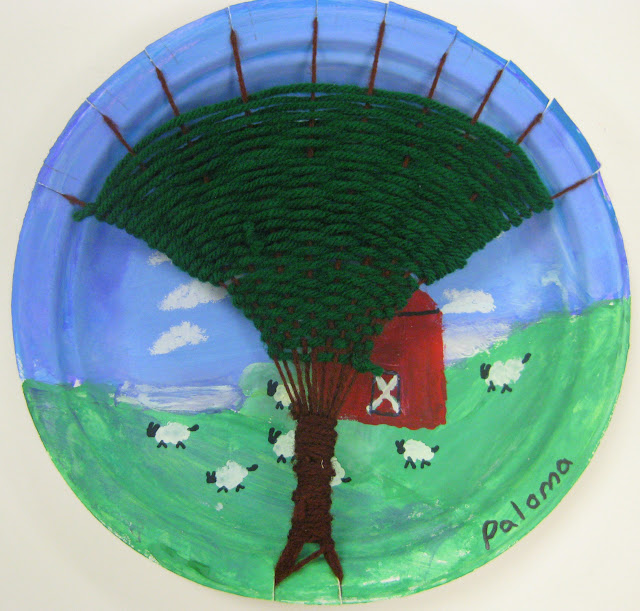
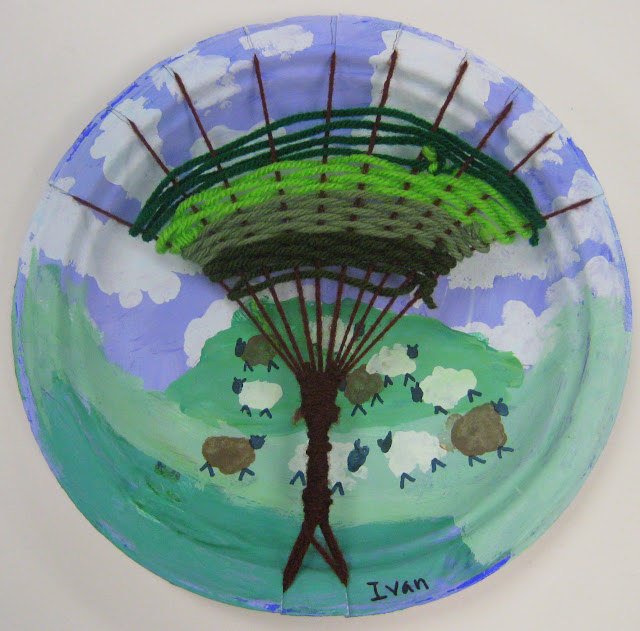
This weaving lesson was also apart of our study of the United Kingdom. We studied many landscape photographs and paintings of the countryside of such places as Northern Ireland and Scotland. Our first day was spent painting a sky on our plate. If you recall, these kids have plenty of experience with sky painting as they are the ones who created these German Gnome Landscapes. The following art class, we chatted about how to create a fore-, middle- and background in our landscapes.
 Students were encouraged to mix three different values of green to create a sense of depth. From there, they were given the option to enhance their landscape with what they'd imagine a countryside in the United Kingdom to look like. As you can see, we were feeling mighty sheepish.
Once our landscapes were complete, we were ready to begin the process of creating and warping our loom.
 By placing a Tree Weaving Template over their plate, students could draw the correct number of notches on the top (10) and the bottom (2). These notches were cut to the inner edge of the plate.
With notches cut, the students met me on the floor with their plates and about a yard and 1/2 of pre-cut yarn. Our first step was to wedge the yarn into the bottom left hand notch as seen above.
With the long end of the yarn, we put the yarn into the far left top notch, out the notch beside it, into the bottom left, out the bottom right and back up to the top. This process was repeated until all top notches were filled in. We ended by going in the bottom left notch, coming out the right. At this point, we were ready to create our tree trunk.
Which is super easy. With the end of the yarn, begin wrapping it around the yarn at the bottom, tugging gently as you go. If you run out of yarn, simply double knot a new piece to the old. Once your trunk is tall enough, tie it off to a tree branch.
Some bare trees ready for weaving.
To begin, we double knot tied our chosen color to one of the tree branches on the end. From there, we began the process of weaving over and under. One thing the students struggled with was weaving loose enough. You see, they wanted to pull tightly which caused the weaving to slide down the branches and pull the warping threads inward. However, once they got the hang of it, it was smooth sailing.
 When we first began this lesson, we chatted about wool and where it came from. I passed around some natural wool roving, some cream colored some brown. We chatted about how different colors of wool come from different color sheep. I guess that inspired the sheep in this landscape.
New colors were added with a double knot tie. Weavings were ended with a double knot tie off as well.
So that we could hang these for our upcoming art show, students tied a piece of yarn to the backside of the plates.
And that's it. Honestly, the warping/weaving portion took no time at all. And I foresee so many variations of this project in the future: a woven peacock, a turkey...okay, that's all I've come up with. But I'm sure to think of some more (your input would be greatly appreciated and promptly stolen as an idea of my own!). 

I do hope my explanations helped and that you're encouraged to try this lesson with your students. If you're still not gettin' it, just translate it into Russian and it'll all become crystal clear. And if you'd like some more weaving projects, you can check here. Chat with you soon!

Monday, April 22, 2013

DIY: Scarf, Meet Cardigan

Confession: There is now not one single solitary sweater in my closet that has not been DIY'ed by me. Yes, seriously. Between the felting and the scarf-izing, I'm all about the Leave No Sweater Behind. I'd say I have a prob but that's just statin' the obvious.
Howevers, if we're gonna point fingers, this is all Anthropologie's fault. 

Case in point: their version of a Scarf-igan now on the clearance rack for the low low price of $49 (originally $98, whah?!). I'm sorry, but Anthro, Chico's called. They want their sweater back. Love the concept, not the execution. So I decided to take matters into my own hands and make a version of my own.
I dug around in my closet and found this rarely worn, thrifted Target sweater. In my scarf stash, I had a more difficult time deciding which to choose. While many of them looked like they'd work, I hated the idea of hacking into (and possibly ruining) a beautiful vintage scarf. I settled on one that was slightly hole-y and stained. I figured I couldn't possibly do any more damage to it.

A part of the scarf I wanted to incorporate was the border. So after cutting the scarf in half, I laid it out on the sweater and tried to pretend I knew what I was doing.
After pinning the edge of the scarf next to the buttons and bottom edge, I cut the scarf with a 1/2" edge at the side seam of the sweater. Then I proceeded to stick more pins in my sweater than a voodoo doll.
Then I cut the scarf 1/2" beyond the shoulder seam of the sweater. If you'll scroll back up to that Anthro sweater and look closely, you'll notice two things: where the bottom of the scarf meets the ribbed bottom of the sweater, it is not sewn and their scarf does not meet the shoulder seam. 
Lemme address the first thing: that not-sewn-down-bottom thing. This actually makes sense as it gives the scarf some room to move. You see, the sweater, being a knit, it going to stretch more than a scarf that's made of a woven material. So when I was sewing, I did the same thing. I began by stitching the edge next to the buttons first, sewed the side sweater seam second (say that 10 times fast), did the armhole and the shoulder seam. And left the bottom open.

Now let's pause for a moment and chat about that second thing: that weird scarf-not-meeting-the-shoulder-seam business. I mean, that sweater's $49 on sale. Make the scarf fit the sweater. It ain't that hard.
Says the person who did this. Like, ewww! What happened?! Okay, lemme back up a little. Cuz maybe there is something to that gathering biz-natch. Even though I allowed myself 1/2" surplus of scarf-age, it seems I needed more as it shrunk up as I was stitching. Can you tell I'm Southern? "Shrunk up" is most definitely in the Southern Webster's Dictionary. Check it.
My solution? Add some trim and call it a day. I just happened to have the most perfect vintage flowery bits that covered my boo-boo. And, I gotta tell ya, I actually love it more with the trim.

Outfit details: While I didn't buy the Anthro skirt, everything else I'm wearing is from there! skirt: Anthro, gift from a friend; shoes: Anthro, $9, what?! Das right. Shoppin' Anthro like a boss.
Now, if you recall, this isn't my first time to the Just Scarfin' Around dance. Oh no. Check out my first scarfigan, my beautiful blarf (that's scarf into blouse) and this here skankie (if you guessed skirt made of hankies then you're like a genius). 

By the way, you mighta noticed I took a break from my weekly What I Wore. Last week was a rough one so I thought I'd just put it behind me. I knew you'd understand. Chat with you soon!