Tuesday, October 6, 2015

In the Art Room: A Color Mixing Unit

You wanna make a whole buncha kids excited, happy and edu-ma-cated all at once? Celebrate the end of a color mixing unit with a Color Mixing Cookie Party! My kindergarten through second grade have been immersed in all sorts of color theory. We've read books, watched videos, learned songs and, of course, painted. Today I thought I'd share with you a couple ways we've been studying color!
My kindergarten friends were introduced to color with the Ellen Stoll Walsh book Mouse Paint! I love this book for a coupla reasons: it's short, to the point and full of great visuals. After that quick read, we did a lil mouse drawing of our own!
In this video, I'll show you how to draw the three mice from the book. And how to mix those primaries into secondaries. I created the video in such a way that you could share it with your students so they could draw along with me.
When I do directed drawing with the kids, they sit on the floor with clipboards, oil pastels and 9" X 12" paper. Because the drawing is repetitive, it doesn't take long for the kids to finish their three mice.
From there, we review the colors mixed in the book. We talk about creating small puddles so that we can still see our cute mice. 
 Once these masterpieces are complete, the kids will paint on 12" X 18" pieces of paper, folded in quarters, all of the secondary colors. These papers will be used for a colorful self-portrait that I'll share with you soon...although, if you follow me here, you've already seen preview! 
These have been my favorite videos to share with the kids on color mixing and color theory. I love when the kids watch and sing along. These videos have been a fabulous addition to my art teacherin' repertoire! 
Being a big ole They Might Be Giants fan from way back, I love playing their tunes in my art room. 
And this series of videos on the Elements of Art have been great to share with the kids before start our sketching at the start of class. 
My students have been working on a behavior incentive where we can earn parties for good behavior. You can read more about that here if you wanna. Well, when they earned parties (and they all eventually will), I wanted to keep it fun and educational...so we had a Color Mixing Cookie Party to celebrate our awesomeness and the end of our color mixing unit.
Here's a lil video for y'all to walk you thru the supplies you'll need and just how easy this activity is.
I happened to have a million popsicle sticks so these worked perfectly as our icing mixers!
 So much deliciousness!

If you decide to do this, just a coupla reminders:

ALWAYS check with your school nurse for allergies! We don't want to chance any child getting sick.

Do this at the END of art class because these kids will be JACKED up on sugar. Thankfully for me, my kids go to P.E. after art...so they were able to burn off all that extra energy. 

And remind the kids how awesome the party is! I like to tell em, "if you thought THAT was fun, just wait until the next party you earn". Nothing like a good bribe for good behavior.

Have ya'll done this in your art room? What spin did you put on it? I'd love to hear details, ya'll! 
 photo signature_zpsd10b3273.png

Sunday, October 4, 2015

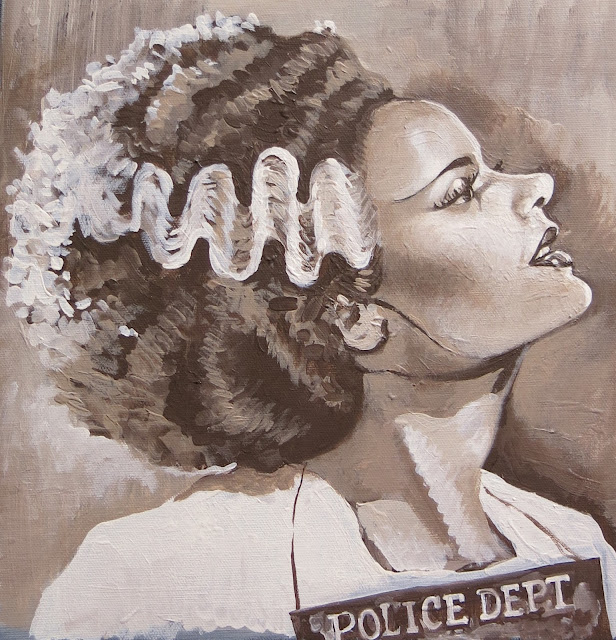
DIY: The Bride Gets Busted! Painting

Lately, I've had the itch to paint pieces to decorate the house. I'm kinda tired of looking at the same ole stuff that's been up for entirely too long. So with the change of the seasons, I thought it'd be fun to create a coupla Halloween-y works o' art. And, ya know, if I'm gonna paint a painting, I gotta redecorate the whole room to work around it, right?!
Right. 

I got the idea to paint mugshots of The Bride way back in August when I came across this amazing post of vintage lady mugshots. Tell me these aren't the most bad a$$ ladies you've ever seen. I've dreamt up stories for each and every one of them! I really wanted to paint my own set of mugshots after seeing these and decided that ones of The Bride would be perfect for Halloween. So, I dug out a canvas from The Hoarder Room (yes, this magical place of never ending chaos and thrifted goodness exists) that I'd painted black and texture-y years ago.
From there, I added two scratchily painted square shapes and started sketching in The Bride.
 I blocked these in all fast and furious like before heading off to bed. I have this habit of getting hung up on small details. So if I can block in an entire painting in one stage of work, it really helps loosen me up, let go and enjoy the process a whole lot more.
Can we just talk about how gorgeous Elsa Lanchester is for a moment? Holy Macaroni, y'all. Those eyes! That pout! That lil dent-in-thingie on her chin. Gorg.
I tried my very best to do her justice. I've never painted monochromatic portraits before so that was fun and interesting. I liked it because I didn't have to mess with skin tones and such. However, the computer image was tricky since it didn't have a huge variety of values to work from. So whenever I would start to get frustrated with her face, I'd work on her hair. Which was super fun!
Ah, lookie! It's a What the Art Teacher Wore on the Weekend: pj's. It's a rare occasion when I'm not in pj's on the weekend. Don't judge. 
There's some lil thingies that still bug me but, eh, she's done. And I'm pretty pleased.
And then there came the profile. UGH, y'all. That profile drove me bananaz!

Even at this stage, it still felt cartoon-y somehow. I stayed on the struggle bus for a while with this one. But I kinda blame the image I was working from.
It truly didn't offer me much value on the surface of her face because of the way the photo was lit. Everytime I painted her face, she just looked so flat. But, look at the photo, it looks flat!
I ultimately took a mirror and used myself as a model to at least capture some cheekbone-age. I just realized I never finished the neck! Oh my gosh, what's that black teardrop shape soul patch thingie hanging from her chin?! Too late now. Once it's on the wall, I won't take it down to fix nothing. I've got another painting on the easel now!
I wanted her mugshot clip board thing to have those slide-in letters that often look crooked and wonky. I thought that might add a bit of silliness to the piece.
And finished! If you like this lil piece, I added it to my Society6 shop! Then you too can rearrange your entire dining room to feature one painting, ha!
Lil known secret: the only reason I actually did clean and redecorate my dining room is because I hosted a lil Crafter-ween party on Friday! More details on that and what we made in an upcoming post. It's sad...but the only reason I'll clean is for company. I think that's why the hubs never argues when I say I'm hosting a Craft Night.
Oh, look, a sneak-peak of our craft night! We worked with Sculpey, one of my fave things ever. But, alas, I'm getting ahead of myself. More to come!
 photo signature_zpsd10b3273.png

Tuesday, September 29, 2015

DIY: Needle Felted Postcards

Hey there, buddies! I hope y'all are doing swimmingly. Here in lovely Tennessee, we're in that moody in-between summer/fall phase which makes is impossible to dress without being horribly under/over prepared. Don't believe me? Lemme paint y'all a visual: Today it was 80% rain/80% sunny/99.2% cloudy/chance of sweating your butt off in the sunshine/chance of freezing your butt off in the shade. It's no wonder my sinuses are causing brain swelling. Tho with a brain the size of mine, a lil swelling never hurt nuthin. There's plenty of real estate between these ears o' mine.

During one of those moody fall days this weekend, I had the wonderful, super-duper, uber-exciting opportunity to teach a workshop at Nashville's Frist Center for Visual Arts! 
That's right, this crazy art teacherin' lady got to teach adult-sized artists my fave craft: needle felting! Our creations were inspired by the Postcards of the Wiener Werstatte which translates to the Vienna Workshop. The Workshop began in the early 1900s and was a means of turning your life into a "total work of art" (sounds fab, right?). Meaning they sold everything you could ever desire as a lovely artistic creation so that your life simply permeated art. The best seller at the time? Postcards! And that's the basis of this incredible exhibit. 
My buddy Rosemary Brunton, associate educator for community engagement at the Frist, lead us through the exhibit, filling us in on the history and allowing us time to explore and sketch. When we returned to the studios, this incredible group of art teachers, fiber-arts lovers and workshop-junkies (you know who you are!) were busting with ideas for their needle felted postcards. 
That's right, we created needle felted postcards! AND mailed them (more on that shortly). We created these little 4" X 6" masterpieces to tiptoe into the fine art of needle felting. It allowed the participants to watch me give a short demo and explore the medium in anyway they wanted. It was a fun and quick-ish intro for the crew. If you wanna catch a snippet of what they learned, you can check out these videos I filmed a while back that will walk you through the needle felting basics and supplies. 
Supplies purchased from Amazon:

*  Clover needle felting tool
*  Replacement needles, fine
*  Roving, variety pack of colors
*  Cushion. I prefer the Clover brand bristle brush but you could use foam in a pinch
*  Fabric to needle felt on. YOU CAN NEEDLE FELT ON ANYTHING. Seriously. Jersey, acrylic felt, wool felt, wool, cashmere, you name it. Shoot, sometimes even your flesh but that's usually after a glass or three of wine. Which I don't recommend.
Stabby-stabby-stabby. It's seriously a stress reliever! 

Exploring on an inexpensive material like acrylic felt or muslin will allow you to really explore the medium without getting hung up on doing it "just right".
These participants did a fine job of really trying out their new craft. I love this spiral!

You can simply use roving in needle felting or you can combine it with yarn like the example on the right. I've only used wool yarn when needle felting but was told that even acrylic yarns would work.
 I love the three dimensional quality of this piece! 
 And this one! This and the one above were created by my art teacher buddies whom I've dubbed my Pensacola Friends! These lovely art teacherin' ladies drove all the way from Pensacola to attend the workshop. They were so sweet and fun, I loved having them! 
I can see this being a great exploration of the use of line and shape for older students. This piece is just so happy!
Once the postcards were complete, we wrote messages on card stock and hot glued them to the back. We popped them in the mail...but, sadly, Rosemary informed me today that they were returned to her. She was kind enough to stuff 'em all in envelopes and resend them. Lesson learned...but it was such a great idea, I thought! 
Once our practice pieces were complete, we moved on to a larger format work of art. Some participants sketched their design in chalk as I often do. I love using chalk on fabric as it "erases" pretty easily (just look at any sleeve of any sweater of mine!).
Others just dove right in with the roving like this van Gogh's Sunflowers-inspired piece.
 Did you know you can needle felt felt to felt? Did you know I can use the word felt in one sentence three times? How does that make you felt, er, feel? I love this piece...just wait til you see it complete!
 I loved everyone's unique ideas and hearing about their inspiration. We had such a happy group that loved to share ideas, thoughts, awkward youtube videos (what WAS that hand-held needle-felting tool/vibrator thing?!). 
 I love the graphic nature of this piece.
And my Pensacola Friends were all about the texture! I love the idea of "yarn painting" with needle felting. I never thought of that!

 Text-ure, baby! Love all the feels!
 Didn't I tell y'all it was amazing?!
 Did I mention that there were art teachers in the house?! This one needle felted pencils onto a pencil case that she hand embroidered. Oh! AND made that wet felted button. WHUUUUT?!
Alright, art history buffs, can you spot the artist-influence behind this tabby-cat piece? If you guessed Georges Rouault, you are correct! I love the stained glass quality of this piece.
 Look how painterly this piece turned out?! I love it!
Seriously. I could not have spent my Saturday with a more fun (funner!) bunch. Thank y'all for making my workshop such a blast to teach. And special thanks to Rosemary and the Frist for allowing me to do so! 
  photo signature_zpsd10b3273.png