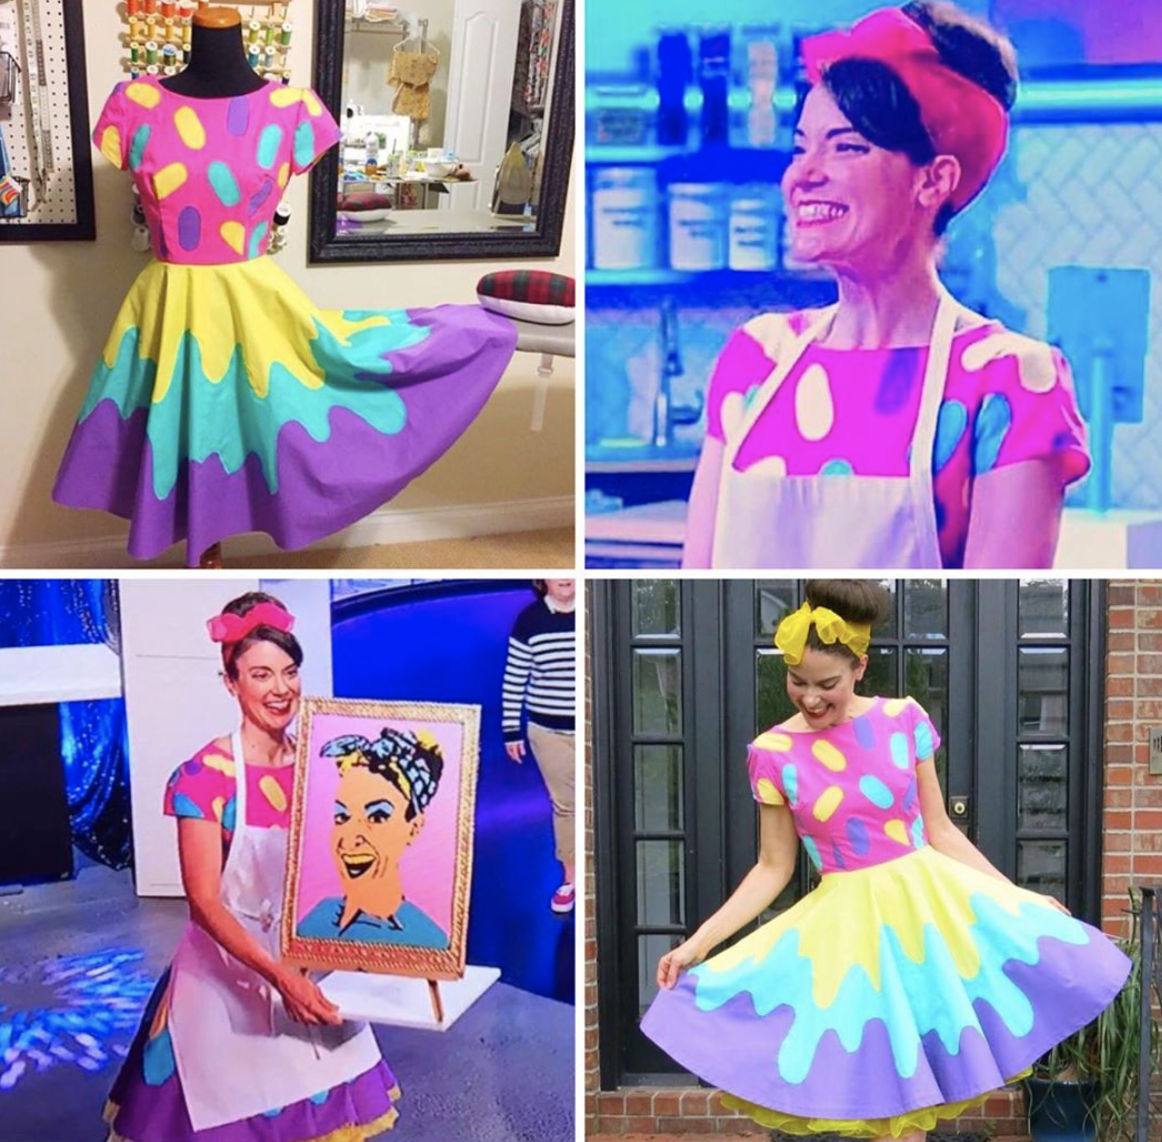
As many of you know by now, I was on an episode of the Netflix show called Nailed It! If you've missed the episode, it is Season 3, Episode 3: Masterpiece or Disasterpiece. Over a year ago, I was contacted by Netflix to audition...and after some serious thought, I decided to give it a shot. Here's a sneak peak from the show:
Since appearing on the show, I've gotten so many questions that range from what is the audition process like, would you do it again, did you practice baking before hand, what's Wes like in real life and so much more. I decided to take all of those questions and answer them in this podcast. Here's a little taste:
The show was a tremendous amount of fun but I won't spoil it here. Click on the link below to listen to the episode in it's entirety. And while you are at it, you might want to give the other episodes a listen too. Episode 1: Welcome to Art Teacherin' with Cassie Stephens
Y'all might recall this dress I made last summer...what I couldn't tell you then was that it was for the show! AND what I didn't know was that they were gonna make me wear an apron the whole time, covering my dress. Dress blog post and details (with video, of course) here.
The best fun with the best folks! I hope you enjoy watching the episode and listening to the behind the scenes details!
If you decide to do a workshop like this in your school or educational setting, please know that this was created by me and I would greatly appreciate acknowledgement. I'd also love to hear from you! My email address is cassieart75@gmail.com. Yesterday I released three new podcast episodes that I hope you'll take a listen to and enjoy. In this blog post, I want to focus on one of those episodes, Ep. 8: Discovering Your WHY. Before you listen to this podcast, I want you to know...it's what I'm gonna call a "working podcast". What I mean by that is I want you to carve a mere 20 minutes out of your day, grab some paper and markers, flair pens, crayons, whatever and sit down with me. And think. And dig a little deep. And create. Here's a little more info:
What we're going to cover are three questions. I'll walk you thru them a little bit here...but listening to the podcast is really going to take in all of what I have to share. Each of these questions only requires four responses. I would encourage you to unplug, settle back, and answer from your heart. Not how you think I want you to respond, now how you think your favorite teacher on IG would answer but YOU.
Me lookin' like a crazy person while presenting. I'm just a lil passionate, that's all.
I did this workshop recently in a two and a half hour session at Get Your Teach On. We spent a lot of time thinking and creating and walked out of that workshop with a strong sense of WHY we teach. Discovering this is empowering for you. It will give you a sense of purpose on those days when you need it the most. Not to mention sharing your WHY with your students allows them to know the importance you place on spending your days with them. They will learn their value in your classroom.
I'm going to be sharing a portion of my workshop in this blog post. I won't be sharing my responses to the questions with you here but you can hear them in my podcast. FINAL THOUGHT: I would love (and share!) to see your responses and creations! Feel free to email me or, if you post to Instagram, tag me in your stories or posts. In doing so, I'll assume you are okay with me sharing your creations here or on my Instagram. Okay! Let's get started!
You can answer this question any way you like, whether that be literally or figuratively. All I want are four little words. Don't over think this. Your knee-jerk answer is what we're lookin' for.
Again, same thing. There is no right or wrong answer, just YOUR answer. What YOU want your students to spend time with you doing. What's important to YOU as their teacher.
You got it? You got your four responses to the three questions? Great. Now let's prioritize those lists with some colorful pie charts. This is where all of those random art supplies you gathered up are going to come in handy. Look at your responses to the question of what do you want your students to LEARN. My kids have 30 minute art classes. It's impossible to pack in everything that I wish. So discovering my Top Four and prioritizing them really helped me. I'm hoping it will do the same for you. Here are the pie charts I created.
You'll notice that sometimes I answered my questions literally and, other times, figuratively. I also decided to make mine colorful because I wanted to make them attractive enough to hang in my art room.
Developing these pie charts really got my wheels turning about my WHY.
And I hope it does the same for you.
I'm going to end the blog post here and hope that you'll take a listen to the podcast. I feel that I have so much more to say on this topic...so I'm going to say that this one "will be continued...". Until then, I'd love to share with you a my WHY along with that of many other teachers. You can take a look and, hopefully be inspired, right here.
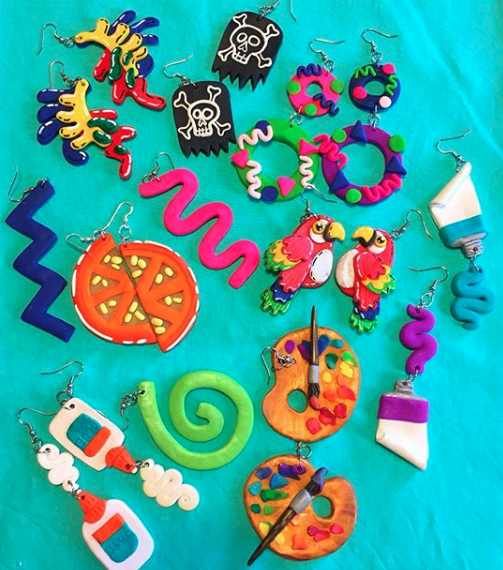
What lengths will you go to in order to avoid unpleasantries? Me, I go to great lengths to dodge sewing. The thing is, I get myself into this sewing pickle every single time. It always starts with the super cute fabric. Currently, I'm in to BIG AND BOLD prints that I usually score at IKEA. Case in point: that bold orange print you see in the background there. I'm currently working on sewing it into a dress but I'm closing in on zipper and hem time and I REALLY don't like zipper and hem time. So, I made earrings to go with my yet to be complete dress!
Polymer clay (I like to use the brand Sculpey) is a clay that comes in a variety of colors and you bake in the oven to harden. I used it a lot in this book. When I wrote that book, I really wanted to include that kind of clay because my students and I love it so much. I keep a stash at home for when I want to work with it because it's so stinkin' fun.
If you are new to polymer clay land, I thought I'd make a little video to walk you through how I made these earrings. Really the only supplies you'll need are the clay, some jump rings, French hook earrings and jewelry tools.
When making polymer clay earrings, just a couple things to remember:
* Polymer clay is self-adhesive. Meaning you don't have to use glue to get the pieces to stick together. Just press and go! * Keep them light! You wouldn't think these would make for heavy earrings but they can if you aren't careful. In fact, the palette ones below, while my fave, are the most heavy and can only be worn for a short while. * Don't put the hole too close to the edge of the design. I learned this the hard way. If you make it too close, the clay just might break when you are sliding the jump rings in. * Don't make the clay too thin. Okay, it's a balance...light enough to be wearable, but not so thin that they break when adding the earrings. * Allow the clay to cool completely. I have noticed that when I take the clay out of the toaster oven, it tends to still be a little bendy. It will harden as it cools. * Bake at a lower temp than suggested if using a toaster oven. I like to use a toaster oven because they heat up faster and require less energy than my oven. That being said, they do tend to bake stuff a lot hotter...and I've burnt my share of polymer creations because of it. For that reason, I'd say bake at 200 for about 5-7 minutes.
My little stash of polymer clay earrings.
I also dig using paint pens on them when they come out of the oven...although I have noticed that the paint does tend to rub off over time.
Hey, friends! Last week, I shared with you the Pirate Gallery, which was one of the three galleries where my student's work was featured at our school wide art show. Today I'm sharing with you our Glow Gallery, the HIT of our art show. Each student had at least one work of art on display with my kindergarten friends having THREE works of art featured. Whew! Here is one side of the gallery with the lights off and the black lights on.
And here it is with the lights on. Still just as beautiful, says me! I thought I'd take you on a tour of this gallery, complete with lights we used, projects each grade level did and supplies that work the best for black light. So, let's go!
I LOVE going through art shows, don't you?! So much happiness and color, baby, color!
Full disclosure: This is a spare classroom. I had the luxury of having an entire room to dedicate to the gallery. I spent one entire day with the help of a parent covering the window and setting up the displays. The artwork was simply hot glued to the wall. The best way to do that without damaging the artwork or the walls is to add a flat bit of masking tape to each corner of the artwork on the back. Then add a small dot of hot glue to the tape and stick to the wall. When taking the art down, simply give the work a gentle tug and it will pop right off the wall.
My kindergarteners created three pieces of art for this gallery. The first were these clay slab fish. You can find this lesson here and in my clay book!
They also made these fun snails from cardboard pizza rounds. They started by painting a spiral with a bingo dauber. Then they added color with fluorescent oil pastels and fluorescent paint (details on supplies in a moment). From there, they were attached to a paper towel tube and antennae were added. So cute! More details on this lesson soon, I hope!
Some of my third graders made these amazing plaster and paper parrots! I think they are one of my favorite projects from the show.
Another lesson which I hope to share with you soon...the kids loved making them!
And they were so striking in the black light.
But also great with the lights on.
Let's talk supplies for a minute because it's important you use the right stuff. * Sargent Brand Fluorescent Oil Pastels * Jack Richeson Fluorescent Tempera Cakes * Fluorescent Liquid Watercolor (optional) * Fluorescent Tempera Paint (optional) The last two we didn't use...we just stuck with the oil pastels and tempera cakes. But I will be getting the other paints for next year. In a pinch, when time was running short, we did use fluorescent poster board and bingo daubers for some of the drawings. We did this because I only had one 30 minute art class with the kids before the big day...so we worked with the time we had. I wanted to insure that every kiddo had a work of art in this special room.
On the night of the art show, we did have a couple of teachers at the door to act as Black Light Bouncers as I knew this room would be busy. I didn't want a crowded room to ruin the experience for the kids or have any artwork potentially be damaged. We did have some glow face painting happening which was also fun for the kids. More details on all of the crazy things we had happening at our art show in a future post.
Let me walk you thru who made what! By the way, each of these 2D works of art took only an hour (or two 30 minute art classes for me) to complete. Some first graders created the octopus (by following along with here) while some of my first graders drew the crab...a guided drawing lesson of mine. I'll be sure to share that with you too. I have a lot of sharing to do! Some second graders created the GIANT angel fish by following here while others created the octopus on the neon paper due to time limitations.
Now, let's talk lighting because that is the true key. It's the reason I avoided doing a gallery like this for so long because I just didn't have a clue what lighting to get. We ended up purchasing three kinds and I'll tell you, this one was easily my fave. Starting out, one is all you need IF you block out all the light in the room, making it completely black.
We left the gallery up for several days because my admin loved it so much, she called in nearly everyone in the district to drop by and see it. Even with the lights on, it was stunning.
Have you done a black light gallery before? What tips do you have? This was my first so I'm sure I have A LOT to learn. I would love to hear from you!
Super excited to start our black light gallery projects next year...even if it's MAY and I'm on summer break, ha!
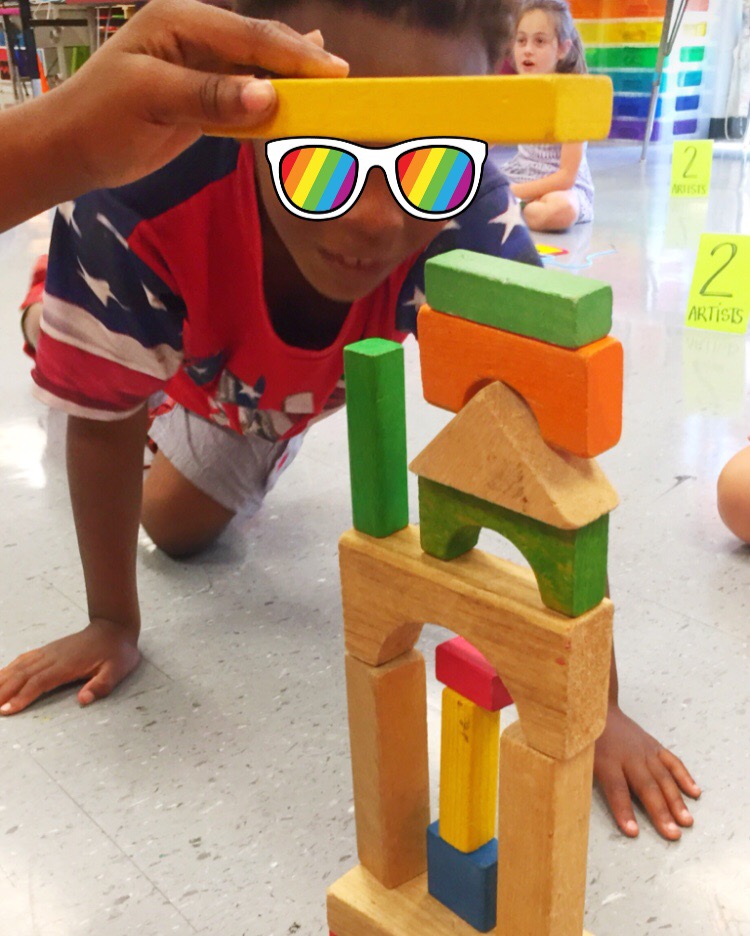
Real talk for a minute here: the last days of school are INSANE. With schedule changes, field days, assemblies, field trips, art shows, awards days and all the rest, there is lil teachin'/learnin' taking place. The kids are hot, tired and ready to go and the teachers are right there, ready to hold the door open for them as they run off into the sunset of summer. So, instead of fighting that Last Days of School beast, why not embrace it? Ditch the tables and chairs, pull out the blocks, games, drawing books and more, crank up the Alvin and the Chipmunks album (it's what we've been rockin' out to) and HAVE FUN. Here's how I set it up in my art room:
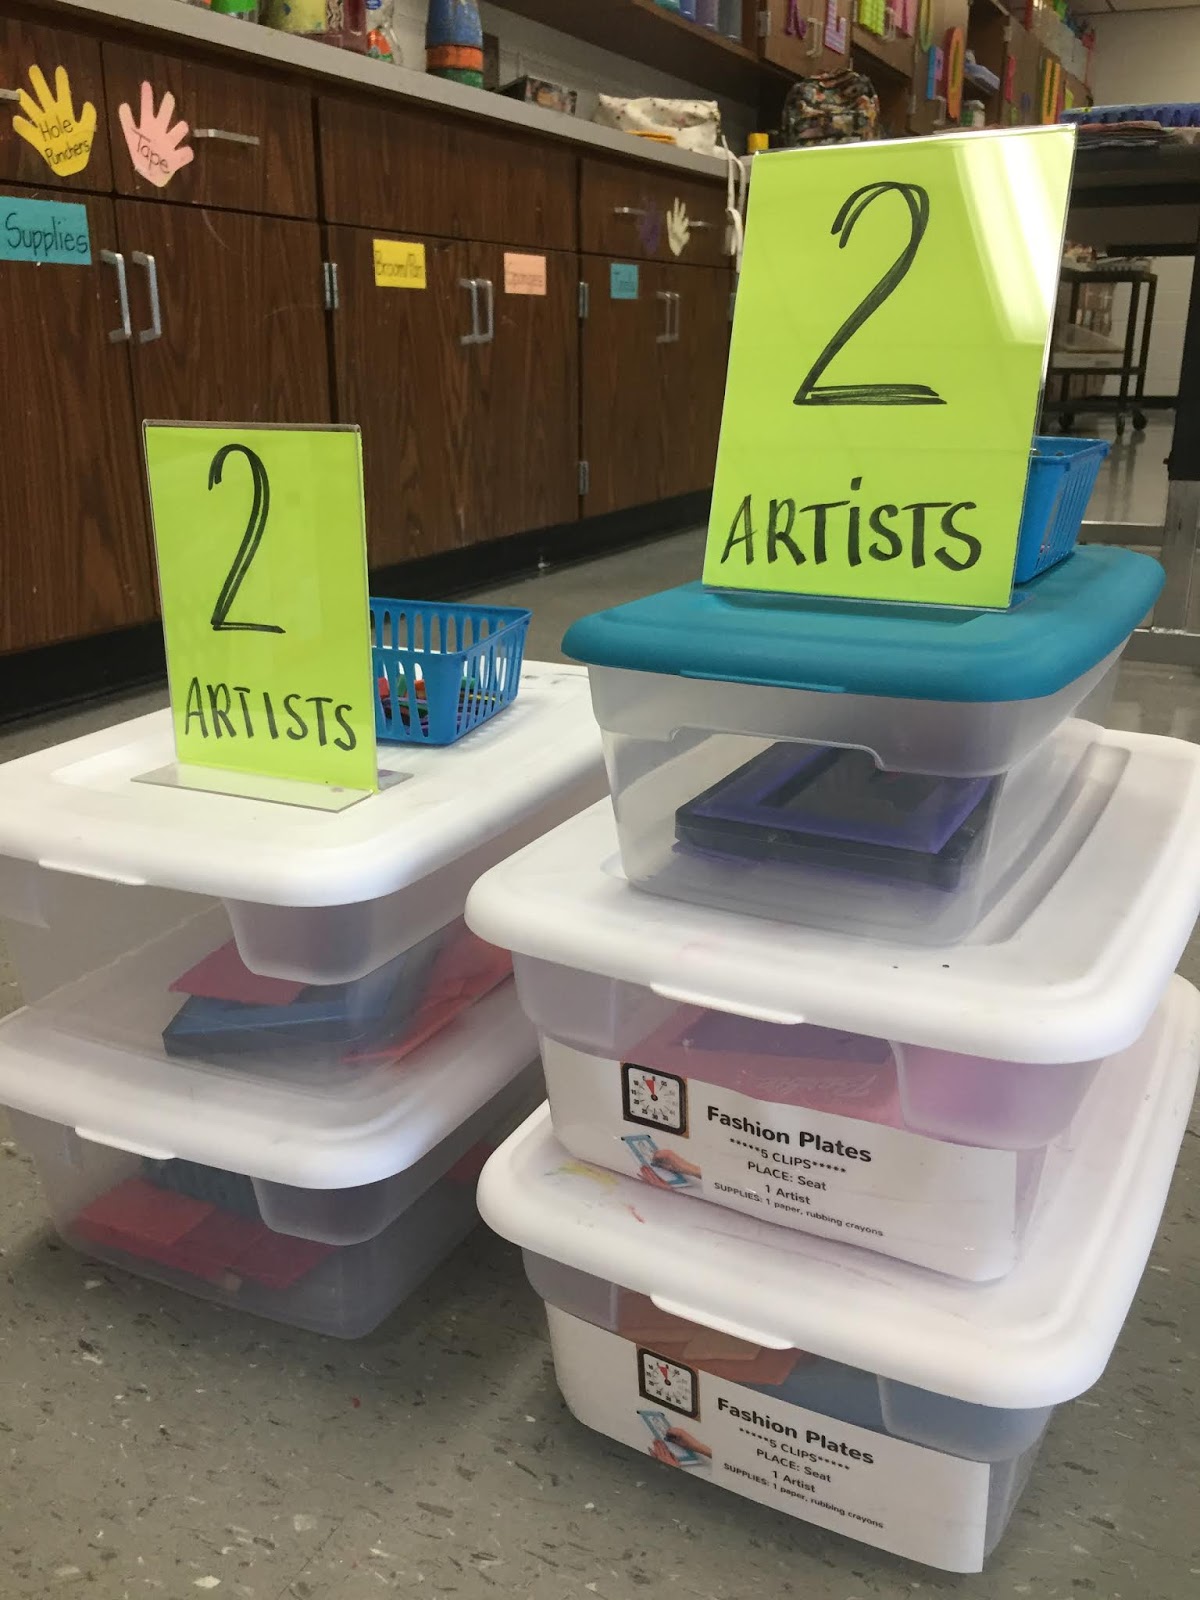
I started by pulling out all of my Early Finish centers. I've accumulated a TON of items for my early finish centers over the years...but the big hits are always the following: blocks (with dinosaurs!), Fashion Plates, spirographs, stitching cards, origami and my how to draw books and drawing prompts. If you click on this link, I'll walk you thru those centers.
A couple years ago, I created a little video explaining this end of the year set up, which you can watch right here:
In the past, I relied on the kids to read the small labels on the bins to know how many young artists could work at a center. Those little labels are hard to read...and not all the bins are labeled. I used these plastic picture frames from the Dollar Tree for our Field Day activities that worked so well, I decided to use them again here:
I loved fashion plates as a kid and my students use the set that I once had! I also have a couple more sets that have been gifted or found at the thrift store. Amazon sells a great Super Hero rubbing set that has both boy and girl super hero characters for the kids to create.
When I picked up a set of Spirographs from the Dollar Tree last year, I wasn't sure how great they'd be...or how well my younger students like first grade would work with them. But check out that amazing design by a firstie! I usually have to give a hand over hand tutorial for the kids because there is a learning curve. I also allow them to use mechanical pencils as they are the only ones with lead that is long and lean enough to fit into the holes of the wheel.
In this blog post, I share with you how I set up my drawing books for early finishers. I got so tired of the kids just randomly placing the books where ever...so I spray painted the binding of each book to make it easier for them to clean up. Also...I limit them to one paper per artist.
If you are a new teacher with few centers, just know that I don't have a ton either. To be honest, with 30 minute art classes, it's a RARE occasion that my students are able to visit these centers. That's why I love having them available these last days of school. It's fun for me to see what they gravitate toward...and gives me ideas for the new school year. If you have limited resources, keep in mind that the following are free and/or cheap: * Origami printouts! * How to Draw printouts! * Blocks borrowed from a kindergarten classroom! * Random objects around the art room for observation drawing! * Pictionary! You don't even have to have the game. Just a dry erase board and a group of kids that can come up with an idea of what to draw on their own as the kids attempt to guess.
My favorite places to find early finisher/end of school year activities are Target Dollar Spot (where these stitching cards are from), the thrift store, yard sales, end-of-the-year email to teachers asking them to send old games/toys your way and the Dollar Tree.
When my older students came in, I busted out the dry erase boards and my Pictionary game. I found it at the thrift store and, really, all you need are the cards with the drawing prompts. We sat in a circle of kids (the ones who opted to play) and had a great time playing. One of my favorite things about these days is that I join the kids on the floor! I chat with them, play games and build.
I do tell the kids that after 10 minutes of exploring, they will be given the opportunity to change centers. They can either opt to stay or go, AFTER they've tidied their spot. During clean up, I simply ask that they tidy which ever spot they were working at and then stand silently beside their area. To encourage a quick, calm and quiet clean up, I silently walk around and just place a couple of stickers on the kiddos who rocked their clean up. I learned this trick from my P.E. teacher buddy. She doesn't announce that she's giving stickers, she just places them on the kids who are on task. She only gave out a few and if the kids asked for a sticker, they didn't get one. It worked SO WELL in her gym that I had to try it on the last day in art...it was MAGIC.
Do y'all do something similar on your last days of art? I'd love to know what you and your kiddos are up to!