Showing posts with label glow gallery. Show all posts

Tuesday, April 19, 2022

Let's Make a Black Light Disco Ball!

Our school-wide art show is coming up and our theme is 1980's! And, I know what you're thinking: aren't disco balls more of a 1970's thing? Well, I suppose although I do remember them in the skating rinks growing up and loving them. So I thought my fourth graders would enjoy creating them as their contribution to our Glow Gallery! 

The supplies we used are the following:
* Cardboard pizza circle, found at restaurant supply stores
* Permanent markers
* Silver paint
* Neon tempera cakes

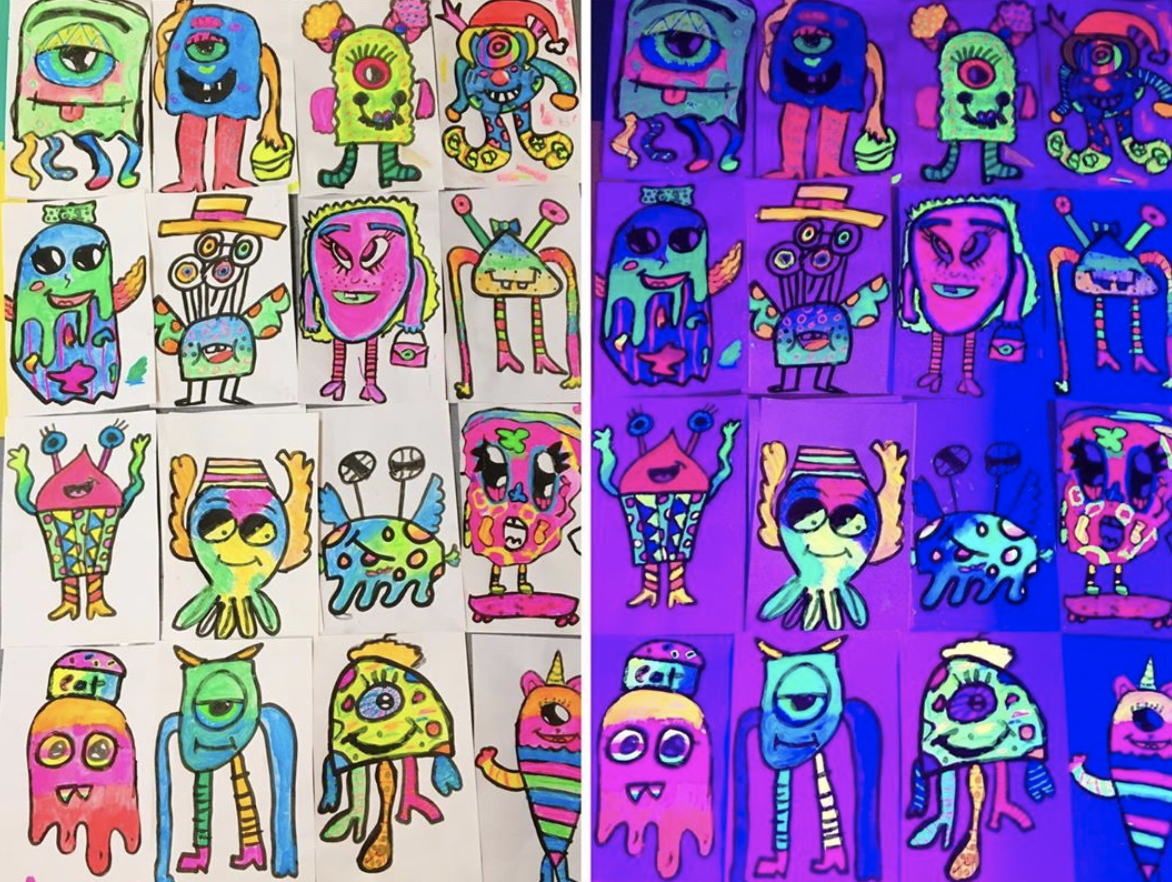
This is a quick lesson, perfect for my 30 minute art classes. We spent the first class drawing and tracing with a sharpie with just a few who started painting. Next time, we'll wrap these up and hang them from the ceiling in the glow gallery. Here's the video you are welcome to use in your art teacherin' world:


photo signature_zpsd10b3273.png
Read more »

Thursday, May 21, 2020

Let's Make Black Light Clay!

Bet you didn't even know you could make clay that glows under black light! Let me show you how to make Salt Dough Clay with my simple three-ingredient recipe...and then how to make it glow! I'll also share how to create a deep sea scene. You'll need the following:

1/4 cup of water
1/4 cups of salt
1/2 cup of flour
Prang Fluorscent Paint
Cardboard
Crayons

Let's create!

 photo signature_zpsd10b3273.png
Read more »

Saturday, May 16, 2020

Let's Draw a Crab and Make Black Light Bubble Prints!

During Under the Sea week, I got a lot of requests for how to draw other sea creatures. So in this video, I'll show you how to draw a crab and his whole family! I'll also be sharing with you how to do bubble prints...that glow under black light! Bubble printing can be done with just water, dishsoap, food coloring and a straw. But if you want the bubbles to glow, you'll have to give fluorescent paint a try. Here we go:
Have fun!
 photo signature_zpsd10b3273.png
Read more »

Thursday, April 30, 2020

Let it Glow: Monsters in the City!

A lesson that I was sharing a lot of images from on my Instagram got a whole lot of love and questions this year and that was this Monsters in the City project! After learning about the artist Kudu-Lah, my students began by designing their cities and creating a series of monsters. I thought I'd share some images from our project but also create a video to walk you and your students through. Because these works of art were going to be apart of our Glow Gallery, I'll be sharing my favorite glow products from Pacon. With my students, we used 24"X36" sheets of paper for the cities and 12"X18" paper for the monsters. I'll be working half that size for the video. And my paper of choice is Pacon's Mixed Media paper. Here you go:
If you are doing this at home, try using a permanent marker to draw your cities and monsters with. Then add color with crayons, markers, colored pencils or paint! 
 In my thirty-minute art classes, my fourth graders spent two days drawing their cityscapes. 
The following day we used fluorescent oil pastels and watercolor for the sky. 
Then we created TONS of monsters! I had them make as many as they could to really loosen them up. I love the variety they achieved! 
 We used our fluorescent paint to make them glow!
Then we cut them out to add to our cities! We used a little bit of foam and cardboard glued to the back of the monsters to make them pop up from our cities. For a sneak peak of last year's glow gallery, check this out:

 photo signature_zpsd10b3273.png
Read more »

Thursday, May 30, 2019

2019 Art Show: Glow Gallery!

Hey, friends! Last week, I shared with you the Pirate Gallery, which was one of the three galleries where my student's work was featured at our school wide art show. Today I'm sharing with you our Glow Gallery, the HIT of our art show. Each student had at least one work of art on display with my kindergarten friends having THREE works of art featured. Whew! Here is one side of the gallery with the lights off and the black lights on.
 And here it is with the lights on. Still just as beautiful, says me! I thought I'd take you on a tour of this gallery, complete with lights we used, projects each grade level did and supplies that work the best for black light. So, let's go!
I LOVE going through art shows, don't you?! So much happiness and color, baby, color!
 Full disclosure: This is a spare classroom. I had the luxury of having an entire room to dedicate to the gallery. I spent one entire day with the help of a parent covering the window and setting up the displays. The artwork was simply hot glued to the wall. The best way to do that without damaging the artwork or the walls is to add a flat bit of masking tape to each corner of the artwork on the back. Then add a small dot of hot glue to the tape and stick to the wall. When taking the art down, simply give the work a gentle tug and it will pop right off the wall. 
 My kindergarteners created three pieces of art for this gallery. The first were these clay slab fish. You can find this lesson here and in my clay book
They also made these fun snails from cardboard pizza rounds. They started by painting a spiral with a bingo dauber. Then they added color with fluorescent oil pastels and fluorescent paint (details on supplies in a moment). From there, they were attached to a paper towel tube and antennae were added. So cute! More details on this lesson soon, I hope!
 Some of my third graders made these amazing plaster and paper parrots! I think they are one of my favorite projects from the show.
 Another lesson which I hope to share with you soon...the kids loved making them!
 And they were so striking in the black light. 
But also great with the lights on.
Let's talk supplies for a minute because it's important you use the right stuff. 

* Sargent Brand Fluorescent Oil Pastels
* Jack Richeson Fluorescent Tempera Cakes
* Fluorescent Liquid Watercolor (optional)
* Fluorescent Tempera Paint (optional)

The last two we didn't use...we just stuck with the oil pastels and tempera cakes. But I will be getting the other paints for next year.

In a pinch, when time was running short, we did use fluorescent poster board and bingo daubers for some of the drawings. We did this because I only had one 30 minute art class with the kids before the big day...so we worked with the time we had. I wanted to insure that every kiddo had a work of art in this special room.
On the night of the art show, we did have a couple of teachers at the door to act as Black Light Bouncers as I knew this room would be busy. I didn't want a crowded room to ruin the experience for the kids or have any artwork potentially be damaged. We did have some glow face painting happening which was also fun for the kids. More details on all of the crazy things we had happening at our art show in a future post.
 Let me walk you thru who made what! By the way, each of these 2D works of art took only an hour (or two 30 minute art classes for me) to complete. 

Some first graders created the octopus (by following along with here) while some of my first graders drew the crab...a guided drawing lesson of mine. I'll be sure to share that with you too. I have a lot of sharing to do! 

Some second graders created the GIANT angel fish by following here while others created the octopus on the neon paper due to time limitations. 
My third graders made the sea turtles and my fourth graders made the sea horses.
 Now, let's talk lighting because that is the true key. It's the reason I avoided doing a gallery like this for so long because I just didn't have a clue what lighting to get. We ended up purchasing three kinds and I'll tell you, this one was easily my fave. Starting out, one is all you need IF you block out all the light in the room, making it completely black. 
We left the gallery up for several days because my admin loved it so much, she called in nearly everyone in the district to drop by and see it. Even with the lights on, it was stunning.
Have you done a black light gallery before? What tips do you have? This was my first so I'm sure I have A LOT to learn. I would love to hear from you!
 Super excited to start our black light gallery projects next year...even if it's MAY and I'm on summer break, ha!
 photo signature_zpsd10b3273.png
Read more »