I'll never forget my first year teaching. It was: wonderful, traumatizing, exciting, nerve-wracking and, most of all, a HUGE learning curve! I'll never forget seeing "weaving" in my first grade curriculum and breaking into a sweat. I'd gotten a C in fibers in college (which is so funny as fibers are my favorite thing!) BECAUSE OF MY WEAVING! When warping that big ole loom, I missed a couple of warps. Instead of going back and fixing my mistake, I thought, "eh, that professor will never notice." Little did I know that it'd leave a huge run all the way down the length of my weaving that seemed to scream, "THIS SLACKER DESERVES A C!" And a C I got. I remember introducing weaving to my first graders that year and a boy named Jonathan shouted out, "Weaving's for GIRLS and I ain't doing it!" It was then that I realized I had to make weaving (and teaching in general) fun, silly, wacky and engaging. For all my learners, boys and girls. The thing is, he turned out to be my best weaving and biggest fan of the medium. As most boys do! Introducing kids to weaving is something that I've been doing now for 18 years...and this lesson hasn't changed all that much. I read the same book, show them how to make a loom on the first day and we weave on the next. I know so many teachers struggle with weaving. The key is, introducing them to weaving with a simple paper weaving. Once they understand the concept, they'll take off like a weavin' rocket ship. I thought I'd record my two thirty minute classes. Here's what we did on the very first day: creating our looms!
Here are some must-have visuals that I always use: thrift store weavings and looms; my GIANT paper loom made from laminated paper; my Goat in the Rug book.
I also love having the roving for the kids to see and touch. Normally, I'll pass it around but I had forgotten to check with the nurse for allergies so I held off on this day.
This here is my FAVORITE book on weaving and the kids absolutely love it! After we create our looms, we sign them and await the following day's weaving adventure:
If you'd like more info on paper weaving, you might enjoy this video. It will explain the process more:
Here's how we went about cutting our looms and how I explained it...
I'll keep you posted on just what we are doing with our weavings...I'm really excited and cannot wait to share. I have a TON of weaving projects both on my YouTube channel (just search my Fibers playlist) and right here on my blog. Happy Weaving!
In case latch hooking a mini rug and sewing it to the back of a jean jacket wasn't the first clue...I have cabin fever! I'm currently on my SEVENTH day off in a row after we got some snowy weather here in the South. Y'all know, we Southern Lilies cannot handle that white powdery stuff and it just shuts our town down. I've been knitting, needle felting, and latch hooking since. It's been GLORIOUS...but with this DIY, I'm starting to question my sanity.
When bad weather is predicted in these here parts, everyone makes a mad dash to the grocery store. I happened to pop in to get my staples (cat food and a bottle of wine. Pretty sure nothing says pathetic more than that!) when I was practically run down by carts filled with Wonder Bread and gallons of milk. What EXACTLY does one do with that much bread and milk? Are milk sammies a thing?
Me, when bad weather hits, I skip the grocery and head to the craft store. My provisions are CRAFTS!! I know I'm gonna need something to occupy my hands. So I hit the craft store with the idea of knitting a rainbow scarf rolling around in my head. After piling my cart full of Roy G. Biv yarn-i-ness, I turned a corner and spotted a whole aisle of these: LATCH HOOK KITS!
I grew up in the best era: the 80's. Crafting was all the rage and I was a huge fan. One of my faves? Latch hooking. I can still remember sitting on my babysitter's couch, latch hooking a mushroom in all those horrible 80's browns and greens while watching MTV. I remember they played that video for Madness' Our House about 20 times a day. I can still see it in my head!
Even my parents caught the latch hook rug and made a huge red rug with a bright orange running tiger across it. It sat in between their dresser and their waterbed (omg! Why was that a thing?!) for years.
I never did finish my mushroom rug but I managed to complete this guy in just a couple nights. I had EVERY intention of taking this to school, showing the kids how to do it and adding it to my early finishers fibers area...but when I got the call for another snow day, I couldn't stop myself! When I bought it, I thought it would be fun to hang in the art room as a reference for TEXTURE (and I still plan to do that!)...but, in all my cabin fever wisdom, I decided to add it to the back of a jacket instead.
The final design, only being 8" square, was not as big as I would have liked to fill the back panel of the coat. So I added 8 additional rows: two turquoise and two indigo, both at the top and the bottom. This filled the space completely. I did have to cut the yarn to that certain size to hook which was a slight drag...but not that bad.
From there, I just used a super sharp needle and some super strong thread and stitched it to the back of the jacket. Easy! Right after this photo, Asha the cat came over and planted herself right here. IT'S A COAT, KITTY! NOT A RUG! NOW MOVE, I GOTTA VACCUM IT!
Alright, be honest: is this crazy or what?!
Not gonna lie, it's warm and certainly easy on the back when I sit down. Kinda like giving a panda a piggy back ride.
Pretty sure I'm gonna be getting a lot of back rubs from the kids for this one!
Now, don't judge...I already have designs on hooking a Mona Lisa coat! Okay...time for me to leave the house. Fresh air and human contact might do me some good.
I hope all y'all had a wonderful holiday! Ours was super low-key and relaxing. I've been taking time to catch up on projects for the art room...just this week alone, I've managed to start three new projects (and finish zero...no surprise there). While working on my latest project, I decided to film the process and share it with you cuz I'm super stoked: Seat Sacks!
Heaven on Earth, aka the Dollar Tree, had seat sacks or over the chair storage in their education isle recently and I was so stoked. Currently, when my kiddos finish early and only have a few minutes to spare, they LOVE to go and get a dry erase board. However, I don't love the extra milling around the room when it's so close to clean up. However-however, I never wanna see a kid just SITTING in their seat, even if for a few moments, not creating something, anything. So when I saw these seat sacks, I thought they'd be the perfect solution: I could store dry erase boards in there (or, dry erase board SLEEVES with drawing sheets, YES!! More on those in a moment) and that would prevent extra movin' and confusion during cleanup.
Now, as you might know, I'm currently on an art room redo bender and I'm color coordinating EVERYTHING. So, while I was excited about these seat sacks, I was disappointed that the above were my only color options. By the way, you can purchase these in bulk here, if they are not available at your local Dollar Tree. So I went on a quest to find another source for the sacks. Y'all. These guys are COSTLY! Then I got the bright idea to SPRAY PAINT the sacks...so I bought one as a test and, um, no. That did not work. Not. At. All.
The one that was sadly spray painted then became my pattern. I looked at the seat sack closely and realized it's a super simple pattern that requires very few supplies. Here's what I used: * 2 yards of ripstop fabric. Really, 1.5 yards would have been plenty. I chose that kind of nylon fabric because I thought it would be easier to wipe down. * 4 packages of bias tape. I am doing 4 sacks per table and this proved to be the right amount of tape. * Elastic. I used the wider kind. Here are the directions:
Like I said in the video, I did this in assembly line fashion so as to get it done faster. I started by cutting everything out and then set to stitching all the red ones first, then the orange...this way I didn't have to keep changing out my thread and bobbin.
I noticed online that there are a lot of other seat sack tutorials...so be sure to check out your options if you do this. I just went the route I thought was easiest. I don't plan to put anything heavy in these so I'm hoping that they'll be solid enough.
In case you need those measurements again...
I don't know if you noticed in the first photo but you'll see the kind of chairs that I have. These seat sacks fit them perfectly. If you decide to make these, you'll def wanna be certain it will work for your chairs!
Of course I had to add a label! I got these labels made a while back from Dutch Label Shop. It says Art Will Rock You. This is the back
And this is the front! I'll keep you posted on how these work out in my art room. They'll either be a hit or a miss...there never seems to be gray area in my art room!
Do y'all use seat sacks? How so? Love to hear more!
My little assembly line of pocket making. Wish me luck!
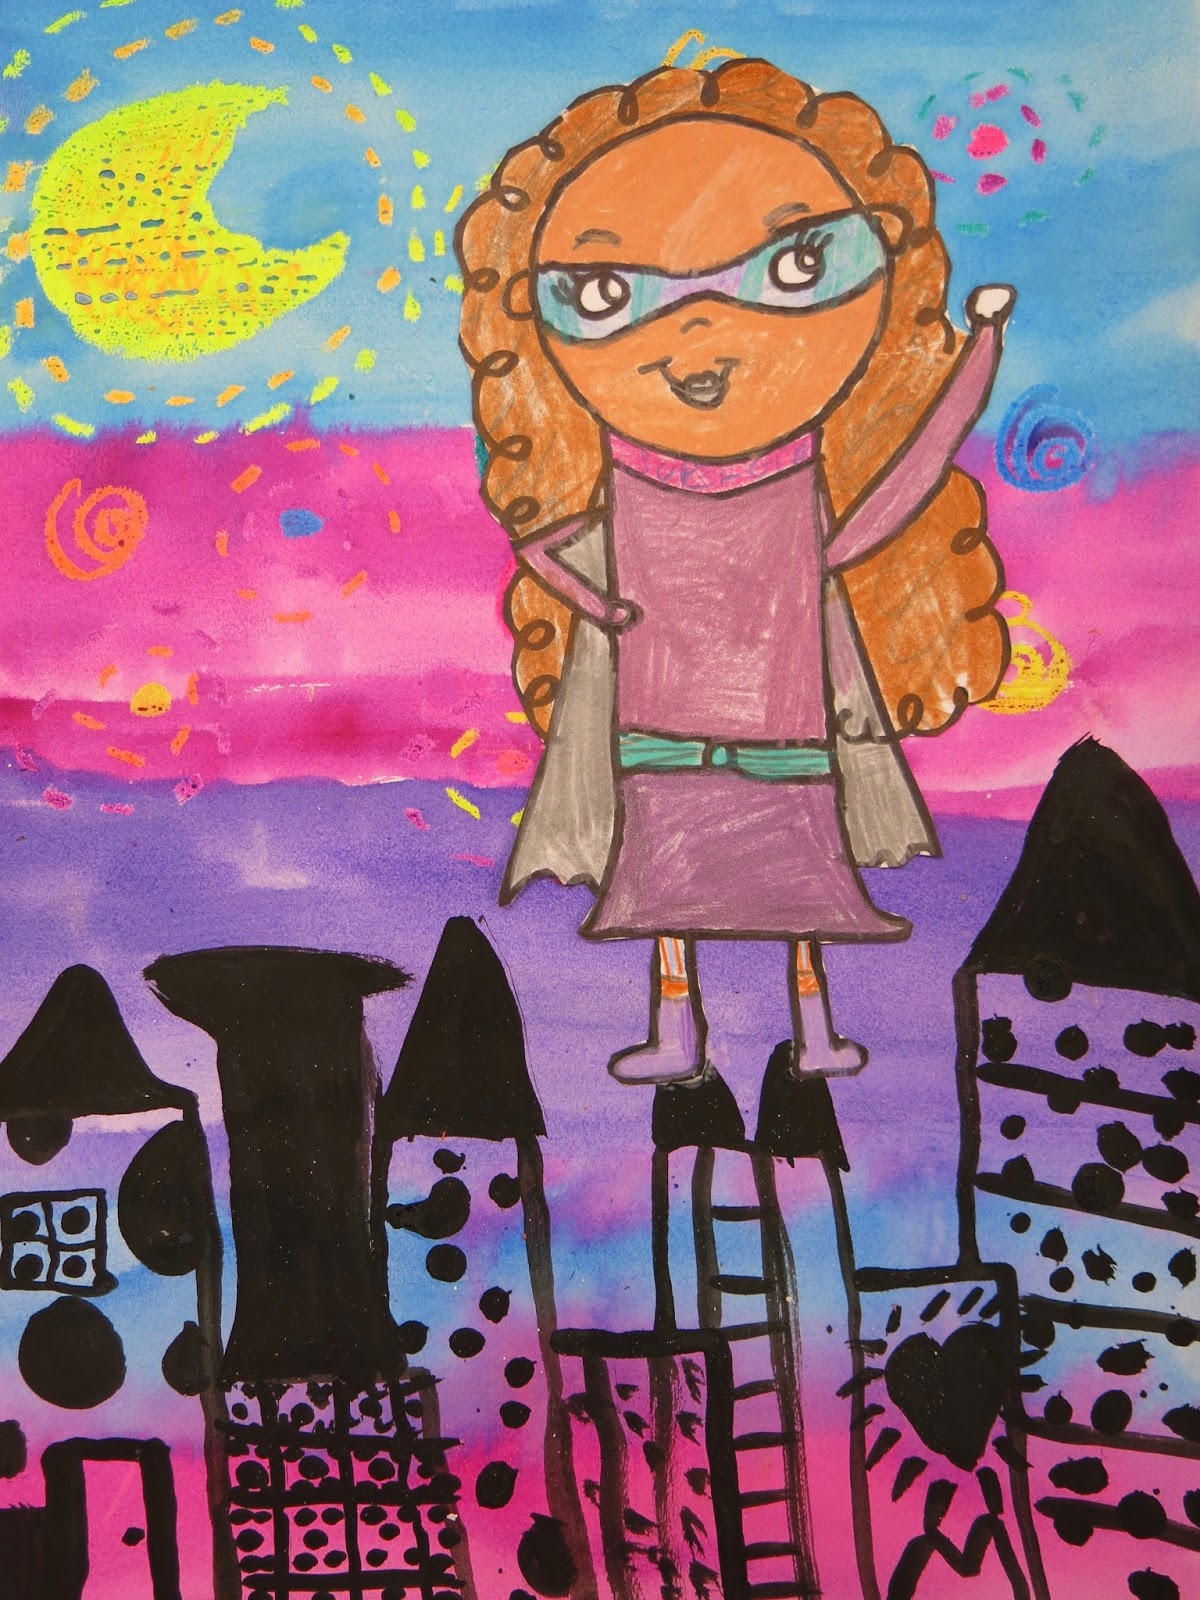
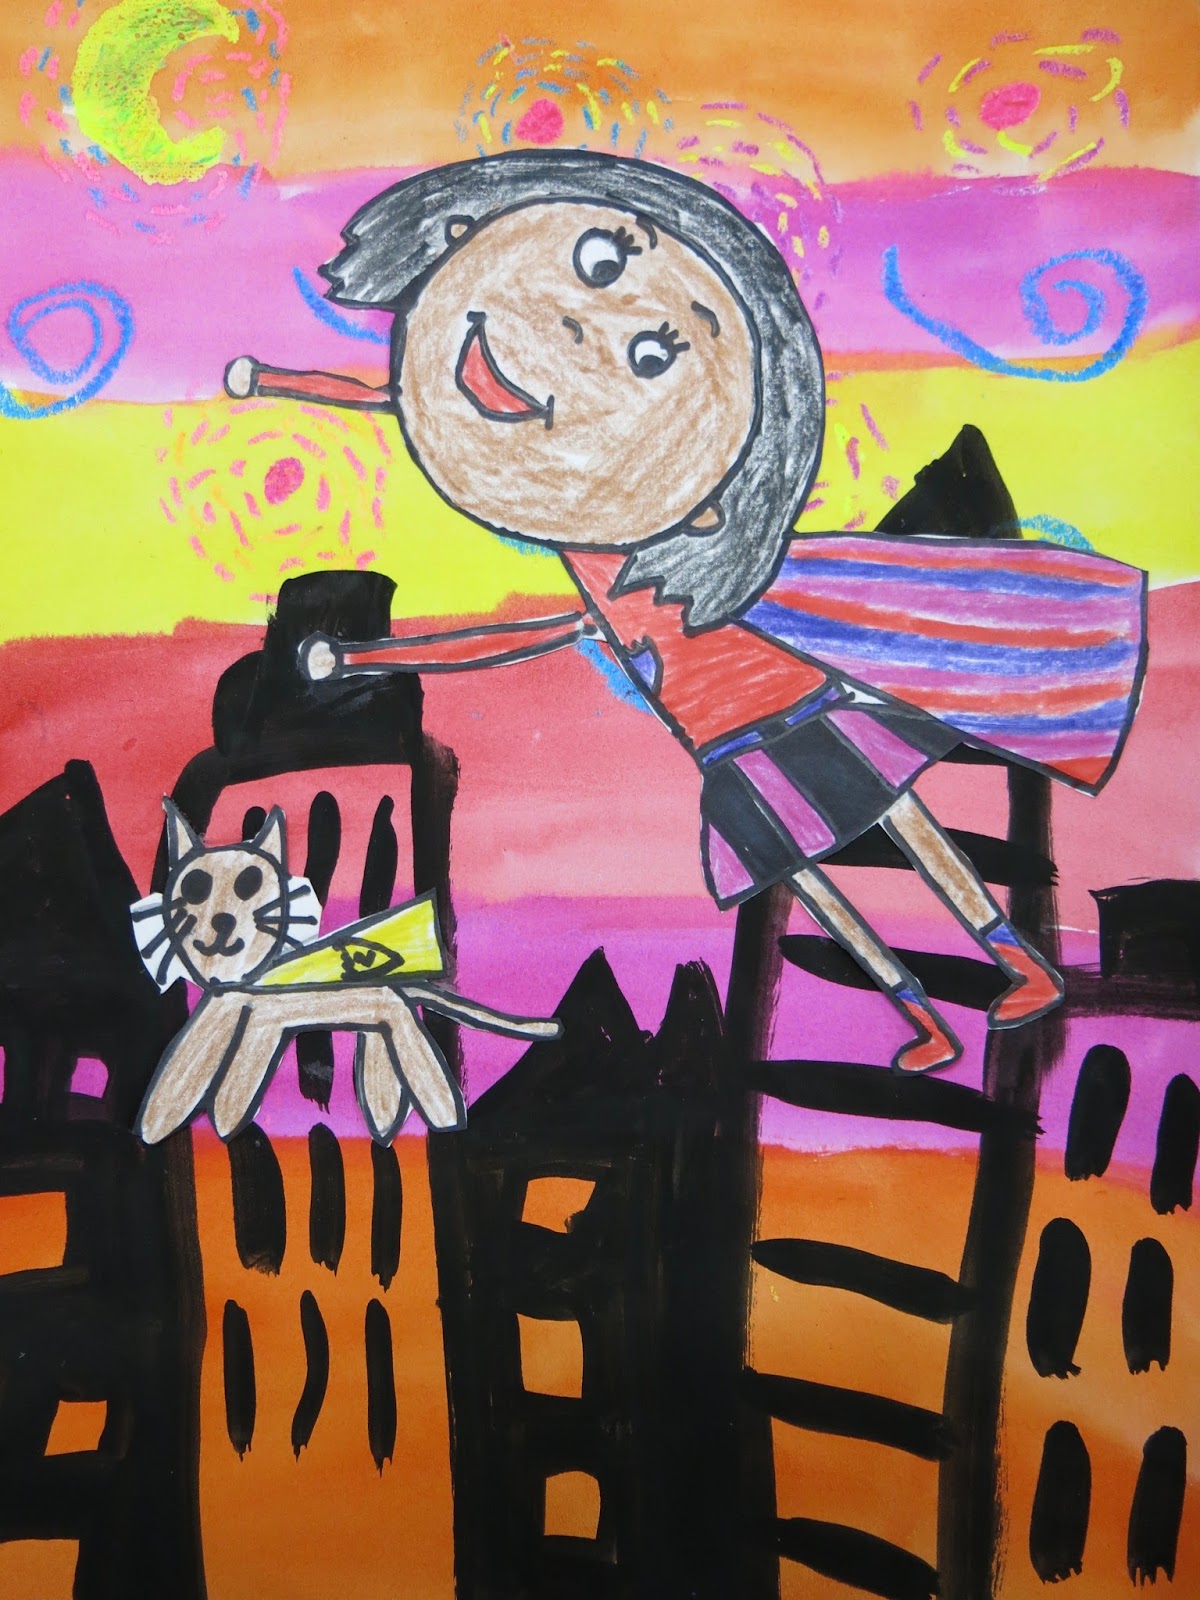
My second grade kiddos just finished up their Super Hero Selfies for their Artome art show! These 12" X 9" works of art were so much fun to make...and to see the finished result. I thought I'd share the process with y'all!
We began by chatting about Vincent van Gogh and looking at Starry Night. From there, we used our paper and my VERY favorite oil pastels (Sargent's florescent brand!) and created our skies. Because I have 30 minute art classes, that took one art class. The following art class, we added either all warm or all cool watercolor to our skies:
Y'all might have heard: I LOVE me some Crayola watercolor paint. I order the following and place them in each watercolor pan: magenta, red, red-orange, yellow, green, turquoise, blue-violet and violet. I place them in that order so the kiddos know what colors they can use as far as warm/cool colors go. The following day, I busted out the tiny brushes and India ink for some cityscape painting:
We started by painting simple rectangle shapes. Then we added shapes on top of those like triangles, rectangles and squares. From there, windows were added. They really rocked these!
Many of my students sketched their cities out on dry erase boards first. This really helped them get comfortable with their ideas before attacking their paper. It did mean that some kids took two 30 minute art classes to complete their cities...I was okay with that. I never mind the kids going slower if it means they do their best and are proud of their work.
Once the paintings were complete, we could start creating our Super Hero Selfie! The kids were given a circle template...simply so we didn't end up with tiny little folks. The template really helped them gauge size and get a jump start. I did a quick demo on how to create a body by using shapes like a rectangle for the torso. I showed them how to draw stick arms and legs and turn them into THICK arms and legs. Some of us are still pretty skinny tho, ha!
LOTS of kids wanted to add their pets or their siblings as their sidekick...how cute! After drawing with pencil, tracing with Sharpie, the kids added color with color pencils. In all, that process took about two art classes as well.
Then the CAREFUL cutting began. Not gonna lie: some of us may have cut off limbs. No biggie, we simply glued them back in when we glued ourselves onto the background.
When coloring, we did talk quite a bit about color schemes. We chatted about the colors of Superman and Spiderman, Wonder Woman and the rest...they have about three specific colors. The kids were tasked with picking out 2-4 colors for their hero.
Weapons were not approved but shields were, of course!
And capes!
And disguises!
One thing that really helped was giving the kids an About Me super hero sheet. They had to come up with a name for their hero, what their special power was and how they make the world a better place. On that same sheet, they had to create a sketch of themselves as well as a sidekick.
I'm really excited about these and cannot wait to see them at our art show!
I don't often repeat projects but this one was a winner with the kids and parents last year.
Last year, I had the kids paint a black silhouette of the city and add the windows with paper. I didn't love that as much...the paper didn't really stick well to the ink and the kids didn't really rock those windows. You can see it here.
I'm IN LOVE with the designs on her buildings. Second grade, y'all!