So...at the BEGINNING of the school year, I got the idea for this collaborative project...and, here we are MIDWAY through the school year and I'm finally assembling and sharing it with you. Story of my life, y'all.
At the start of the school year, I dyed a bunch of clothes pins by placing them in a bin of watered down paint. I later learned that food coloring works well also. I dyed them red, orange, yellow, green, blue and purple.
When the students came in, we read The Dot (yes, this was our Dot Day attempt!) and we spoke about all of the things that we are. "I am creative. I am amazing. I am silly. I am funny." You get the idea.
I had the kids get two colorful clothes pins (any color the wanted) and one plain one. On the colorful clothes pin, they were to write their name on one and a word that described them on another.
On the plain ones, I had them with monochromatic Sharpies and create a design. I did this project with my first and second grade students who have 30 minute art classes. My third and fourth graders, who have an hour, did a different collaborative project:
You can find out details on this project here. I at least managed to get this project finished and hung at the start of the year!
After the kids were done with the clothes pins, I had them sort them by color. Then I clipped them around 9" cardboard pizza rounds. I then painted the center black and used the kids' painted papers to create the I am... in the middle. Initially I was going to hang these in the hallway but I was afraid they would get damaged without a watchful eye on them.
AND because they are so stinkin' pretty I wanted to be able to see them all the time! I used command hooks and yarn to hang them above my window. They did keep rotating which would have been fine if I'd had the kids draw on BOTH sides of the clothes pin (which you might wanna do if you do this project). To keep them forward facing, I simply hot glued them together where you see them touching/overlapping a bit.
Another happy rainbow addition to the art room that I'm happy to finally have on display!
Those who are unfortunate enough to have to work with me know that I'm a bite-off-more-than-I-can-chew/start-now-figure-it-out-later/wild-and-crazy kind of gal. Thankfully, I work with The Best folks who not only tolerate my silliness but, I daresay, encourage and facilitate my weird ways. All that jib-jab to say this: look what the kiddos created for our 2017 collaborative! Learning for All with a contribution from each of my first through fourth grade artists and a whole lotta blood, sweat and (after misfires of the staple and hot glue gun) tears on behalf of me and my P.E. teacherin' buddy Ali Starkweather!
Ah! This 5' 6" mama weighs in at just over 15 lbs and is every bit of awesome, if I do say so. I've had the itch to create something in our foyer every since the kiddos created our Johnson Elementary sign a couple of years ago. And, with the successful creation of this massively heavy mosaic beast, I KNEW the custodians and maintenance dudes could make hang the monster...but how to create it?
I originally got the idea this summer while I was at the hardware store and spotted paint stirring sticks. Before I knew what was happening, I was taking the folks at Home Depot into donating a ton of sticks to me for the cause. I was inspired by the Color Wheel Clock I created some years ago and just kind of went from there.
With this inspo in mind, the first days of school, I had my first through third grade kiddos paint a stick with a color and white. This was easy: after going over the rules, routines and whut-nots of the first day, I was like, here, let's paint a stick, doesn't that sound fun?! After a resounding NO!, I chatted about creating a collaborative and a legacy piece to leave behind. That was a little more inspiring. With our leftover paint, we created painted papers for future projects.
My fourth grade kiddos were given the large paint stirring sticks. Those I did have to pay for as Home Depot decided they had to draw the line somewhere. I didn't mind. The kids were given baskets of analogous colors and requested to "leave their mark". They happily did so. After a wee sword fight with the sticks.
Once all the sticks were complete, the MASSIVE assembling began. I'm not even gonna lie: I hardly snapped any photos as I wasn't sure if this was even going to be possible. In fact, it wouldn't have been possible had my buddy Ali not stepped in. She was determined this was gonna work. I'm so thankful she helped me...otherwise it would still be in bits in the art room!
I just so happened to have the large round canvas at my house, sitting around, collecting dust. Ali and I began by laying out the colors of the shorter sticks and deciding how they would go together. When someone asked how it was assembled, I believe Ali put it best, "Lots of hot glue, gorilla glue, and a staple gun....and then LOTS of hot glue, gorilla glue and a staple gun!!! lol..." She says LOL but what that really means is for real tho. There's a reason we didn't snap any photos of the assembly.
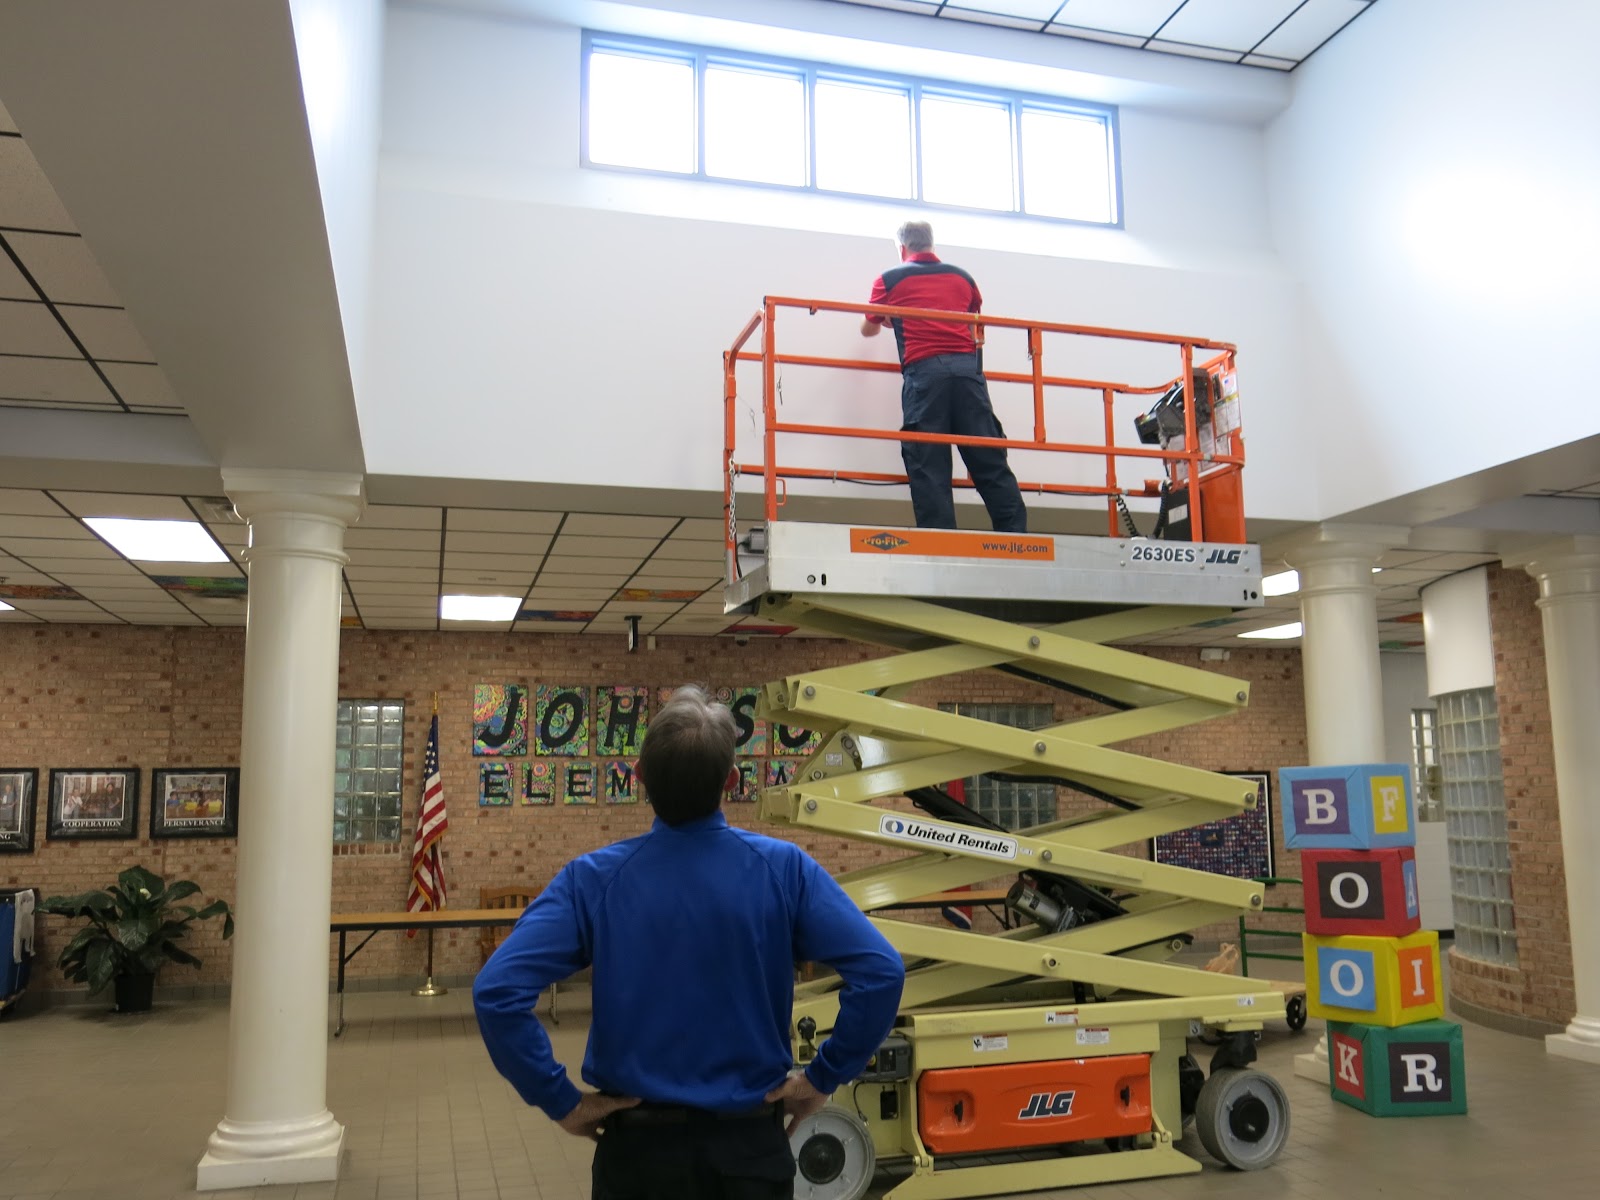
Y'all better believe I wanted this bad boy up in time for Open House. And all y'all better also believe it was only finished the day of. In fact, these sweet fellas had to wait a pinch as the wording I had JUST painted needed to dry.
And then, of course, the domino effect of disasters transpired: the lift stopped working; I didn't paint the wording to align with the hanger on the back (no surprise there)...but there was no need to worry. By some miracle of miracles, the lift was fixed the so was my hanger malfunction. And, viola! Masterpiece hung in time for Open House!
High five to these handsome devils!
Every morning, when I do morning duty, I've been pleased as punch to see this happiness greeting our kiddos as they enter our school. This mantra is a portion of our school motto...and I believe everyone who loves to teach at Johnson Elementary agrees.
Even if some of 'em are a wee bit crazy. But I'm in such good company!
Thanks for letting me share! This was a fun collaborative...and one that my wee artists and I (as well as all who were involved!) are mighty proud of!
Oh boy. We're back! In my district, we returned to school last (officially) last Thursday and it's been nonstop action since: professional development, back to school night, room prep, you name it. The one thing, THE MOST IMPORTANT THING, that I'm currently consumed with is our first art project of the school year. I love to hit the ground running to build excitement and fun in the art room with a big, fat, hairy paint-y, sticky and colorful project. While I wrack my brain over this year's projects, I thought I'd do a lil series on this here blog titled Best Back to School Projects. These aren't the Best Ever, mind you, these are just the best that can be found here. So take that with a grain o' salt.
That being said, I LOVE to start my school year reading The Dot by Peter H. Reynolds. It's got such a great message...one that speaks to children of all ages. In this post, I'm going to share my very favorite Dot Day projects that I've done over the years with my kindergarten through fourth grade kiddos. I'm including links to blog posts with lesson details and videos. I really started to use videos in my art room last year...so that's why not every project has a vid. By the way, feel free to subscribe here to view newly loaded videos.
So, without further jibber-jabber, let's get started!
One year, my first grade students created this dot-inspired mural...with a heavy influence by the folk artist Heather Galler. They not only painted the plates but created the painted papers used as the flower petals and the papers used in the background landscape. This one is definitely one of my faves. You can find the lesson details here and here.
This fun and quick project can be found in more detail here. This was one of those quickie projects where everyone in the school created the same thing: a marker design on a coffee filter. Once each design was complete, the filters were sprayed with water and allowed to dry on plastic. Each was hung by paperclips. This was a show stopper at our Open House...and so stinkin' easy!
My second graders created these reversible dot paintings one year on pizza rounds I purchased via Amazon. This was a fun project and another were I could display the work mobile style. You can find out more info here.
Can you tell I have a thing for hanging things in front of our window? Before you ask: yes, the kids DO touch them and we have had a few fall down. The teachers and I stay on top of reminding them that most art is for looking and not touching but, you know. They are curious kiddos!
Last year, second grade created these fun textured dots! I love this project as it really teaches children so much about texture. I've done various takes on this project. More details here.
You are more than welcome to use my videos in your art teacherin' world!
A couple years ago, my third graders created these dotted relief sculptures with Styrofoam plates and aluminum foil. I love shiny and reflective surfaces for the kid's creations. And they do to. The Sharpies used really take on a new life.
Last year my third grade created these amazing dots! This project was a huge hit with the kids. It also sparked a lot of conversation in the halls that started with, "How did they make this?!" Third grade project can be found here.
Using pre-cut tissue paper found at The Dollar Tree REALLY saved on prep time!
I've been a big fan of string art since 5th grade when my teacher introduced me to it. I still have my string art example that I share with the kids. This project is a FAVORITE of theirs, it's so much fun. You can find lesson details here.
Having a video really helps with a project like this!
Radial printing project with fourth grade can be found here. Again, we used pizza rounds for this project and it was a great way to kick off the school year. The kids really enjoyed working with the foam stickers to create their designs.
I did question my sanity doing printmaking with 35 fourth graders during the first month of school but they really loved it.
Printmaking is always action-packed tho, am I right?
Once printmaking was complete, we covered the boards in aluminum foil (again, see a pattern here?).
This was a fun way to allow those early finishers to continue creating while my other students were still printing. Full lesson here.
I don't usually repeat projects but when I do, it's projects I've done with kindergarten that I know are successful. One project I ALWAYS do on that very first day in kindergarten is have them create line sculptures.
I begin by introducing them to line with his poem.
And then we dive in. This is one of my favorite days of the school year! I promise you, the kinder kiddies will love this project. You can check out more dot stuff here but you might enjoy this unit I created about LINE for kindergarten.
I promise you, y'all will have the best time with this project!
I'd love to hear your fave Dot Day projects. International Dot Day is on September 15-ish and you can read all about it here. Last year, to celebrate, some of my classes made Shrinkie Dink Dots! More details here.
Not even gonna lie to you: no matter how "prepared" I am, I spend most of my plan time running around like a crazy person prepping supplies, setting up the room, getting videos cued up or visuals displayed. I call it the Art Teacherin' Hustle. And most of the time, my hustle is spent SEARCHING for stuff. From my luke warm coffee to my half eaten Lara bar to the Sharpie markers or the funky monkey scissors, the hustle is strong with this one, y'all. But NOT for grade level examples and visuals. Nope. I always know where that stuff is, thanks to today's Art Teacherin' 101 tip:
How's that for easy? I'm a firm believer in Keep It Simple, Stupid cuz I'm pretty heavy on the stupid. But, you gotta admit, keeping up with all of this art biz is tough! I'm currently digging myself out of all things Dot Day and putting them up on the walls...(or, in the case of the very first photo, putting them around necks. My students also made Dot Day shrink plastic necklaces!)
In case you missed these snaps over on my Instagram, here is just a sprinkling of all the projects (and project examples) that I attempt to keep up with using my lil system. By the way, you can find this lesson with video here.
I've always wanted to do this extension project with printing plates. More on this process later this week. I love when a project lends it self to more fun lessons!
By the way, my second graders framed out their texture relief pieces with some painted cardboard pizza rounds. I did notice that their texture pieces were looking a little lackluster. So I had them brush a thin coat of ModPodge over them and I'm super happy with how much they pop now.
And this third grade lesson can be found here! I swear one of these days I'm gonna get FUR REALZ organized...but until then, I'll keep offering y'all my super simple tips. Have a great week, kids!
Hey, kids! Today I'm sharing with you the follow up to a lesson I shared a coupla weeks ago: Tissue Paper Relief. Because of the delicate nature of these tissue paper reliefs, I knew the kids would need to back them on something. So, after a review of radial balance and design, as well as the elements of art, we created these colorful backgrounds, added our tissue creations to them and, viola! Third grade successfully created their dot designs for Dot Day!
Aren't they so spectacularly colorful? I swear they practically glow in the dark! In case you missed it, here is the video I created to introduce the kids to radial balance and design as well as the process of making the tissue reliefs:
BIG SHOUT OUT to AOE and Blick for sharing this lesson at the most recent online conference.
Surprisingly, this project was a quick one. We spent one day creating our tissue reliefs which needed a day (or more) to completely dry before popping out.
Once dry, I popped the designs out as they are pretty delicate and I didn't want the kids to accidentally tear them. The following art class, they were given 10" cardboard rounds. They traced their tissue relief in pencil and then created a radial design in black marker.
I reminded them to keep their designs big because they would be coloring with these bad boys:
So I'm a sucker for all things fluorescent. And so are the kids. I love these Gallery brand oil pastels which you can find in most of your art supply catalogs and Amazon.
Creating and coloring the design took them just under an hour. Enough time to attach our tissue reliefs to the center and have them ready for a display in the hall!
What I love about this project is that it reinforced our study of radial balance...
Gave us the chance to work with a variety of art supplies...
And create something really cool! Definitely a project I see myself teaching again in the future.
I'm not usually a repeat offender when it comes to art projects but for this one, I might have to make an exception.
I know several of you purchased the rubbing plates after hearing about it from AOE. I'd love to see where you take this project!