Showing posts with label elementary art teacher. Show all posts

Monday, February 16, 2015

DIY: A Mondrian Moment in Dress and Shoes

Well, kids, today is one of those days that every teacher on the planet dreams of: A Snow Day! In Tennessee that means we scored a whooping 2" of ice pellets (which, as it turns out, sounds like someone is throwing rabbit pooh at your windows all day. Not my fave sound in the world). One of the best things to do on a Snow Day is turn it into Sew Day! And that's just what I did in finishing off this Mondrian Dress-terpiece. 
 
The whole idea started when I saw this fabric and popped it into my virtual shopping cart faster than you can say, "OMG, don't you have enough fabric already?!" Answer, no. Also, if anyone ever says that to you they are: A. Being absurd. and B. Prolly your husband. So see A.
Once the fabric arrived, I set off to JoAnn's to pick up a new dress pattern. I've been using and reusing, like, the same 4 patterns and Ima starting to get a lil bored. Not that this here pattern is much of a stray from my norm. I'm all about the 1950's fitted bodice, flair skirt deal. 'Tis my fave.

I'm currently working on two other dresses from this pattern, each with a diff collar. I'm hoping to finish 'em off with tomorrow's snow day (yeppers, I scored a Snow Day Double Header, yee-haw!). I decided to go with the "stand collar" for this dress because I wanted it to have a 1960's feel. But more on that in uno momento.
Let's talk about Simplicity #2444 for a sec, kay? Do y'all sew? Personally, I love the Project Runway patterns because they come with a ton of options and are pretty stinkin' simple. Also, I secretly stalk Professor Pincushion who creates videos of many of the PR patterns and walks you through the entire dress-making process. Yes, you read that right. No, I'm not even kidding. She's totes stalker-worthy.
 So, the stand collar. I know the fit and flair of this dress is mostly 1950's but I wanted a nod to the 60's. Mostly because this era of Mondrian's paintings have a super mod vibe to me. I'm happy with the collar, I think it gives this dress a bit more attitude than the no-collar version woulda had. Whatcha think? 
 So let's talk ole Mondrian for a moment, shall we? I'm gearing up to start a big fat hair Primary Colors unit with kindergarten and who better to showcase than this ole boy? What I was totes bummed to find is that there is, like, one kids book on Mondrian and I wasn't loving it. Do you all have any recommendations for me? I recall learning about Broadway Boogie Woogie (1942-43) in those dark and sleepy art history sessions in college. Please tell me I'm not the only one who always fell asleep and woke up with drool-soaked notes. How you gonna turn off the lights, talk in a monotone voice and not expect me to snore my way through your course?! I'm hoping to make Mondrian more 'citing for my kids.
As I was stitching up this dress, I got the idea to MOD-ify some booties (get it, MOD-ify 'em?! Sometimes my incredible sense of humor even leaves me in tears. Of sadness. That no one else is nearly as hysterically humorous as me. Ahem.) Mostly cuz I always thought that when I got around to Mondrianin' a dress (yes, now he's a verb) it would look like this 1965 Yves Saint Laurent number.

I love Yves Saint Laurent. He studied under The Greatest Designer of All Time: Christian Dior. Oh my goodness, don't even get me started on my love of Dior. It's borderline cray. But back to Laurent. This dress of his is so mod and so 1960's that I always thought it'd be the perfect thing to stitch up. The prob? I'm not a fan of the shift dress. I get it, it's comfy, it's classic. But it's just not my bag, baby. So some 1960's Mondrian-inspired booties would just have to do the trick. 
Now, before I go too much further, lemme just throw in a disclaimer: I prolly shouldn't even be showing you this here DIY. Mostly cuz I just used whatever I had on hand: booties and acrylic paint. I hear they make paint specifically for leather. And I hear you should treat your leather before painting it. I learned all this after I started painting and decided to do a lil googling. Eh, says me. Too late now. 
 This truly was a simple and speedy DIY. Just mask off some geometric shapes and start a-painting. I used a coupla coats. 
And allowed to dry before pealing off the tape. Some of the acrylic did come off with the tape (nice job, acrylic) so I did have to do some retouching but it really wasn't a biggie. 
And I was pretty psyched with how they turned out. Y'all should totally do this. Then we'll be Mondrian Bootie Twins! Wait, that doesn't sound right.
Now, as y'all might know, this isn't my first Artist-Inspired Dress Rodeo. In case you want some more, follow these linky-loos:

A Light-Up Starry Night Dress
Warhol's Soup Can Dress
Kandinsky Dress #1
Kandinsky Dress #2
The Great Wave Dress
Munch's The Scream Dress
Keith Haring Ensemble
Jim Dine Heart Dress
A Roy Lichtenstein Ensemble
 photo signature_zpsd10b3273.png
Read more »

Sunday, January 25, 2015

What the Art Teacher Wore #131 and Happy Surprises

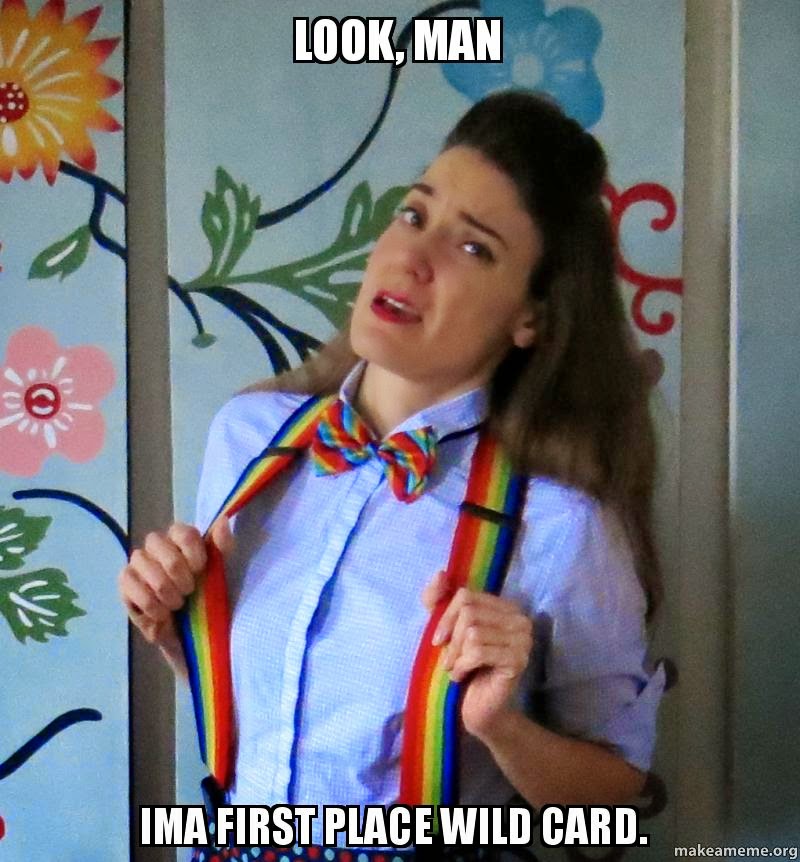
 Dorkin' Out Tuesday: My sweet baby bro got me that rainbow tie and suspenders for Christmas. Upon my request. He asked mom, "Does she REALLY want this stuff?" You know it! One kid said I looked like "Dr. Art". I'll take that! blouse: thrifted; rainbow tie and suspenders: Amazon; skirt and tights: Target

Hey, y'all! I hope you had a super fantastical week, are all rested up and ready to roll for that one day of the week that I swear always seems to come a day early: Monday. My week was an exciting one. I found out on Wednesday that I was crowned Teacher of the Year at my school (and by "crowned", I mean no such thing. I was, however, given a lovely amount of paperwork to complete). I was very honored as I work with the best educators in all the land. It was funny, when the announcement was made, I was in the middle of teaching third grade. When the kids heard my name, they were all, "Hey! That's YOU, Mrs. Stephens!" And I was all, "Are you sure? I thought there was another Mrs. Stephens at this school. I think she teaches Deep Sea Fishing." To which they rolled their eyes and gave me their best, "Mrs. Steeeeepheeeeeens" reprimand. 

Then, just this morning, I found out that this here blog received this: 

That's right, y'all. Ima First Place Wild Card. Can I get that printed on a t-shirt, please? Can I go around acting (even more) like a crazy person and when someone questions my behavior, can I do this...
Werd.

In all seriousness, I'm excited to receive such a title! Thank you so very much for the nominations and the votes. It really means a lot. If you've not checked out the list of winners (as well as nominations!), please be sure to do so. There are so many incredible art teacherin' bloggers out there who I'd be lost without their advice, tips -n- tricks as well as friendship. Often times, teaching art can be like teaching on a deserted island without a single soul in sight who "gets" you. Thankfully, the interwebs have made it so we can all stay connected and sane. Ish. 

Oh and one last thing before I shuddup. I now have 700 lovely "followers" of this here blog! Now, normally, I don't like a follower but in this case, if you wanna follow me, well then, who am I to stop you? Welcome, all you new readers! It's super fantastical to have you here.

AND one last-last thing (I swear), since I've blabbed enough in this post, we'll resume our Artsy Book Clubbin' chat next week, ermkay? Cuz, let's be honest, you stopped reading this post like 5 minutes ago, didn't you? THAT'S what I thought. Y'all have a great week and I'll be back attcha soon.
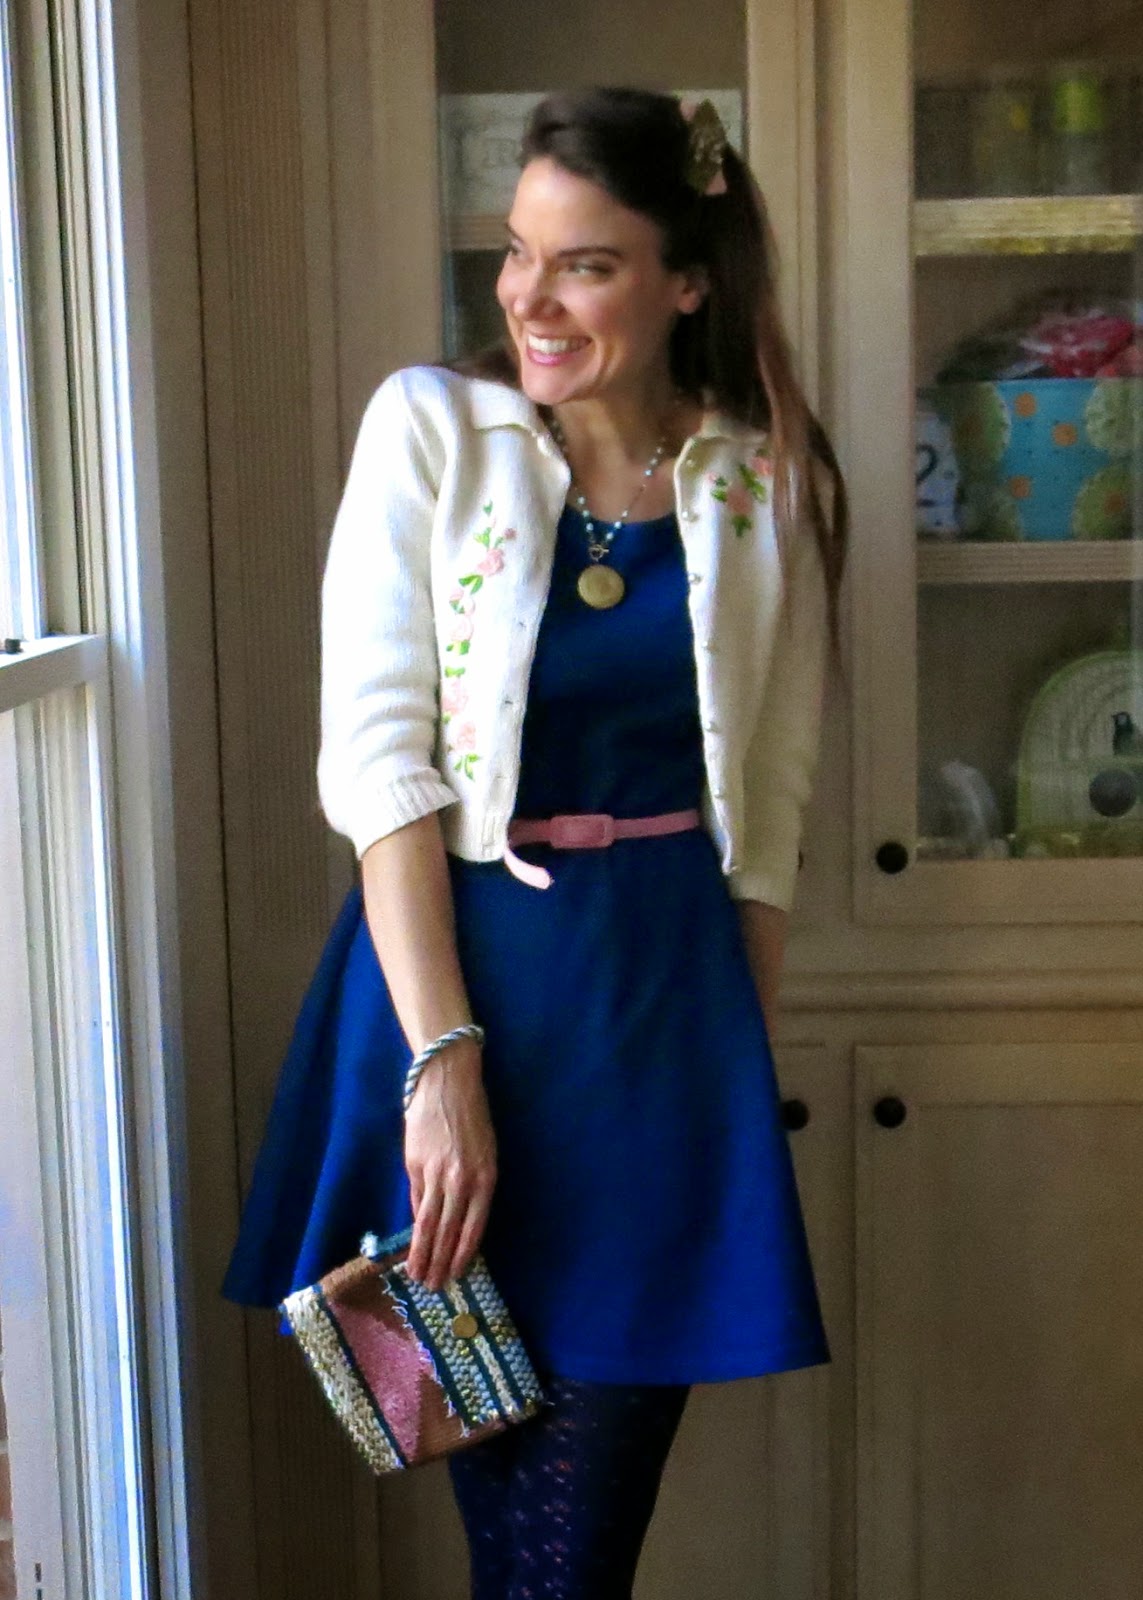
 Prom Dress Wednesday: I love this stinkin' dress, specially with a big fat crinoline underneath cuz I feel like I'm going to some sorta artsy prom all day long. Course, the crinoline drives the kids crazy because every time I walk past their table, my big skirt knocks their painting/pencil/papers/you-name-its off their table. "Mrs. Stephens! Your swishy skirt took my paper!" Sorry, not sorry. sweater: vintage, thrifted; necklace: The Paper Source; Jackson Pollock Dress: made by me, details here; tights: Target
 Sharpen Yer Pencils Thursday: So I got this dress a while back and it's been super popular among art teachers for obvious reasons. Howevers, if you do order this dress, just be aware that the catalog which will flood your mailbox is, um, very interesting. One that you'll wanna have stashed away when company comes over. sweater: thrifted; dress: The Pyramid Collection; tights: Target
Runs with Scissors Friday: I love a skirt with a good art teacherin' motif, don't you? sweater: vintage, thrifted; top and tights: Target; bow belt: Pin Up Girl Clothing; scissor skirt: ModCloth
 photo signature_zpsd10b3273.png
Read more »

Wednesday, January 21, 2015

In the Art Room: A Woven Clutch

Welcome to the season finale of the Weaving Series, y'all! I do hope that you've enjoyed this little trip down weaving lane as much as I have. I know I was always super stressed about teaching kids this craft when I didn't feel so confident myself. I'm hoping that these posts, videos and avalanche of photos have been useful for you. Here's a recap of all the posts from this series:

The Weaving Series: Paper Loom Weaving (perfect for first grade)
The Weaving Series: Straw Weaving (second grade and up)
The Weaving Series: Circle Loom Weaving (second grade and up)
The Weaving Series: CD Loom Weaving (second grade and up)

The Weaving Series: Ojo de Dios (second grade and up)
 
The Weaving Series: Tree Weaving (third grade and up)

So, I'd love to hear from you! Have you given any of these projects a go? Did you find the videos useful or are step-by-step photos your preference? If I do another series, what would you be interested in? Thank you so much for the feedback, guys!
Today I'm sharing with you a woven clutch project that is just perfect for those kids in fourth grade and up. It brings together all of those skills learned from previous weaving experiences however it's simple enough for those that have never woven before to do. 

A while back, I shared a series of posts that detail how to weave a basic pouch. You'll definitely want to start here if you've never created a woven pouch before. In this post, I'm going to show you how to get fancy with your pouch (btw, I have a habit of calling these creations a "pouch" for fear that I'll drop the "purse" bomb in front of a class of boys. And you know what that would mean: Game.Over.) So, follow these links to begin your pouch then c'mon back for some fancy stitchin':

Pouch Weaving, One: Getting Started
Pouch Weaving, Two: Weaving the Flap
Pouch Weaving, Three: Removing the Weaving
Pouch Weaving, Four: Weaving the Cord

So in today's post, Ima gonna show you how to do a little tapestry weaving along with creating a buttonhole and a checkerboard pattern.
Just to be a brag-a-saurus for a pinch, can I just tell you how much I love the back of this clutch? It took me a while (weaving with fine yarn was prolly not the smartest move) but I love the way it looks...and I'm already dreaming up my next woven clutch! Lemme show you how I created this triangular tapestry.
For this, you'll be using a dovetail tapestry stitch. For me, this entailed weaving with four needles at once (confusing? kinda. But for those middle and high school kids, def doable): two needles of brown yarn for the sides and two needles of pink for the triangles on either side of the clutch.
I found this super groovy 1970's craft book which had these super groove diagrams of all the stitches. This is a close up of what that dovetail woven stitch looks like. 
I wove this guy a couple years ago with some funky yarn. While I think the end result was cool, weaving with that stuff is a headache. For your first go, I'd definitely use regular yarn.
You can see a different take on that dovetail weave here. 
Now, let's talk buttonhole. That was simple. I really like simple. That checkerboard pattern? Gave me 5 new gray hairs and a migraine. Mostly cuz I wasn't doing it right for the longest time. In this clip, I'll show you how it's done (bear with me, it's confusing):

Here's a peak at what the buttonhole weave looks like. You're just creating an opening. Cake.
And here's that confounded checkerboard weave. Oui. It's not hard it's just confusing for the small minded like myself. 


The cord is by far the most fun and simplest thing to create. My kids love creating these! We turn them into bracelets, belts and, of course, the strap for our clutch. I've created these cords with kids as young as second grade. 
To attach the cords, I usually hand sew them to the side of the pouch. On my larger clutch, I first stitched a figure-eight around the base of the cord before hand sewing it to the clutch. I'm so happy with these little guys! And I know you and your students would be as well.

DISCLAIMER, SHAMELESS SELF-PROMO: Y'all. If you've not voted for your fave art ed blog, would you mind taking a moment to do so? There's some fantastic ones and my crazy blog is in the mix (in the "Wild Card" division). If you'd be so kind to cast your vote (you can vote for as many blogs as you like), that'd be just swell. Here's the link. 
And there you have it! The season finale of The Weaving Series! I do hope you enjoyed this woven adventure. 
 photo signature_zpsd10b3273.png
Read more »

Wednesday, December 24, 2014

DIY: A Christmas Dress

Merry (almost) Christmas, y'all! Ima gonna hafta keep this here post short -n- sweet as I'm so stinkin' tired I can't even think straight. I was up last night workin' on this lil number until the wee hours of the morn. I was only down to a sleeve and zipper install but that still took me til 1am. Which should mean that the whole thang is gloriously perfect. Howeverness, I created it. Therefore, 'tis not.
 If this dress pattern looks vaguely familiar to you that's cuz I used the same Emery pattern that I had in the creation of this Christmas dress. In fact, I created them both in tandem with the exception of the sleeves and zip. I've never created two dresses simultaneously before and I kinda liked it. Despite the slight sweatshop vibe, I loved that I was busting out two frocks as once. 
However, even though I love the Emery pattern, I kinda feel like it's a lil too high waisted for me. The dress waist seems to hit a good inch or two above my true waist. With a belt, I don't think you can see the dif but without, I kinda look like I'm in a kid's dress. Or is it just me? What do y'all think? 

I would also like it if the dress was about 3-4 inches longer. A longer length might give it more of a vintage-y vibe? However, I do love the fitted bust and the simplicity of the sleeve install. 
On a dif note, I gotta say that as an artsy type, I really don't know if I should be dabblin' in such things as knitting (oh, I've not shared that mess with you yet.) and sewing. Cuz they are, like, precise kind of crafts, for lack of a better word. I mean, you gotta get those pieces cut and stitched just so; those knits and purls just right or else the whole thing is a disaster. But as an artsy type (I hesitate to use the word "artist" cuz, well, have you seen half of my DIY's?!), my solution to an oops is to hot glue something over it. Which, sadly, you can't do to a dress. Or a knitted scarf. Cuz I've tried. 
Despite that, my desire to create uber tacky art teacherin' garb overrides my slight dislike for the technicality of stitching. I just need to find a fabric friendly hot glue, I guess. 

By the way, did y'all notice the serious furry photobombing that's been happening in this post?
So I got the genius idea to attempt some kitty-cat Christmas pics. Someone was not convinced this was a good idea.
 
 Like really not diggin' it. 
 And game over. "I said, put me down right meow!" Yes, ma'am. 
 And now for the final giveaway of the year...

A Build Your Own Alpaca Pack! I'll give you one of my handmade alpacas (and a hand painted card!), the supplies to create two alpacas (minus the papier mache) and plenty of ribbons and yarn for embellishments. So, here's how you can enter to win:

1. Tell me just one of your New Year's resolutions. Does it involve creating more? I know mine does!

2. Don't forget that email addy, kids!
 And yesterday's winner? Young by Design! Congrats, buddy.

And Merry Christmas, y'all! Have a wonderful time with friends and fam. 


 photo signature_zpsd10b3273.png
Read more »

Monday, December 22, 2014

DIY: A Christmas Craft Night

 Can't take credit for this lovely. It was created by my super talented friend Tamara. Isn't it so stinkin' sweet?

Just so you know, my house only gets cleaned when company is coming. Now, not the entire house, mind you. Just the places I think peeps be seein'. And if Ima gonna go all out and decorate for the holla-daze, then somebody best come around for a visit. For that reason, 'tis the perfect time to host a Christmas Craft Night, says moi.
 When I popped in to visit my buddy the other day, I totally stole her little lovely off her tree and promptly placed it on her front door for a photo op. What you can't see is her standing just on the other side of the door asking, "Is it cute? Do you have it on the wreath straight?!" Oh, if these poor blog photos could talk, y'all. The stories they'd tell. 

'Kay, so I super duper love having buddies over for crafting. For the occasion, I usually make a big ole pot of soup (minestrone is my fave), have some bread/cheese/wine handy and a dining room table all covered in crafts. As folks trickle in bearing gifts of apps and zerts we usually vent about the day's teacherin' events (as expected, most of my buddies are art teachers) before bucklin' down with a bowl of soup and get to crafting.
On this particular craft night, we did some needle felting. I thought it'd be fun to just needle felt whatever (like I said, most are art teachers, you give 'em the goods and they'll go to town) and frame it in an embroidery hoop. As for supplies, you can see (from left to right) I had some foam cushions for underneath the felting, wool yarn, wool roving, fabric (not necessarily wool), embroidery hoops and needle felting tools. I loved seeing the variety of what everyone created.
So simple and sweet, right? Meredith outlined her R in wool yarn which really made the letter stand out. 
My best gal Mallory made a sweet little "L" for her daughter Lydia Dot who's celebrating her first Christmas this year. You might recall we had a Pee Wee themed baby shower for the arrival of El Dotto. 


Here was my lil 'zample that I busted out about 10 minutes before everyone arrived. Mostly cuz I was running around like a crazy person attempting to get my home to look less an-army-of-clown-hobos-live-here-esque. 
Need a coupla needle felting toots? Cuz I've got some for ya. Check here to see what you need to shop for and here to see just how you can go about creating. Oh, and a lil more here. AND if you need a barrage of my needle felting DIYs, you can go here and follow the linkzzz
Now whilst everyone was needling away, I got the notion that the hoops would be super cute wrapped in this amazing gold leafed yarn I picked up at Joann's. 
It actually was easy to do and I think looks great. But I think a lotta things look great so what do I know?! To start, use the outer hoop an remove the screw. Hot glue the end of the yarn to the start of the hoop and commence wrapping, you rapper, you.
AND hot glue the other end of the yarn! Now, the yarn will make the hoop so large it won't be able to close with the screw. So we used some jewelry wire and closed the hoop with that. Which was pretty unsightly so we covered that with a lil pompom. 
 Like so! Totes adorbs, amirate?! By the way, in case you are wondering, that's a fox that has hyper extended his neck. 
What that lovely lil dinning room table looked like near night's end.  Sadly, I didn't get a pic of everyone's creation. Although, I did manage this gem...
Not only are my friends so exceptionally good looking that it's almost criminal, but they are a super talented crew too. Meredith, top left, is an art teacher and incredible paper flower fabricator whose lovelies you can see here and here. And Aimee, red apron in the middle, sells the most fabulous vintage classes in her art teacherin' spare time. Crystal, who is just to the right of Aimee, creates incredible jewelry with guitar strings from her husband's band Old Crow Medicine Show. All of these ladies are awesomely wonderful, I was simply thrilled to get my Christmas craft on with them.
Which brings me to my most exciting giveaway goodies of them all (mostly because needle felting is my ab fave!). A slightly used needle felting tool and cushion. AND two pieces of lovely fabric and roving! Here's how you can enter to win...

1. I'd love to know...if I shared more DIY video clips on this blog, would you be interested? Would you view them or is that simply not your thing?

2. Please leave your email so I can reach ya!

As for yesterday's winner...congrats to Debbie! I'll get those lovely magazines out to you soon. 

 photo signature_zpsd10b3273.png
Read more »