Showing posts with label tennessee. Show all posts

Monday, April 3, 2017

Art Scouts 2017 UPDATE!

Big News: Registration for Art Scouts 2017 is now open! And we are filling up fast. Want to learn more about this summer's Scouts? Here you go...
Are you excited yet? I can tell you that Ginger, Laura, Jennifer and I are super stoked. We can't hardly wait to head to Montgomery Bell State Park, roll up our sleeves and introduce you to brand new projects that are all about making big messes with little people. We are offering two options for Art Scouts this summer:
Here is a look at what our schedule of events looks like:
We're going to introduce you to so many projects, you'll be able to kick off your school year with plenty of clay (for no kiln and kiln friends), fibers, collage and painting projects. Not to mention, you'll meet so many new art teacherin' types that will become fast friends. It really is a summer camp experience...but for art teachers!
Last summer we hosted our first ever Art Scouts in Ohio, home to Laura and Ginger. You can check out that experience right here. Just a matter of weeks after that, Jen and I had folks join us in Nashville, Tennessee. It truly was the highlight of our summer (maybe even our year!) to spend time with so many fun, dedicated and creative art teacherin' types. We are looking forward to an even bigger and better experience this summer!
So looking forward to meeting friends, new and old, and spending time sharing our passion: Art Teacherin'. Get yourself over here and register to join Art Scouts 2017
 photo signature_zpsd10b3273.png
Read more »

Tuesday, March 17, 2015

DIY: WPA-Inspired Smoky Mountain Paintings

When I first moved down to Tennessee from Indiana, I didn't have any intentions of staying. I mean, I was fresh outta college and was looking for a job and an adventure. When I got a job offer in Tennessee I was all, "huh, why not?" with plans to move away in a coupla years (as a kid, I had this crazy notion that I'd live in each state, one year at a time). After settling into Tennessee and meeting my hubs, we realized we just love this place too much to move. And now it's home.

Over the last coupla years, I've been Tennessee-izing our house. You can see my first attempts at TN decor here and a painting dedicated to Nashville made from maps of TN here. Recently, I decided I needed a coupla new paintings for a sad little area at the top of our stairs and was inspired by some WPA paintings of the Smoky Mountains. 
So the WPA program (aka the Works Progress [or Projects] Administration) was established during the Great Depression to give jobs to millions of unemployed Americans. Their job was to work on public works projects like public roads and buildings. Many schools, libraries and government buildings were constructed during this time. An offshoot of this program also employed artists, musicians and actors to do works for the public.
Incredibly talented artists were employed such as Romare Bearden, Thomas Hart Benton (one of my personal faves), The Soyer Brothers (also a fave of mine), Stuart Davis, Mark Rothko, Jackson Pollock and Willem de Kooning, just to name a few. Without this program, millions of people and their families would have been left destitute during this difficult time in our history.

Some of my favorite work created by WPA artists are the national parks posters. I love the almost paint-by-numbers/propaganda style of these works. They are ab fab. In fact, these paintings here are my SECOND time to copy a WPA painting; you can see my first one here. Now, on to the latest ones...
 I started by adding that yellow ochre color to the top and creating texture by scrapping the wet paint with a chopped up plastic card (I have a mountain of hotel key cards just for this reason). Then I began sketching out my plan in chalk.
And then I really went at it paint-by-numbers style. I love painting this way! Y'all, it's so easy and I personally dig the flat look to the painting. Side note: I use our glass dinner plates as palettes. If you ever dine at mi casa, kindly check your plates for paint before eating.
This painting was pretty basic so it came together quickly. I work with acrylic which dries super fast. I like that because I could move on to the next portions of the painting without waiting forever (ahem, oil paint).
 I added a lil bit of texture to the ground by using a super crappy, paint-dried-on-the-bristles brush. Sometimes those brushes have their purpose too.
And last came the trees. Since this painting was super basic (and is going to hang next to one that is uber busy), I decided to add the lettering to the top and bottom. 
Y'all. I hate lettering. It involves measuring and math and both make my abnormally small sized brain hurt. But what's the worst is painting lettering as I always screw up with letters that gradually get bigger and bigger as the painting goes on. So! My solution are Sharpie brand paint pens. I loves them! They work great and create a clean even line. 
The neighbor to my first painting started much the same. Chalk outline (ahem) and color blocking. Cake.
 Howevertown, this painting has a whole lot more details. Which were super fun to paint but did take me a while. So I power watched old episodes of Project Runway and just blasted through.
 (One of these days, my dining room table will be used for...dining.)
 Although it's super busy, I do love how this painting turned out. The colors are my fave part. But I also love how it does remind me of the Smokies. 
Now to get 'em up on the wall! I'll have to share that snap with you when I get to it. Later, kids!

 photo signature_zpsd10b3273.png
Read more »

Monday, April 15, 2013

DIY: More Dip Dying and High/Low Hemline

There's something you should know about me: I'm a fads-hater. I ain't proud. But there are current trends that make me wanna punch a pillow (kinda wimpy, I know, but I've got soft delicate hands and punching hurts!). Case in point:
  • Skinny Jeans on Dudes. Seriously? I don't know what it's like to be a dude but I can only guess that those are...uncomfortable. They make me uncomfortable. Shoot, I actually can't even wear those because the moment I get my leg half way in, I start to experience calf-claustrophobia. Every time I've tried on a pair, I have a near panic attack and can't get outta 'em fast enough.
  • Yoga Pants as Pants. Ladies, for reals? Ya'll act like it's so terrible when our Walmart friends show up shopping in their sweats and slippers. To me yoga pants is just the yuppie version of the same thing. You just worked out? Awesome. Now go change your clothes.
  • The High/Low Hemline. Didn't we do a varied length hemline like 5 years ago? So this one is now high in the front/short in the back? Yippie, I can flash my spider veins and ghastly white thighs for all the world to see...
World, you're welcome.

So, um, yeah, not only am I a fads hater but I'm also a big fat hypocrite. But I promise I didn't recreate this hemline simply because it's "in". I kinda had to alter it somehow or this dip-dyed DIY would have me lookin' like a wannabe hippie. And I gave up that look in high school.

But I'm getting ahead of myself. Let's do the back-track boogie and start at the beginning...
 So a couple of weekends ago, when I was on my dip-dying bender, I decided to dye this 1990's Express rayon number that's been hiding in my closet since high school. Because I'm an idiot, I forgot to snap a photo of the dress before...but the one on the left is very similar in pattern, color and style. And, of course, a DIY of mine wouldn't be complete without a little Antho-spiration.

I began by actually reading the directions a little bit more carefully. Turns out you are to completely dissolve the dye in a small amount of hot water before adding it to the warm water dye bath (I used warm water because I was afraid hot would shrink the rayon). Not dissolving the dye completely and simply adding the powder to the dye bath is the reason I had a couple of dark dye dots on my shirt. Live and learn.
Or not. This is my version of a measured portion of non-iodonized salt. For more dying directions, you can see my first attempts here.

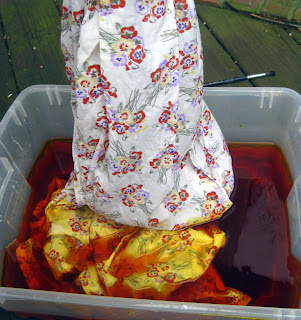
Originally, I had wanted only the bottom of the dress to be dyed. So, like last week, I double bagged the top of the dress and proceeded to slowly sink the dress into the yellow dye bath on on the left. I let it soak up to the waistline for about 5 minutes. Then I pulled the dress out about 5" and left the rest of it to soak in the yellow dye for 20 minutes. This helped achieve the gradation to yellow I was going for.

After pulling that out of the dye bath and doing the running-under-water-until-clear thing, I prepped a fuschia dye bath. I eased the now-yellow dress into that bath (see right photo) following the same routine: about 5 minutes of a soak to create a gradation and the bottom for 20 minutes.

And then I pulled a typical Cassie: I touched the top of the clean white dress with drippy fuschia dye fingers. So much for that double bagging. Knowing I'd never be able to wash out those drips, I proceeded to dye the top of the dress in the fuschia dye bath.

And, viola! One hippy-dippy-dyed dress. Now all I need are some Birkenstocks, some dreads and a couple showerless days and I'll be all set!
And that's when I decided that an altered hemline would update this dress a pinch. I figured I'd already taken this dress beyond the point of no return, why not hack into it and see what more damage I can do? Creating this high/low hemline is quite possibly the easiest thing in the world. Decide just how high you'd like the dress to go and mark the dress. Using a curved line reminiscent of an elementary school slide, stop just beyond the midpoint of the hem. Iron a 1/4" hem and stitch.
And done. One style I exclaimed not three days ago that I'd never EVER wear now happily resides in my closet between my skinny jeans and yoga pants.
Warning: High/Low hemlines are not for windy days and grannie panties. Just sayin'.
Outfit details: dress: Express; shoes: Lucky Brand; bow belt: made by me, DIY here
As I was dying this dress and the one from last week, I realized one was made up of the cold colors while this was warm. I thought for sure they'd make great teaching outfits when teaching color theory...but I've since changed my mind on this little number. It's going to have to be a fun summer frock or beach coverup. I'm stamping this one "Not Approved for the Artroom". See, I kinda know what professional attire looks like. Fishnets, yes; high/low, no. 

Until next time!


Read more »

Wednesday, February 20, 2013

In the Art Room: Winter Wonderland

A grouping of kindergarten landscapes.
For the last three years, when my kindergarteners painted these snowy scenes, the following day was a snow day. I kid you not. This year was no different. Despite the fact that snow wasn't even in the forecast, it fell steadily from midnight on to the following day. The kindergarteners are convinced they made this happen. I'm beginning to believe them and I'm plotting more snowy projects for the very near future.
I love that this tree has outgrown the frame.
I don't usually repeat projects from year to year cuz I get bored easily. But I often struggle with kindergarten project ideas. This is one of my ole standbys because it's got it all: a little painting, a little collaging and a whole lotta landscaping all in one.
After looking at several landscapes (with a big focus on Grandma Moses because she's awesome and so kid-friendly), we began our own paintings. During our first half an hour together, the students were given the following directions:
  • Paint any kind of line that would be good for a hill. Paint that in blue from one side of your paper to another.
  • Blend white paint into the blue line to create light blue or a tint of blue. 
  • Repeat the first two steps with a hilly line below the first.
  • Put that masterpiece on the drying rack, paint brush in the sink, clean that table and you're done for the day!
  • The following day we chatted all about shades. We were creating an evening sky so we used black and blue this time. Some students chose to use the back of their paint brush to draw wind and stars into the sky (Vincent van Gogh much?) while other dabbed on snow or just left it black.
  • On this day we looked at Grandma Moses' landscapes again and chatted about the three parts to a landscape: fore, middle and background. After eyeing her work, we noticed she showed space my painting her trees, houses, people, everything smaller in the background. 
  • Each artist chose their own house from a stash of die cuts. Snow and icicles were added with white oil pastels. We learned how to cut out triangles and rectangles for our trees. 
  • As you can see above, most of the wee ones understood that to create space in their landscape, their trees needed to decrease in size. Just don't ask them what "decrease" means. We're not there yet.
  • Students were given metallic gold and silver oil pastels to add wind and stars to their evening skies. Looks like this artist opted to just stick with white snow and asteroids.
  • Finally, we chatted snowflakes, added them in white oil pastel to our frames along with our signatures.
In all, I'd say these turned out pretty stinkin' cute. Even if some of us still refer to them as our "landscrapes." Call it what you wanna, if it brings us a Snow Day, I'll take it!
On a super happy side note, I came home from school today to find my art room in the back of SchoolArts magazine! I'm so excited. I hardly recognize that super clean room as it currently looks like someone turned it upside down, gave it a couple hard shakes, squirted same paint and threw some glitter inside before slamming it back down again. Small correction: my school is Johnson Elementary. Gotta give the best school to work at props!

Until we chitty-chat again, enjoy the rest of your week!
Read more »
Tuesday, January 22, 2013

What the Art Teacher Wore #51

Monday with the Moms: Okay, I'm just going to brag and say I have the best moms at my school. A couple of them have been working with the kids to create a ceramic piece for a fundraiser. If you don't have mom helpers, I strongly encourage you to send out an email and just ask. You won't believe the response you'll receive! sweater and skirt: someone PLEASE make me step away from the Anthropologie sale rack, it is so awesome right now!; tights: Target; belt: made by me for the Gnome Dress; shoes: Miss Albright, Anthro
 Hiya, dudes. Sorry for the slightly delayed "What I Wore this Week" as I know you were just dying to see what duds I donned. But I have a good excuse:  My mom was in town from Indiana! We didn't have the chance to see each other over the holidays and so there was much gift-giving, chitty-chattering and face-timing with lil Bro and his girlfriend to do. Not to mention the serious retail therapy and dining out we indulged in. When we weren't together, I did manage to finish a DIY that nearly was the end of me (pretty sure I say that about every DIY). Spoiler: it involves 17 yards of tulle. A tool working with tulle? Never a good idea.

Along with my weekly wears, check out these rad photos hubs managed to get with his Christmas present. I got him a deer camera and he mounted it in the woods near our house. He's not a hunter but a big time animal lover and thoroughly enjoys seeing these animals in their element. I think I like these furry neighbors of ours way better than the human ones. 

I do hope you enjoy. Stay tuned for this week's DIY and possibly a finished art project by the lil artists. Until then, have a wonderful week!
Hubs had his camera on the motion sensor to capture these shots. This weekend he switched it so that the camera will start recording 30 second snippets of video. I can't wait to see what it captures.
Too Warm for Snow Tuesday: You already heard me whining about my lack of a Snow Day here. With the 50 degree temps we experienced this weekend, I have this sneaky suspicion we aren't going to score a free day this year. Such sadness. dress: Max and Cleo, TJMaxx; fur collar: gift from a friend; tights: Target; leg warmers: Germany; boots: Anthro
You might notice in some of these photos that the bucks are missing an antler. This is the time of year that the deer begin to lose their antlers. They grow them again in the spring. Hubs has found at least three deer antler on his walks in our neighborhood woods. We've got a couple on our mantle and one on our deck for the squirrels. Apparently they are a fan of the marrow.
Giant Bun Wednesday: I actually had  a student inquire what was inside my hair that "makes it so big." I told him donuts. And I have a kindergartener convinced that it's what I eat that causes my legs to "change colors". When I wore my purple tights, I told her I had eaten too many grapes and the white tights made my legs white from too much milk. This time when she asked what I'd been eating, I asked her what she thought. "Cotton candy and ketchup." Like, ew. dress, sweater, sweater clip: vintage; shoes: thrifted; red fishnets and turquoise tights: Target: bow belt: Pinkyotto
Can you count how many deer are in this photo? The camera isn't supposed to make a sound but it must do something. In many of the photos the deer are looking right at the camera. I love the thick coat of fur on this guy.
Big Ole Skirt Thursday: The only prob with wearing a crinoline under your skirt is that you are constantly knocking things off tables! I must have sent a dozen works of art flying off tables and to the floor with just a stroll through the art room. sweater and tights: Target, old; shirt and necklace: gift; skirt: made by me, tutorial here; belt: Pin Up Girl; shoes: Softt
While the deer cam was snapping away photos of animals in the wild, I managed to get a photo of this 18 lbs. beast with my cat cam. We found out this week that not only does she resemble Garfield in her girth and tabbiness but also her affinity for lasagna. P.S. If you come to my house for leftover lasagna, don't mind the cat hair.
Floral Legs Friday: Sometimes I don't even know what I was thinking when I put together an outfit. Take this fine specimen for example. Flowers? Plaid? I should thrown in some polka dots and called it a day. What in the world...? blouse, brooch and skirt: vintage; sweater: thrifted; tights: Urban Outfitters; shoes: Anthro
Hands down my fave deer camera photo so far, this image of Grizzly Adams. Or is that Chuck Norris? Sasquatch, perhaps? The world may never know...


Read more »