Showing posts with label third grade. Show all posts

Thursday, August 25, 2016

In the Art Room: Tissue Paper Relief by Third Grade

Now that our Monochromatic Selfies are complete, the third grade was ready to spend their third day in the art room creating tissue paper reliefs! I've been looking for a different spin on Dot Day and when I saw Blick present this at the AOE Now summer conference, I knew I had to give it a go!
This project took us the hour to complete and made for so much prettiness (not to mention educatin'). I created the video to share with my students...but you are welcome to share it with yours! 
Now, the relief might be finished but the project isn't complete yet! Our next step will be to adhere them to 10" cardboard rounds found on Amazon (I just have them sitting on 8" rounds for the photo) and continue our study of radial balance. I'll be sure to share that with you when they are complete. I was just too excited by these lovelies not to share right away!
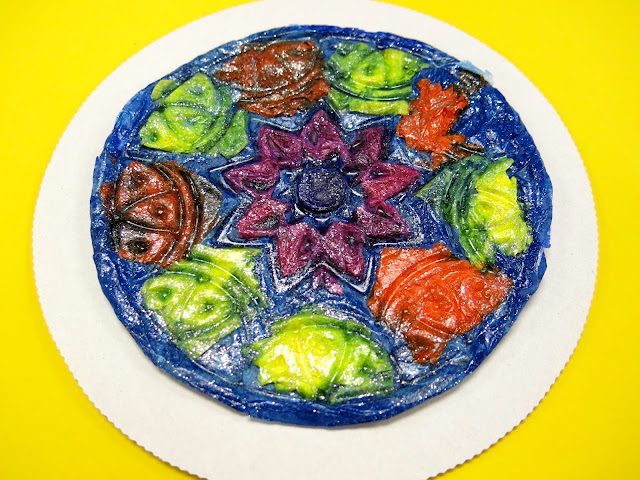
 I mean...so fun, right?
 For this project, you'll need some of the following:
* Texture plates I used the ones that was recommended by Blick at the AOE conference. I liked the circle design as it went perfectly with our Dot Day lesson. However, they have a ton of cool texture plate designs to chose from. I purchased thirty plus because that's how many third graders I have in a class...and the artwork will need to remain in the texture plate until completely dry. 
 * Tissue paper squares These small squares are PERFECT if the kids are wanting to create a design. I left that completely up to the students. Many chose to create a radial design on their plate while some did a random one. I was cool with both. 
I was DREADING the idea of cutting tissue paper. I was so excited when I found these at the Dollar Tree! I purchased one for each table of four students and it was more than enough. It is a bleeding tissue, however...so some designs may get a little fuzzy around the edges. I was willing to take that as opposed to cutting thousands of squares.
* Large Tissue Paper This is where all of your scraps come in handy. The kids were instructed to use the smaller pieces for their design portion. When that was complete, they were to put AT LEAST three layers of large tissue on the back to strengthen the tissue design. 

* Watery Glue...with GLITTER! I just put white glue and water in a cup and sprinkled glitter into that. The kids also used soft brushes to apply the glue. Anything bristly tour the tissue more than normal. 
The kids put a piece of tape on the back of the plate with their name and teacher code. Here's what they look like as they are drying...not so interesting as the cool design is underneath!
 Not even gonna lie: the big draw back to this project was popping the creations out of the plate. Because the tissue is pretty fragile, I knew the kids might accidentally tear their work and become frustrated. It took me about 10 minutes to bust all of these bad boys out of the texture plates. I did crack a few of the plates while doing so...but they're fine to use again. 
Once popped out, the kids will trim around their circle design, cutting off the excess. 
 I know they'll be thrilled to see them when they get them back!
 Next up: add to a cardboard round and continue the radial design! 
This was such a fun and unique project that the kids really enjoyed. I don't often repeat projects but I can see this one happening again in the ole art room sometime soon!

 photo signature_zpsd10b3273.png
Read more »

Monday, March 7, 2016

In the Art Room: Printed Cityscape Collages with Third Grade

What you see here is my final installment of printmaking lessons for the firsties thru thirdz. We started our printmaking units many moons ago and we've been having a big time since. You might recall my lil printmaking pep talk here...
You can check out the first graders printmaking lesson here as well as second grade's here. Fourth gradeland is currently in the midst of a collaborative/legacy/sculptural project that meant they were left outta the printmaking loop. I'm hoping to remedy that before the school year ends. I'll be sure to keep y'all posted. Until then, let's talk about these beauts...
 I am so in love with how these printed and collaged cityscapes turned out, y'all! The kids had a blast printmaking...but where really thrilled to see their cities come together. 
Lemme tell you what each kid created:

* After creating their own printing plate (demo'ed in the video below), each child printed a minimum of four prints on colorful copy paper. They were to do two prints in white ink and two in black ink (or the reverse of that, depending on what was available at their table). 

* The following art class, the kids learned about wax resist, warm/cool colors and watercoloring a skyscape. Each student created a warm and cool colored sky (with a sprinkle of salt for added effect!).

* Finally, each kid got back their warm and cool skies along with their prints. They then assembled their printed, painted and collaged landscapes with a layer of cardboard in-between for added depth. This resulted in TWO finished pieces by each student, as you see above!
This was such a fun and successful project for all students. Here's a list of supplies we used:

* Scratch-Art Foam (tho styro plates would work in a pinch...they'd just create a rounded landscape which could be totally amazing!)
* Speedball Printing Ink (or markers and water! Watch that first clip!) 
* ink pens
* colorful copy paper
* watercolor 
* oil pastels for the wax resist
* cardboard
* glue
I hope these videos are useful as I'm too tired to type out the directions (lazy much?). I have found that all kids can be successful with printmaking IF you teach them correctly and IF you are a stickler for proper printmaking techniques. I found that having the kids work in pairs really helped them hold each other accountable, even the littles. 
For example, we learned that you don't need a barren to rub the back of the print, just use a good back massage. No pounding necessary. Unless you wanna take a time-out break (eyebrow-raise, head-tilt, teacher-face).
 Every print pulled was magic. However, not gonna lie, the first prints are usually stinkers. Not enough ink, not enough "massaging" the back of the paper, etc. I told the kids to NEVER throw a way a print. If they didn't like it, they were to figure out what was wrong with it and learn from it. Blurry? Then you moved it accidentally. Can't see your lines? You used too much ink. Faded looking? Not enough ink. That's why we did a million prints. So we'd at least have a handful of successful ones.
In other news, I cannot take any credit for this perspective drawing or that amazing use of letter reversal. This kid's just rockin' it!
 Once all the prints were made and backgrounds painted, the kids were given a 9" X 12" piece of paper. They attached their paintings to the top and were told to CUT OUT their skyscape. Oh, the whining, y'all! "I can't cut out all those small shapes!", "This is gonna take forever!", "My hand is cramping, can you help me?!"

Nope. You do it. 
 And then they did.
I threw the option of adding a rectangle of cardboard between the cities out there. Most kids opted to do it as they loved the depth it added. 
I think if I were to ask them what one of their fave things this year has been, they'd def say printmaking. The magic of it is addictive!
Next up: rolling their printing plates thru the slab roller with clay! I'll keep you posted on how their ceramic cities turn out. Til then, what are some of your fave printing projects, y'all?
 photo signature_zpsd10b3273.png
Read more »

Wednesday, July 9, 2014

In the Art Room: Ceramic Chinese Dragons with Third Grade

 Well, kids, it happened. I got That Note in the mail. You know, the one with the return address from your school.  In the middle of summer that could only mean one of two thangs: it's yer walkin' papers or, worse, a note containing a  listing of "Back to Cruel, er, School" meetings. That's right. Tuesday, July 9th marks the beginning of the end of my summer. Cue loud and obnoxious horror film-esque scream...
Make no mistake, this has left me in a rather fire-breathingly fowl mood. So what better time to share with ya these here Ceramic Chinese Dragons by my Amazingly Awesome Third Grade Artists!
 Since I've been spending my blogging time sharing travel pics and rando Pee-Wee packed posts, I've fallen a pinch behind on my In the Art Room adventures. My apologies. So whatcha see here is a project that I think my third graders would agree was one of their faves. Now, for those of you out there that are kilnless, hang with me as Ima gonna show you how you can create a Chinese dragon with a ceramic clay-ternative. But before we get into all that, lemme tell you how this all came about.
 Because we were learning about all-things-Asian last school year, I settled on the idea of having the kids create Chinese dragons. After a quick search on the interwebs, I found this post by my art teachin' buddy Rina over at K-6 Art. I loved her lesson as she broke it down into baby steps that were just perfect. Now she did her dragons with the younger set (first grade, people and they rocked it!). Since I was doing this with third grade, I knew I'd have to get 'em to step up their dragon makin' game. But first, a lil dragon-y background, emrkay?
Not all dragons are alike, y'all (Y'ALL!! This is off-topic but what else is new: I was recently BUSTED as a Mid-Westerner wearing Southern's clothing {which would be overalls and Crocs, in case you were wondering}. It turns out I've been conjugating "y'all" all wrong! Thank you, kind commenter, for pointing out my Big Fat Hairy Southern Poser mistake. Hopefully my Southern license won't be revoked {penalties include grits restriction and consumption of unsweetened tea}).

WAAAAAAAIT, what were we talking about? Oh, yeah. Dragons. Let's address the Chinese ones first, shall we? They're kinda like Mid-Westerners, after all. They've got a snake-like body with feet like that of an eagle. Which doesn't really make them Mid-Western-esque at all but their affinity for Pabst Blue Ribbon and corn hole does (can somebody please explain that fascination to me?!). Also, they can fly but don't have wings. And they like their possessions deep-fried as is evidenced by the fried pearl (the Chinese dragons are often seen with a pearl which is believed to be their source of power).
 My students were pretty unfamiliar with the characteristics of the Chinese dragon because they're usta seeing this European/Fairy Tale number. The Euro-dragon is much lie a Southerner in that when it says "Bless your heart" it really means "I hate you and wanna breathe fire down your neck". Also, when it's not flying with it's wings, this dragon can be seen wearing copious amounts of seersucker. And loafers without socks. And shirts with GIANT Polo logos. Ahem.
 After that brief chat with the kids, we spent three / thirty-minute art classes crafting these bad boys. On our first day, we began by creating a base for our dragon. For that we pounded our clay onto a texture and into a slab as thick as a cookie. Check out this post to see what I'm talking about. After our texture was in the clay, we cut the clay out with our wood skewers into a choice of base shapes: round, square or flower-like (which was later folded up to create water-y like waves).

With the excess clay cut off from the creation of the base, the kids rolled a thick coil that was about 5" in length. Once that was complete, we draped the base and coil in a damp paper towel, gently placed it into a zip lock bag and wrapped it up until our next 30 minute class.

The following class I gave the kids a rough and rapid idea on how to create their head (see below in just a momento). I don't like to get too detailed because I want them to come up with ideas of their own. I also had loads of Chinese dragon pics available for them to draw ideas from if needed. At the end of that 30, we didn't attach the heads (I had visions of them falling off whilst sealed in the damp bag) but placed them on the base with the coil.

On their third and final day, heads were attached and an environment for the dragon was created. If details like spikes, limbs, horns, fire, you-name-it's were desired, the kids added 'em then. After drying out and being fired (kinda sounds like I'm talking about Lindsay Lohan, donnit?!), the kids spent a coupla days glazing with Mayco's Stroke and Coat. And, viola-ness! Ceramic Chinese Dragons, y'all!


 Now, let's address the kiln less folks in the group, shall we? A similar dragon can be created with one of my fave kiln-free clays: Scupley. Almost every year, my students engage in a Sculpey bead-making project and almost every year, this is all that's left. Lots and lots of white.
 No worries! You can create any color of clay using that white stuff as your base. Case in point, a dragon's head. Just roll the desired shape in white, flatten your color to a paper-thickness, wrap it around your shape and roll smooth.

 Which might look a lil like the left. If you have white spots, fill 'em with some Scupley Band-Aids and roll again.

Now, these are the same rough and rapid directions I have the kids when they were creating their dragon's face. Use that skewer to skewer a mouth. It kinda mashes the shape a bit so you'll have to resculpt that face. But you can do it. 
 I like to use my fingers to create the indentions of eye sockets. Now roll some small spheres (because we don't say "balls" in the art room, ahem) and place them in the sockets. Remember if you are working with ceramic clay, you gotta slip and score. She slips! She scores!
 It's all about the details, y'all. Add some teeth, fire coming outta the mouth, a tongue (although preferably not all three as that's a mouthful. Literally.)
 I created a coil body in the same white-covered-in-green way as the head. Although this time I used two kinds of green and left some of the white areas alone. I was kinda digging the camo look.
 I know, right?
 Attach that head to the coil and shape. Bake in your oven at 275 (I think, check directions. I burn everything on a regular basis so my clay-cooking advice might not be the best) for abouts 15 minutes. And your finished!
 Suriously, yous guise, the kids were so thrilled with their dragons.
 I love watching the kids work with clay. It's a medium that kids who aren't fascinated with 2-dimensional art can really bloom. I mean, this artist was so into his dragon-making, he even created a baby dragon!
 You'll notice that most of the kids included a pearl...and many of them had a story to go along with their dragon. I love the detail in the face on this orange guy.
 And there you have it, y'all! Chinese dragons by the third grade set! Have y'all ever done a project like this before? If so, I'd love to hear what your students created. Special thanks to Rina for the inspirational-lesson!

Chat at Y'ALL soonish!

Read more »