Showing posts sorted by relevance for query grade 2. Sort by date Show all posts

Thursday, April 4, 2019

In the Art Room: Mad Scientist STEAM Lesson for First Grade!

 About three years ago, I did a project titled Mad Scientists. We focused a lot on color mixing and drawing three dimensional shapes. We even did some bubble printing. The end result looked like this:
And you can find all the lesson details here. 

And while I really did enjoy this lesson, along with my students, when I went to do it again this year, I decided to put a different spin on it...and include scientist self portraits!
 This was a lesson that took several days. I have 30 minute art classes with my first grade, twice a week. Here's how we broke it down:

Day #1: we watched two wonderful bubble videos. One explained the science of bubbles and the other showed GIANT bubbles being blown on a beach. We went to our seats and filled our construction paper with bubbles using chalk. I walked around the room with my Target Dollar Spot bubble gun and we took bubble dance breaks throughout the class. It was super fun.
 Day #2: We learned how to draw three dimensional beakers! Here's the video I used then and this year too. We drew in pencil first and then traced in Sharpie. Feel free to use it in your art teacherin' world:
Day #3: We read Mix It Up and learned how to use the primary colors to fill our bottles and create the secondary colors! Early finishers met me on the floor and we also read Mouse Paint. 
 Day #4: We drew ourselves as Mad Scientists!
Day #5: We traced our drawings in Sharpie and added color with construction paper crayons. Many were ready to start cutting out their portraits. 
 Day #6: We put it all together! Many kids wanted to add more bubbles when they were finished so after they collaged, they returned to bubble making. 
 I really love this new layer of this project...each one is so stinkin' amazing. 
 Next time, I'd love to share with them more about famous scientists. We spoke a lot about Einstein...but I do want to share more with them, especially female scientists. 
 We used so many different media and learned so many techniques in this project that it was so fun. 
You'll have to let me know if you give it a go! 
 photo signature_zpsd10b3273.png

Monday, July 10, 2017

In the Art Room: Celluclay Taxidermy Creatures!

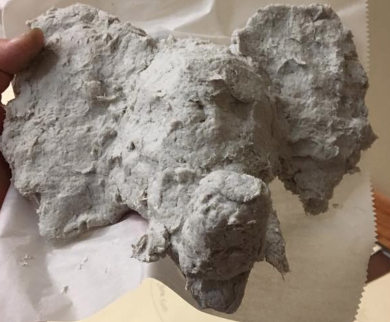
Y'all, I know. You don't even have to tell me: these are the ugliest things I've created to date. When I showed the hubs the creation on the right, he said, "that thing is scary. Like really scary." This coming from a dude who lives for haunted attractions. Mission accomplished. 

I got the idea for this Celluclay project when I hosting my #creatingwithcassie craft nights over on Facebook live. It is similar to a project I did when writing my book except with that project, I used air dry clay and created cute little forest animal heads. With this one, I used Celluclay and made these ugly/cute bad boys. How to here:
Supplies: 

* Celluclay: To say I am obsessed with this stuff is an understatement. I love me some Celluclay every since discovering it when writing my clay book. For a grade level of 80 kiddos, I'd say you'd need 2-3 bags of the 5 lb. of clay. I always premix the clay, I never let the kids do this. It's very dusty and, with a group of kids, could get real insane, real quick. I like to mix mine up the day before, creating batches the size of a large grapefruit for every two kids. I then wrap the clay in plastic wrap and store in the fridge so as not to mold. The next day, I place in a bowl and let the kids unwrap the clay.

* Water: For mixing the clay. Don't ask me about measurements. This stuff should feel like clay. Not to soggy, not too dry. 

* Cardboard for Wall Mount: This project is geared towards kids in middle school and beyond. I'm guessing they will be able to cut through cardboard. Chipboard and mat board would work just as well. 

* Aluminum Foil: The Dollar Tree sells packs of 30 sheets of aluminum foil. I love this! The stuff is already cut for you. I will say, it's a very thin foil. You and your students may have to use more than one sheet to build a strong armature. It will need to support the weight of the clay.

* Paint: I used acrylic but tempera would work. I always cover my Celluclay pieces in a varnish like ModPodge to seal and protect. 

* Polymer Clay: Totally optional! I used this to create the eyes and the teeth. I thought the difference in texture would be fun. 
 This guy is small, only about 6.5" in height. What I love about this project and working with Celluclay:

1. You don't have to wrap your project to prevent from drying when class is over or you need to take a break. Allow your clay to dry out. You can simply work the wet clay back into the dry. YES!

2. It sticks to everything! Seriously. I've adhered this clay to plastic, cardboard, tagboard, foil and plaster and I've never had to bust out the hot glue gun. 

3. For that reason, no need to slip and score! Yippie!

4. I love the rough texture it creates. However, if that is not your bag, then good news, you can sand the clay once it's dry. Use a fine grit paper and do this either outside or wearing a cute lil paper mask thingie. 
 I always and forever, amen dry my Celluclay in front of a fan. It can dry super fast that way. Otherwise...it may take much longer to dry and mold. No one wants that. 
I've used both the white and the gray clay. Both take to paint very well...so no reason to purchase one over the other. 
Because the Celluclay sticks to everything in the universe (in the best possible way), you can use such things as air dry clay in combination. We found that out while I was leading a clay session at Art Scouts (details on that amazing adventure later this week!). The participants were adding tooth-shaped clay right into their masterpieces while it was wet...the next day, they were stuck in to place. 
 I also shared this process during my online craft nights. I LOVED seeing everyone's spin on this project. Imagine where our students could go with this idea. This amazing unicorn was created with plaster trips instead of Celluclay...which works just as well! 
 Here are just a few of the incredible creations I managed to snag a picture of at Art Scouts. Love this elephant! 
 And this dragon! At Art Scouts, I had about an hour for the participants to create an armature and make their masterpiece. Pretty impressive that they could knock it out so fast. The method I share in the video makes it a simple process. Once home, the Art Scouts started sending me photos of their finished pieces. 
 Love this one by Polly Blair. Notice she did not cover her cardboard in Celluclay. Totally optional. It really giver her piece a great contrast between the smooth wall mount and the rough texture of the dragon. 
 And this cutie from Jennifer Day. That face is a total crack up. 
Here's a peak at the other clay creations our Scouts knocked out in just two hours! These were created by my Joliet pal Nora Gleason. The heart was created with Celluclay while the wings were made with plaster trips. You can find that project here
 And these cuties created by Ryann Hawkins. LOVE them! I can't wait to share more from our Art Scouts adventures in a future post. Until then, I leave you with these faces only a mother could love...
Ah! I failed to mention that the "retainer" on the dino on the left was created with an unfolded paperclip and attached with hot glue. The cat eye glasses were some I had in my stash where I just removed the legs and attached to the bridge of the nose with hot glue. The bowtie on the dino on the right, was created from polymer clay and simply attached to the finished piece with hot glue. Now...where to hang such craziness. My art room, of course! 
 photo signature_zpsd10b3273.png

Friday, March 7, 2014

DIY: Sushi on my Head, Sushi on my Feet, Sushi EVERYWHERE

So, I managed to score Snow Day this week, ya'll! Which, in Tennessee, means a coupla things:

1. It probably won't snow but it might snow so get yourself to the Winn-Dixie, buy all the beer and bananas that'll fit in your buggie* and drive like a crazy fool on the slightly slick roads, ya'll! 

2. Your TN friends will be blowin' up your Facebook with photos of their kids creating the World's Smallest Snowmen (complete with copious amounts of dirt and gravel), making snow angels in 1" snow (dirt -n- gravel angels to match the snowmen) and sledding. Again, in dirt and gravel. Cuz in the South we like to say, "You get whatcha get and you don't pitch a fit." This apparently applies to snow-dirt-gravel.

3.  It will more than likely be a lovely 70 degrees in just a matter of days (because TN weather is moodier than me after sobering up from a Beer/Banana Cocktail {see first footnote to understand my only slightly humorous humor}). So, for that reason, a Tennessee Snow Day is Sew-a-Sundress Day!
Since we are currently learning about Japan in art class, complete with my 1st grade friends creating a sushi collage, I thought it was about time I stitched up a Japanese-themed dress. I actually have a couple Asian-themed dresses in the works but they were placed on the back burner for my Artist of the Month dresses...which got put on the backety-back burner for my Valentines' Day number and my Dress Like a Book Character frock. Whew! Too many burners goin', ya'll! Story of my life.

For this here dress, I used the same vintage Vogue (or "Vague" as I like to call 'em) dress pattern as I did for my Crayon Dress. It's a pattern that honestly has hardly a whisper of directions, just arrows, diagrams and comments like "sew this to that and make sure it fits."
Even with those lame-o directions, this snowed-in seamstress was able to stitch it together (my apologies for the creepy speaking-in-third-person-ness). Speaking of snowed-in, that dusting of white stuff on the ground which kinda looks like I dropped a super small sack of flour? That's what we in Tennessee call SNOW. Yessur, that thar got me a day off from school and a two-hour delay the following day. Don't hate.
In my latest What I Wore post, I shared with ya this Sushi Hat that I wore for Wacky Hat Day. I had seen several images of "sushi hats" online and they looked simple enough to make. Turns out they were so easy-peasy that I even made some Sushi Shoes. Because what's better than Stinky Feet? Stinky Fishy Feet, that's what!
So just how did I make this, you ask (well, more than likely you are probably asking, "WHY did you make this" or maybe "WHY do you think I wanna know, I ain't makin' this!" to which I would respond, if you don't  have a handcrafted sushi hat and matching shoes, you just ain't livin', my friend). 

For this magical feast for the feet, you'll need some stiff sparkly felt (yes there is such a thing. My life is now complete), pompoms, tooth picks and white felt. Oh and a pair of thrift shop shoes you don't mind permanently adhering felt sushi to.
Cut a 2" strip of felt about an 1" tall. Hot glue your pompoms of choice to the end, roll it up and glue it closed.

Cut some white felt about 6" long, 1" tall. If you snip the ends, the white felt looks more like rice once it's rolled up. Wrap that a coupla times around and hot glue into place.
Like so. By the way, in each photo I had to cleverly hide my pitifully peeling thumb. This weather has my fingers cracking and nails peeling. Which means my dreams of becoming a hand/foot model are pretty much ruined. Sigh.

Oh! To finish, wrap the "sushi" in a final layer of black felt for the seaweed and glue into place.
For the sashimi, I did do a wee bit of felting so show the little lines of fat in the salmon. That was then glued to a bit of rolled up white felt and wrapped in a strip of black. I had to add a felt bit for ginger and a green lump for wasbi. Toothpicks worked best for the chopsticks on my shoes. For my hat, I used small skewer sticks.
And now a word from my boss, The Cat...
"Don't you believe for one second that this crazy lady sewed this dress herself! While she was making sushi, which, by the way, she wouldn't even let me sample!, she locked me in her sewing room and demanded I finish the hem of her dress. As you can see by the look of focus on my seriously cute kitten face, I take my job very seriously. Despite my lack of recognition by said crazy lady. Humph!"


Ahem, whatever. Don't you believe a word outta that cat's mouth! She's convinced me on more than one occasion that I've forgotten to feed her and tricked me into doubling her breakfast! She's basically a con-artist in a cute kitten suit. 

And that's all, ya'll! I hope you have a super fab weekend and I'll chat with you again at week's end!

* So I was at the grocery just a day or two before the weather hit and I noticed that there were no bananas like anywhere. And then I saw buggie (yep, that's what we call 'em down here) after buggie filled to the brim with beer and 'nanas. Is there some sort of Banana/Beer Cocktail I'm not aware of? 

Wednesday, November 7, 2012

In the Art Room: Printed Paris

Goin' out with a bang! We are slowly wrapping up our unit on Paris, France and what better way to say goodbye than with fireworks.
As my third grade students were finishing up these printed and chalked Parisian pictures, I was so impressed, I thought I'd share them with you. They were mighty proud of them too which lead to the following back and forth:

Kids: Can we PLEASE take these home today?
Evil Art Teacher: No! I must keep all of these masterpieces for the end-of-the-school-year art show!
OTL Kid [OTL = Out To Lunch]: When's the end-of-the-school-year art show?
EAT: The end-of-the-school-year art show is next week. 
OTL Kid: Yay! What time?
The Rest of Us: face palm.
Once we got OTL straightened out, I convinced the kids that this kind of art activity is one they could easily do at home. All that is needed is the following:
  • cardboard cut into 1" X 2" rectangles. Be sure to cut it so that the wiggly corrugated cardboard line is visible on the 1" side. This will keep the cardboard sturdy enough for printing.
  • tempra paint
  • paper
I know, I know, paint on the floor? Really? I never claimed to be the Smartest Artist Teacher.
Group of finished third grade prints.
Want to make some printed Eiffel Towers of your own? Well, it's super easy. I thought I'd share with you the steps I had on display for the kids to follow.


  1. We began by folding our paper in half both vertically and horizontally. After unfolding the paper completely, we brought the bottom of the paper up to the middle line and created another fold.
  2. From there, we printed a vertical line from the top of the paper to the first horizontal crease. We added two diagonal lines and an intersecting horizontal line at the top.

3. We chatted about parallel lines and created two parallel lines from the ends of the diagonal lines. These were both the same length of the initial vertical line.
4. We crossed the initial vertical lines with intersecting horizontal lines. These were filled with diagonal lines that created X's.
5. All along we are learning factoids about the Eiffel Tower and it's creator Gustave Eiffel. We used the Eiffel Tower bulletin board and my windows as a helpful reminder. The second level of the tower was created with a printed rectangle shape.
6.  A triangle shape was created underneath that as were the long diagonal lines of the side of the towers legs.

7. From there, we created the arch and filled the legs of the tower with horizontal, vertical and intersecting diagonal lines.

And while I loved the end results of the prints, I wanted the kids to experience working in another medium and add their own personal flair to the project. Hence the chalking of their prints. I created the display of directions shown above to allow the kids to work independently on this portion of the project.

We also chatted about some of the famous structures in Paris that could be included in our chalked landscape like Sacre Coeur, Arc de Triumph and Notre Dame.
The key is not to let your paper move as you smudge the chalk upwards. If this happens, you might lose image in your design.
The kids had great fun with this project. I've already received a couple "I did this at home!" versions of both the prints and the chalk. Nothing makes this Evil Art Teacher happier. You'll have to let me know if you decide to give this a go. Just don't let me get my hands on your masterpiece...it's likely you won't get it back. That is until the end-of-the-year...which I could only dream was next week (just kidding...we have entirely too much fun in store!).