Showing posts sorted by date for query art show. Sort by relevance Show all posts

Wednesday, March 1, 2023

Let's Talk Clay! Part 1

Well hello there, y'all! It's been a minute...and, if you haven't heard, a lot has happened around here. Like, for instance, me stepping away from teaching art in a classroom setting after doing so for 25 years! I KNOW. CRAZY. All the details on THAT very soon but first...a little something that I've been promising on Instagram for quite some time: a big ole post on all things CLAY. 

Let's first cover my supply list of Must-Have's for working with clay:
* TOOTHBRUSHES! I'm so sorry to shout...actually, I'm not. You will thank me later but THIS is what your kids should be using when they slip and score. Buy this set and use them year after year!
* WATER DISHES! This is where we keep our slip. In fact, I use the same set of no-spill cups each year, just add more clay to it. When clay time is over, I let the water evaporate and just leave the dried clay inside. When the new year begins, I just add water and we have insta-slip! Kids dip their brushes here. We also have a set of these just for painting...so I don't have to worry about cleaning them out when we switch from clay to painting!
* DOGGIE DISHES! Okay, so this is an alternative to the no-spill cups. I love these! We use these also when painting. So if the other cups are too much for your budget, try these!
* DOILIES! Since I started shouting, now I just can't stop. I LOVE doilies...in fact, just scroll below and you'll see a ton of my projects features a texture...it's from theses bad boys! You can also find them at your local thrift store and yard sale so be on the look out!
*SKEWERS! I think we all know about using skewers with clay but one thing that really always bothered me was how long they were. I was always thinking someone was gonna lose an eye! Not a happy thought. I discovered these shorter skewers a couple years ago and now...this is all we use. 
*TRAYS! Contain all of that dusty mess with trays. I didn't start using trays until recently and I was like WHERE HAS THIS BEEN MY WHOLE ENTIRE LIFE?! 
* GARLIC PRESSES! Oh man. You can't just get one of these. You're gonna need bunches! I found them here...but I have also found them less expensive at the Dollar Tree and Walmart. 
* REUSEABLE TOWELS! Oh man...I cannot tell you how much this saved the MESS in my room this year. Hear me out: I placed a bin of water on each table with a splash of soap and 2 towels. At the end of each art class, the kids used a towel to both clean their hands and the table. This kept the dust mess down! My custodian friend was so happy. 

The other items you'll find on my list are the air dry clays I've used in the past. I'm also sharing glaze (which is only used on kiln fire clay). I purchase my clay locally from The Clay Lady. She also sells the clay mats I strongly recommend. If you purchase your clay locally, you'll be supporting local businesses. 

And now...on with the show!

Isn't it crazy to think that we are expected to know about all things clay...just cuz we have an art teacherin' degree?! Well, I created a video sharing everything I know about clay. You can catch even more details in this blog post. 

Of course, there are plenty of ways to add beautiful color to ceramics without the hassle of a second fire and of the expense of glaze. I'll share a TON of projects in the second installment of this blog post that do not require glaze...and still look amazing. BUT FIRST...
What is Clay is a video I created several years ago to share with my students on the very first day of working with clay. With my 30 minute classes, we watch the videos and then we spend the rest of class just rolling up our sleeves and getting a little messy. It's a great introduction to clay, no matter what the project. Here's a peak at the video:
And now...a moment from our sponsor. 

Me. I'm the sponsor. 
Many of my projects can also be done with air dry clays, either homemade or store-bought. And if you are kiln-less and would like a little more guidance, I wrote a whole book about it! You can find it here
Okay, y'all. I really thought I could also add all my favorite clay projects also in this blog post BUT...I think I'll save that for the second installment of this series, so stay tuned. Until then, have a good one!


photo signature_zpsd10b3273.png


Saturday, November 5, 2022

3 Fun Art Lessons to Show Gratitude

Over the years, I've done a handful of gratitude style projects that my students have not only enjoyed but really sparked joy around the school. I'm breaking these down from most involved to easiest incase you are uncertain which you'd like to do.

Let's start with my favorite: Gallery of Gratitude Modeling Clay Portraits!
For all the lesson details, you can visit my first blog post where I created a video I shared with my students. This introduced a modeling clay artist as well as walked them through the steps. 
I did this lesson with my fourth grade students. They could choose who to create a portrait of...but, as you can imagine, that got a little tricky. Several students volunteered to create a portrait of a teacher or staff member whom they didn't know well. We talked about how everyone in the school is important, their role in the school and how they make our school better. After the first two 30 minute art classes, we got about this far. 
You can see their completed portraits here, framed in a sparkly Hobby Lobby plate! Students also had to type up why they appreciated the staff member. This was printed on framed paper and hung with the clay piece. Many teachers still have these portraits in their classroom!
This Gallery of Gratitude was created by all of my students, kindergarten through fourth grade. My older students created the portraits while my kindergarten and first graders added the High Fives and the hearts. 
Here was the set up for my students to create their framed portraits. Teachers names were laid out as well as sparkly paper for the frame. 
Like the other project, students had to express their gratitude toward the chosen staff member. 
If you need a shorter lesson or one that is more student-focused, try this Tiny Gallery of Gratitude on for size! You can download it for free right here!
There is even a simplified version for younger students, also free, right here. Have fun!


photo signature_zpsd10b3273.png

Sunday, September 25, 2022

Creating Line-Making Stations in the Art Room

Hi! I shared earlier this week that all of my students, kindergarten through fourth would be doing line-making stations for 2, 30 minute art classes as an introduction for some and a review for most. I created a short video to walk them through each station and you can check it out here to see what we were up to:

On my Instagram, I got some questions about where I got the line spinner and the other resources I used...I made them! And it was so easy, I thought I'd show you how I did it in case you are interested. So here's the how-to video:

I've already decided what each grade level will do with their collection of line-making papers and I'll share soon. In the meantime, I'm already thinking of ways to expand on this idea of stations. The kids are loving it and it really helps with the wiggles. We have the need to move and this helps. Although a balance of calm days will definitely be sprinkled into the mix! 
Because my students do stations in PE, this concept was something they easily understood. Honestly, the only thing holding me back on doing this sooner was...me! I'm not great with change but this year, I am excited to try all sorts of new things. It's helping me get outta of my burnout that I was experiencing since 2020.
I think that's one of the reasons I slowed down so much on blogging this last year: I just felt stale. I'm feeling excited now...and I think the kids are too.
Anyway, I just wanted to share how we created these centers in case you are interested. I hope you have a relaxing weekend!


photo signature_zpsd10b3273.png

Friday, June 17, 2022

In the Art Room: Cassette Tape Sculptures!

I've not shared details from our art show yet...I've just been enjoying my summer vacation a little too much, I guess! But we had a themed art show, as we usually do, and this year it was 1980s themed! 

I came up with the theme after winter break but got the idea for this project a little too late in the game. We ran out of time to create these cassette tape sculptures but I did create a video...and I thought I'd share it with you just the same. 

The boxes were ones I happened to have a surplus of in my storage closet. But they look like they probably came from here, if interested. The plaster strips are from here!
And the video is here! Have fun!


photo signature_zpsd10b3273.png

Tuesday, April 19, 2022

Let's Make a Black Light Disco Ball!

Our school-wide art show is coming up and our theme is 1980's! And, I know what you're thinking: aren't disco balls more of a 1970's thing? Well, I suppose although I do remember them in the skating rinks growing up and loving them. So I thought my fourth graders would enjoy creating them as their contribution to our Glow Gallery! 

The supplies we used are the following:
* Cardboard pizza circle, found at restaurant supply stores
* Permanent markers
* Silver paint
* Neon tempera cakes

This is a quick lesson, perfect for my 30 minute art classes. We spent the first class drawing and tracing with a sharpie with just a few who started painting. Next time, we'll wrap these up and hang them from the ceiling in the glow gallery. Here's the video you are welcome to use in your art teacherin' world:


photo signature_zpsd10b3273.png

Sunday, April 3, 2022

Clay Mugs for Kids!

Hi, friends! My students are wrapping up one of the clay projects they created and I thought I'd share. Last year, my first through fourth created clay mugs and it was easily everyone's favorite clay project. When I shared that we were working with clay again, a few weeks ago, their first question was "are we making mugs again?!" I had already planned on it...so they were excited to hear the answer. Once mugs are complete, we celebrate by drinking hot chocolate out of them...so it's a whole lot of fun. 

This year, I created a video to share with them. Because I have 30 minute art classes, I only showed the pinch pot portion and a bit of coil making for the first class. The second class, we did a brief coil making reminder and then watched the portion about creating a handle. The video helped them trouble shoot and get their mugs completed in just two 30 minute classes!
This week, we started glazing! They were told they could use any two colors of glaze, one for the inside and one for the outside. They were to do at least three coats of their chosen colors and not to glaze the bottom. Once complete, they could join me at the splatter glaze station!

When my students were finished glazing, they could help a friend or work on the large banners I created to announce our upcoming art show! 

We used Prang's Creativity Street Tempera Sticks to color these with.
The glaze we used are from two companies and I like them both: Mayco's Stroke and Coat and Amaco's Teacher's Palette. Both are food safe and fire to cone 06.
When introducing clay to your students, you might find this video fun to share:


Sunday, March 28, 2021

20 of My Favorite School-Wide Collaborative Projects!

Collaborative projects! Collaborative projects are one of my favorite things. I love them at the start of the year and the end. I love doing them with the whole school or just a grade level. I love using songs, themes, artist-inspiration...you name it. I just love collaboratives!

We've done a TON over the years and I thought I'd put them all together in one big ole blog post. So, here you go: my 20 Favorite Collabortive Projects. Be sure and click on the links, many of these have how-to videos. 


Check out this blog post on how we created several canvases in this style for our school and the school library!


Students worked in table teams to create these positive four-letter words to describe our school

A fun mural based on the book You Be You was created by nearly all of my students. You can learn about the process of creating our fish here. Read all about the making of the mural itself here!

Another book we used for inspiration is the book by Todd Parr called It's Okay to be Different. You can check out how we created these collages here!

The Our School Has Heart mural was a piece with a contribution from each student in the school. You can see the breakdown of who created what in this blog post
Our clay collaborative mural is a bright and shiny beauty that hangs in a prominent place in our school. Each student contributed something to this piece...you can read more about the process here

One year, we created a Village of Kindness as apart of our art show! Each student upcycled a milk carton that our cafeteria queen cleaned in the dishwasher. The students made little doors that opened and said kind words to those who peeked inside. Students worked together to create the landscape on the bulletin board. 

I love to do collaboratives at the start of the school year. I especially like ones where students celebrate our school and that set a postive tone. That was the idea behind this collaborative!
Another fun way to start the school year is with some selfies! We've created them for a monochromatic mural. You can check out the video here. 
Inspired by the artist Romero Britto, this mural was created by my students when I was out for jury duty! My sub just played the video and when I returned, I assembled the mural!
A collaborative mural that definitely made the rounds was this one! The kids loved creating the feathers and it was a beautiful thing while in the hallway but I will say...it was a lot of work to assemble. All the details here. 
My fourth graders created this collaborative one year that lives at the front entrance of our school. We even 'wrapped' it for Christmas and brought out admin out for them to unwrap it as it was hung on the wall of our school. 
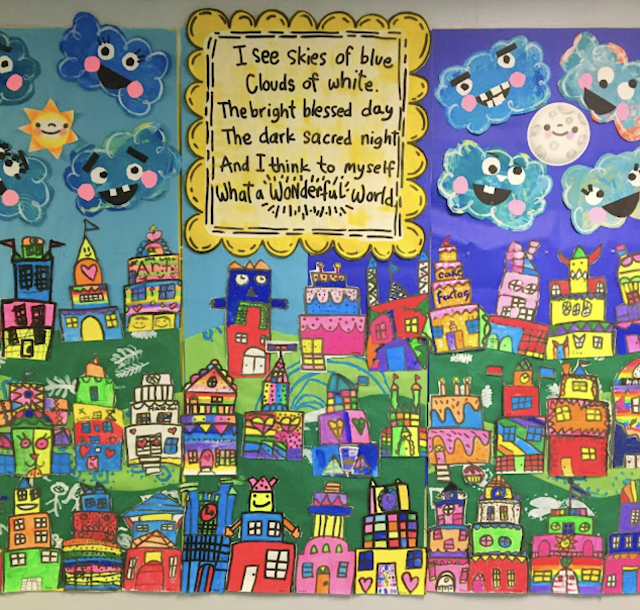
We kicked off this school year with our What a Wonderful World collaborative mural. Details and video tour here. 

Here's another look of our school mural. Above that, you'll see our Learning for All collaborative!
During our field day one year, my students rotated through many art stations. One of them was this alphabet and number series. My librarian requested them and we just love how they turned out. Click here to see them framed and hung in our school library. 

Much like our monochromatic collaborative, this map collaborative was created with a self-portrait of each of my students! 

We are the tigers at my school so we do tiger-themed artwork every so often. This mural was created by first graders of all of their tiger drawings. You can find a how-to video right here!

In table teams, my third graders created a Rizzi City inspired by the artist James Rizzi. 

One year, we did super-sized works of art inspired by Andy Warhol and Vincent van Gogh! When these came together, they were stunning. All the details can be found here


photo signature_zpsd10b3273.png