Thursday, May 3, 2012

In the Artroom: The Art History Wall

A Rockin' Trip Thru Art History with...Mona Lisa's Masterpieces.
This week in the art room, I thought I'd share with you the backdrop seen in many of my What-I-Wore-This-Week posts. Every school year, I create a theme of study. The year I created the Art History Wall, our theme was Rockin' Thru Art History. I wore this wacky apron and the kids created guitars and rocked their way through the history of art.  I loved the wall too much at the end of the year to take it down. With the exception of a random piece of art falling off the wall, it's held up well through the years and, more importantly, it's proved to be a valuable educational tool in the art room.
Every art room should have a mascot.
I am fortunate in that I have a very large art room. Once upon a time, my art room was the school library. So it is very long with plenty of former book shelves turned cabinets and storage.
The Wall in total. Narrowing down the history of art to fit my wall was the hardest part.
That being said, I have this very large wall space which seemed to be the perfect canvas for a giant display. I began by jotting down the major movements in art history. From there, I rooted through my mountains of visuals: old calendars, postcards, posters -- even cutting up the art history books I'd hoarded since college, to find just the right images.
In the Beginning...we had rock art, no paper, no scissors.
With my art movements and visuals sorted, I began the writing of the Art History Wall. This proved to be difficult as I had to keep it simple and kid friendly. To add a little  three dimensional pop to the wall, I clued a piece of foam to the back of the purple papers as well as some of the visuals.
If you are interested in creating your own wall, feel free to borrow from mine as much as you like. The following are the movements and their simple descriptions:
Rock Painting: The beginning of art...
Ancient Egypt: tombs, pyramids, mummies, OH MY!
Ancient Greece: athletic people that believed in many gods...
Ancient Rome: expanded Greek art ideas (after conquering them)
Middle Ages: Bible stories were told through art
Early Renaissance: Artists learned to paint realistically
High Renaissance: Michelangleo painted the ceiling of the Sistine Chapel and sculpted David; Leonardo da Vinci sketched inventions and painted the Mona Lisa

Dutch painting: Dutch artists painted portraits, still lives and genre paintings
Romantics and Realists: wanted to show emotion in their art
Impressionists: group of artists that wanted to show color and light
Famous impressionists were Monet, Manet, Renoir, Degas, Cassatt
Post Impressionist: artists that created after the Impressionists and expanded their ideas: van Gogh, Seurat, Cezanne
Modern Art: In modern art, artists realized that the possibilities are endless!
The bulletin board beside the art history wall.

What's the point in having a mascot when you don't get to wear a silly costume? I got this idea from one of the most amazing and inspirational art teachers I know, Debi West. You can read more about her and her students here.
And there you have it! We put the wall in action when we are learning about an artist or a certain movement in art. I'll ask the kids to follow me to the Art History wall so they can visually grasp important periods in art. Thanks for reading!

Tuesday, May 1, 2012

DIY: Floral Embroidery

So, do you remember that floral embroidery sneak-peak I shared with you here? Well, I finally finished it! But if you want to read more, you'll have to head over to one of my favorite blogs, The Little Red Squirrel.

Sweet Katie, the creative mind behind The Little Red Squirrel, is on vacation in Paris (I had to photoshop my green-with-envy face) and asked me if I wouldn't mind being a guest blogger for her. I shared with her readers my floral embroidery DIY. I do hope you'll take a look and add her blog to your blog reader, it's fantastic!

And thanks again, Katie, it was a delight. Enjoy your holiday!

Monday, April 30, 2012

Weekend Adventure: Back and Forth

I love this turtle mosaic by the Tennessee artist Sherri Warner Hunter. This guy was featured with several large mosaic fish and a lizard bench at a rest stop on the way to Chattanooga.
This weekend, hubs and I took a road trip to Chattanooga, Tennessee. Now, if ya'll aren't from around these parts, Chattanooga is a sweet town most famous for it's Lookout Mountain. To access the mountain, you can take what's called the Incline Railway which is a sort of train car that halls you at a near 75 degree angle to the top. It is not for the faint of heart.
It's about a two hour drive to Chat from Nashville. On my lap was my latest embroidery project. I'm working from a vintage dictionary with the best illustrations. I can't wait to share with you the finished product...but it might be a while.
Having done the Incline before, we passed on it. Besides we had other things on our agenda. Me, I was all about the vintage, antique and thrift shops. Hubs? Well, if you must know, it was the donut shop. Seriously. We drove two hours for donuts.
Not just any donuts, mind you, Julie Darling Donuts. They were pretty fab. We sampled the red velvet, blueberry and the glazed. None of them were your traditional donut: the glazed was amazing with a bread like texture; the blueberry was crispy on the outside like it had been deep fried and the red velvet had an incredible cream cheese frosting. They also had a bacon donut and an Oreo covered number that looked pretty interesting.
Chattanooga is a pretty arsty town with sculptures and paintings along their river front. I took piano lessons for years, but those of you that know me, know the real piano story. Those of you that don't know this infamous tale, let's just say it involves an Amish piano-tuning dude, my mother and something you'd never thought you'd find inside a piano.
After devouring our donuts, we walked along the riverfront venturing into shops. I managed to do a little damage at one antique store before we hit Lupi's Pizza.
One of my finds: I picked up this sweet little bird tray at The Knitting Mill Antiques. I loved it's unique diamond shape. Perfect for holding my wool snippets and my hook. The little snippets can be felted and made into things like this sweet pin cushion.
Our intent was to stay over in Chat...but to be honest, we felt like we'd done what we came to do: eat deliciously naughty food and buy other people's junk. To Do, Ta Done.
Getting home early allowed me to finish another square in my rug hooking! The flower took a lot longer than the geometric design but I'm really excited with the result.
The variegated yellow wool and the maroon wool that are outlining the flower are both from recycled clothing. I cannot wait to start on my next square. But I have entirely too many other things on my Shoulda-Gotten-Done-Five-Days-Ago list to even think about that.
Okay, the real reason we drove all the way to Chattanooga and back again? This sweet face.
Not only that, but someone has staked her claim in my wool storage! And, lemme tell you, if you even attempt to pull out a strand of wool on her watch, she'll shred you to bits with those claws. So, until she moves on, looks like I'll working on that embroidery!

Saturday, April 28, 2012

What the Art Teacher Wore #14

Floral, Gingham and Dots Monday: This photo was taken as the UPS man drove by, honking and waving at silly me and my tripod. sweater: vintage and thrifted; skirt: Anthropologie, last summer; tights: Target; shoes: Dolls by Nina
Kids, you'll have to forgive me, but I've gone a bit berzerk. Not only did I find some super groovy masterpieces that kinda-sorta coordinate with my ensemble...but I've also found The Missing Link. I'm not talking about some neanderthal-looking dude (though I'm pretty sure that guy was standing behind me in Goodwill yesterday telling his kid to, "Git over hair, nay-ow!"). I mean, The Missing Link to completing my look. I'm adding each to my Christmas, birthday and Arbor Day wishlists (what, you don't get prezzies on Arbor Day?). Thanks for indulging my silliness. Enjoy!
Red, White and Blue Cherries created by the husband and wife team at Just Plain Pix.Cherries are my absolute fave fruit. You?

I really really want a bike. Not to ride or anything. Just to look at. I promise I would look at it every single day. Can I have this one, pretty please?

Surprise! Evaluation Tuesday: Erm, yeah. My dear principal came about 30 seconds before my kids did for my surprise evaluation. No word on how it went. But there was no rolling around on the floor, crying or fit throwing, so that's good. I was on my best behavior. dress, jacket and belt: vintage, thrifted; tights: Target; shoes: Lucky, purchased on the cheap at Marti and Liz

The browns and golds in my outfit reminded me of this painting. Do you recognize it? It's kinda famous. But it's a little difficult for me to see...

Oh, that's better. I just needed my fancy smancy brown and gold cat eye glasses that coordinate with my outfit to help me see. Now I recognize her, it's Mona Lisa by "Vincent da Vinci" (a direct quote from one of my students this week).

Seeing Spots Wednesday: On this day, I just happened to be wearing an apron...which was good because I managed to pour a ton of paint all over it without even noticing. Afterward, one of my kids told me that my name should be "Mrs. Messy". dress: vintage, thrifted; sweater: thrifted; shoes: thrifted and altered by me...I had to add the blue fabric just to keep the shoes on.

Explosion, Roy Lichtenstein ... this is pretty much what my apron looked like after the paint attacked it.

Wonder what the UPS man would say if he saw me in my polka dotted ensemble on the steps of this  red spotted house with the teal blue steps?

Thursday: sweater: Paris Market Vintage for $4! ; dress: Talbots, thrifted; belt and flower: H&M; fishnets: Target; shoes: Indigo by Clarks; kid sunglasses: ebay

Love Angie Lewin's work. She's got a book out of her prints as well.

You see, I won't be riding the bike because I'll be driving this! I really want a vintage car. But hubs has had his share of old cars: a Bronco and a couple of Mustangs and says his days with the oldies are over. Sigh.

Friday, My Love: sweater: Ann Taylor, thrifted; dress: vintage, thrifted; belt: made by me; shoes: BC Shoes

My outfit reminded me of ketchup and mustard. So did this painting by Henri Matisse.

And what better way to handle one's ketchup and mustard than with these incredible gloves. I went through a phase in high school wear I wore sweet lace gloves until my giant man-hands busted out of them. Oh well. One can dream.

Wednesday, April 25, 2012

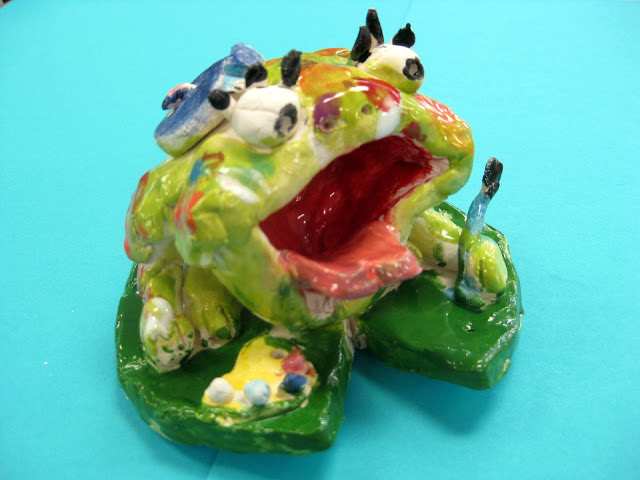
In the Artroom: Fabulous Frogs

Painterly Frog: This here is a froggy artist that really gets into her work. Notice the sweet details like the paint brush, palette, blue beret and, of course, the paint splatters.
I can't tell you how much fun it has been to go to school, open the kiln and be greeted by these guys each morning. While learning about all things Claude Monet, my third grade students contributed to our school's Mammoth Monet Mural with their frog-tastic drawings. When brainstorming their upcoming clay projects, I thought it would be good to continue our Monet theme. So my second graders created ceramic waterlilies and my third, these frogs!
Redneck Frog: Oh my, can you believe those teeth?! I am so in love with this backwards-baseball-cap-wearing, orange-eyebrows-on-the-outside-of-the-baseball-cap wigglin', mysterious-black-bug-eating Hillbilly Frog!
Obviously, the kids really enjoyed creating these unique frogs. They have been so pleased with them, as they should be. I loved this lesson because, once the kids followed the steps of sculpting their frog, they were free create any sort of frog imaginable. And they did.
Fashionista Frog: That was actually the name given to the frog by the artist. Apparently, Fashionista's hobbies include"being pretty, being sassy, hopping and teasing the poor fish." Hmmm, sounds a lot like the artist herself!
For this Fabulous Frog creation, we used the following:
Artistically-Inclined Frog: I was really concerned about the stability of this frogs easel that is precariously straddling the lily pad but it made it out of the kiln unscathed. Notice the little beret, the palette and the paintbrush.
Because I have half hour classes, I taught this lesson in several classes. On Day #1, we:
  1. Twisted our grapefruit sized piece of clay into two equal pieces. 
  2. With one piece, we pounded the clay flat into Oreo-cookie thickness and traced a template that was in the shape of a lily pad. We wrote our names on the bottom of this clay, wrapped it in a wet paper towel and placed it in a zip lock bag with our names written on it.
  3. With the other half of the grapefruit, we created a pinch pot for the frog's mouth and body.
  4. With the leftover clay from cutting out the lily pad, we rolled coils for the legs and attached them to the pinch pot with the toothbrush and water.
  5. The pinch pot with legs was then wrapped in a wet paper towel and placed inside the ziplock bag on top of the lily pad until next time.
As the kids were working, they were constantly coming up with names and quirky stories about their frog. So, once the frogs were out of the kiln, I had them do a little froggy biography.
Day #2:
  1. I demonstrated to the kids how to add eyes and a tongue.
  2. I explained to the kids that all things can be created out of clay with the use of a sphere, a coil or a slab.
  3. We brainstormed different ideas for frogs and froggy accessories and discussed how they could be created.
  4. Students completed their frogs (just barely in a half an hour!) and attached them to their lily pads.
Standardized Test Taking Frog: Yep, it's the time of year. Notice the #2 pencil. What you can't see is that this frog is also wearing a fabulous red and blue backpack.
Day #3 and 4: Once the clay projects have been fired, we begin glazing. I tell the kids I only have two rules for glazing: don't glaze the bottom (it will adhere to the shelf in the kiln) and no glazing your clay projects five thousand colors. We spend one day just blocking in the colors with at least two coats of glaze.
Rock Star Frog: Gotta love a frog that dyes his mohawk to match is guitar.
On the second day of glazing, we use smaller brushes and begin to add details like dots, stripes or just delicate lines.
Special Agent Frog: Ma'am, I believe I found the dragonfly you were looking for...

And here was our final task: writing about our fabulous frogs. The kids don't get to take their frogs home for a couple of weeks due to our school-wide art show. But they were dying to see them and chat about them. So, we filled out this sheet in pencil and traced over our pencil lines in skinny sharpie. This paper is actually a folded card. When we display the frogs at the art show, this little placard will sit next to the artist's frog.

Paint-Brush-in-my-Mouth Frog
This project really brought out the kids artsy side...which is why I think they created so many Artist Frogs! It also brought out more of their crazy humor...I learned that during this exchange:

Me: Hmmm...it says on your sheet that your frog loves to eat "pizza, sushi and ... frog legs?"
Kid #1: Yep!
Me: You do realize that you made a frog. And he likes to eat other frog's legs?
Kid #1: Yep, he's got cannibalistic tendencies.

Ya gotta love 'em!