Showing posts sorted by date for query Field day. Sort by relevance Show all posts

Saturday, August 11, 2018

What the Art Teacher Wore #201

Hey, friend! Well, I made it! One week down (with two of those days being PD and the rest being with the kiddos) and many more to go. I will officially see my artists on Monday...but even without the wee ones in art, this week still wore me out! On Monday, we had some professional development during the day. Our evening was our Meet the Teacher night where I thought my new shirt from Old Navy would be perfect. 
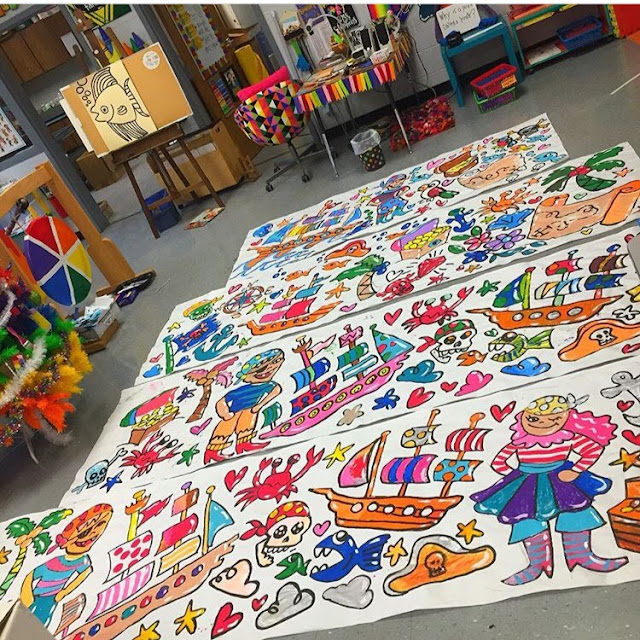
 Normally, at the start of the school year, the halls are barren and drab. If you remember, my students painted this huge HUGE banner on field day. I saved it from that day and hung it right before school started. I added some Welcome Back banners to go above these giant paintings. They make me so happy and brighten our halls. 
Monday: Shirt is from Old Navy; necklace: J.Crew Kids; skirt is vintage from Etsy; shoes: TJMaxx; headband (seen in first photo) was created by a fellow art teacher!
Every new year means trying new things. One thing I'm trying out this year is having a little mailbox for the kids to place their drawings and notes. Like most teachers, I get A LOT of fan mail...and while I love each and every one, it can eat up a lot of instructional time if I go through them during art class. I found this cute little mailbox at Joann's and my buddy Ali used her Cricket to bedazzle it for me. The idea is that the kids can place their drawings in there. I have a special place for notes and drawings called The Masterpiece Gallery. I'll keep you posted on how this goes!
Tuesday: Sweater and headscarf: thrifted; necklace: The Paper Source; belt: Amazon; dress: Modcloth

Tuesday was meant to be a work day and I felt like I got nothing done. I'm so glad that I put in my hours before most folks were in the building. I've noticed that I'm super social and love to go around and visit...and folks love to pop by and visit me. Since I was mostly prepped, it wasn't a problem. In years past, it always stressed me out and put me behind. So I guess there is something to that whole "planning ahead" thing.
Wednesday was our first day back and it was a half day. No kids in art so that meant I had time to slap together a welcome back photo op (with the help of my music teacher friend Kiera!). We were pretty proud of our 5 minute backdrop making skills. I'm just glad I'm so good at hoarding fun finds from the Dollar Tree which is where the flora and fauna are from. 
 Welcome Back Wednesday: I decided to join in on the photo op fun by dressing in my Crayon costume. Scored this bad boy from Amazon a couple years ago. 
Here's what I was wearing underneath: t-shirt: Forever21; belt: Amazon; watches: Swatch; necklace: made by me; skirt: thrifted
Since the kiddos are coming on Monday, I've been prepping our table folders. This year, I decided to laminate them so we can use them over and again each six weeks. Details about them here.
 Nearly every year, for as long as I can remember, I've made a Back to Art Teacherin' Dress. The start of this school year has been just a little busy...and my focus has been on other things. I'm so bummed I didn't make the time to create a BTS dress! I've got so many ideas in my head...just not enough hours in my day. Details on this dress I created last year here

This was our first full day with kiddos. It's been our tradition for as long as I've been at my school, to pool all the kids into the Multi-purpose room and cover school rules, make introductions, talk about arrival, dismissal, lunch and so on. Last year, we got wise and made a video that covered nearly everything. It's a great way for us to make sure all kids get the basic school information that they need to be successful.
 I used to always cover my tables in paper....but it got to be too much of a waste of paper and my time. However, I do love to do it at the start of the year as there is no confusion what table the kiddos sit at. 
 It also allows me to number the spots. I do give assigned seats...so being able to say, "Jimbo, you are Green Table #1" is so much easier when they are marked this way. Once the paper gets too gnarly for use, we'll pitch it and, hopefully, still remember our seats. 
 Fri-yippie! My tables are prepped with our first day(s) activity and I'm feeling pretty good about it. Dress: made by me, details here; shoes: Chucks; belt and crinoline: Amazon! 
 I love LOVE to do collaboratives as apart of our first days back and this year is no different. Details on this to come as I'm still working on those dirty little words: lesson plans. 
Hope y'all had a great week! Details on my Matisse-inspired necklace right here
 photo signature_zpsd10b3273.png

Tuesday, July 31, 2018

First Days of School ... The Art Room Edition!

Guess who has her very first day of school tomorrow?! 

That's right, this gal right here! Our tiny but amazing school district begins returns tomorrow and we always kick off the school year with a welcome back bash and a motivational speaker. From there we dive into our art PD...and we'll be learning from a weaving pro! I'm so excited...it's such a fun way to return to school.

My kiddos don't come to art for a couple of weeks so that gives me a minute to rehang LITERALLY EVERYTHING that fell off my walls and figure out what we're gonna be creating this year. In case you missed a room tour, I got you, boo. Check it here:
But that's not why I'm here today. While I try to wrap my brain around just what it is we'll be doing this year, I'm also reflecting on how we start our school year. Y'all know that means an intro to rules, routines and just how we "do" this art class thang. I've written many posts about my First Days of Art Class over the years. If you are interested...than this post is for you! Loads of links with videos for you to check out. 
If you need a lil cheat sheet for that very first day, I've got you COVERED, y'all! You can check out a video chat all about my WELCOME philosophy for the first day as well as more details right here.
 I don't know what your schedule looks like but mine is a lil crazy. Such is the life of a special's teacher. I'm not on a rotation schedule but one where I see the same classes on the same days of the week. Which is great because I always know what my Monday will look like...same as last Monday. It's not so great when we have a Monday off and then a snow day Monday and then a field trip Monday and the next thing you know...

A way to stay on top of all that is being organized. I'm organized-challenged but I like to play an organized art teacher on T.V. (or YouTube). Check out a blog post with video all about that here
I've shared a lot of videos about how I run my first day(s) of art right here and my YouTube channel (where I often upload first then share here...if you'd like to be "in the know", than you might wanna subscribe). And, honestly, it changes from year to year. I switch it up, change, "improve", decide something was NOT an improvement and change again. You can check out how I ran my first day of art back in 2015 right here. Please note how DRASTICALLY DIFFERENT my art room is now right here!
There are so many fun ways to introduce your students to your art room rules. One year, I created an Escape Game for my 2nd-4th grade students. They LOVED it! You can check out the video they viewed and the resources they used right here.
 Last year, I created a super fun video with my faculty! They pretended to be my students and shared the Do's and Don't's of art class. It was such a joy and happy memory to make this video with them. I plan to share the video again this year as all the rules still apply...and it cracks me up EVERY TIME! You can see the video and more details about my first days of art last year, here.
 Now...let's talk about that bird of a different feather: KINDERGARTEN. I totally go about my first days with kindergarten MUCH differently. I've created many videos of myself teaching kindergarten and sharing lessons for their first days. If you are interested, go here.
I'm pretty big on mess-making on the very first day. My philosophy is this: THE KIDS HAVE HEARD NOTHING BUT RULES ALL DAY! It's important for you to cover yours...but, let's be honest, by the time they reach you, they are checked out! You have many art classes to establish rules and routines. Dole it out over the first weeks and month...and make sure to make messes in between. I've shared MANY of my first day art lessons here...check it out!

Have a super return to the school year, friends! If you'd like to follow my adventures, do so here!  

 photo signature_zpsd10b3273.png

Monday, May 28, 2018

In the Art Room: A Collaborative Painting for Field Day!

Disclaimer: Since discovering Instagram and my love for it, I've gotten super bad about snapping photos with my camera and simply using my phone. So what you have in this blog post are phone photos and for that, I apologize. If you'd like to see me overshare my art room happenings (as well as just my hot mess of a life), you can find me here

In my last post, I shared what we did for the art station portion of Field Day...when I thought it was going to be rained out. The night before Field Day, while I was head scratching what we could do, I thought creating a collaborative canvas painting would be fun (this is what happens when your brain is fried, y'all). So I pulled this giant canvas out of my closet and went to town. 
 I've had this canvas for years. I had started a painting on it years ago and never did anything with it. So I simply painted over it with a cream color paint (cuz that's all I had on hand) and used watered down black acrylic paint to create this. Why watered down acrylic? Because it has better viscosity that way. I began by sketching out four wavy lines across the canvas. Then I wrote out the letters of our school. Once I was happy with the placement, I painted it with a flat brush and called it a night. 
 Along with our other painting station, I let the kids go to town on this. My only "rule" was that one color go in one space...and TRY to stay within the lines. As you can see above, that was a struggle. But it was field day, we were wound up and I knew I could lean up the lines by simply going back over them. So no worries. 
 This was after the first day. I was tempted to leave it this way...and then I added the little pattern on the top and thought it would be fun for the kids to add patterns the following day. 
 Again, so sorry for the grainy photo. My only rule for the patterns was that the kids had to pick one pattern and color and stick with it. For the dots, they used wine corks dipped in paint (fave part of the day? A kid saying, "oh my mom has TONS of these!" Ha!) and thin brushes for the designs. Again, other than that, little direction was given. This was on the last day of school where I had free choice centers set up around the room. This just happened to be one of them. 
 Once dry, I went back over the black to once again clean up the edges. Then I thought it might be fun to add some white highlights to make the letters pop. Look, even the edge got painted!
The admin had no idea we were creating this painting. When I was sharing it with them, our school librarian saw it and LOVED IT. It was decided that this painting would go in the library for everyone to see. AND I'm really excited to share that now the librarian and I are collaborating to create an entire ALPHABET WALL in this style! The kids will kick off the new school year painting a canvas for each letter in the alphabet to showcase in the library. Y'all I'm so stoked! This project was so easy, colorful, happy and fun. I'm looking forward to making more. LOVE to hear if you give this a go! 
 photo signature_zpsd10b3273.png

Sunday, May 27, 2018

In the Art Room: A Giant Painting Banner for Field Day!

This past Monday was our school's field day. There was a 90% chance of rain and thunderstorms for the occasion (of course!). I was in charge of the Art Station which was a new thing last year. In the past, I'd always been in charge of the Face Painting Station with parent and student volunteers. Last year, some changes were made and I was given a box of sidewalk chalk and told that was my station. Y'all...I don't know if you've ever sat outside all day in the blazing sun while kids rotate every 15 minutes only to write words like "fart" on the sidewalk and then ask when they can go to the next station but I can easily testify that it is NO BUENO. I decided to do something different this year...
And this was NOT it. My grand idea would have involved being outside (I'm keeping it a secret in hopes that I can make it happen next year!) and Mutha Nature was given me a big fat "no" with those impending storms. So I arrived at school at 6:30 am to start plotting what my Art Station might look like. I created a video to kinda walk you through what we did:
 I already have several "stations" or centers in my art room that the kids are familiar with as they are my Early Finisher Centers. In addition to those centers, I also created two painting stations for the kids to explore. This HUGE banner was one of them and what we created on canvas I will share in an upcoming blog post. 
 These banners are about 18' long. I simply rolled out huge pieces of bulletin board paper, laid it across three tables and went to town with my good ole bingo dauber. I'm about read to retire this set as we've used them a lot this year and the tops have lost their fuzzy marker-ish-ness. But they work so well for big posters!
 As soon as the kids walked in my room from their outside activities (I have an exterior door making it easy for them to come in), I invited them to take a seat on the floor. I was concerned the kids would be bummed that they were inside (cuz, y'all, IT NEVER DID RAIN!) but they actually loved it. 15 minutes in air conditioning with a chance to go to the restroom if needed ended up being a good thing. I told their teachers, who were rotating with them, to take a little break and come back in 15. It was a good moment to relax for everyone. 
Once everyone was seated, I reminded them of their centers choices and talked to them briefly about the banner. Then I released them. 
 I told the kids that they could rotate to a new center if they wanted but first had to leave the old one as they found it...or even better. 
 Painting friends were reminded to slap on an apron as leaning over the giant banner could get paint on clothes.
 I gave no instructions when it came to painting other than be sure and clean your brush between colors. To clean it up a bit, I painted over the whole thing with my black outline and added pops of white once it was dry.
 And now we have two huge banners to decorate the halls when we come back to school in August! I'm so excited as our hallways are usually so sad when we return. 
Have you ever done anything like this? Love to know what you did in your art teacherin' world!
 photo signature_zpsd10b3273.png

Thursday, January 25, 2018

Gallery of Gratitude, Part 1

Hey, y'all! I am so excited with how these kid-created portraits of the faculty and staff at my school are turning out, I thought I'd share. This is just Part 1 of the Gallery of Gratitude posts...I'll be sure and post again once these are on display.

In case you missed the first post about our Gallery of Gratitude, you can check it out here. This idea is not a new one at my school...you can see our Gallery of Gratitude from a couple years ago here
 Two of my fourth grade classes got their portraits complete. They did such a great job and I have so much left over modeling clay that I think I'm going to have them create self portraits next week. They've become pros at this and have really loved creating them. Here's the lesson video I created and used:
Here are the supplies we are using:

* Modeling or plasticine clay. No one brand is better than another. I have just been purchasing whatever is cheap at the craft store.

* Model Magic Glaze. Here's the thing: modeling clay always stays soft. These portraits will be on display for a while in my school...so I knew I'd want them to be protected with a hard varnish. This "glaze" works really well at becoming super hard. I think ModPodge might work pretty good...but this stuff is a lot harder than that. 

* Plates from Hobby Lobby. So our "frames" are actually plates from Hobby Lobby! You can probably find them online. 

* Matte board. I cut ours down into 4" squares.
 Day #1: It took us some time to cover the entire background, create a skin color and add the head, ears, neck and nose. That took us an hour, believe it or not. Chatting about the project and watching the video took some of the time too.
Day #2: We really made progress. Almost all of the kids finished their portraits...some were super close! I thought I'd share what their works in progress look like.
Biggest bit of advice: HAVE PHOTOS! The kids really studied the photos, matching outfits, hairstyles, glasses and more. My sweet buddy the bookkeeper printed off yearbook photos and each student was able to use one as a reference. I plan to hang these photos near the clay creations when on display.
 And now, forgive me while I share a ton of these cute clay portraits!
 When we take these down, they'll be gifted to the teachers, faculty and staff. The kids will also write a message of gratitude about that person to be hung with their portrait. I'll post about that in Part 2!
 In the background, the kids were asked to add something that "said" something about that person. Here's a portrait of a kindergarten teacher. 
 Those are books behind our library assistant!
 And music notes behind our music teacher!
 I am loving the giant earrings and the cherries in this portrait. 
 This teacher plays guitar in his class. The glaze was just put on so it will dry clear, not milky like you see.
 One of our custodians is also our school D.J. Here he is, outside on field day with his baseball cap on backwards spinning records.
 This background, love!
 Incredible attention to detail! This one makes me so happy!
 Artistic license was taken with hair color here and I'm loving it. 

More to come, y'all! I had to share our amazing progress!

 photo signature_zpsd10b3273.png