Showing posts with label art projects for kids. Show all posts

Monday, May 19, 2014

In the Art Room: Kindergarten Clay Butterflies

Ya'll. I got this genius idea about a month and a half ago that all 400+ of my students should be working with clay. At the same time. And while this made for easy set up/clean up (read: We're 5 minutes late, ya'll -- Stop, Drop and Get Out! The next class is using the same thing!), all that clay left my room covered in a lovely layer of dust. Which, if you are an art teacher then you know, means two things:

1. The kids will figure skate across your dust-covered floor much to your pretend dismay (because, let's face it, you do the same thing when they're not in the room).

2. The kids will leave a path of dust covered foot prints leading a slightly disgruntled custodian to your door (ha, I totally kid as I have the most understanding custodial buddies around). 
Despite the dust-bowl-esque appearance of the art room, I love teaching clay as much as the kids do working with it. Seeing what creations they come up with is always so much fun. Howevers, with the wee ones in kindergarten-town, I like to start with the basics of hand building construction (slab, coil, sphere) in a pretty structured way.

Which leads me to this here Clay Butterfly project. If you're new to teaching clay or you simply need a quick project that teaches the basics of clay construction in a fool-proof-ish kind of way then this big bad butterfly is the thing for you. Here's what you'll need:
  • Low Fire Clay (I use cone 06)
  • No kiln to fire the clay? No worries. Try this out with air dry clay or Sculptey, available at craft stores.
  • Skewer
  • Toothbrush and cup of water
  • Texture for the butterfly. We use a lot of lace, doilies and placemats in my art room.
  • A butterfly template, optional
  • Crayons
  • Watercolor paint
 When I introduce clay, I have the kids gather around a table and do a demo from start to finish. Then I run through the entire thing again, this time having them repeat the directions after me. I thought I'd share with ya'll the start-to-finish routine...but don't worry, I won't make you repeat it back.

On auto-repeat, I tell the kids: You can make ANYTHING outta clay as long as you can make a Slab, a Coil and Sphere. With those three things, anything is possible. First, I have 'em make a slab.

1. Begin by squishing the clay as hard as you can between your two hands. Then thump it down onto your textured surface (this thumping-down business is always a hit, no matter what the age) and begin pounding the daylights outta that clay. Now, you're gonna have to remind the kids that the goal is not to punch they clay too much, it's not your brother after all. The end result should be a clay that is a consistent cookie thickness.
 Sometimes you can pound and pound that clay and it just won't get wide enough. So I tell the kids to pound their clay at a diagonal to help the clay stretch and become the desired width.
 The end result should have the texture of your pounding and be consistently cookie thick.
 2. Peal that clay off of your texture like a Fruit Roll-Up. I have to tell the kids that otherwise they'll simply dig at it with their fingernails. If you show them how to pull the clay and the texture away from each other, it's much easier. Also, isn't that texture rad? Clay is so receptive to texture that I'm always showing kids ways to incorporate that into their clay piece. Lace is my personal fave.
3. Once the clay has been pealed off of the texture, have the kids trace a butterfly template (not shown, duh). Or, if you are a Template Hater, don't. I use templates for this activity as the focus is on working with clay. If I can remove the frustration of drawing and redrawing a butterfly onto clay, them Ima gonna do it. When the kids cut into the clay, show them how to properly use that skewer stick. It should stand up vertically, like a solider. If the kids hold it like a pencil, they either just saw through the clay (leaving behind a chewed up looking edge) or don't cut all the way through. 
3. Smooth out those clay boogers. I know those rough edges aren't sharp now...but just you wait until you run your hand over that bad boy after a good bisque firing (that's a first fire for you first timers). I've sliced my hand up on such a surface. I always emphasize running a finger over the edges to smooth 'em.
4. Once they've gotten that slab butterfly body made, I teach 'em how to make a coil. For them, that's old hat. That's like the very first thing all kids make outta clay: a snake! Using my extra clay, I roll out a coil that is as long as the center of the butterfly. If I make it too long, I cut it to size with my skewer.

5. Now, I don't use a scoring tool, I use a toothbrush. I do use the terminology "slip and score" and explain to them that it's the glue that binds it all together. Without it, your clay project is sure to fall apart and you'll be so super sad. Don't let it happen to you.

 6. Stick that coil to the slab. In my demos, we chatted for a hot minute about the three parts of the butterflies body and used our pinching fingers to create them.
 7. Using spheres, we created eyes for our butterfly. Again, we toothbrushes because we didn't want our eyes to fall off. It totes sucks when that happens. Eyelashes (because all butterflies have 'em, right?) and mouthes were added along with anything else the kinderkiddos might imagine.
8.  When they brought their finished pieces to me, I wrote their names on the back and stuck two holes in the head for antennae and a hole in each wing for hanging. You might not want to do this in front of the children, especially if you fail to tell 'em what you're doing as stabbing their clay project proves to be a traumatic experience for some...not that I've ever done it or anything. Ahem.
Now, bisque or first firing these guys was cake because I could just stack 'em up on my kiln shelves. But I knew that glaze firing would involve many rounds of loading and unloading the kiln because of the flat and wide nature of the pieces (in case I'm not speaking your language: you cannot stack glazed pieces in the kiln as they'll stick together once fired). If you recall from earlier in this here post I mentioned that EVERYONE in the UNIVERSE was making something out of clay so glaze firing all of these really would have slowed my firing to a snail's pace. Therefore, I knew I had to find a glazing alternative.
I gave the kids watercolor paint and we had a chat about crayon resist. It helped that we'd dabbled in this in a previous lesson so the kids kinda got the concept. I told 'em that bright colors worked the best and that coloring super hard was the key to making this work. I likened it to putting a raincoat on the butterfly so that when it got wet with the paint, the paint would roll right off the rain coat. We also chatted about the symmetrical nature of a butterfly's design which inspired some kids. For others, they either weren't interested in that or their texture pattern made it too difficult to create a symmetrical design.
Once the crayon coloring business was through, the kids were free to paint. I asked them to pick one color (my friend above chose not to but the end result is lovely) and really like really had to stress painting away the white spots. The key is to have a moppy wet brush and to paint slow enough for the paint to sink into the crevices. Once complete, I slapped some ModPodge on 'em and my fourth grade morning helpers added the hanger. I added a dot of hot glue inside each opening at the top, inserted the antennae and, viola! Kindergarten Clay Butterfly!

What are some of your fave kindergarten clay projects? I'd love to hear, ya'll!


Read more »

Wednesday, February 5, 2014

DIY: Broken Bowl Wall Pocket

You know, every now and then I make a super feeble attempt to shake my hoarder-habit ways. I start going through stuff, making piles upon piles of junk to either recycle, donate or "gift" to some unfortunate soul. In the middle of one said attempt some weeks ago, I went downstairs to grab a drink (of water, people. Although liquor definitely woulda been prefered) when hubs presented me with a broken bowl and a half broken cup.

Hubs: Here. I thought you might want these.

Me: Um. They're broken. Trash 'em.

Hubs: But you could make something out of them. They are broken clean in half. 

(me, taking dishes and walking over to the trash can.)

Hubs: I know you aren't going to throw those away. 

Me (with dishes poised above trash can): I KNOW! I can't seem to let them go (frantically shaking hands holding dishes over can). Argh! I can't throw away anything. What am I going to do with these?

Hubs: Eh, just glue them to a board or something and hang it up.

And, weeks later,  that's exactly what I did.
I found these wooden boards in my spare-bedroom/craft-storage/extra-clothing-space/ hoarder room. What, one of these rooms didn't come with your house? I originally picked 'em up at Hobby Lobby but I've since forgotten what I intended to do with 'em. Turns out, they were just waiting to become wall pockets.
(Big Hairy) BUT...before we get to all that, let's chat about these papers I used to cover my wall pocket boards. Without sounding too much like a bragasaurus, aren't they just the purtiest thing ev-er? Gee, thanks, I made them. I learned a technique where you can make oodles of collage paper with a super cheap supply: Deli Paper.
Back in November, I attended my state's art educator's conference. I took a two day collage workshop with just the coolest lady*. She showed us how to make that mountain of paper and use it for collage projects. However, I got so involved in the painted/printed paper process that I never did use mine to collage which left them available for this here wall pocket project. 

So just how did we create these amazing papers? I'll tell ya. We began with the supplies you see above. The white container is gesso. We mixed dullish/neutral colors with a touch of gesso. This allowed the paint to better adhere to the deli wax paper (which you can find at those Mega-Giant-Buy-the-World's-Largest-Jar-of-Peanut-Butter Stores that you have to be a member of. Which I'm not. I mean, why do I need a jar of peanut butter that big?! Oh yeah. Because peanut butter is the butter of the gods. Delish. Off to make a pb'n'j. Back in a minute).
Okay, I'm back. A dull color was used in the background so that you could build up layers of color and patterns with brighter and lighter colors.
The instructor used a foam roller to quickly cover sheet after sheet of the papers.
The paper had this cool iridescent look to it.
Once those papers were painted, we immediately started playing with the instructor's huge assortment of carved stamps. The deli papers dried so fast that you could print and over print right away.
Or stencil! The entire process was so relaxing and fun. Because we created tons of papers, you never worried about messing any of them up. It was all about experimenting which I loved. I'm looking forward to giving this a go in my art room.
After laying out my mountain of papers, I chose three that I thought would work for my wall pockets. I painted the edge of the boards to match a color on the paper, flipped the board over, traced and cut it out.
I then slathered Mod Podge all over the back of the paper, placed it on the board, smoothed out all the tiny air bubbles and then gave the paper a top coat of  the Podge.
Then I proceeded to adhere the cup and bowls to the wooden base with E600, aka The World's Smelliest Glue. Seriously, ya'll. That stuff smells like someone downed a Rubber Cement/Spray Paint cocktail and then farted up a storm. I huffed it for an hour. I should know (jk, I totally don't condone the act of huffing. Especially this stuff.)
And, done!

Yay-ness!
The prettiest, albeit the stinkiest, wall pockets ev-errr, ya'll.
 And now...where do I hang 'em?! I'm dying to put them in the kitchen...but I can't seem to justify hanging them there. Which I kinda have to do in my house because there's this dude who lives here that is constantly wincing when I hang stuff up. He's got Cracker-Barrel-Phobia. He just knows that I'm only a random-rake-hanging-on-the-wall breath away from over-decorating the crap outta our house. So...kitchen? Bathroom for holding the necklaces I currently have strewn all over the vanity? Use 'em for mini-flower pots and hang 'em anywhere?

By the way, they are currently in the garage as that aforementioned Rubber Cement/Spray Paint Fart Smell has yet to go away. I'll keep ya posted on where they land up. Until then, whatcha suggest?

ALSO! If you enjoyed reading this ridiculous post (and honestly, how could you not?) please consider voting for this here blog for Art Ed Blog of the Year. Go here, por favor, and cast your vote!

* Sorry, her name escapes me and the link I had to the conference is now broken. Does anyone who attended happen to know the instructor's name? I'd love to give her credit.
Read more »

Tuesday, January 21, 2014

In the Art Room: Self-Portrait in a Kimono

Konichiwa, ya'll! 

My second grade students have been wrapping up their Self-Portraits in a Kimono collages this week and I just had to share. Because, well, look at 'em. They are, like, totes adorbs (so sorry. With my {gulp} 39th birthday approaching in a month and a half, I've decided to hit mid-life crisis mode and talk like a 13 year old. Mostly because I still act like a 13 year old.)

We covered so much with this project from traditional Japanese clothing to portrait drawing to collage techniques.  We even learned how to write a couple of Japanese characters! It was a whole lotta stuff crammed into one masterpiece and the kids are so excited with the results.

One of my favorite things about displaying these pieces together is that they often appear to interact with each other...like Capt. Spiky Hair and Samurai Scar Face. Scar Face doesn't look too enthused. Maybe the scar is from a bad run-in with a certain spiked hair dude.

Students could create a fan to include in their collage or not. Some students decided to get all FANtastic and spring for two fans. Notice the one tucked into the obijime (which is that little yarn belt).
Now, ya'll might recall that our theme for the school year is Asia (even if we did take a wee detour to Norway to study all things Viking when my student teacher was with us). You can catch a glimpse of my Asian-themed art room here. I've worn this kimono a couple of times and chatted with the kids about the different elements of the outfit. This really piqued their curiosity and got them excited about creating a mini-kimono of their own. Now the boys did take a little convincing...that was until I showed them examples of samurai in their kimonos. Then they were totally on board. 

BY THE WAY...if you are attending the Art of Education's online conference this Saturday, this here is one of the four different costumes you'll get the chance to see. Please BYOC (Bring Your Own Crackers) because my presentation is full of some serious cheesiness.
The first thing we did was create our kimonos. We chatted about the tradition in Japan of having four different kimonos, one for every season. I asked the kids to pick their favorite season and color two coffee filters with colors that reminded them of that time of year. Once colored, these filters were placed on a styrofoam plate and painted with water. NOW, this project was delayed a bit because I did switch gears and have them use their painted coffee filters for a temporary installation for International Dot Day (see here). Once that installation was down, coffee filters were returned and we were back to work.

Our next order of business was creating the body. The children were given a template that was about 3" wide and 9" tall with a round head shape at the top. After selecting their flesh color, they traced the template for the head portion only and began drawing out the features of the face.
We did chat quite a bit about the placement of facial features. The children drew their portraits in pencil, traced with thin sharpie and then erased their pencil lines. Color was added with colored pencils. We then worked on the kimono. The children learned that a collar called a eri sugata is often worn under a kimono. They created one with a small piece of origami paper. Next we folded the kimono over the body...in just the right way with the left side first, right side on top. Folding the kimono the opposite way is how it is worn when buried.
Hair was added with a choice of decorations for the ladies. Arms were created with the second coffee filter folded just like the kimono. Hands were made with the aid of a template. Then came the belts: the obi, which is the large belt and the obijimi, the small cord that goes around the obi. I happened to have some snazzy fabric for the obi and some funky monkey yarn for the obijimi.

Here's a group of first grade creations before arms were added.
Because white toe socks are usually worn with the wooden clogs called geta, the students were given white paper the same width of the body. They were told to draw two curved lines, cut out and slip inside the bottom of the kimono. The top of the geta clogs were created with the letter "V".

I really wanted the background to be interesting but not take away from the awesomeness of the self-portrait. For that reason, the kids used Mod Podge to adhere a piece of tissue paper to white drawing paper and then proceeded to cover that with Mod Podge I had added glitter to.

Once the sparkly background was complete, the kids added their self-portraits. Then they were to write some Japanese characters that best described them (based on a handout that was on their tables) and glue to the bottom of their piece. Once complete, I have the kids my "red stamp of approval": a stamp I had created in Japan that has my name on it. 

Whew! I'm exhausted just explaining all the elements of this lesson...I know the kids are happy with their work. And probably even happier still to move on to something new. Next up: Sumi-e Brush Painting! I'm excited to share this art with the children. Have you taught sumi-e before? Any tips?

OH! And thanks to all of you that have joined in on the Artsy Book Club! If you've not done it already, you can join our facebook page here. And you can join this blog's facebook page here

Chat with you soon!


Read more »

Wednesday, January 30, 2013

In the Art Room: Cuckoo for Cuckoo Clocks

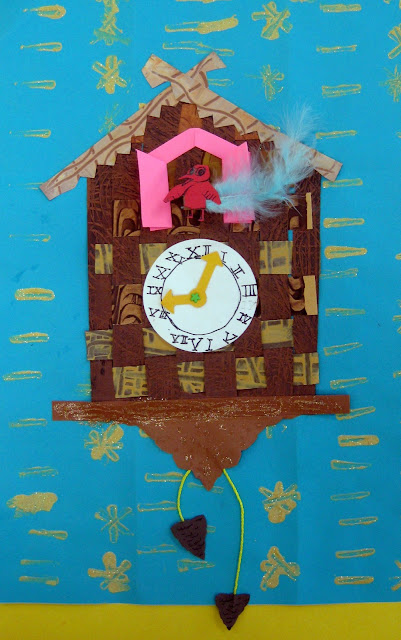
Ain't no doubt about it, that's one cuckoo bird.
Dunno what time your alarm clock sounded this morning, but I was awoken at 2:55 am by tornado sirens. I flew outta bed looking every bit as crazed as the little pink bird above to check the weather...and, okay, to see if quite possibly they cancelled school for a severe storm. No go. And doncha know I couldn't fall back asleep. Which left me feeling a little tired and blue kinda like the cuckoo bird below.

Now doncha go and take me the wrong way, I love that quite little bird. Especially since it's every bit the opposite as it's feisty young creator.
However, once my second grade students starting putting the finishing touches on their cuckoo clocks and they started filling the drying racks with their masterpieces, my attitude quickly changed. I mean, just look at these guys! It's been a long project but I'm totally nuts, er, cuckoo over it.

A flock of Cuckoo-Bird-tasticness.
We began this lesson before Christmas with an introduction to Germany. From there we chatted all about the history of cuckoo clocks which I shared on What I Wore this Week #43. Ya'll might also recall I even crafted a Cuckoo Clock Frock. To begin creating their own wooden cuckoo clocks, the students began by painting two faux wood papers with brown paint and texture combs.

The following art class, the students used one piece of paper to cut a loom and the other paper to weave with. This was pretty easy for them as these guys are the ones who wove the Croco'Nile Puppets last year.
 Once the weaving was complete, we began working on our Roman Numeral clock faces. This was a big time math lesson for the kids and they enjoyed it. I'm lucky that my school has a dye cut machine for the clock hands as cutting out miniature clock hands would have driven us all cuckoo.
 The next couple of art classes were spent in Cardboard Printing Town. The students used 1" X 2" pieces of cardboard and some yellow paint that I added gold glitter to (I'm currently on this kick where I add that super fine glitter to all of the paint. I want everything to be sparkly!).
 We had a big time chat about patterns. I had tri-folded their 12" X 18" piece of construction paper and explained to them that what ever pattern they printed in the first column had to be repeated in the following two. We also had to have a chat about the dif between printing and painting as some of us were using our pieces of cardboard like a palette knife and just painting the paper gold (I'm not the only one addicted to sparkle). I have found the best way to explain the dif is this: printing is when you put something down and you pick it back up; painting is when you put something down and you move it all around. Or something like that.
 Once all of the pieces were complete, we were ready to assemble our clocks. We began by cutting the top of our weaving so it would resemble a house and glued it to the center of our printed paper. From there, we added our roof, a door for our birds and our clocks. The kids had a lot of fun coming up with what their version of a cuckoo bird would look like. Some added a feather for the tale. All of them zigzag folded a piece of paper that served as their pop out.
 After that, a symmetrically cut piece of paper (which we called the "bottom decoration") and a bottom ledge was added. Some kids were inspired by the cuckoo clock visuals I had hanging up to create a little Black Forest scene to the bottom ledge.
I love the flapping wings and the wonky pine cones.
 For our final step of adding the pine cones, I brought in some pine cones from my yard. I placed several on the tables to inspire the kids. These were attached by a couple of strings and, viola! our Cuckoo Clocks were complete. 

The kids were so thrilled by the end result that several asked if we were now going to create real clocks. You know, like with whittled birds and working clock mechanisms. Yeah, um, no. I do believe I'm cuckoo'ed out.

 And now I believe Ima go and catch up on some much needed sleep. Until next time, enjoy the rest of your week!

Read more »