Showing posts with label clay projects for kids. Show all posts

Monday, June 3, 2013

In the Art Room: Pinch Pot Pets Take 2

Sometimes giving the kids the choice of every color glaze in the rainbow can be a dangerous thing. But I happen to think this turquoise with white spots pup is just the cutest.
If you are a teacher, then you are currently in one of two places: Summer Vacation Bliss or On the Verge of Summer Vacation Madness. I'm the former but I can totally empathize with all ya'll in the latter. The last week of school followed our school-wide art show which left my art room as cleared out and empty as my brain. But have no fear, all you O.V.S.V.M. folk! The end will come (of the school year, not the end of time. I'm an art teacher not an evangelist) and soon you'll be like me: feet up, taking in the sunshine with a nice tall cold...um...tea (well, perhaps a splash of tea along with some other happiness-inducing ingredients) and frantically brainstorming lesson plans and thematic ideas for next year. Ah, the joys of being a teacher. Which sometimes feels like that unwanted gift that keeps on giving. Like a Chia Pet. Or crabs. 

(Did I really just liken my job to an STD? I believe I did.)

Don't get me wrong: if I didn't love what I do, I wouldn't spend so much time plotting and planning. Which brings me to this lesson. I started the planning stages of this project about this time last year. If you've read my recent art project posts (you haven't?! What's wrong with you, you got a life or something? No you don't, go read here and here.) then you know our purpose behind these animal sculptures: to raise money for a local humane society. Each grade level sculpted a dog or cat sculpture (check out my kindergartener's work and my fourth grader's masterpieces) with these being the ones my awesome second graders created.
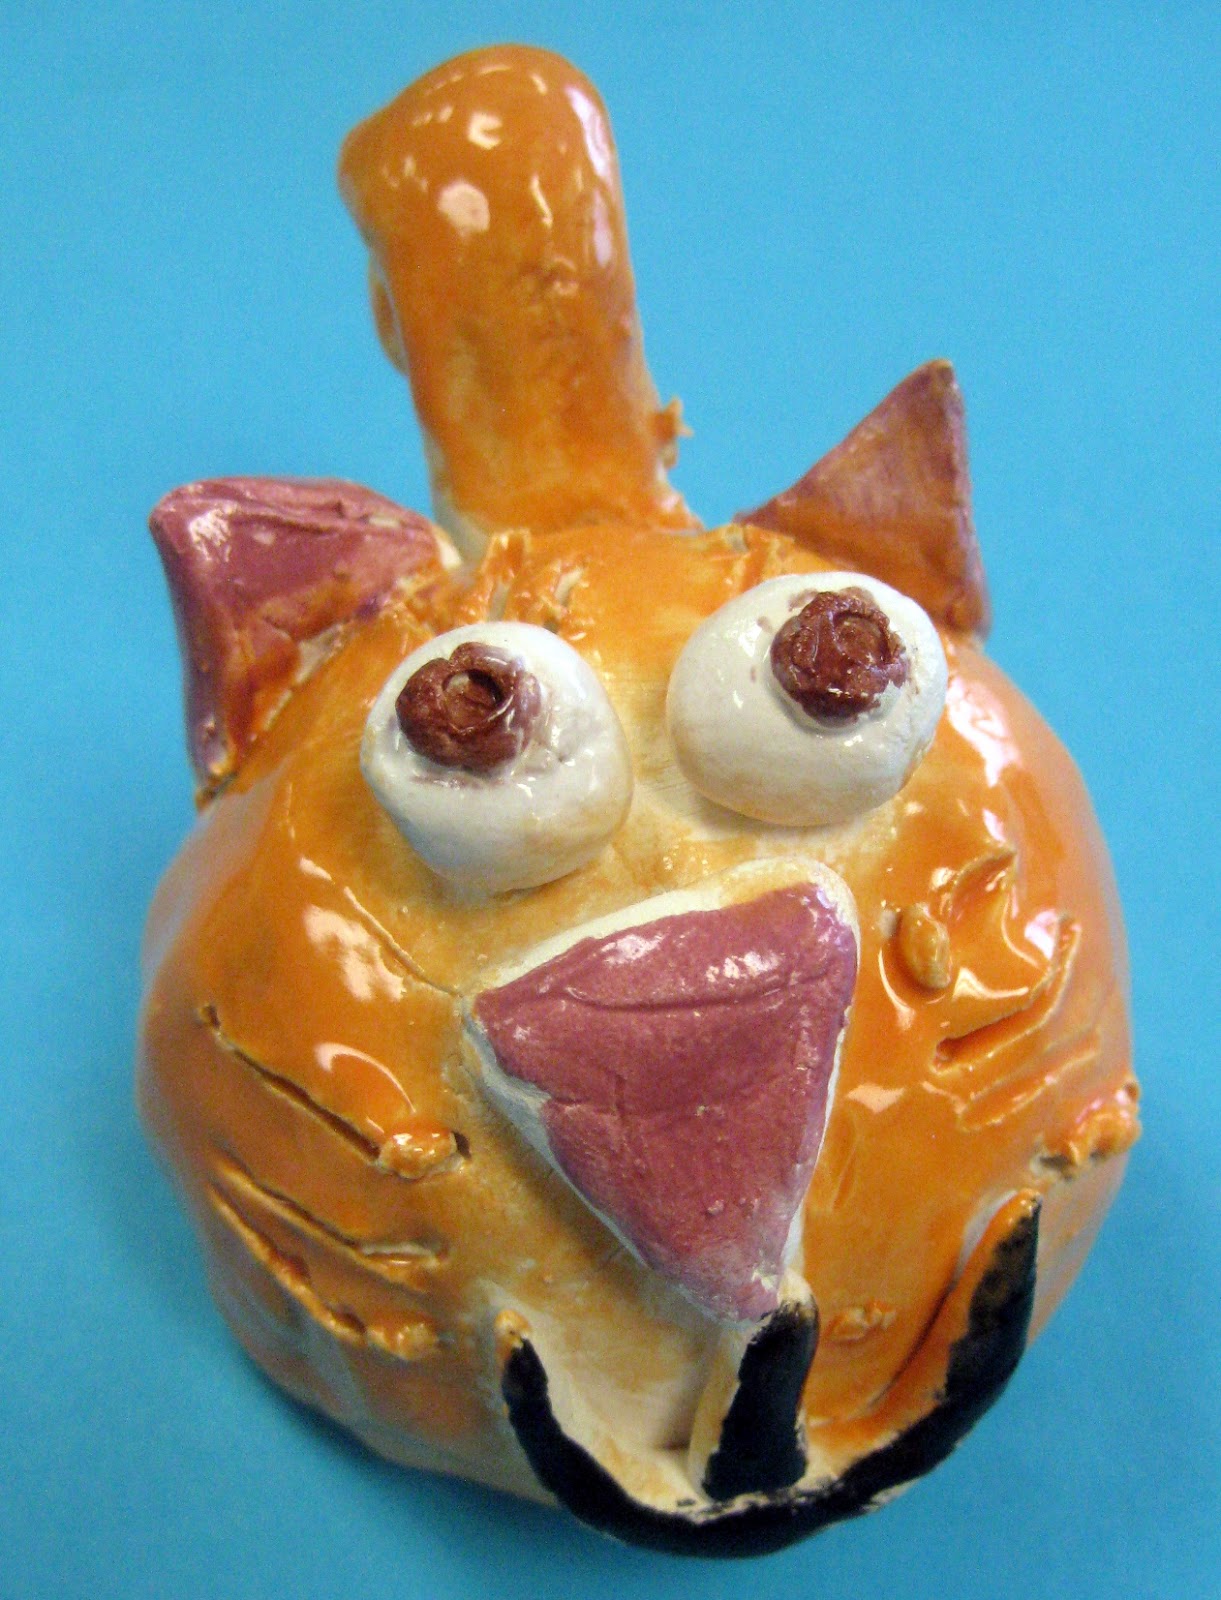
The problem with projectile whiskers is sometimes they break. I still love this green-eyed spotted kitty just the same.
Because I'm missing school just a pinch (yeah, I do believe there was a little too much happiness in that last cup as well), let me geek out on you and break this lesson down with some good ole bullet points: 
  • On our first day, the kids were given a piece of clay the size of an orange. They twisted this piece in half and created a pinch pot with each piece. 
  • To connect the pots and create a sphere, each kid was given a small piece of newspaper (pages from the phone book work great...why am I still getting those, btw?). This was crumpled up and placed inside the pinch pots to prevent them from flattening. In the past, we've rolled up small spheres of clay and placed those in the newspaper before sealing it inside. When the newspaper burns, those little clay beads create a rattle inside of your piece.
  • After the newspaper was placed inside the two pots, the sphere was complete. To reinforce the seam where the two pots came together, the kids rolled a coil of clay and placed it over the seam. This was flattened and smoothed. I know what you're thinking, "An enclosed piece of clay is going to explode in the kiln!" Dude, relax, I got this. Holes were pierced into the sphere at a later stage.
  • Because my classes are a half and hour long, it was at this point that the kids wrapped their spheres in a wet paper towel and sealed them inside their labeled ziplock bag.
  • On the following day, the kids rolled out and attached four thick and short coils of clay for legs. To prevent the legs from falling off once attached, we bent the end of each leg at the top. This created a larger flat surface for the leg to attach to the bottom of the sphere. Of course, we tooth brushed the bottom of the sphere and the tops of the legs before attaching.
  • The kids were given some ideas on how to create a face for their pet. Then they came up with a billion much better ideas. Which is how is always goes, isn't it? I cannot keep up with their superior imaginations.
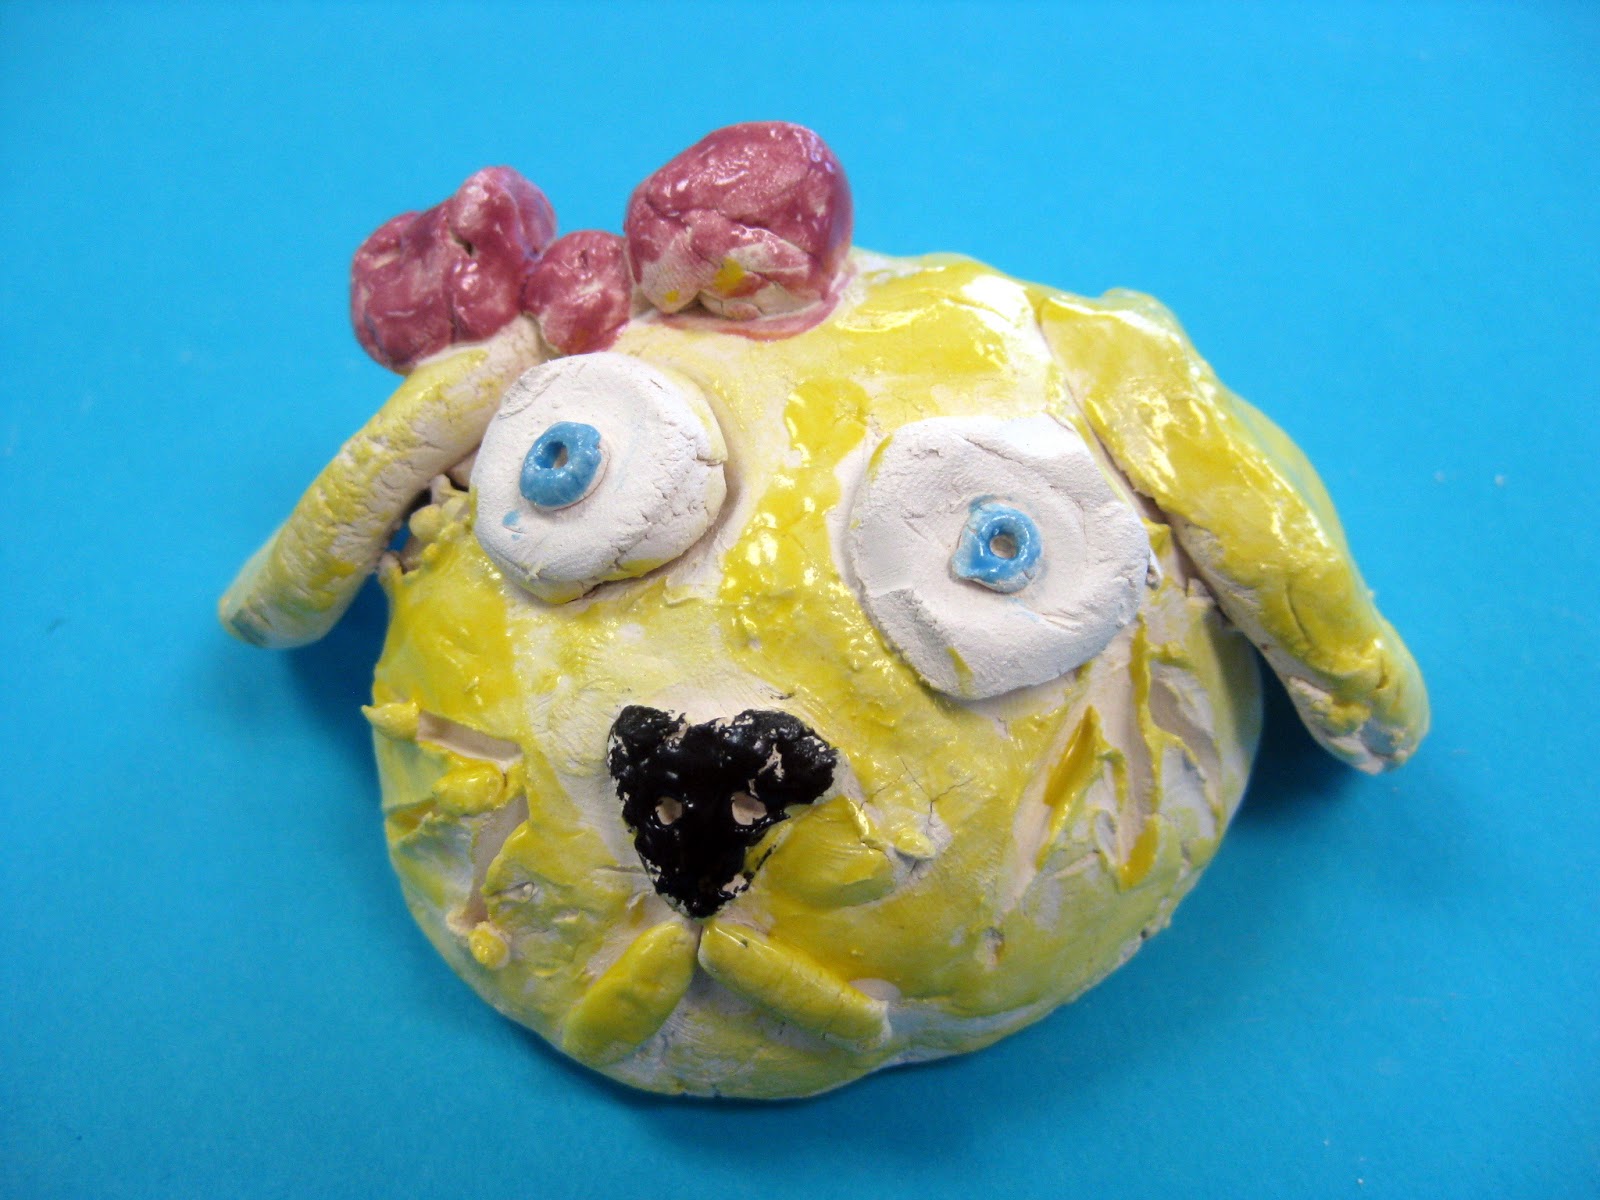
Best. Ears. Ever.
  • Now, I gotta tell you two quandaries I found myself in with this here project: One was finding a place to write the student's names. Ultimately most ended up being emblazoned on the tooshie. And the other quandary was that we did have a couple explosions in the kiln. Because all of the pieces were given a "belly button" (a small hole with a skewer stick in the bottom of the piece) I can only imagine that the explosions were caused by the thickness of the clay. The two kids handled it quite well, knowing that they'd be able to create a new piece. Apparently, it's very cool in secondgradeland to be able to tell your buddies "my dog blew up the kiln". 
  • Once the pieces were returned to the kids, we set to glazing. I love Mayco's Stroke and Coat as do the kids. We chatted about the patterns that might appear on dogs and cats, real or imaginary. 
And there you have it! I've still no idea just what we'll be up to this summer...but I've got a couple crazy ideas rolling around. Until next time, have a great Monday!
Read more »

Wednesday, April 17, 2013

In the Art Room: Pinch Pot Pets

Every time I go into the kiln room and see these little guys staring at me from the shelves, I feel like singing: I always feel like...Somebody's watching me. And I have no privacy, Whooooa, oh-oh (go get you some Rockwell here and be prepared to get your paranoid on).
Greetings from the land of Pinch Pot Pets! Last week my younger students completed glazing their clay animals (my older students are still painstakingly working on every minute detail of theirs) and I'm excited about the results. Our theme for this year's clay projects were cats and dogs as our students will be "selling" their work back to their parents for a donation to the local humane society. We're do-gooders like that. The kids love clay and really enjoyed this project. But I'm rambling. Check out this cuteness:
Aw! This looks like a certain orange cat that lives in my house! I wonder if this one plants herself on the table at dinnertime as well.
"Hmmm? Did someone say snack?!" I love the added detail of the collar and hair bow by this first grade student.
So just how did my wee ones complete these clay projects in half an hour art classes, you ask? Well, it wasn't easy. But I've found that breaking the clay construction up into two days helps. And having several parent volunteers on hand. Mostly to keep me in line.

In preparation, here's what's on each table:
  • a clay mat for each child, purchased from The Clay Lady
  • 2 cups of water and 2 toothbrushes
  • 4 skewer sticks
  • 1 piece of clay the size of a small orange per student
Other preparation included:
  • One labeled ziplock bag per student
  • a damp paper towel per student
 For the demonstration, I have the students gather around a table and I show them the steps to creating a pinch pot. Here's what I tell 'em:
  • Roll your clay into a sphere and place it into the palm of your hand.
  • Using your other hand, put your thumb on the top of the sphere and wrap your fingers around the back.
  • Sink your thumb so deep into the clay that it looks like your thumb is wearing a clay afro. But don't go too deep and have your thumb pop out the other end because then you'll end up with a donut. And nobody likes clay donuts.
  • That part they can do no problem. Thumb afros, they got that. It's the pinching-into-a-pot part that some struggle with. I ask them to imagine they are holding a cookie and show me what that would look like. They all hold up their fingers about 1/2" apart. I tell them that their clay should have that same thickness. And then we eat the imaginary cookie with a loud "crunch!" and "mmm!" before proceeding.

  • After showing them a couple of non-examples of pots that are too thick or thin, I show them what a correctly pinched pot should look like. 
  • At this point, the demo is over. I show the kids how to wrap their pot gently in a damp paper towel and place it carefully into the ziplock bag. They are not to seal the bag closed as trapped air inside will dry out the clay. Instead we simply tuck the bag underneath the pot. Like this, their project will stay damp for up to a week. But it might begin to smell a bit if kept longer.
  • The following art class, I tell the kids that they may either create a dog or a cat. I introduce them to the idea that you can make anything out of clay with three things: a sphere, a slab and/or a coil. To illustrate that, I begin by using spheres for the eyes. 
  • Note: all pieces of clay must be attached by using the toothbrush and cup of water. I tell the kids, if you don't brush your teeth, your teeth fall out. If you don't brush your clay, your parts will fall off. It kinda works.
  • I demonstrate using the stick to add the pupils and eyelashes.
  • A sphere pinched into a triangle is used for the nose.
  • Coils for the mouth and skewer-drawn whiskers.
  • I tell the kids that the parts of a face for a dog and cat are about the same. It's the ears that make the difference. Using a slab, or flattened piece of clay, the kids can create dog ears. Cat ears can be created by cutting the slab into a triangle shape.
  • Some finished theirs off with a coil for a tail. 
  • And that concludes the second day of Pinch Pot Pets! As the students finish, the volunteers and I wrote their names and teacher codes on the inside of the pot. Then I set them out over Spring Break to dry completely.
After Spring Break and many firings, their bisque-fired clay animals were ready for glaze. I like to use Mayco's Stroke and Coat. I gave the kids every color in the rainbow (which many saw as an opportunity to go hog wild) and told them my two glazing rules: don't glaze the bottom as the glaze will cause the project to stick to the kiln shelf; don't layer 15 different colors of glaze on top of each other. Because it will look like a rainbow exploded in a really bad way. However, if you want color, do it with patterns.
And suddenly I feel like I'm in San Francisco all over again. Super psychedelic, dude.
These two crack me up. The Eye-Popper-Outter and the Cheshire Cat.

Stripes and spots were a pretty big hit.

And there you have it! Pinch Pot Pets. If you'd like to see what my students created last year out of clay, you can visit here. Be on the look out for more clay posts within the next couple weeks as the kiln just keeps spittin' out these awesome little masterpieces. Until then, enjoy the rest of your week!


Read more »

Monday, February 25, 2013

DIY: Ceramic Gnome Homes

A neighborhood of gnome homes.
 My hubs and I've been married for something like a dozen years. Not sure exactly because I lost our marriage certificate long ago. It wasn't a day that stands out in my mind because it was simply a fifteen minute session with the judge at the courthouse. I don't remember much except that I wore this horrible cornflower blue two-piece suit dress from Talbots thus making me look like Barbara Bush. Hawt.

Details of adorableness. You sure you can handle this much cute?

Wait. Where was I going with this? Ah, yes, married life. In the beginning, hubs and I were never apart. And it was lovely cause we didn't wanna be. This changed over time (like six months in) and I began to kinda-sorta freakin' love my alone time. You see, hubs has to go on these occasional work trips and when he does, I likes to party. And by party I mean invite a buncha buddies over for grown-up drinks, laughs and gnome-home making. Exactly what the Beastie Boys were talkin' about during their fight for the right to party.
Textures for clay: lace, crochet bits, burlap and plastic doilies. Although texture possibilities are endless. My personal fave: the bottom of my shoe.
 Let's say you wanna indulge in your own gnome home making merriment. Well, this here clay project is so easy you can still be successful after a grown-up drink or three. Here's what you'll need:
  •  clay (I use a low-fire clay like cone 04-06)
  • rolling pins
  • textures
  • cornstarch (clay can often be too damp and stick to your rolling pin and textures. Cornstarch makes it less sticky without removing too much moisture)
  • old toothbrushes and cups of water
  • wooden skewers (for cutting the clay)
I swear to you my hands are not this skin-removed pink. Although maybe they are. The kids can hardly focus when I demonstrate on the elmo (not the doll, you silly, the piece of electronic equipment). My favorite kid comment of late: (whispering) ewww, did you see her hands?!
 To begin, I create the bottom of my home. Pick a texture and place it on a non-sticky surface. Place your clay on top of that. If your clay is sticky, sprinkle it with cornstarch and set to rollin' wit your pin. Not your homies. Keep you clay at a 1/4" thickness. Any thicker can cause explosions in your kiln while any thinner can be too weak. You gots to get this just right, Goldie Locks.
 Peel your clay off and viola! You've got texture. Now let's roll it up and make it into the base of your home.

 Now you could just roll it up as-is as shown on the left. Or you could cut one end of your rolled slab with an interesting line to jazz of the piece. It's up to you. Whatever you decide, use your old toothbrush to scrub one side thus gluing the connected pieces together.
 For some variety, I opted for a different texture for the roof. Crocheted bits like this can be purchased at your local craft store or pinched from your grannies house. You know, that lady who dresses like Barbara Bush.
 Roll this up waffle cone style. Again, toothbrush before you attach one side of the cone to the other. It might stick while you work but there's a chance that without using the toothbrush and water to attach it might not remain stuck for long.

 Set the roof on your house and pray you made it the right size. And if you didn't then you just messed the whole thing up. Aw, just kidding. But you did kinda mess up. Sorry. Make your waffle smaller/bigger and try to get it right this time, would ya?

My other favorite textures? Stamps! The larger stamps could also be used for the base or the roof.
I decided to use the stamps for details like this little faux wooden door. Clay loves to adhere to stamps so go all cornstarch on it and you'll be fine.
 My fave finishing touches are doors, windows, flowers and hearts. There are endless possibilities. I mean, just take a look at this cuteness:

 Aww! Add a couple hearts to the top for you and that special guy you hope goes out of town. These were done with stamps but you could also use alphabet pasta. Just leave the pasta in and let it fire off in the kiln.
 Sweet little ladder. It's always good to have a fire escape.
 It's so adorable it's burning my eyes. Seriously.
Because I knew I'd have a hard time getting all these ladies back at the same time, I opted to have them make and glaze their houses in one sitting. For that I used The Clay Lady's Clay Paint. Her "paint" is an engobe (which is dried clay with pigment added). This can be painted directly on to wet clay. Once dry, these pieces were dunked in The Clay Lady Glaze. Because I love vibrant colors, I use Mayco's Stroke and Coat with the children.
I'm thinking that the creation of these homes just might have gotten the gnome bug outta my system (as evidenced by this gnome dress, my students gnomies and my own gnome homes). In fact, I think I'll turn to my longtime fashion consultant and ask her opinion. What say you, Barb?
Hey! That's my wedding dress!
Geez, so many caption options with this photo:

"Shhh! You'll wake the gnomes!"

"Smell my finger. Does it smell like Cheetos to you?"

"I know where your marriage certificate is but I'll never tell!"

Wow, Barb. Just, wow.

Merry gnome-home making to you! Until next time, enjoy your week.


Read more »