Happy New Year's Eve! If you are a TOTAL homebody/crafty nerd like me, than that means your evening is much like mine: you are in your pj's, enjoying a cup of hot cocoa (of whatever else pleases ya, I'm not here to judge) and you are writing up your New Years Craft-solutions, er Craft-utions (that's my best effort to combine craft and resolutions, in case you didn't catch my drift). One thing that WON'T be on my list for 2018 is a Painted Globe...as I just narrowly completed it today!
If you follow me on IG, then you've been hangin' with me on this journey to turn this trashed globe into treasure. I found it in the trash at school and had to dig it out immediately. It wasn't until I had it back in my art room and added to my collection of globes (why I have so many, I have no idea...it's just that I cannot seem to let them be thrown away!) that I noticed why it had been trashed: it was busted right across the equator.
I took it home and decided to fix it with a large plaster gauze strip...which made it quite unsightly. During my repair stage, I noticed that this globe was pretty dated...and poorly made from plastic. With that in mind, I didn't have much of a problem giving this blog the reboot. I'm a lover of all things vintage and it burns my eyeballs when I see folks "flipping" vintage (i.e. turning treasure into trash, says me). However, this bad boy wasn't very old...just old enough to have countries with incorrect names and a big honkin' crack right through the middle.
Here you can see my plaster strip repair job. I done tole you it wasn't pretty.
If you've been on pinterest for a hot minute than you know that painted globes are pretty hip. Maybe even past tense hip. But I don't care. After a little bit of searching for ideas, I was so inspired, I decided to paint my globe. I used the same wall paint as I had for the walls at school because 1. I still have a ton; 2. I wanted it to match, color-wise; 3. It was more opaque than any other paint I could find.
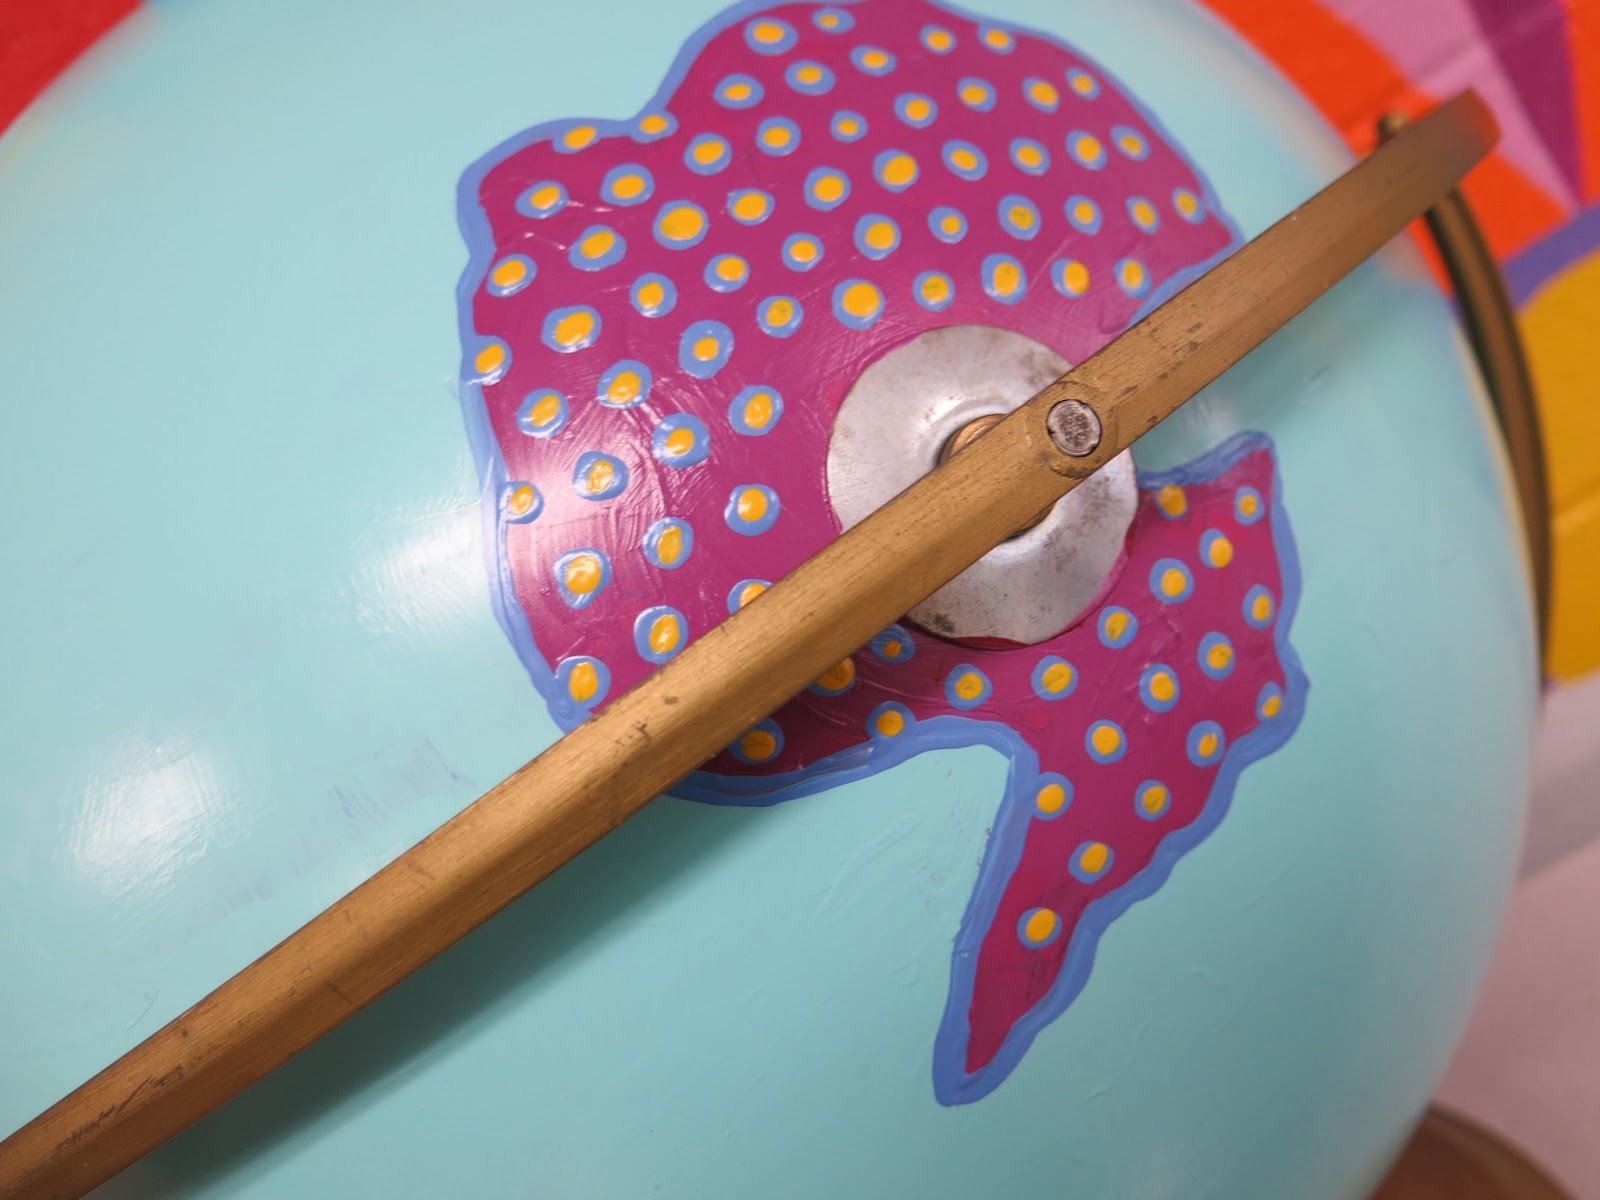
I decided to paint each of the seven continents and give each a pattern.
I used the planters I painted a while back as my inspiration. I just picked patterns at random.
I love patterns. Like, LOVE-love. Tis the reason you'll rarely find me in a solid color. And if you do, it's paired with a buncha other solid colors thus creating...A PATTERN.
This was such a fun winter break project for me. I've managed to knock out a couple...but sitting in my craft room and painting is my favorite way to end my day. I've got mountains of pattern-y painting projects just waiting for me in that messy space.
Texture is also my BFF. I suppose I could have used paint pens to create the patterns on this globe...but I don't know that they would have given me all this thick-ish texture.
You can kind of see my layers of paint in the photo below.
Now I do have a "normal" globe in my art room as well...for when we need to examine places other than just continents. But I think this will be a fun addition.
Brrr! My heat cut off when I was working a little in my art room today and it felt like Antartica! Or at least that's what 62 degrees feels like to me.
What projects were you working on this winter break?
Thanks for letting me share mine!
We head back this Wednesday for a coupla days of PD and the kids return on Friday. I'm excited to see their happy little faces! Happy New Year, y'all!
I hope all y'all had a wonderful holiday! Ours was super low-key and relaxing. I've been taking time to catch up on projects for the art room...just this week alone, I've managed to start three new projects (and finish zero...no surprise there). While working on my latest project, I decided to film the process and share it with you cuz I'm super stoked: Seat Sacks!
Heaven on Earth, aka the Dollar Tree, had seat sacks or over the chair storage in their education isle recently and I was so stoked. Currently, when my kiddos finish early and only have a few minutes to spare, they LOVE to go and get a dry erase board. However, I don't love the extra milling around the room when it's so close to clean up. However-however, I never wanna see a kid just SITTING in their seat, even if for a few moments, not creating something, anything. So when I saw these seat sacks, I thought they'd be the perfect solution: I could store dry erase boards in there (or, dry erase board SLEEVES with drawing sheets, YES!! More on those in a moment) and that would prevent extra movin' and confusion during cleanup.
Now, as you might know, I'm currently on an art room redo bender and I'm color coordinating EVERYTHING. So, while I was excited about these seat sacks, I was disappointed that the above were my only color options. By the way, you can purchase these in bulk here, if they are not available at your local Dollar Tree. So I went on a quest to find another source for the sacks. Y'all. These guys are COSTLY! Then I got the bright idea to SPRAY PAINT the sacks...so I bought one as a test and, um, no. That did not work. Not. At. All.
The one that was sadly spray painted then became my pattern. I looked at the seat sack closely and realized it's a super simple pattern that requires very few supplies. Here's what I used: * 2 yards of ripstop fabric. Really, 1.5 yards would have been plenty. I chose that kind of nylon fabric because I thought it would be easier to wipe down. * 4 packages of bias tape. I am doing 4 sacks per table and this proved to be the right amount of tape. * Elastic. I used the wider kind. Here are the directions:
Like I said in the video, I did this in assembly line fashion so as to get it done faster. I started by cutting everything out and then set to stitching all the red ones first, then the orange...this way I didn't have to keep changing out my thread and bobbin.
I noticed online that there are a lot of other seat sack tutorials...so be sure to check out your options if you do this. I just went the route I thought was easiest. I don't plan to put anything heavy in these so I'm hoping that they'll be solid enough.
In case you need those measurements again...
I don't know if you noticed in the first photo but you'll see the kind of chairs that I have. These seat sacks fit them perfectly. If you decide to make these, you'll def wanna be certain it will work for your chairs!
Of course I had to add a label! I got these labels made a while back from Dutch Label Shop. It says Art Will Rock You. This is the back
And this is the front! I'll keep you posted on how these work out in my art room. They'll either be a hit or a miss...there never seems to be gray area in my art room!
Do y'all use seat sacks? How so? Love to hear more!
My little assembly line of pocket making. Wish me luck!
A couple of weeks ago, I spent a weekend elbows deep in clay and Halloween crafterin' and, I'm not even gonna lie, I.Was.In.Heaven. Seriously. In fact, just tonight, I asked el hubs-tastic if there he thought there was a book publisher out there who might be interested in a new edition of Encyclopedia Britannica of Halloween Crafter'ness cuz I just might be the gal for the gig. Case in point: these Halloween Chatter Teeth!
I created these bad boys after settling on the theme for my Candy Corn Tree: Monster Mash (BTW, have you entered to win a $150 shopping spree yet? If not, what in the world is wrong with you, get yourself here, right meow!) Don't ask me what this has to do with traditional monsters...other than the iconic Rocky Horror Picture Show image. I mean, that qualifies as a classic, right?
In all honesty, the idea came to me from my sketchbook. A year ago, I filled my sketchbook with Halloween-themed ideas and these chatter teeth were one of them. After a pinch of troubleshooting, I discovered that these silly teeth were super easy to make. So much so, I created a video just for you! Here you go:
To create these bad boys, rustle up the following:
* Aluminum Foil I like the stuff in the precut sheets cuz I'm too lazy to cut. Hit up the Dollar Tree for the Aluminum Foil for Lazy People. Yes, that's the actual name.
* Rigid Wrap Plaster Strips I like the stuff from Activa Products which you can find here. By the way, full disclosure and such, I often work with Activa Products. But I do truly love their products. Case in point...
* Celluclay I don't care what you say, Celluclay is my JAM, boy! I love the stuff, it makes my world go 'round.
Now, if you've never worked with plaster strips, lemme just say, it is a gift sent from heaven above. It dries so quickly! It has the strength of ten horses! It's quite possibly the best thing ever!
But I say "quite possibly the best thing ever" with a grain of salt. Because, in all honesty, Celluclay is the best. I'm telling you, get you some, I'll make you a believer. I will say that the stuff does take FOREVER to dry so, for the love, put your creations in front of a fan and rotate, rotate, rotate. As mold loves to grow if you do not. At least in the humid mold-growin' breeding grounds of middle Tennessee.
AND once dry, paint with acrylic.
And display where big mouths and loud mouths hang.
Out of laziness, I did not cover the chatter teeth with a clear varnish. The acrylic had enough shine to give these guys the sheen they needed.
Once complete, these chatter boxes can be displayed just about anywhere! In the living room...
In your Candy Corn Halloween Tree...
Next to a decapitated head of Dracula...I mean, really, the choice is yours.
Wherever you decide to do, just don't for get to enter to win THIS GIVEAWAY, for the love of all things chatter teeth-y and holy. Okay?!
I'm launching a ton of landscape projects with my students this fall. I shared the Claire West inspired landscape project my fourth grade is working on here. This week, I'll be rolling out my third graders' landscape lesson. Today I thought I'd share with y'all the Elouise Renouf-inspired landscape collage that my first graders will be doing! Here's the video'ed lesson that you are more than welcome to use in your art teacherin' world:
I was recently asked how I share these videos with my students: do I show the video in it's entirety or just in bite sized bits. Definitely the latter: I share what we will be working on that day. I share the opening, of course, as an intro to the artist...and we dig deeper into the work of the artist in LIVE format (meaning sans vid). The first day I taught this lesson, I didn't have my video ready for one class so I did it LIVE. I managed to get some footage of me teaching and thought I'd share:
Once again, what's my take-away? I TALK TOO MUCH! Seriously, filming myself teaching has really helped me grow as a teacher. I know what it is I'm doing wrong (so many things!) and what I need to improve upon. I also see what I am doing right and what the kids are responding too. It's painful to watch but super enlightening.
If you've not explored the work of Elouise Renouf, you really should. I love everything she creates and found so much inspiration.
I will definitely share the progress my first graders make on this landscape adventure. Until then, have a great week, y'all!
Last week, as I was piling the day's art bins on the floor around my desk, I managed to accidentally kick one of 'em, spilling the contents, and trip over two of them. I muttered WHY ARE THESE ON THE FLOOR ANYWAY?! I literally barricade myself in them daily. That's when I decided, after 19 years, NO MORE! I'm getting a cart to hold these bad boys. And, thus, the Paint Stick Pencil Cabinet was born!
I picked up a ton of these paint stirring sticks not long ago as apart of a collaborative the kids are creating (don't ask...I'm still trying to figure that mess out). I had some left over and one night, in a fit of painting all the wooden thingies, I painted them like pencils. And I just couldn't stop! Here's how they were created:
So now I had two things: a need for a bin cabinet and a plethora of pencils. What to do? I'm super lucky in that I'm surrounded by thrift stores where I work. I popped by one and spotted this sad little back T.V. cart on wheels for a mere $2. I had not done any measuring (because math, ew) but I had a feeling it would hold two of my bins side by side. AND it was only 2 bucks so there's that. I took it to school and was super stoked to see that my lack of measuring paid off! A perfect fit! Now to start bedazzling.
This extraordinarily handcrafted (ahem), pressed board piece was in decent shape but dreadfully dull. My P.E. teacher buddy primed it for me and I used whatever latex paint I had around from this episode. After painting it, I was happy with the color...but still bored.
I mean, meh, right?
So the next day, I brought in the sticks I'd been painting and started hot gluing them on...and suddenly I was diggin' it.
In just a couple of minutes, the cabinet was complete!
Here's how it looks when the kids enter the art room. So fun! I'll keep my morning classes in the cabinet and then swap them out at lunch with my afternoon classes. These bins came with my art room and they are so handy. Our large work does not go in here...but our smaller pieces do. And now we have a cabinet to hold the bins...so I won't be tripping all over them anymore.
You can find out more details of all the newly created decor for my art room here.
The top of the cart will come in handy too. Many times, when my students enter, I have them gather supplies right away. This usually means they have to turn the left corner in my art room and go to "the store". Now, I can simply place the supplies on this cabinet and they can grab them there...much faster! When you have 30 minute art classes, every second counts.
I contemplated painting the pencils at different heights or even alternate flipping them, meaning one upside down and one right side up. But in the end, I liked the consistent look the best.
Not gonna like, all my new decor makes me super happy...and excited to have a less cluttered and unorganized space. Now...to tackle the rest of my Hot Mess Express of an art room!
Until then, I have a pretty cabinet to look at, right?
There are pegs for a shelf...but the shelf was missing. Maybe one day I'll get a shelf cut to fit. That way I don't have to stack the boxes. I need a wood shop, y'all!
Thanks for letting me share my latest addition to the art room!