Showing posts with label fiber arts. Show all posts

Sunday, April 16, 2017

DIY: Intro to Wet Felting!

 During our Intro to Wet Felting session, we learned how to do a little ziplock baggie felting. This one was created by artteacher. Once the wet felted piece dried, she cut it into a heart. I love her colors!

In case you missed the wet felting fun last Wednesday night over here, it is archived both on my Facebook page and on my YouTube channel. We had a whole lotta wet and sudsy fun all the while creating a wet felted piece, felted beads, a felted container and buttons! We managed to pack in a lot...an hour just isn't long enough. But I do love that those participating keep on creating long after we say goodnight. In case you missed it, here is our Wednesday night session:
Of course, it's never too late to join the fun. Sue told me that orders for felting kits are still rolling in which has me so happy! Here's a link to where you can purchase, if you are interested. Again, all previous craft nights are archived both here (subscribe!) and here (follow!). 

And don't forget that we'll be continuing this crafting fun in May with Clay! 
Supplies for that workshop can be picked up here. You can still join the fun without the supplies, of course. 

Now, on to everyone's fiber creations! 
 Don't you love this needle felted Friday by the_doodle_birds? It would make a great pin or even an image on the back of a sweater! LOVE the flowers.
 Look how productive echopaitsel was that night? Love the beads. I think everyone's take-away that night was that wet felting is pretty labor intensive!
 How sweet is this colorful needle felted number by mrsdow_artroom
 Can you even believe this? It's so beautiful, I think it needs framing. You should be proud, parkesphoto!
 So, um, I just might have to track down mmmelllodyyy, raid her closet and steal this sweater. I am IN LOVE! 
 Last week, visualpraisestudio covered a hat in needle felted birds...and this week, she's covered even more. I love the talent in our craft night group!
 There is a definite learning curve when it comes to wet felting. Work to fast, and the fibers felt at different speeds and might result in something unexpected (read: not what you'd hoped for). Working slowly is the best bet. That being said, never ever just throw away your felted creations. They can always be recreated into something far more interesting than you'd ever imagined. I love these earrings by alison.m.klein!
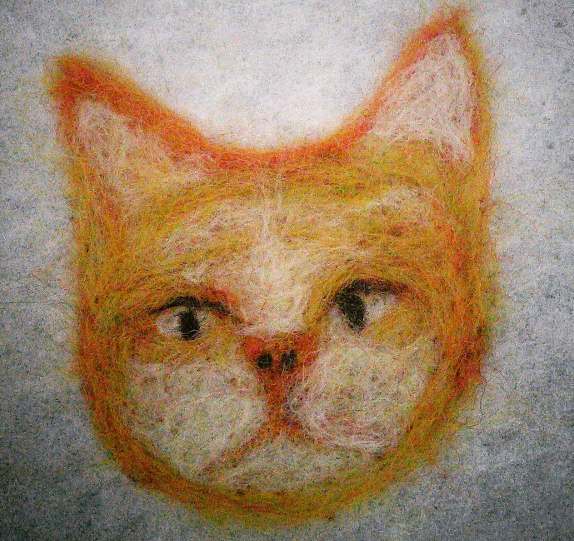
 I love that the fam is getting in on the felting action! Check out this sweet cat being needle felted by kmmckinney's daughter. 
 Artroomblog has taken to needle felting...and entire coat! I know how taxing that is, kudos to you, Lee!

Jtheen is a week ahead of us, she's already started creating needle felted sculptures! How fun is this sweet and colorful bird?
 Me being a sucker for bright colors, y'all know I love this dog by mrsdow_artroom! I see an art project based on this one, don't you?
 This Bob Ross by the_doodle_birds made me so happy when I saw it. Adorable!
 This masterpiece looks like it should be in a gallery. I can see mommaplouff creating a whole series of these beauties, don't you?
 Another stunner by parkesphoto. I love the three dimensional look of this piece.
 Check out these artist-inspired pieces created by Jan Marie...can you guess the inspo behind each one? 
 If you didn't believe that we got a lotta work done on Wednesday, Ashley Bruce has done a bang up job breaking it down for you! 
 Gemma has something so beautiful here. I love the organic nature of her piece. 
 When jtheen shared this needle felted cat, I was super stoked since it looks so much like my cat Asha. In other news, there is a book called Crafting with Cat Hair that my mama picked up for me. My cat leaves behind a lotta hair...but I don't know how I feel creating with it!
 I want this on the back of a super hero cape! Love this, the_doodle_birds!


Everything about these needle felted numbers by mommaplouff make me so happy. All done with a single needle too!
 Amandakaiser211 needle felted this adorable French bulldog. I am loving the color choices.
 Tell me this isn't the baddest thing you've ever seen? Meganhallenbwck this is the best!
 My buddy Earl Delong snapped step by step photos of his street-art inspired design. I know his students are gonna love this!
 Check out this busy bee! Sarah Shumaker, you are killin it! 
 And this by Ms. Schmidt cracked me up! I mean, what else do you do with a wet felted piece besides make it into a crazy hair day portrait? I think students would LOVE this idea!

As you can see, we are having a whole lot of fun on this felting adventure of ours. Thank you so much to all of you who have been joining the fun! Remember, you can still join in anytime. If you'd like me to share your work here, just remember to use #creatingwithcassie. Have fun stabbing stuff!
 photo signature_zpsd10b3273.png
Read more »

Wednesday, March 15, 2017

Exciting News: Free Felting Workshop!

I have EXCITING NEWS!

I have been working with Sue Bunch of Back to Back Fiber Products for the last couple of weeks dreaming, plotting and planning a free online felting workshop

Like, what?!

That's right! It all started during one of my Wednesday night Facebook LIVE chats. I host one each Wednesday evening at 8pm CST. We cover all sorts of art teacherin' topics which are archived on my page. One evening we were chatting about Teacher Burnout and I mentioned that one way I combat burnout is by hosting craft nights at my home. I don't do it as often as I would like because, honestly, when the weekend hits I usually spend the following 48 hours in pajamas binge watching RuPaul's Drag Race and making big messes. This lead to following the idea: what if we spent the month of April, during my Facebook LIVE chats enjoying a craft night? We wouldn't have to leave our house, we could spend time with folks who get us (art teachers!) and we could learn a new craft while creating something beautiful and fun. What could be a more perfect evening than that?
So, how can you join the fun?

1. Start by "liking" my Facebook page. This is how you can stay posted and join the chats. If you've never joined a FB chat, it's quite simple. If you've liked my page then at the time when I'm LIVE, I will pop up in your feed. Don't see me? Then hop on over to my page. If you happen to miss the chat, NO WORRIES! All my chats are archived on my page. I'll also be archiving them on my YouTube channel. So you can join the craft night live or think of my page as an after pass. 

2. Purchase the supplies for the workshop. Sue and I have been working very closely to put together a kit which will proved all the supplies needed for our month-long felted workshop series. She's been super kind to keep the price economical and offer free shipping to those in the continental USA. If you are outside of the US, please contact Sue for shipping information. 

You don't have to purchase the kit to join the fun! If you already have the supplies, you don't have to purchase the kit. I'm teaching this class for free because I LOVE needle felting and craft nights. This is not a money making venture for Sue or me. We are doing this because we love felting so much and want more folks to explore this craft. So don't feel obligated to purchase. Just be sure to join the fun!

Here's a peak of what is inside each kit:
What does each kit include? All of the supplies you would need for the month of April's free felting workshops. Each Wednesday evening, for the month of April, I will be introducing you to a new felting technique. Here's a peak at our fibers schedule:

Wednesday, April 5th: Learn to Needle Felt
To kick off our craft nights, I'll share with you how to needle felt! Included in the kit, Sue has provided a little list of supplies you'll need for each session. I'll provide a more detailed description of what we'll be making right here in blog post form as we get closer to the date. Essentially,  I want to share with you the basics of this craft so that you'll feel comfortable creating whatever you like! All projects will be very open ended so that you can explore what interests you. 

Wednesday, April 12th: Intro to Wet Felting
While needle felting is one of my favorite crafts, sharing needles (ahem) with your students in the classroom might give you the shakes. Wet felting however is PERFECT for kiddos of all ages and it's super fun to explore. I'll be sharing a couple of my fave wet felting techniques on this evening.

Wednesday, April 19th: Sculpting with Fiber
Felted sculptures are so much fun! This is an area that I really want to explore more as well. I'll share ways to create basic sculptures with an armature and both wet and dry felting techniques. 

Wednesday, April 26th: Felting in Fashion
Y'all come prepared to create something fashionable! We'll be creating that wee palette hair clip I love so much and felting old sweaters into masterpieces. I'm super excited about this one. 
Are you excited yet? I know I am!

Join the chat right here tonight. If you have ANY questions, either leave them in the comments or throw them my way this evening. I plan to do an unboxing of Sue's kit so you can see what you'd be receiving. 

Interested in ordering a kit? Pop on over here! If you have any questions for Sue, feel free to reach out to her at sue@backtobackalpaca.com. 

I can't wait to have y'all over for a craft night starting in April!
 photo signature_zpsd10b3273.png
Read more »

Wednesday, January 25, 2017

In the Art Room: Stitched Monsters!

Going LIVE tonight, Wednesday at 8pm CST to talk about some art teacherin' issues! Hope you'll join me over here. See you real soon! 

As my fourth graders are wrapping up their Candy Heart Sculptures and drawing, I'm thinking ahead to a fun fibers unit for them. Last year, this group explored embroidery and did a really fabulous job. I know they will love expanding their knowledge and creating these fun stitched monsters!  
I wanted a stitching project that would introduce them to the following: pattern cutting, pinning, sewing, stuffing and embellishing. I also wanted a fun contemporary artist tie-in and I found the artist behind Cotton Monster, Jennifer Strunge, to be perfect. 
Aren't her monsters just the most amazing thing ever? I need one in my life, stat. 

Here's the video I created to introduce my kiddos to Jennifer and all things stitching! Feel free to use it in your art teacherin' world. I think it would be perfect for 3rd grade on up.
We will be using the following supplies:

* 9" X 12" sheet of Smart-Fab or felt
* Additional felt for arms, legs and details
* Tacky glue
* Sharp tapestry needles
* 4 pins per student
* Scissors
* Embroidery floss or crochet thread
* Paper needle threaders

I anticipate this project will take my students 3 one-hour art classes. When I share my video, I show it to the kids in short bursts. I then allow them to go work and set my timer for the amount of time I expect it will take them. When the timer goes off, finished or not, all kids report to the floor for the next video viewing. 
On Day 1, we'll learn about Jennifer Strunge, cut out arms, pin them in place and, hopefully, stitch one side. The following day, we should be able to wrap up the stitching, turn inside out and start working on the face. We will pulling out our Monsters of Creativity collages and looking at those for inspiration! 
Day 3 (and, let's be honesty, probably Day 4) will include gluing the parts of the face down, stuffing and stitching closed. 
I'm thinking of tasking my early finishers to think of themselves as toy creators and their monsters as their creation. As such, they'll need to think of their monster as a product. Who will it be sold to? How will it be packaged? What will be the price? Why should people buy it? I'll keep you posted on this adventure!
Have y'all done stitched monster projects with your students? Love to hear what you've done! And if you do this project, please be sure and let me know, I'd love to see your student's creations. 
 photo signature_zpsd10b3273.png
Read more »

Tuesday, January 10, 2017

In the Art Room: First Grade Fiber Arts

Every year I do paper weaving with my first grade artists...and every year, when the weavings are complete, I think, "well, now what?"

This year, my first graders FLEW through weaving without much help or reteaching from me. I was so excited that I decided to throw some simple stitching into the mix and I'm so glad I did. The kids nailed it and created a beautiful heart-tastic quilt to boot.
Day 1: If you've never done paper weaving with kids before, here is how I teach them to cut their looms. We used painted paper for our looms. Cutting our looms and weaving a couple of strips took us one 30 minute class. 
Day 2: On our second day, we reviewed the weaving process. We sit in a circle and weave together. I like to use peer tutoring for those who understand weaving to help others. I find the kids do an excellent job teaching one another!
Our Love Quilt now hangs outside my art room! This is the work of two classes. My next two classes will have a different color scheme. I'll be sure to share when they are complete. 
Day 3: The next art class, students chose a 12" square piece of construction paper. We learned all about symmetry as well as positive and negative shapes and how to cut out a heart! This was then glued over our weavings. We saved the positive shape hearts for our next project. As a wrap up, we had a drawing sheet full of symmetrical and asymmetrical images for the kids to draw.
Day 4: I had to do some prep work for this day, not even gonna lie. I hot glued another square paper on the back of the artwork to anchor the weaving (see below) and I hole punched the sides. For two classes, that took about 20 minutes. Then I cut the yarn to about 18" strips and had pieces of tape on hand for the kids.
To begin, each child anchored their yarn with tape on the back. I showed them out to do a whip stitch and they went to town. To end the stitch, they added another piece of tape on the back. 
Early finishers helped those those who needed assistance. Everyone finished in under 20 minutes. This gave us time to add our names with silver Sharpie!
Once the kids were done, I laid the pieces out on the floor and decided to display the artwork quilt-style. 
For that, I simply hole punched the tops and bottoms of the weavings and tied them together with two pieces of yarn. This created long pieces of art that I hung next to each other to create the illusion of a blanket. That took a mere 30 minutes! 

I was so excited that with 4 30 minute art classes, the kids learned about weaving, symmetry and stitching...all while having a blast! I am so glad to have this beautiful masterpiece outside my art room. 

Love to hear about your favorite projects that involve paper weaving!
 photo signature_zpsd10b3273.png
Read more »