Showing posts with label van gogh. Show all posts

Saturday, October 25, 2025

Let's Draw Sunflowers (and 3 Bonus Sunflower Projects!)

Hey, friends! I'm coming to you with my second sunflower themed lesson because, well, they are just so perfect for this time of year!

Recently, I shared a sunflower printing collage project here that I know you'll love:
This lesson is also perfect for a line and shape review as well as an introduction to collage!
Making your own sunflowers is also super fun! I have done projects like this with my students with kiln fired clay...but this one was done with salt dough clay. Recipe and details here!
If you are looking for a fun printing sunflower lesson with a nod to Warhol, you may want to check this lesson out! 
Speaking of artist inspiration, this one was clearly inspired by Vincent van Gogh! To watch the full drawing video, just go here:

Now, more on Payons and how I use them in a moment! I have lots to say about this art supply from Prang. But first...

Did you know that Vincent is one of the seven artists featured in my decide-your-direction art adventure titled Find Your Way? There are seven world famous artists for you to go on adventures with!

I wrote this book for my students...as they worked, they loved to be read to. But I always struggled to find the perfect art history book for them. So...I wrote one! My book also includes art activities and biographies of the seven artists featured. To read snippets, find out more and get a copy, visit here. 
Oh! Did I mention that I created over 80 illustrations to bring the book to life?! Yeah...this was a huge project and one that I know you and your artists will love. To learn more about how I read chapter books in my art room, visit here!
I also included actual quotes from the artists...that's what you see here in bold print. The other artists featured are: Hokusai, Frida Kahlo, Claude Monet, Augusta Savage, Leonardo da Vinci and Salvador Dali!
What better way to create artwork inspired by Vincent van Gogh than while hearing all about him in art class!?

Okay, now let's talk art supplies...
For this lesson, I am using Prang's Payons which are water soluable or watercolor CRAYONS! I had never played with them much before until the last couple years and I love them! They go on just like a crayon BUT...with the addition of water, the colors transform into watercolor. The colors are super vibrant and fun. 

However...if you don't have those on hand or they are not in your budget, you can do THE SAME THING with Prang's markers! I used ton only buy a certain brand of markers (ahem, I think you know the ones I mean) until I discovered that they seemed to dry out quickly and just seemed like they didn't last as long. When I got my hands on Prang's markers, I was suprised: they are juicy and bright...AND work perfect for a project like this where you just add water! If you aren't familiar with this method, you can see it in action in this lesson of mine here. 

Anyway, have fun friends! I hope there's a sunflowery lesson here that you and your artists enjoy!


photo signature_zpsd10b3273.png
Read more »

Tuesday, October 14, 2025

Sunflower Still Life Collage


Hey friends! Today I'm sharing with you a fun sunflower still life lesson that is the perfect review for lines and shapes...while introducting collage and monoprinting! This lesson is perfect for your 1st grade and up...and I'm going to share with you a bunch of alternative art supplies just in case you are on a cart or don't have the supplies I am using on hand. So, like many of my videos of late, I'll walk you through a 'teacher talk' at the start of the video to help you think through how you can best make this lesson work for you. Here you go:
Before we dive in, I do want to share...my book, Art Teacherin' 101, has been sold out for the last month. I'm happy to say that I now have it back in stock! If you have been waiting to get a copy or just want to find out more details on my book, you can find it here. 
I'm so excited that my book has sold 10K copies! It's so amazing to think that I've been able to share with so many incredible art teachers. A big thanks if you have ordered a copy! And...just so you know...I sign all copies before packing them up. That's right...my books are packed and sold by yours truly. I'm an independent book publisher and seller. If you ever have any questions about that, feel free to reach out! 

And now...back to the lesson:
To begin, I used my tempera paint filled bingo daubers! You can pick up your empty daubers here.  And my preferred paint (and supplies) are here.

Knowing that not everyone has bingo daubers or the time to fill them, in the video, I share a couple of alternatives. Students could use tempera sticks to create their line papers or...they could paint the lines! So even if you are on a cart or short on supplies, I got you.
This lesson could be done on 9" X 12" paper as the final result or, my preference, 12" X 18" paper. I like the larger format only because it allowed more room for the bigger flower prints. 

For the flower prints, I would recommend using a pizza pan. I got a class set at Dollar Tree for $1.25 each and use them ALL THE TIME. We print on them so much! 
By the way, if you are new to using tempera paint with students and are looking for some pointers, I got you covered right here!
I would split this lesson into three days: 

Day #1: Creating the line papers! Do a Line Review with my friend Larry the Line, of course!
Day #2: Flower Printing! You could include a shape review here! In the video, I talk about both organic and geometric shapes. Alfred the Ape Knows his Shapes would come in handy here!
Day #3: Collage it all together! On the final days of this lesson, it's time to create a collage! If students need a reminder on how to use their scissors and glue...well, I think I can help!
AND...if you are looking for a way to have a Calm and Focused art class, you may want to check out my tips here...and my book that kids LOVE to hear while they work...here!

Have a great week, friends!


photo signature_zpsd10b3273.png
Read more »

Sunday, March 27, 2022

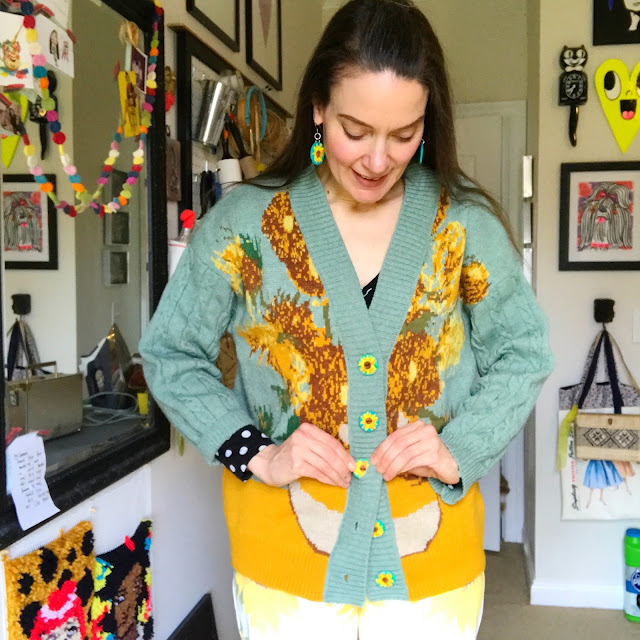
Vincent van Gogh Inspired Buttons and Earrings!

Hi! I scored this amazing sweater recently and while I absolutely loved it, I hated the obnoxious plastic white buttons that were on the sweater. They just stuck out like a sore thumb! So I picked up some polymer clay at the craft store with the idea to create my own. Normally, I buy the 'name brand' polymer clay but this time, I was feeling cheap and decided to give the house brand a try. It was half the price and I have to say...despite the fact that the yellow clay stained my hands a pinch, it worked great! I'm used to stained hands so, no big deal!
I went about creating these factory style and it went pretty quickly. I made a video to share the process in case you need some van Gogh bling in your life. Like, duh. Of course you do.

So easy, right?
Once complete, I just stitched these onto my sweater and added some jump rings and a French hook to the earrings and I was all set in my new upgraded van Gogh sweater!

Not only that but this craft was just the creativity thirst quencher I needed this weekend. Thanks for letting me share, y'all!
photo signature_zpsd10b3273.png
Read more »

Wednesday, April 4, 2018

In the Art Room: Walk Around the Room

 Did you know that today is National Walk Around Things Day?! Me neither! That is, not until I checked my calendar. What is this day? Well, apparently, it's open to interpretation...personally, I thought it sounded like a fun way to get the kids up, moving, doing something new AND having them search for mini-masterpieces by the artist we are currently learning about: Vincent van Gogh! Here's how I introduced Walk Around Things Day and this hunt to my first graders: 
Y'all, this was so much fun and so interactive! When I explained what they were to do, one of my students said, "like an Easter egg hunt, but for Vincent van Gogh!" My fourth graders are also learning about van Gogh and I did the same activity with them. Because I have doubled up fourth grade classes, I skipped over the "walking around like a giant bit"...I'm certain they would have loved it but I know my crowd: they are a little wild. I can only give the a little bit of leash, if you know what I mean. So, instead, we reviewed what we knew about van Gogh before going on our hunt. I managed to snap one photo of the fourthies as they walked around the art room. 
When they returned to the floor with our found masterpieces, We chatted about them. This lead to many more discussions about van Gogh as well as the difference between a still-life, a land and seascape and portrait vs. self-portrait. After this bit of moving around, we were ready to settle in to our lesson for the day. What a great way to get moving, thanks National Walk Around the Things Day! We'll have to do it more often!

 photo signature_zpsd10b3273.png
Read more »

Sunday, March 18, 2018

In the Art Room: Rizzi Meets van Gogh Cities (Sub Plans!)

 The other day, I had to take a day from school. I created a sub plan video for my sub to use with my first through fourth grade classes. My younger kids worked on 9" X 12" paper because they have 30 minute art classes. My older students worked on 12" X 18" pieces of paper since they have an hour. I created this video and a simple handout. When I had returned, the students had gotten as far as tracing their designs in Sharpie. They were SO EXCITED to continue working on these that I put their current projects aside to let them finish. Here are a handful of fourth grader's pieces that have been finished and are in process. 
I'm loving each and every one! Since this was such an engaging lesson for the kids, I thought I'd share it with y'all. If you are going to NAEA this coming week and in need of a lesson, you might consider using this!
In addition to the video I created for my sub, I also made these handouts. That way the kiddos would recall a simple breakdown of the lesson. Feel free to reproduce for your art teacherin' world. 
I also had a production of a James Rizzi cityscape as well as some images of the Nashville skyline. The kids were told they could create ANY city they wanted: real or imagined. Many of my students are interested in the buildings of Nashville since we live so close so that's why I included that visual.
My students were also allowed to use my how to draw books which is why you'll see some recognizable cartoon characters on the buildings. Several of them also used my mirrors so they could create self-portrait buildings or simply see how to portray different emotions. 
I did notice that some students got a little lazy when it came time to create doors and windows. So I reproduced a doors and windows idea sheet from line drawings printed from the internet. This really helped encourage more creativity.
So many of them just went wild with this lesson and they really loved it!
 When I returned, I introduced them to Vincent van Gogh and we spent a lot of time learning about him, looking at his paintings and chatting about his brushstrokes. Then we looked at The Starry Night and used that as our inspiration for our skies.
 For that we used both oil pastels and markers. Once our skies were full of dashed lines, we simply added water!
 From there, we used the warm colors (ahem, well, some of us did) to add color to the sides and top of the buildings. Afterward, water was added. This was a super non-mess way to create a vibrant and creative masterpiece. 
 Unfortunately, my kiddos are in various stages of finishing. Why have we not been able to invent a All Finished At The Same Time Machine yet?! Ugh, the worst. So here as some spectacular almost-finished masterpieces.
This is easily a lesson that ALL of my students adored, from first grade all the way up to fourth. 
 And certainly one that a sub, even if not an "art" sub, could handle.
I know a James Rizzi lesson isn't anything new...but I thought this was a fun and SIMPLE take on it that even a sub (or us...when we are nearing spring break and need that easy project that also keeps them engaged!) could use. 
 Speaking of sub days...who is going to NAEA?! I'm so excited, I've never been to Seattle before.
I won't be leading any sessions but I will be doing TWO meet-ups and I'd love to see you. 
You can join me on Friday in the Activa booth where you can make and take one of these cuties! Or just hang out and chat. 
Or come hang out on Saturday with me and the podcastin' gang from AOE! Tim will be there along with the AOE team so it will be super fun. 
 photo signature_zpsd10b3273.png
Read more »

Sunday, March 11, 2018

In the Art Room: Your Face Here Famous Paintings!

If you are looking at my blog right before bedtime, lemme just go ahead and apologize for this nightmarishly frightening image. But I had so much fun creating this mess-terpiece from a $1.50 thrift store frame, that I just had to share it with you! Here's the process:
The idea started last week when I introduced my kindergarten to something called "Quiet Critters"...I'll be sharing more about those magical beasts later this week (tomorrow, I hope but we'll see how life goes). The short story is that my Q.C.'s only come to the quietest and hardest working tables in kindergarten. Here's what they look like:
Giant pompoms with eyeballs, feet and antennae glued to the them. I JUST started using this system with my kindergarten as they are my noisiest crew...and, so far, they are working wonders! Each Q.C. is named after a famous artist with the plan being that I'll introduce one of those artists every other art class. Last week, we met Mona Lisa! Here's a short video of that I shared on my IG:
It went over so stinkin' well that this weekend, I knew I'd need to create another Your Face Here painting. This time 'round, I went with van Gogh! We've been talking about him and perseverance a lot lately...so he seemed like the obvious choice. Here's a snippet from our most recent chat:
I've been sharing short clips of myself teaching over on my IG. One of my most favorite things in the world is to watch others teach...I thought I'd share a little glimpse inside.
When creating these frames, here's what I look for: something cheap, without glass and with a heavy card or foam board that I can paint directly on. This allows me to just "gesso" over the painting (and by gesso, I mean just paint it white) and go to town on the new one. It's super fast, super fun and I'm so excited to bring van Gogh to my students. I won't be painting myself a beard as I just don't feel like wearing a beard for several days straight. I am the proud owner of a nice red fake beard that I can easily slide on before introducing van Gogh to the kids. 
I plan to make many more of these. My friend Ashley made a ton for her students' art show and I LOVE that idea! I think I might have to have them out as a photo op for the big night. 

 photo signature_zpsd10b3273.png
Read more »