Back to the lesson at hand! In this one, students will use watercolor paint and a wet-on-wet technique to create their jumble of geometric shapes! For my favorite watercolor supplies, you can visit here. Here's the video lesson:
This lesson pairs perfectly with my previous one on organic shapes so they are fun to do together. And they are quick lessons, so no need for a lotta days set aside for this!
Transparency film is totally not necessary BUT...I have found that kids love to draw on the slick surface of a dry erase board. With that in mind, I thought of my stash of transparency film when it came to these projects. If you ask around at school, there is usually a ton under a pile of dust somewhere in the librarian's closet! Or you can pick it up here.
OR students could simply draw directly onto their paintings!
This shape sheet can be found in the back of my book!
OR you could just totally leave 'em like this! I love the look of these with the watercolor dots!
Regardless, I do hope you and your amazing artists have fun!
Hey, y'all! I'm coming to you this week with two new fun lessons with a focus on SHAPE! I'm super stoked about these and how they tie in with my book Alfred the Ape Knows His Shapes. Now, you don't need my book for the lesson as I share some images from the book in the video but...it would really suppliment the lesson for sure!
For this project, you'll need the following supplies:
* Paper cut to 8.5" X 11"; I like to use 80 lbs mixed media paper
The focus of this lesson (and the one I'll be sharing in the next couple of days) is SHAPE. In particular, the difference between ORGANIC and GEOMETRIC shapes. In this lesson, the artists will be creating an organic shape painting while learning a fun watercolor technique called Wet-On-Wet.
By the way, my book explores ALL things shape! I wrote it because...while there are a lot of books on shapes they seem to focus namely on teaching the names of shapes. Often, they seem geared to ward a very young audience. I wrote this book with the second grade curriculum in mind and all of the knowlege that children that age should know. To take a look inside my book, watch the video or...visit here!
I was recently sharing with some art teachers during a virtual PD (did you know that I host those? Yep! You can always contact me at cassieart75@gmail.com to learn more!) and we were talking about 'early finishers'. For this lesson, students who finish painting early can always...create another painting! I like to offer smaller papers for my early finishers. This saves paper and, if students are given a smaller brush, they are also forced to WORK smaller!
Often, I'll ask my early finishers to be 'art helpers' and ask their friends "do you want some help?" before assisting them on their work. Some students love the help of their friends while others prefer to work independently. It's important that students have that choice.
Just a couple of thoughts on those early finisher friends!
Going on a SHAPE walk, especially outside, can be fun when introducing organic and geometric shapes. Or! Just press pause on my video and let the students see if they can identify the difference between the two.
Personally, I think the paintings without the lines are a lot of fun! My students LOVE the wet on wet watercolor technique. It's also great for teaching paintbrush control.
Now no matter what the thickness of paper, unless you are using watercolor paper (and who has the budget for that?!), it's gonna wrinkle. This is why I keep a thrift store iron in my art room to stack and flatten the artwork. Just a hot tip of ya, in case you too are a little wrinkly (I blame the children for each of my wrinkles).
Now, once the paintings are complete and dry, the kids could draw directly on their artwork OR...they could use transparency film.
I like the transparency film because the slick surface is super fun to draw on AND....if the kids draw something they don't like, you can 'erase' the lines with a dry erase marker! Just trace over the lines with the dry erase and wipe off with a tissue. Boom! It's gone!
WARNING! I made the error of not making my paper the same size as the transparency film...so don't make that mistake! Be sure and cut the paper to a 8.5" X 11" before letting the kids paint. Trust me! It will make things a whole lot easier.
Have fun and stay tuned for the GEOMETRIC shape lesson.
Oh! And!
Just a reminder that I'll be at NAEA next month, signing and selling my books. Hope to see you there!
I recently created a lesson with my friends over at Prang using (my favorite!) their Tru-Ray construction paper and Prang's white school glue. You can find the lesson, with the step-by-step process here!
Several years ago, I started doing these shape sculptures with my students when we were finished with our unit on LINE. And I realized...I never shared that lesson with you in video form!
So, I thought I'd create a new video for you and your artists in case you are ready to dive into the wonderful world of SHAPES!
Some troubleshooting for this lesson:
* You'll probably want to start with either a 12" square of paper or a sheet of 9" X 12" construction paper to create the cube.
* So that your students will be able to create shapes that are a good size for the cube, you'll want rectangles of paper that are 12" X 2"
* You'll need glue! Glue sticks may work in a pinch...but I find that the hold is better with glue.
* OF COURSE, you'll probably want a good book to read for your shape lesson. How about THIS ONE?! ;)
You could do this lesson any number of ways!
For a quick version, you may wish to leave the construction paper blank. This allows the shapes to really take center stage.
OR...you could use paint sticks or ink-filled bingo daubers and have students do a little bit of a line review. In the video, I wanted to share all three versions! Personally, I like the plain background best but I am always looking for a good review and the lines in the background does just that.
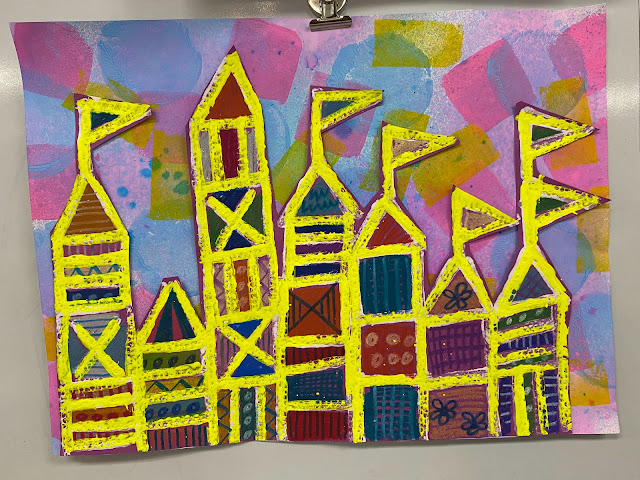
One of the lessons that came out of those shape stations was this Paul Klee meets Mary Blair inspired castle project. Today, I thought I'd repackage the lesson into one video that will walk your artists through the process.
Now, this lesson can be as simple as making printed castles all the way up to using chalk pastels and adding a background. I'll leave that up to you! Just know that I wanted to cater the video to your art teacherin' needs. So keep it a one-day activity with castle printing or take it beyond (as I did with my older students) and add more art supplies.
By the way, using puffy paint with students IS NOT for the faint of heart. You gotta keep an eagle eye on those kids when they are using puffy paint or they will ruin their artwork in a blink. So...I recommend doing it in small groups with you or a trustworthy student as the monitor. Trust me on this one!
This lesson is a long one...if you decide to go the whole thing, just so you know! But the results are pretty fun.
Of course, you can also skip the cutting out of the castles and adding to the background. Instead, simply have students add "snow" or stars to the background paper to add a little more interest. Maybe even glitter!? BUT that might be a little too much.
Of course, if you are introducing students to shape, might I recommend MY book?! You can find it here!
No matter what you do, I hope you and your artists have fun creating!
If you've been hangin' around this blog for a while (I thank you!) then you might know that I love to make my own clothing. It started with a desire to craft clothing to teach a lesson in (a la Miss Frizzle) and then morphed into wanting to make everything in my wardrobe. One thing I never seemed to be able to accomplish: Designing my own fabric.
Well...when my book Larry the Line came out, I was able to do just that! But it was easy as the pattern from the book was a stripe pattern. So it naturally repeated making for the perfect pattern.
However, there were no stripes in my new book Alfred the Ape Knows his Shapes. So I thought it would be a good time to learn how to design my own fabric. I was so excited with how it turned out! When I shared it on my Instagram, I promised I'd give a tutorial...and, so, here we are!
I hope this helps!
Now I always get dress-making questions too...which I share a little about in the video. However, I'm no dress-making expert. I just know what I like and what works for me.
For the bodice of my dress, I use a vintage Simplicity pattern #4343. If you search around on eBay or Etsy, you may find it. For the bottom, I use a circle skirt pattern and always add pockets.
Creating a pattern was very hard for me to comprehend initially. So I thought I'd kick the video off with a little Post-It tutorial. I hope that helps!
And, of course, if you'd like a copy of my book, Alfred the Ape Knows his Shapes, I'd love to sign one and send it your way! You can find my books here. And THANK YOU for supporting my small business! I'm an independent seller so...I'm the author, illustrator, social media person, shipper, handler, you name it!
Recently I shared that my students were doing Shape Stations (or centers) in the art room. I did this after the success of both our Dot Day and Line Study stations. I'm loving the exploration the kids are able to do and the kids are loving it...for the same reasons. Not to mention, it's just FUN to try a whole bunch of new ways to create in just a few art classes. Here's a look at our Shape Stations:
And what we did during our Line Study:
And some behind-the-scenes tips on these stations:
Here is a look at the Dot Day stations that started it all:
And since we did two days worth of fun:
Once we finished creating artwork from our line study (lessons which I've yet to share here!), I ventured into shape. Currently, I'm doing shape stations with 2-4th only as kindergarten and first are in the middle of other projects. I do think that these shape stations would work for k-1st except maybe the radial symmetry design. But it's always worth throwing the idea out there to see what the kids come up with, right?
Here's a little look at what the back table in my art room looked like after I began prepping for our shape study. Initially we were going to do some shape stamps (seen in the upper left hand corner) but after giving that a run through with one class, I decided it was too similar to the sponge stamping. We switched to the bleeding tissue paper shapes in the end.
Now when I'm working through these station ideas, I also gotta start thinking: what are we gonna do with all of these papers and things we create? Here's a little look at what I've come up with...
First grade is currently working on the self portrait in the upper left hand corner. This is a lesson I've done many times, you can check out the lesson here. As for 2-4th, well...I am currently having them all work on those castles! We will all do printing with our stars...and do some embossing too...but as of right now, we are all learning about Mary Blair. Here's the video I created.
The kids are enjoying working with chalk and oil pastel. I'm excited to give them another opportunity to really explore a variety of supplies.
Above is my example and below is a class of I think thrid graders examples. I will say this...stations means the kids will often work quickly and not always at a slow and 'careful' pace. I'm fine with that. However, I did have a small handful of students later decide the wanted to redo theirs, knowing it was not their best work. I allowed that too.
So far, we've gotten the castles chalked in and now we are ready for the oil pastel.
Our backgrounds will be our bleeding tissue paper. Since winter is coming, we are turning it into a winter wonderland with snow...and a little bit of sparkle on the frame. Oh...and PUFFY PAINT. Everyone's favorite!