Monday, January 11, 2021

Art Teacherin' 101: New Seat Spots and Dance Party Color Wheels!

I've been in school since August and since that time, my room has changed more than it ever has over the course of my 21 years teaching! First I was told I'd be on a cart...then that I would have to have my students hear instructions from their tables (which I hate as I find it's just too distracting for them) and THEN I was told that I could have my students sit on the floor as long as they are spread apart and all wearing their masks. We never take off our masks in art so this was like a gift sent from heaven. I'm lucky in that my room is very big...but it did mean that I totally had to revamp my instructional area, even getting my T.V. and document camera moved, to accommodate all of these changes. At the start of the new school year, my instructional area looked like this:
To keep on top of contact tracing, all of my students in every class have a number order. They line up this way, sit next to the same friends this way, grab supplies this way...you get the idea. I numbered my line up spots both in the hallway and in my room as well as our instructional area (seen here) and tables and chairs! It has helped tremendously. BUT...these floor spots were simply numbered paper circles taped to the floor. Their life didn't outlast the determination that is small humans picking at things. So this weekend, I thought I'd trade them out for dry erase cirles! I ordered some, they arrived with lightening speed and today I was blessed with a ...
SNOW DAY! I didn't find out about it until I arrived at school to find the parking lot deserted. No worries! It gave me plenty of time to create my dream floor! I created a video to walk you through it, if you are interested.
Oh, y'all! I'm so excited!
If I could dry erase the art room from floor to ceiling I would...oh, wait. I think I pretty much have! 
Like I said, not sure how this is gonna work, if it is gonna work. BUT I am forever switching the script to find something that just might. It keeps me and my students on my toes. Here's a pic of my toes for emphasis. Also, pleas ignore my pale and hairy legs!
If anything, at least it's colorful! I'm hoping the kids are as excited as I am when they see it tomorrow. In the meantime, I will ALWAYS be checking for a snow day from now on!


photo signature_zpsd10b3273.png

Wednesday, January 6, 2021

What is Clay? An Introduction to Clay and Ceramics for Elementary Age Children

Every year, I give the same spiel to my classes about clay and ceramics: what clay is made from, how it is fired, what glaze is, the difference between hand built versus wheel thrown and more. It's exhausting! So this year, I put it into a video, added some visuals and used it today. It worked great, even my kindergarten understood what I was yammering about. It's a little long and it's definitely not perfect but...you are more than welcome to use it in your art teacherin' world. Here you go:

Stay tuned for a lot of clay videos coming your way! 

photo signature_zpsd10b3273.png

Sunday, January 3, 2021

DIY Earrings: Embroidered Color Wheel Earrings for the Beginner!

I just stitched up another pair of embroidered earrings, y'all! This time the theme was color wheel. I used a different stitch in each of the triangles and shared the process in this video! I hope you'll stitch along with me:

This has been a lot of fun for me...while I love embroidery, I don't love long projects. These are short and simple. Not only that but these earrings are so lightweight! In the past, I've made earrings of other things and they've always weighted a ton. These I don't even think about once I have them on! 
More plans for more earrings are in the works! I'll keep creating the videos...if anything, it might introduce you to some new stitches! Have fun!

photo signature_zpsd10b3273.png

Thursday, December 31, 2020

21 Art Lessons with the Theme of Love!

Who's ready to kick off this new year with a whole lotta love, color and bright, fun lessons? BUT who's also not done any real thinkin' about said lessons?! If you said ME to both of those questions than I gotta tell ya, YOU AND ME BOTH. Luckily, I've done a whole lotta love lessons over the years and put all 21 of 'em right here in this blog post. If you follow the links to these, you'll find videos for most and lesson details for ll of them. Have fun creating!
Learn how to draw each of these cuties in these how to draw videos, found here
Kindergarten tried their hand at printing with this project and had such a blast! 
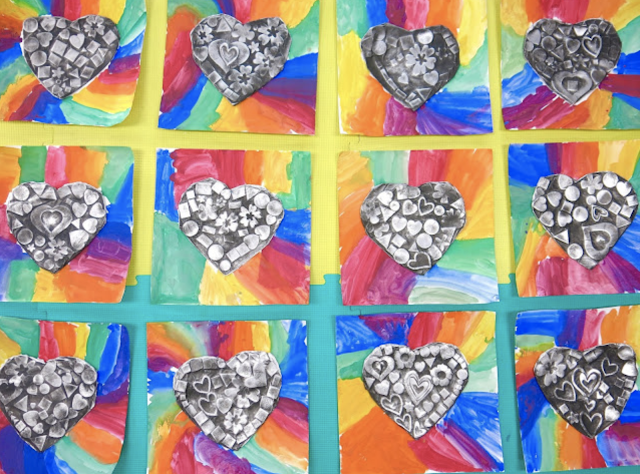
These relief hearts by kindergarten were a hit and definitely a lesson I hope to repeat soon! 
Of course, you can't celebrate all things love and Valentines-y without sharing the work of Chris Uphues with your students! We've done a couple lessons inspired by him. This one is a collage and printing project. 
This lesson has always been a hit on my blog with other art teachers and my students. In fact, I created this lesson as a sub plan so it's been a hit with my subs too! You can find all the details and video here.
My students created this HUGE collaborative mural inspired buy Britto. Lesson video here!
First grade created these huge Britto-inspired hearts with bingo daubers, bleeding tissue paper and paint sticks. Lesson details here. 
Ready to tackle printmaking with your students? Here's a lesson I've done a couple of years now with my second graders: Robert Indiana-inspired LOVE prints! 
I created these hearts with wings with foil, Celluclay and plaster strips! They are super simple to make. More here. 
Inspired by those hearts, I created a lesson for my second graders to make these
A couple of years ago, I did a professional development with the faculty and staff at my school. We created these My Heart Has Wings sculptures. Details here. 
Here was a fun lesson where we were able to use our messy mats as apart of our masterpiece! Not only that but this project provided two heart-tastic pieces for the price of one. These...
And these!
If you are looking to have your students create a large collaborative piece, you can see what each grade level worked on to make this piece here
Looking for a quick lesson that introduces students to three contemporary artists who used love and hearts as their theme? Check out this blog post with a video lesson! 
James Rizzi is always a fun artist to share with your students. We loved creating these love birds!
Here's another lesson we do just about every year in first grade: these woven and stitched hearts! All the lesson details can be found here. I created a variation of this lesson recently where students weave together strips of paper in their skin tones. You can find it here. 
These candy hearts were created by my fourth graders and we used plaster strips to create them. It was so fun to see these all come together and display them in a large candy heart box! Lesson details here. 
Early finishers of the candy hearts lesson moved onto this project when they were finished! 
Wow, did the third graders have a blast with this one! We made plaster chocolates that looked good enough to eat! All the lesson details here. 
Need a quick lesson with a contemporary artist inspiration? Try this JGoldcrown lesson on for size!


photo signature_zpsd10b3273.png

Tuesday, December 29, 2020

Art Teacherin' 101: The Anatomy of a Paintbrush!

I know that somewhere, out there, there's an art teacher putting off their art supply order because they just don't know where to start. I mean, just look at the paintbrush section, for example! There you'll find page after page of paintbrushes ranging in a variety of sizes and shapes. Where to start?! In this wee little five minute video, I'll share with you how to decide what to buy from the bristles all the way down to what the handle is made from. I hope it helps! 
Happy painting!


photo signature_zpsd10b3273.png

Monday, December 28, 2020

DIY Earrings! Learn to Embroidery and Make Pompom Earrings!

For the longest, I never wore earrings. My ears have been pierced since I was a kid but...my poor little earlobes have always been high maintenance. If the metal of the post isn't just right, my ears itch and throb. If the earring is even just the slightest bit heavy, my ears start complaining and driving my left eye to twitch. It was all too much! But a couple of years ago, that changed when I spotted a pair of earrings that just sent me spiraling outta control. These days, all I can say is: I like big earrings...and I cannot lie.

But with big earrings, comes big wait. And, y'all, I just cannot. I tried making my own earrings out of wooden beads and polymer clay but, man, they were so heavy! Not too long ago, on a road trip, I stitched up a couple of rainbow earrings and they were perfect! Not heavy at all, nice and big like I like 'em and, best of all, I can walk around and say "THANKS! I MADE THEM!" to anyone who asks (and even if they don't). 

Since, I've gotten some questions on social media just how I made them and if I'd make a tutorial. So! Here you are! I've created two earring tutorials just for you...one on these rainbows and the other on pompoms. More to come as I'm currently on an earring makin' bender, so stay tuned. Until then, gather up your supplies and get to stitchin'! 
And get to pompomin'! Have fun!


photo signature_zpsd10b3273.png

Sunday, December 13, 2020

Christmas Crafts for the Holidays!

Recently, I posted my favorite winter lessons for my students (you can find it here!) Today I thought I'd share my fave Christmas crafts for we adults! These are projects I've done with my friends in years past when I hosted Christmas craft nights. One of my favorite things to do during the holidays...that I've just not been able to do this year. But that doesn't mean we still can't create! You might even want to schedule a Zoom craft night with friends to give these a whirl. So here we go...my favorite Christmas crafts!
Check out these cuties! These were made with old paint brushes, polymer clay, paint, yarn and whatever else I had on hand. You can find a video and learn more right here!
A handful of years ago, we created Putz Houses! If you aren't familiar, these little houses were created in the 1950's and used to decorate trees. There's a hole in the back where you can slide them onto tree lights and the houses then light up! You can see all the step by step details in this blog post. 
These are highly addictive to make!
And all together, they create a sweet village!
Is there anything more festive than an art supply decorated wreath? I say no! You can see a video on how I created these paint tubes FROM TOILET PAPER TUBES here! I also did this craft with my students and they loved it. Check it out here
You won't believe how EASY this one is!
My all time favorite craft is needle-felting. Creating wee needle felted ornaments with small embroidery hoops was a fun and easy craft. Some of us even added some embroidery to our designs. Details here
To decorate my art room rainbow tree, I used palettes that I just painted as well as old paint brushes and cardboard tube crayons I created! Check it out here. 
Crayon tube sculpture details here, with video! 
This majestic thing of beauty actually stays up all year in my art room and is from Treetopia.

For our most recent craft night, we created these! So simple to make. We created them with cardboard cones left over from yarn, yarn bombed them and added details. I'm thinking I may have to create a how-to video of this and the pompoms this week so stay tuned.

Happy Christmas Crafting, y'all!


photo signature_zpsd10b3273.png

Wednesday, December 9, 2020

How to Draw Winter Pups and Kittens!

Hey there, friends! I recently had to take some time off from school putting me out of my classroom for three weeks. I'm fine, everything's fine (and no, I didn't have covid) but coming back...that didn't feel fine. Projects that we'd left hanging for the last three weeks didn't seem the best place to pick up where we left off. So I decided to give my youngest artists and myself a break from those projects and start something new. These little cats and dogs inspired by artist, author and illustrator Angie Rozelaar seemed like the perfect thing. Above is what my first graders created in 30 minutes. I got a lot of questions on this over on my IG so I decided to create a video. Here you go:

Feel free to use in your teaching world! All I ask is that credit be given when asked. I always share lessons and resources FOR FREE...my only "payment" required is that my lessons not be sold on TPT (it happens ALL THE TIME) and that credit be given. Please and thank you!
Just for a little variety, I decided to have my second graders draw pups instead of kittens. This tutorial can also be found in the video. Have fun, y'all! And here's to making it through this last week and a half before break!


photo signature_zpsd10b3273.png