 |
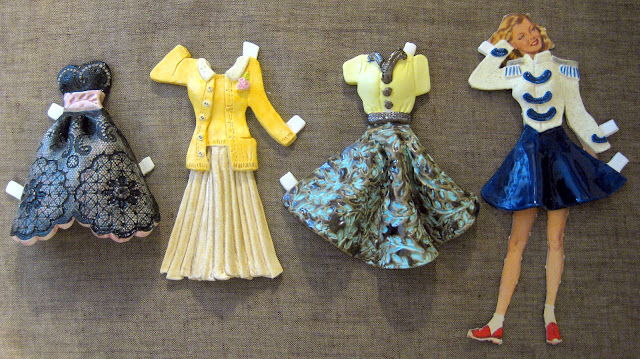
| A girl can never have too many dresses, I say. While creating these ceramic dresses, I had a theme in mind for each. Starting from the left, I call these The Debutante, The Librarian, The Lady Who Lunches and The Majorette. |
I have a wee bit of a vintage paper doll collection as you might recall
here. I just love the sweet illustrations and the beautiful dresses. As a kid, I often resorted to playing with my paper dolls when it became too stinkin' difficult to slide Barbie's tight Calvin Klein-inspired jeans over her sticky rubber legs. I'm pretty sure I was on the verge of getting kid's carpal tunnel, thanks to Mattel. But I digress.
 |
| The Summer Picnic, The Prom Date, The Secretary, The Cheerleader |
One of my other fave kid toys were my
Fashion Plates. Did anyone else have these? I recently found a set on etsy and scooped them up. I loved coming up with my own outfit designs as a kid. Huh, go figure, right?
Both of these interests, vintage paper dolls and dress designing, started me down this latest DIY path: Ceramic Paper Doll Dresses. I had been toying with the idea for a while but not until I found some old photos of my maternal grandmother was I inspired to set to work.
 |
| My beautiful grandmother is the girl on the right. I love her widow's peak, olive colored skin and wavy dark hair, none of which I inherited. |
I love this photo of my grandmother with her mother and siblings. Her pretty little legs in those too-big shoes, her sweet smile but most of all,
that dress. I was determined to sculpt a ceramic version.
 |
| Since I've been creating ceramic belts, I've been using tons of different textures for surface design. Among my favorites are doilies, burlap and these polymer clay texture plates sold at craft stores. |
To create my little dresses, I first went through my stash of textures. Many of my textures are vintage lace which are perfect for creating little mini-vintage ensembles. For this process, I lay my texture down on my work surface (a wooden board), lay a piece of clay on the texture and use a rolling pin to flatten. Once the clay is flattened to an even surface, I peal the clay off of the texture, turn over and, voila! "fabric" for my dress.
 |
| The secret ingredient to working with clay and not having it stick to the rolling pin, your fingers, and everything else? Corn starch. That's the white powder you see on my clay. |
I used one of my favorite vintage paper dolls as the model for all of my dresses. She was placed on my textured surface and the dresses were designed around her. This made dealing with proportion a snap and left me able to focus on the fun part, designing her vintage look.
 |
| My grandmother's dress. I cannot wait to have it fired and glazed. I would love to know the original color of the dress. My grandmother is no longer with us but maybe her sister will know. |
Forming the little details, like the buttons and the ruffle, are my favorite parts about creating these little outfits. Once that's complete, I add the tabs and allow the clay a day or two to dry before a slow fire in the kiln.
 |
| My grandmother was also a majorette. My plan is to eventually create the accessories that go with these outfits, like the baton and the knee-high tasseled boots. |
Once the dresses are out of the kiln, the glazing adventure begins. I have a love/hate relationship with glaze as you can never know for certain what you are gonna get. One of my favorite dresses I created was a Dale Evans-inspired cowgirl dress. Sadly the glaze was much too shiny and bright and the dress lost that certain something.
 |
| "Oh, what's that, Charlie? You wanna take me to the prom? Golly gee, I dunno. I've already been asked by Timmy, Bobby and Bill!" |
I decided what these dresses needed was a satin glaze. So I ordered some
here and was much happier with the result.
 |
| The Librarian. I designed the skirt of this dress around one I saw my grandmother wearing in a school photo. |
 |
| My grandmother was never a cheerleader but I just couldn't resist creating a vintage cheer look in my college colors. I'm a hoosier, what can I say? |
 |
| Okay, so someone needs to go shoe shopping. This dress is easily my favorite. |
 |
| I attempted to use a tarnished gold metallic glaze on the skirt. Yeah, not what I was expecting. |
I'm interested to hear what you think of this little DIY of mine. And now the question is...what do I do with these wee little wonders? I have a couple of ideas but nothing is really lighting my fire, if you know what I mean. What do you think? Frame them? Put them in a shadow box, as a friend suggested? Display them...how?
Thanks for reading, guys! I do hope you have a lovely day. Oh, and the next time Barbie's pants won't go up? Put her in a dress. That's what I do Every Single Day ;).


