Showing posts sorted by relevance for query Clay. Sort by date Show all posts

Monday, March 27, 2017

In the Art Room: Clay Chameleons!

If you follow me on Instagram, then you've seen me over-sharing all of the clay projects that my kiddos will be creating during Clay Week. I like to go with a theme when it comes to clay as that makes the art show seem cohesive. Last year, we went with the clay theme of a 1950's Diner where all the kids created clay food. It was a big hit and a whole lot of fun. 

This year, I decided to go with a Pet Shop theme! You can actually view all of the clay videos I've created for my students right here (and feel free to use them). I add new art teacherin' videos every week so if it's something that you are interested in, you might want to subscribe.

Today, my third grade students watched this video in bite-sized pieces and were able to create their chameleon from start to finish. We did use up more than our normal hour long art class...thankfully, I have a plan time after this class and the teachers were kind enough to let me use some of their instructional time for the kids to finish. I work with some super supportive folks, y'all! Otherwise, this project would have taken us about an hour and a half.
I get a lot of questions on how I show my students my videos because they are pretty long. I don't show the video in it's entirety as that would be too much information for the kids to process. Instead, I show bite-sized portions. Then I send the kids to their seats to work. When a handful of them have finished and trickled back to the floor, then I call all of them to join us, finished or not, and we watch the next portion. For these guys that meant they learned how to make a leaf and then created it; came back to learn about how to make the body and legs of the chameleon and created it; and finally, they learned how to create the head and attach to the leaf. This keeps us up, active, busy and working the entire time. 
Have I told y'all lately that I wrote a clay book? You can scoop it up for preorder right here. When I first became an art teacher some 18 odd years ago, I'd never even taken a ceramics class. And yet...my first year teaching, clay was in my curriculum. With no kiln and a small budget, I had to create clay for my kids to use. Without much info online at the time, I scoured the public library for recipes and ideas. I learned many recipes and included them in the book. In fact, all of the projects in the book are made with no-kiln clays...but have been tested out with kiln fire clay. So it's for everyone!
Working on a book filled with 52 projects meant that I had to dream up, snap photos of and write about, well, 52 projects. Y'all, that's a lot! I learned many a thing working on that book...and I believe it has made me a better clay teacher. 
If you find clay to be intimidating as I once did, I have a surprise for you! I'm going to be offering a Crash Course in Clay here during the month of May! Follow me on Facebook and I'll keep you posted on the details. Here's a peek at how I set my tables up for clay: doggie bowls for water (from the Dollar Tree and they NEVER spill!), toothbrushes for scoring, skewers for carving, cutting and creating design, clay mats (which I have had for well over 10 years) from my friend Danielle McDanielle, aka The Clay Lady, usually lots of texture tools and sponges for wiping hands when they start to feel too dry. What do you keep on hand during clay time?
Oh! And I busted out the marker caps to make these fun eyes for the chameleons.
I'm thinking we will glaze these after firing. I hope I have some room in my budget to splurge on the glaze with the flecks of glass in it. I think that would be perfect for these little guys. I'll be sure to do a follow-up post once complete. 
I've tried many a thing when it comes to finishing clay projects: gouache, oil pastel and dip in black tempera and glaze. Which is your preferred method? 
By the way, this clay project could just as easily be done with air dry clay! You'll have to keep me posted if you give it a go. 
 photo signature_zpsd10b3273.png

Sunday, July 1, 2018

DIY: Polymer Clay Snack Foods Necklace

 As you might have guessed from my last post, I'm on a bit of a polymer clay bender. I have this habit of going thru phases when working with different art supplies. When I'm needle felting, I needle felt EVERYTHING;  when I'm painting the walls of my art room, NOTHING IS SAFE; and when I decide to make miniature snack foods out of clay, watch out! 
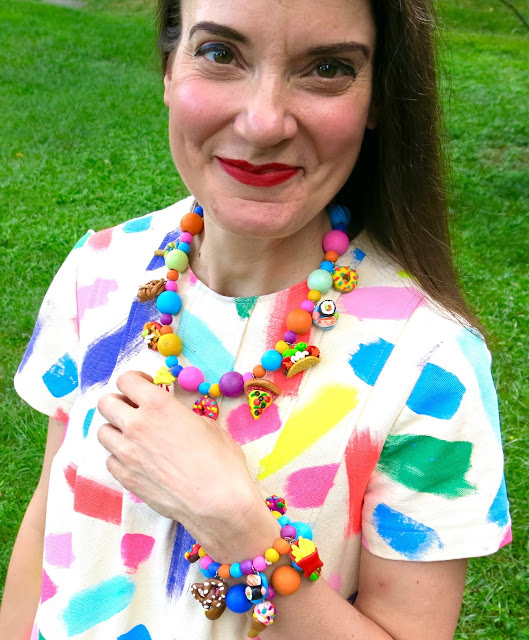
I've got sushi, pie, popcorn, cupcakes, donuts, pizza, tacos, nachos, pretzels, lollies, pancakes, ice cream, bacon -n- eggs and more! I have to blame some of this on my friends over on Instagram who gave me a TON of ideas for what to sculpt. So many that I ended up with enough charms for not one necklace but also two charm bracelets! 
I hope this helps!
Because the grand majority of clothing in my closet is just as busy as this necklace, I decided to pair it with the dress I painted and stitched. Yes, this would be one of the more tame pieces of clothing in my closet. Surprised? I didn't think so. 
Wanna make some snack food charms of your own? You totally should! I even made a video tutorial showcasing how to make the tacos, nachos, donuts and sushi! Once you conquer those, you can take on all the snack foods. Here's a little list of supplies:
 * Sculptey Clay...or whatever your polymer clay of choice might be. I like the big ole 24 pack of the clay for a wide range of colors. Be sure and use all of the craft store coupons you can find as this stuff ain't cheap.

* Jump Rings...that's the little metal circles you'll want to add to your clay piece before popping it in the oven. I just slide mind in the back of the clay, sinking them about half way in. You'll be adding two jump rings per creation...but you'll only need to add one before baking. The other one can be added once the clay is cooled and easier to handle.

* Jeweler's Tools...or pliers. You'll need small tools to pry the second jump ring open and add it to the one that is already on the clay. Each charm will need TWO jump rings. If you only use one, then your charms will hang sideways. With the addition of the second one, your charm will hang straight on and be visible to all of your admirers. 

* Elastic...I use elastic string for my necklaces as I truly hate creating jewelry and working with tiny findings and jump rings. So being able to slide my necklace over my big ole head Candy Necklace style works best for me. 

* Modpodge...I used that to seal and protect my charms once they were out of the oven and cooled. 

* Wooden Beads...You can find a variety of wooden beads in the wood department (heh-heh) of your local craft store. I use acrylic paint to add color to mine. 
 My favorite part of making this necklace was making the charms...obviously. I made so many! I still want to make more. But do I really need ANOTHER snack food jewelry item? Probably. 
 Some tips about polymer clay: it's weird. Sometimes it can sit out forever and never harden and other times, it becomes like a rock. 
They sell a kind of polymer clay softener at the craft store for exactly one million dollars (but seriously, it's ridiculously pricey for the size of the bottle). OR you could simply add just a drop of baby oil to the hardened clay, rework and TA-DA! You are back in business. 
 Another tidbit: I used to sort and store my clay by color in styrofoam bowls and/or thin plastic containers. When I went back to reuse the clay, it had eaten holes right thru the styrofoam! I shared that on my IG and most folks said they had success keeping their clay in plastic bags or thicker plastic containers. I now store mine in a wooden drawer with dividers. WHO CAN EAT THRU STYROFOAM?! I mean, that stuff isn't even biodegradable! 
 My students LOVE making food items out of clay. In fact, one of our art shows was a 1950's diner where all of the food was sculpted from clay. I think they would so love making these tiny foods...they have tiny hands, they could handle it, right? (okay, MAYBE on a slightly larger scale!)
You can also find a ton of clay food times in my kid's clay book! Shameless plug, over and out. 
By the way, is it one MILLION TRILLION degrees where you are? I went outside to snap these photos and was dripping sweat within the first three minutes. Summer in Tennessee is no joke, y'all. 
I need to hit my sewing room and start up on my Back to School ensembles but I so wanna make more charms. I made art supply shoe clips out of this clay a couple years ago but now I think I need a art supply charm necklace too. Oh boy. The polymer clay creatin' journey continues! 
 photo signature_zpsd10b3273.png

Tuesday, June 27, 2017

In the Art Room: Clay Tacos!

Hey, friends! I thought I'd share with you a fun clay project that you can do with either kiln fire or air dry clay: Clay Tacos! I did this project with my kindergarten kiddos and it was a huge hit. It also taught them a ton: clay can capture texture; how to create a sphere, coil and a slab, the holy trinity of clay sculpture; how to adhere clay with an alternative slip and score method. So here you go: Clay Tacos!
One thing I love when working with clay and kiddos is introducing them to texture and clay. We step on the clay, pound it into textures, you name it, we try it. My favorite thing is to have a variety of lace, doilies and burlap for them to experiment with. 
With a class of 20 kids pounding clay flat, it is going to sound like a crazy roll of thunder (with echoes of lots of laughs from the kids) but I have found it to be the quickest and easiest way to introduce the kids to creating a slab. 
With a beautiful textured piece of clay, the possibilities are endless! In fact, I'll be sharing EIGHT of my favorite air dry clay projects using this method and more at the Art Ed NOW conference
Have y'all signed up? You really should, it's a ton of fun. 
I explored EVERY air dry clay on the market (seriously) when working on my clay book which is now available for sale here! Many of the air dry clays have the look and feel of kiln fire so it's a great way to introduce kids to the magic of clay even if you are kiln-less. So get you some clay and make you a clay taco today! 
 photo signature_zpsd10b3273.png

Wednesday, April 17, 2013

In the Art Room: Pinch Pot Pets

Every time I go into the kiln room and see these little guys staring at me from the shelves, I feel like singing: I always feel like...Somebody's watching me. And I have no privacy, Whooooa, oh-oh (go get you some Rockwell here and be prepared to get your paranoid on).
Greetings from the land of Pinch Pot Pets! Last week my younger students completed glazing their clay animals (my older students are still painstakingly working on every minute detail of theirs) and I'm excited about the results. Our theme for this year's clay projects were cats and dogs as our students will be "selling" their work back to their parents for a donation to the local humane society. We're do-gooders like that. The kids love clay and really enjoyed this project. But I'm rambling. Check out this cuteness:
Aw! This looks like a certain orange cat that lives in my house! I wonder if this one plants herself on the table at dinnertime as well.
"Hmmm? Did someone say snack?!" I love the added detail of the collar and hair bow by this first grade student.
So just how did my wee ones complete these clay projects in half an hour art classes, you ask? Well, it wasn't easy. But I've found that breaking the clay construction up into two days helps. And having several parent volunteers on hand. Mostly to keep me in line.

In preparation, here's what's on each table:
  • a clay mat for each child, purchased from The Clay Lady
  • 2 cups of water and 2 toothbrushes
  • 4 skewer sticks
  • 1 piece of clay the size of a small orange per student
Other preparation included:
  • One labeled ziplock bag per student
  • a damp paper towel per student
 For the demonstration, I have the students gather around a table and I show them the steps to creating a pinch pot. Here's what I tell 'em:
  • Roll your clay into a sphere and place it into the palm of your hand.
  • Using your other hand, put your thumb on the top of the sphere and wrap your fingers around the back.
  • Sink your thumb so deep into the clay that it looks like your thumb is wearing a clay afro. But don't go too deep and have your thumb pop out the other end because then you'll end up with a donut. And nobody likes clay donuts.
  • That part they can do no problem. Thumb afros, they got that. It's the pinching-into-a-pot part that some struggle with. I ask them to imagine they are holding a cookie and show me what that would look like. They all hold up their fingers about 1/2" apart. I tell them that their clay should have that same thickness. And then we eat the imaginary cookie with a loud "crunch!" and "mmm!" before proceeding.

  • After showing them a couple of non-examples of pots that are too thick or thin, I show them what a correctly pinched pot should look like. 
  • At this point, the demo is over. I show the kids how to wrap their pot gently in a damp paper towel and place it carefully into the ziplock bag. They are not to seal the bag closed as trapped air inside will dry out the clay. Instead we simply tuck the bag underneath the pot. Like this, their project will stay damp for up to a week. But it might begin to smell a bit if kept longer.
  • The following art class, I tell the kids that they may either create a dog or a cat. I introduce them to the idea that you can make anything out of clay with three things: a sphere, a slab and/or a coil. To illustrate that, I begin by using spheres for the eyes. 
  • Note: all pieces of clay must be attached by using the toothbrush and cup of water. I tell the kids, if you don't brush your teeth, your teeth fall out. If you don't brush your clay, your parts will fall off. It kinda works.
  • I demonstrate using the stick to add the pupils and eyelashes.
  • A sphere pinched into a triangle is used for the nose.
  • Coils for the mouth and skewer-drawn whiskers.
  • I tell the kids that the parts of a face for a dog and cat are about the same. It's the ears that make the difference. Using a slab, or flattened piece of clay, the kids can create dog ears. Cat ears can be created by cutting the slab into a triangle shape.
  • Some finished theirs off with a coil for a tail. 
  • And that concludes the second day of Pinch Pot Pets! As the students finish, the volunteers and I wrote their names and teacher codes on the inside of the pot. Then I set them out over Spring Break to dry completely.
After Spring Break and many firings, their bisque-fired clay animals were ready for glaze. I like to use Mayco's Stroke and Coat. I gave the kids every color in the rainbow (which many saw as an opportunity to go hog wild) and told them my two glazing rules: don't glaze the bottom as the glaze will cause the project to stick to the kiln shelf; don't layer 15 different colors of glaze on top of each other. Because it will look like a rainbow exploded in a really bad way. However, if you want color, do it with patterns.
And suddenly I feel like I'm in San Francisco all over again. Super psychedelic, dude.
These two crack me up. The Eye-Popper-Outter and the Cheshire Cat.

Stripes and spots were a pretty big hit.

And there you have it! Pinch Pot Pets. If you'd like to see what my students created last year out of clay, you can visit here. Be on the look out for more clay posts within the next couple weeks as the kiln just keeps spittin' out these awesome little masterpieces. Until then, enjoy the rest of your week!


Tuesday, April 18, 2017

In the Art Room: Clay Chameleons, Update Part 2

Y'all. When I opened the kiln this morning (which I had no right doing as that big ole lug was still flashing 600 degrees), I let out a squeal. Who snuck into the art room and put a bunch of cute-ified chameleons in my kiln?! I mean, really. Can you even handle...THIS?
 I know I can't. I'm so excited to share these with the kids next week. Their hard work sculpting and glazing paid off. Here's the video that I created to teach my sweet third graders this fun lesson:
The kids have loved this lesson! Having taught art (and clay!) for nearly 20 years, I've learned a thing or two along the way. My biggest tip for those working with kiln-fire clay: LET THE FINISHED PIECES DRY FOR LONGER THAN YOU'D EVER IMAGINE.
I was always led to believe that the reason clay exploded in the kiln (and I've had my share of 'splosions) was because of air bubbles. I call baloney on that theory. The reason there are explosions is: the clay is still WET. I allow my clay projects to dry in the kiln room which is both hot (due to the kiln) and well ventilated (as they should be) for TWO WEEKS. That's right, you heard me. Here's the deal: if there are any water molecules in the clay, as they are heated up in the kiln, they begin to move, faster and faster, until they cause an explosion. However, if you wait...every last one of those water molecules will evaporate and diminish your chance of breakage. One way to test and see if greenware (unfired clay) is ready to be fired? Touch it. If it feels damp, even slightly, it is still holding water and needs to dry.

The problem is...if your students' clay projects are thick (and some of these chameleons were very thick!) there might be water trapped within the clay project that you cannot feel with touch. My suggestion? Fire on the slowest setting possible. This will help air out the clay before ramping up to firing mode. 

In other words: When in doubt, DRY IT OUT. 

Can someone please help me off this firing soap box?! It's hot up here!
Now, when it comes to glazing, that's a whole 'nother story. Glazed pieces can be fired on the fastest setting as they have already been fired once and are not going to explode. In case you are curious, I use Cone 06 clay and glaze. 
 I don't always glaze with my students. After all, two firings is super time consuming. However, I do think that the glazing experience is important for kids to be exposed to at least once. It's truly magical. Imagine: little pieces of glass that are going to transform your dull clay project into a shining, sparkling masterpiece!
My favorite glazes are Mayco's Stroke and Coat. I love their color variety. I did order some of their Jungle Gems to add a bit of spots and sparkle to their projects...and I was a touch disappointed. I don't think I shook the bottles up enough because I don't see too much of the spotted and speckled effect. Perhaps my next crop of chameleons will be more speckled as their glaze is near the bottom of the bottle where all the glass has settled. 
 Oh! And if you follow me here...you might have seen that I received a copy of my book
This lesson is NOT featured in my book...which is why I can share it and the video for free with you here. Many of the project directions from last year's art show were not shared here...because I was under contract with the book publisher. Little known fact: when you are writing a book, they "own" the rights to your ideas! All that to say...all of the lessons I share in the book have not been released here. So 52 NEW art projects for you and your kiddos...that can be used with both no-kiln and kiln-fired clays! 
 ALSO...in case you didn't know, I've been hosting weekly #creatingwithcassie craft nights right here. Currently, we are felting but next month, we are exploring clay! 
If you'd like to join the fun and explore some fun new materials, pick up your clay kit here...no kiln required! 
 Now...this is just the beginning of clay themed posts as I've declared the month of May, the month of CLAY! So brace yourself...lots of clay posts ahead!
Until then!

 photo signature_zpsd10b3273.png