Thursday, December 18, 2014

In the Art Room: A Legacy Mural

Hey, y'all! I'm super excited to share with you a project that my fourth graders started just last week when their certifiably insane art teacher decided that they outta create a present for the principals of our school. I've mentioned before that our school is participating in a Be Nice campaign. In the art room, I've been trying to post a weekly "Give Nice a Try" idea in my room each week. A coupla times, we've actually had the opportunity to make it happen in the art room. You can read about how we wrote Thank You notes to a local art museum after our field trip, created a Gallery of Gratitude for all the faculty and staff in the school and wrote kind notes to each other. This time, our Give Nice a Try was to give a gift (especially during the season when most kids are thinking about receiving). And this here Legacy Mural is the result of their hard work.
I got the idea for this mural at NAEA during a presentation by Janine Campbell (thanks, Janine! If you guys ever have a chance to see her present, do it, she's amazing). She had her middle school students paint on black canvases that she'd taped off the words ART onto. Then, when the kids were finished painting, she simply removed the tape. So smart, right? Well, being the crazy Last Minute Lassie that I am, I didn't bother with the masking bit. I just let the kids start attacking the black canvases with fluorescent paints.
Well, okay, "attacking" is a bit of a stretch. We kinda sorta did the whole circle painting thing. You know, paint circles and more circles and don't paint over anyone's circles but enhance them with more...wait for it...circles. I did give them the chance to enhance the designs with patterns and lines of their choice. I only had a coupla rules: 

1. Don't paint over anyone's design. You can build upon their painting but you cannot cover it up.

2. Paint on dry areas. Painting over wet areas will muddy your colors because they'll become mixed.

3. This is your legacy as the out-going fourth grade! Do your very best to leave your mark behind. 
At the end of four fourth grade classes working on 17 canvases for an hour at a time, we had this. It's like an acid trip on canvas. And I mean that in the best possible way. I'm dying to get my kitten mittens on a black light, y'all. 
 Oh! In case you are wondering, the black canvases came from Blick (are they just "Blick" now? Like, are the "Dick"less? [heehee, sorry, not sorry]) and the paint was by Sax. Because I'm now in love with Sax Versa Temp. It's my jam. 
The amazing bookkeeper at my school worked out the canvas dimensions and was able to scrap together enough dinero to purchase 'em. She also was kind enough to print off the lettering. I originally had the genius idea to have a sign company print the letters. Then I could just slap 'em on top. However, that was gonna cost us well over a hundred smacks. Plan B was to use the printed letters. After the kids had completed the canvases, I traced the letters in yellow chalk and painted them in with India ink. 
Obviously, it woulda been swell to have the kids paint the letters but I was in a time crunch. In fact, these letters were painted just last night. I did notice that the India ink was cracking on the surface in some spots so I sealed it with high gloss ModPodge. The happy accident there was that it gave the letters a great shine.
 This morning, I got to school at the crack of dawn to hang the letters. My BFF the custodian helped out tremendously. Because this was a surprise to be revealed at the end of the day, he and I "wrapped" the present so the principals wouldn't see it until the unveiling.
During the unveiling time, I had all fourth grade classes gather in the lobby. The wrapping paper was removed and the principals were escorted out blindfolded. On the count of three, the blindfolds were removed, the kids shouted Merry Christmas! and the principals saw this.
To hang next to the mural will be this small golden sign. This was wrapped and given to the principals after the unveiling.

It was a super exciting event, albeit a very crazy and noisy one. I don't do well with managing a crowd of over a hundred kids so it was a pinch cray but a happy kinda cray. 

And now on to the winner of yesterday's giveaway...

Yippie, Rachelle! I'll be in touch so I can ship that stash your way!

And now...for today's goodness...
Four whole rolls of paint-splattered duck tape! Here's how you can enter to win:

1. Leave your email in the comments.

2. If you are an art teacher, I wanna know, what's been your fave group project to do with the kids?

3. Not an art teacher? Tell me what you plan to create with this tape stash!

Good luck and I'll see you with another giveaway tomorrow!

 photo signature_zpsd10b3273.png

Wednesday, December 17, 2014

In the Art Room: Printed Winter Banners

Greetings, giveaway friends! I thought I'd share with y'all the Printed and Stitched Winter Banners my third grade just finished off. Since they aren't Christmas-y, I'm excited that I can hang 'em in the hallway and keep 'em up for a while. AND hope that they bring us the glorious gift of a snow day. Or five. Not that I'd love a couple of days to stay home in my pajamas and power-watch episodes of Pee-Wee's Playhouse (don't judge) when I could be teaching childrens all day (wink-wink, nudge-nudge). But what am I even talking about, I've got 2 weeks of that kind of sloth-esque behavior in my future. So, lemme get back to the post at hand: Stitched and Printed Winter Banners.
 Ohhhhh, but lemme guess. You only came here to see if you won yesterday's giveaway and to see what's up for grabs today. Well, if you must know, like, right meow, scroll yourself downeth and sneak a peak. Then pop back up here and keep on reading. Go on, I'm waiting... 
 Oh, yay, you came back! I'll get to how you can win today's goodies in just a sec. For now, lemme 'splain these banners.
Since we've been jibber jabbering about Mexico this year in art class, I shared with the kids a couple of prezies on papel picado. We also chatted about other cultures that partake in cut paper designs like Japan (with kirogami) and Germany, to name a few. 

Then we talked snowflakes. Now, I go about teaching snow flaking making all wrong according to Phyl. I gave the kids a 5" square of paper which they folded in half and then in half again thus creating a square. Then they rotated the square to a diamond and folded that in half until they had a triangle. Which they cut into bits for their snowflake-y design. 

Using Geli-Plates, fabric and white tempra paint, we covered the surface of the plate.
Our snowflake was placed atop. I told the kids that it was okay if the flake didn't lie flat. If they fuss with the flake too much, it will leave marks on the surface of the printing plate which could result in a not-so-clean print. 
 Place fabric on top (pattern side down if using patterned fabric) and a piece of recycled "massaging paper" on top of that. Rub the entire surface...
 Remove massaging paper and fabric. Proceed to oooooooh and aahhhhhhh over your awesome print!
 The designs were really lovely and the kids enjoyed seeing the negative of their design.
The fabric we used was 7" square quilters cotton fabric. I happen to get a lotta fabric donations which is super great.
 I dig how this one looks very Aztec-ian.
Printing two separate snowflake designs took us one art class. On the following, the kids created the hangers for the banner. They used three small pieces of Sculpey clay that they swirled together.
 Here's how we kept track of everyone's stick. 
About half way into the second hour long class, I called a meeting at the sewing machines. I explained to the kids that only half of them would have the chance to stitch one day and the rest the next. After a brief sewing demo, I called about 4 kids over to the "sewing table" at a time. When those 4 finished, they became assistants to those up next at the table. 
 Meanwhile, the rest of the kids were either working on their hangers or drawing penguins (to be shared in an upcoming post!). Having all kids on task made my life a lot easier when it came to sticking close to the sewing table. 

And there you have it! And now, the winner...
Congrats, Natalie! (Lawd, my nails! Can you tell I was attempting to hold the paper in such a way to hide that thumb?!) I'll get your Tammis Keefe fabric out to you tomorrow!
Lemme share with you what's in store today. I have two miniature easels with canvases (like, cute!), a super adorable vintage book (the illustrations are amazing! I've already made copies of them so I'll have a set once this is outta my hands) and a VINTAGE Milton and Bradley (before they combined with Crayola) unused watercolor set! Yay!

Here's how you can enter to win (just a lil more work for you today):

1. Please follow me on Twitter! You can find me here.

2. I'm curious...why do you come to this blog? For the lessons, the DIY's or crazy outfits? I often feel this blog might be a pinch all over the place. So, I wonder, are there certain topics you enjoy reading about more than others? I truly appreciate your input.

3. Don't forget to leave your email addy so I can contact you. 

Until tomorrow, friends!


 photo signature_zpsd10b3273.png

Tuesday, December 16, 2014

DIY: A Candy Cane Christmas New Dress

Well, hello there, friends! Welcome back to my lil ole 10 Day Giveaway. Thank you to all y'all that have participated, the response was super great and I really appreciate those of you that took the time to become a follower of this here craziness. So, just who won that lovely Christmas-y fabric cache?!
 (Please pardon my still-painted-covered hands, we've been working on this wild -n- wacky 4th grade legacy mural [you'll find out more in an upcoming giveaway post!] and I'm finding paint everywhere). Congratulations, Charlotte! I'll pop the fabric in the post tomorrow in hopes that it reaches you before the holiday. 

So, what's up for grabs today...?
Two whole yards of this amazing Tammis Keefe vintage reproduction fabric by Michael Miller! This here is enough loveliness to really create something marvelous. If you aren't familiar with Tammis Keefe's designs (or my obsession with her), you really outta visit here. Since I had you jumping through a coupla hoops for yesterday's giveaway, I thought I'd make this giveaway a pinch simpler...

To enter to win these two yards of glorious fabric, simply leave a comment on what'd you'd make with the stuff and add your email address so I can contact you tomorrow afternoon. Thanks and good luck! By the way, non-fabric lovers: Don't fret! I'll be giving away all sorts of fabric-free goodness over the next coupla days as well so pop back by!And now...on to the dress!
 I've actually had this fabric for a while. Anytime I see Tammis Keefe repros, I scoop them up. She's simply one of my faves. The prob with buying fabric without a solid plan is that, if you're like me, you over-buy. Which is way better than under-buying cuz running out simply sux. When I was digging out some holiday fabrics this fall, I knew I wanted to work with this fabric and decided that candy cane striped stuff would make a perfect bodice for this dress. But what pattern to use?
 One of my fave stitching blogs is Roisin over at Dolly Clacket. She always stitches with the cutest prints and makes me feel better about always sewing with quilter's cottons (I know there are those out there that oppose sewing with quilter's cottons but I just find the prints are the cutest thing ever!). One pattern I've noticed that she and several other sewing bloggers use is Christine Haynes' Emery. So I decided to get outta my comfort zone, pick up this popular pattern and try something new!

By the way, it wasn't until I was deep into stitching that I noticed what was happening on the fabric...is Santa beating his reindeer?! DUDE, that's not cool. I definitely wouldn't challenge that deer wielding that candy cane. Cuz, Claus, it might end up somewheres that you might not like, ya feel me? Ho-ho-OH NO YOU DIDN'T. 
And I totally love the dress! It's not without it's issues which had nothing to do with the pattern, it was all me. My zipper install looks like some sorta botched plastic surgery which really ain't no thang if I wear the belt. AND I prolly shoulda made a muslin (haha, as if. My laziness knows no bounds, y'all) cuz the back is a lil gappy. Of course, who's gonna notice that when you're trimmed in faux fur, riiiiight? Speaking of, sewing that stuff was a barrel of (un)fun. That stuff was flying outta my sewing machine and goin' straight up mah nose. I've had furry boogers all day and I'm almost positive all my coughing is due to the early stages of fur-lung. 
 Oh, but the pockets. I do love them so. I used the striped fabric for those which is all kinds of cuteness, if I do say so. I also love the pocket placement way better than the sewing pattern I usually work with (which I've dubbed "piddlin' pockets"). AND the sleeves were actually a painless install! Hurray! 
To top off this Christmas-masterpiece, I wore these lovely kicks which I found on ebay (can you believe I was the ONLY bidder?! Wait, don't answer that). The kids thought they were the best thing ever even if I felt like Hooker Claus in 'em all day long. My feet are  not happy but, hey, it was worth it. 
And there you have it! A new Christmas dress just in time for the holidazzzze. 

Good luck on today's giveaway, friends! I'll announce the winner and what's up for grabbies tomorrow. Until then!


 photo signature_zpsd10b3273.png

Monday, December 15, 2014

In the Art Room: Kindergarten Reindeer!

This giveaway is now closed. Kindly click on my name at the top for the latest post and giveaway. Thank you!

Alrightie friends, as promised, today begins my lil 10 Days Til Christmas Giveaway madness (and I say "madness" because me attempting to stay on top of blogging each day AND giving y'all stuff is going to be nothing short of a Christmas miracle). As I blabbered about yesterday, each day I'll share with y'all a post (I'm super behind on sharing what's been happening in the art room and some DIY's, so brace yourself for the barrage) AND giving away some giveaways (oooooh, so that's why they call 'em "giveaways"! I always wondered). So, without further ado, here's what's up for grabs today...(no, not a brand new car, silly. I ain't Oprah).
Daw, some super cuteness Christmas fabric, yay! Each piece is about 1/2 of a yard so they would be perfect for small DIY projects (totes adorbs stocking, anyone?) or, if sewing ain't your thang, use it in collage projects (how cute would a Christmas cookie recipe book covered in this fabric be?!). I'm currently using that top fabric for a dress and the middle fabric was used in the creation of this Christmas light-up number. The bottom fabric was thrown into the mix for the fun of it. 

So just how do you go about scoring this goodness? Kindly do the following: 

1. Please follow this here blog. You can do so by clicking on the "Join this site" button on the right of your computer screen. Already a follower? Thank you so much!

2. Leave a comment below about your thoughts on directed drawing projects (which is what this here post is all about. That and giveaways, of course). Or, for my non-art-teacherin friends, what you'd do with this fab fabric!

3. Do leave your email address so I can let you know that you're the Winner, Winner, Chicken Dinner!

Winner will be announced tomorrow afternoon along with tomorrow's giveaway item (it's another good one!). International friends, you are welcome to play along! Tomorrow, not only will the new item be up for grabs but I'll have slightly different requirements for y'all. I hope you'll pop back in to see if you won and what I'm giving away!

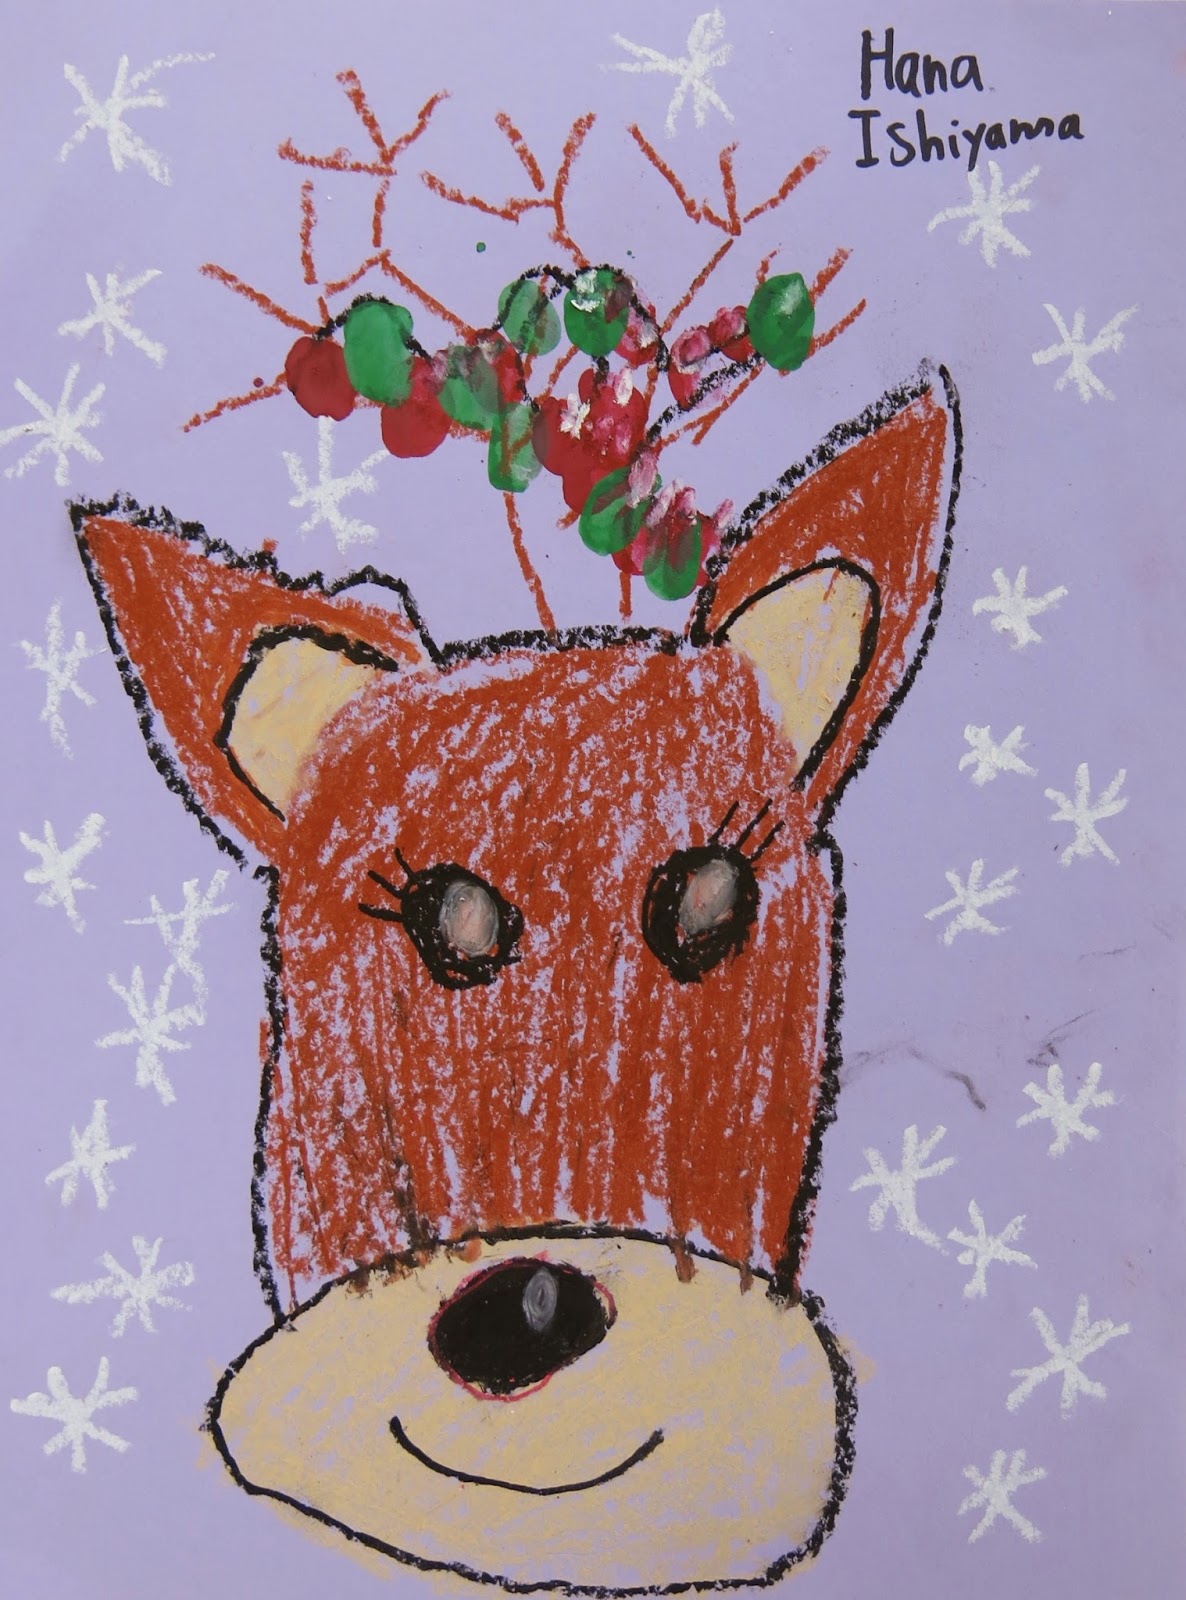
Until then, let's chat about these here Kindergarten Reindeer, ermkay?
I had my lovely kindergarten kids for the last time before break recently. They had just completed their Winter Collage Landscapes so I was in need of a one-class project that would hold their attention and teach 'em some new skillz with an art supply that is new to them: oil pastels!
To begin, I greeted the kids in the hallway and told them that they'd be going shopping for one clipboard and one sheet of paper, their choice of color. After the kids reported to the floor, they were to place their paper and clipboards in front of them to give me the Super Duper Special Signal that they were ready to learn. At this point, I projected a photo of a giant buck that my husband had caught a photo of on his deer camera. The kids loved seeing the deer and talking about all the parts of his body and face. My hubs loves to hike in the woods near our house and has found a couple of deer antlers there. I allowed the kids to touch the antlers and we talked about texture. I also told them how deer lose their antlers in the spring but grow new ones later. One smartie said, "Oh, like us! We lose our teeth but a new one grows back!"
After that chat, the kids were excited and ready to draw a deer of their own. I told them that'd we be using a lot of round shapes and rounded lines for this drawing. Step by step, I walked them threw the directions you see above. Once the deer was drawn (with the option of making Rudolph or not), the kids were sent back to their seats to do three things: draw snowflakes, add a black line for (optional) Christmas lights, use red and green tempra cakes to add finger printed lights. 
Of course, this guy's name came up a lot (painted my lil ole me a while back). Our word of the week was "nonconformity" (which is a lot for a 5 year old to comprehend). I explained how different Rudolph was and how that made him special. When doing guided drawing, I always emphasis how unique each of our drawings should be. Even though we are following the same steps, we are all different (like Ruddie!) and thus should have reindeer as unique as us. This takes the pressure off the children who are concerned that their drawing doesn't look just like mine or their friends. I always remind them that if I had wanted all their drawings to be alike, I would have simply given them a coloring sheet. And what's the fun in that?!
By the way, this isn't my first time down Reindeer Lane with the kindergarten set. These guys were created a couple years back. You can read all about 'em here
I'm curious to know where y'all stand on guided drawing. I'll usually do one (occasionally 2) with kindergarten and first grade during the school year but for the older kids, not so much. One of the reasons I enjoy teaching it is that it helps reinforce that everyone is an artist and everyone is unique. I had one special needs student who was so thrilled with herself that I got permission from her teacher to walk her around after art and share her drawing with anyone she could find. She stopped nearly everyone in the hallway with, "Do you like my drawing? I'm an artist!" It was simply the best.
However, I know there are some that are strongly opposed to directed or guided drawing. Perhaps it's too much instruction. Maybe it's restricting creativity. I know for my TAB friends, this is nails-on-a-chalkboard worthy. I hosted a wee bit of a debate on my blog last winter about this very topic and touched on it again in this post about craftsmanship
I wonder, why is this topic so polarizing amongst art teachers? I think, when taught right, directed drawing can simply introduce children to one way of drawing something (in this case, a reindeer) while reminding them that there are many ways to go about it. 
So just how did we end the lesson? With kindergarten, I love to take them on end-of-the-class gallery walks where we look at everyone's work, give e'm a complement and a round of applause. In this case, I borrowed a sleigh bell from my neighbor and we went on a sleigh ride around the room cheering on all of our friends. 

Looking forward to hearing from you, friends. And, good luck!

 photo signature_zpsd10b3273.png