My fourth grade classes have been all over the place, y'all. With snow days, holidays and my jury duty-in', I've got some classes light years ahead of the rest. To try and get everyone back on the same page, I threw this lil Crayon-tastic Collaborative into the mix. The kids are currently creating papier mache crayons and pencils for an installation. I thought this little project would be a nice intro to composition, teamwork and value all while bringing everyone up to speed.
This project took my students an hour and a half (that'd be one and a half art classes). We spent the first 30 minutes of the first day priming our papier mache creations and then jumping right in to the crayon composition portion of the project. To best explain it, I created a video that you can view and share with your students if you'd like. My apologies for the fact that my hairs kept swinging into the demo portion of the video. Note to self: invest in a hair-tie!
Really, youtube? This is the photo you pick (well, they actually give you an option. Sadly, this was the best one).
I have about 20 kids per 4th grade class. To pick the groups, I randomly called on a student to pick a partner. Then I allowed that partner to pick the next and so on. My students are very sweet to each other so there wasn't any weirdness, thank goodness. I did step in when one group was assembled because I knew these particular kids would do more chatting than working. But other than that, the teams did great! Our first half of the day was spent plotting out the composition.
Which looked a lil like this. I gave the kids a stack of templates because I wanted their focus to be on composition, teamwork and learning to create value. I know some folks are anti-templates but not me. With limited amount of time and the lesson focus on other elements, I like to remove as many hurdles as possible. Because, let's face it, why make the struggle even more real when it already is.
Once the team was in agreement about the composition, the tracing started. That was a pinch tricky as the kids had to think about overlapping.
From there it was the drawing of the paper. This was also tricky as the kids had to use curved lines to create the illusion that their crayon was three dimensional.
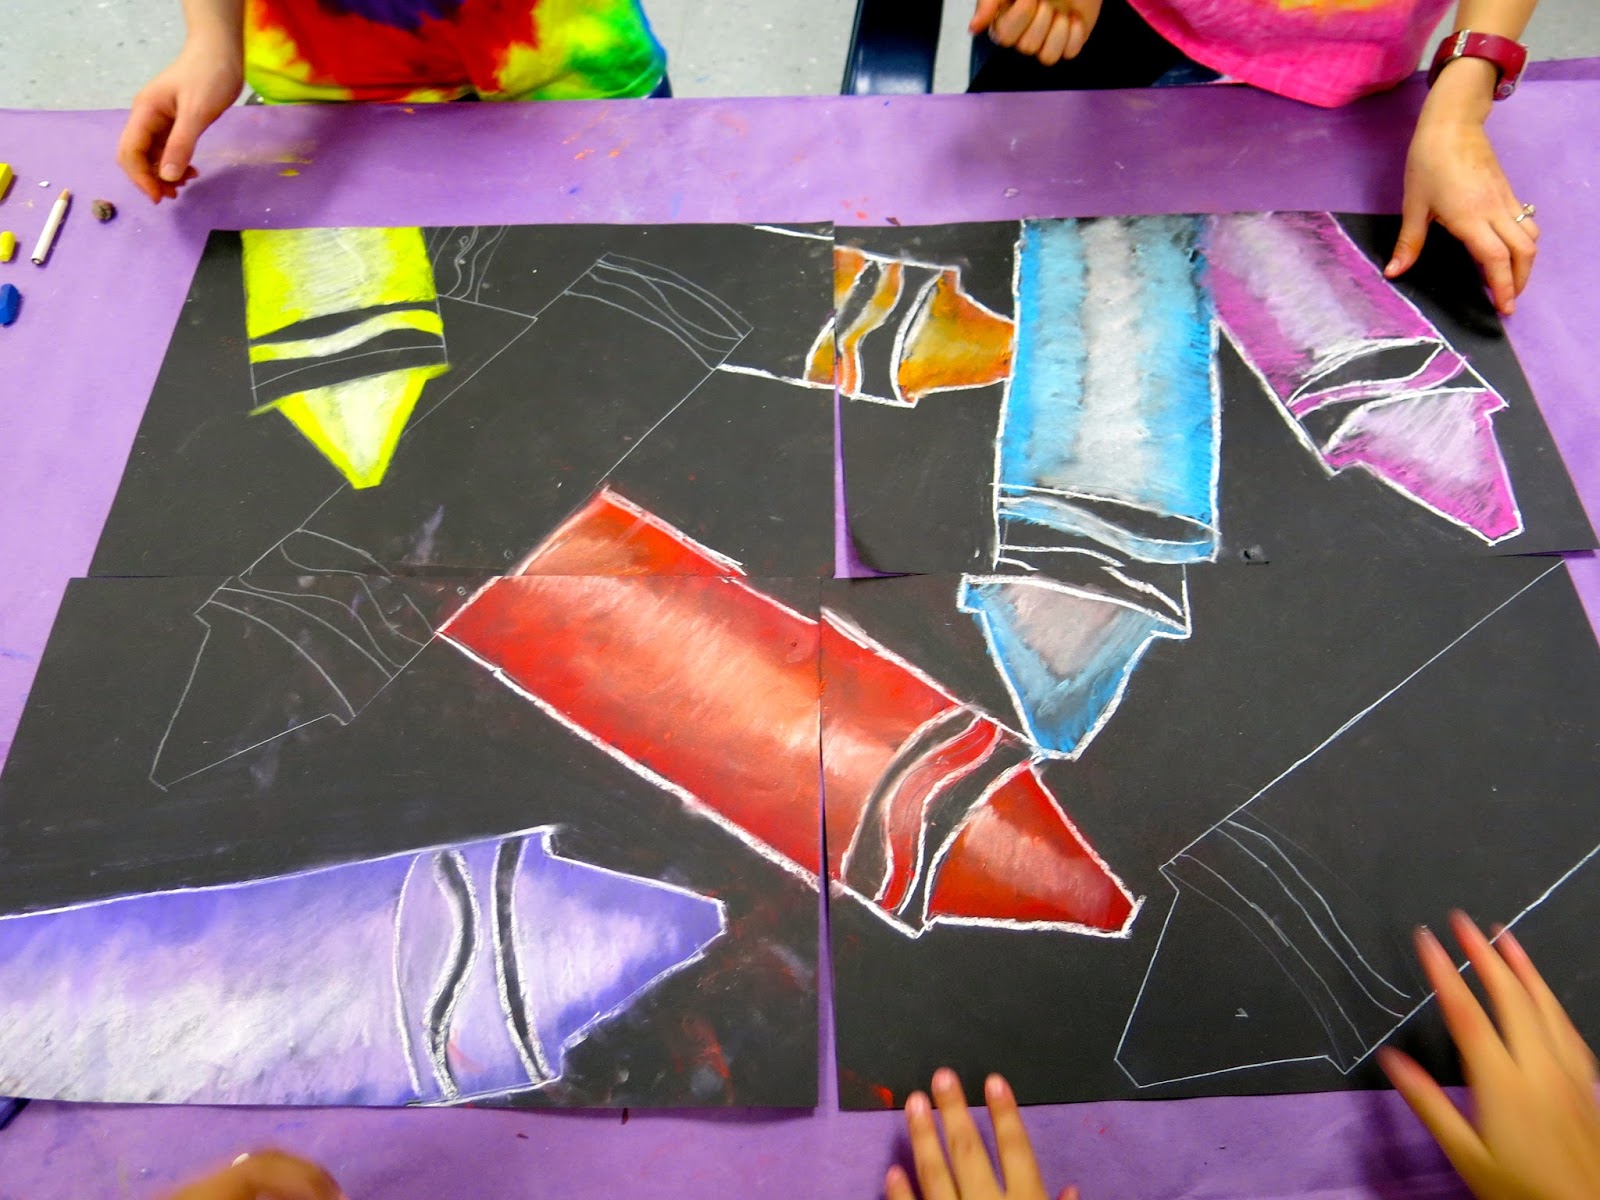
Once the crayons were all drawn, the kids cleared the messy mats off the tables and picked a table on which to work. I was fairly certain my custodian friend would not have loved chalk pastel all over the floor. We watched this video before diving in (I love Scratch Garden's videos!)...
This helped us review monochromatic and value. The kids were to share the same pastels for one crayon. Meaning, if they agreed on a blue crayon, they had to use the same set of chalk. If they didn't, some of them ended up picking different tints and shades of blue resulting in slightly mismatched crayons.
This group only wants blue crayons. So they are having to come up with a variety of blues.
After the crayons are complete, the kids are to outline with white chalk. As y'all know, chalk is super messy so the final step was to clean up any smudges with a kneaded eraser. Side note: kids go BANANAZ when introduced to kneaded erasers.
I was walking around the room once everyone had started to check on them. This was my chatty group that I looked in on last...my mistake. They'd forgotten to agree on crayon colors and got 'em all mixed up! After correcting MOST of them, they requested to leave one mixed up because, in their words, "we are kind of crazy." Can't argue with that!
Since it is Read Across America week, we have all been decorating our doors with our fave books! I decided upon The Day the Crayons Quit since it seemed to tie in with our fourth grade project! For this, I simply had my first thru third grade early finishers cut out a crayon and shade it in a similar (albeit more simplified!) manner as the fourth graders.
I loved having the kids help me (read: do most of the work) and that it tied in so well with what the older kids are creating! I hope y'all have a Crayon-tastic week! Until next time...
Squidward Monday: I scored this Artists Only Squidward shirt at a resale shop and love it as did the kids. It was the perfect comfy thing to wear on a Monday because, let's face it, Mon-daze are no bueno. top: Buffalo Exchange but also available at Forever21; Matisse-inspired skirt: estate sale; tights: Target; shoes: Fluevog
Sup, buddies?! I do believe it's been a good coupla weeks since I've shown y'all what I've been a-wearing but it's totes not my fault. I've not worked a full week since the holidays, I swear! And it currently seems like I'm buried under my To-Do lists, swimming upstream from the piles of student artwork, stacks of personal projects and just mounds of STUFF. Every weekend, I try and catch up and every Monday, I'm all...
But, whateves. We're all busy, right? It's just a matter of managing the messes. Which, as it turns out, I'm suck-tastic at doing. Oh well. I take heart in knowing that I've got another shot at getting my life together every Monday. Wish me luck, y'all!
Crayon-tastic Tuesday: My fourth graders are in the middle of some crayon-inspired projects. They are making three-dimensional papier mache'd crayons as well as team-work collaborative two-dimensional designs. That lesson (with video!) will be up on my blog this week. I wore this lil ensemble for some inspo! crayon sweater: made by me, DIY here; crazy art teacherin' skirt: made by me, DIY here
Honest speaking: I don't do many team projects. Okay so maybe I've NEVER done a team project. Mostly cuz I didn't know how it would pan out...would the kids get along, would I need to intervene, would they be able to pick their teams, etc. Well, I gotta say, I'm a convert! This has been such a success so far. I only had to step in to tell 'em to stop and clean up! Like I said, this lesson will be up on Tuesday this week so stay tuned (but if you wanna see the lesson video now, go here)!
If you follow me here, you've already seen a sneak preview of how these are turning out!
Hump Day!: My mission of late is to be as comfy as possible so this sweatshirt and stretch pencil skirt is the new yoga pant, says me. Also, I'm totes on a combat boot bender, y'all. I've bought two in the last month. I love the stacked heal but also the comfort. It also reminds me of my 1990's alternative-dressin' days! Keith Haring top: Forever 21; skirt: old, Target; boots: Aldo
I shared my firsties Mad Scientist lesson with y'all here. Here was our final installment of the lesson: bubble printing! It was just about the most funnest thing ever and reminded me about everything I love about teaching art. Lemme tell you how we did it...
Firsties at their finest!
To make the bubble printing paint use the following: aluminum pie pans, dish soap, water and paint. I add about two table spoons of soap to the pan with nearly a 1/4 cup of paint. Then stir in about 1-2 cups of water. There really isn't any exact science to it, I just dumped stuff in but for those of you that like measurements, there you go. Stir it around and it's ready! I had four students at each table with four different colors in each spot: red, blue, black and yellow. The kids were armed with a straw and a piece of construction paper (any thicker stock paper would work).
I then told the kids our routine. When I hit my chime once, they place their paper in the corner of their table and blow into the pan in front of them. When I hit the chime again (10 seconds or so later), they were to "Smash Them Bubbles!" which quickly became our new chat. Then I would say, "Move to the right, move to the right, take your paper and your stray and move to the right, show me you're ready!". The kids would place their paper in the corner of their table again, bend down in front of their new pan and wait for the chime. It worked great! The next day, I spent about 10 minutes gluing their artwork to their new frames. They look fab, says moi!
We're Almost There, Thursday: So the rumors went to flying about bubble printing! My kindergarteners came in asking if they were going to do it because their sibs had told them all about it. Made me so happy! AND I had totes planned on them doing it as well so they were thrilled! sweater: Boden, thrifted; dress: Modcloth; boots: Frye; necklace: Paper Source; belt: Amazon
Finally Friday!: By the way, if you are curious as to why I am standing in front of the same stinkin' back drop this week, it's because my art room has become the armpit of the school. Between bubble printing, papier mache, printmaking, chalking, painting and collage, the art room looks like, well, an art room. But I thought I'd spare you the gory. sweater: old, H&M; paint drip scarf: flea market; scissor skirt: old, Modcloth; boots: Frye; palette hair clip: DIY, here
Just in case you were wondering what my cabinet said! You can take a tour of my art room if you are interested here!
So I kinda sorta told the kids that if they painted and printed their winter selfies really well, we just might get the magic of snow. Snow seems to elude us in these parts...but not this year. Turns out these cute things really DID bring on the snow which was totes fab...except for the fact that it meant we've been working on these bad boys for a coupla days weeks. But that's all right. I mean, just take a lil look-see at how stinkin' awesome these printed and collaged winter self-portraits are!
I knew I wanted to introduce my second graders to printmaking but how? I remembered that my buddy Laura over at this fab-o blog taught her students how to create adorable winter selfies last year. I thought it'd be fun to add the printmaking element to this lesson and viola! Here you have it!
This lesson was chuck full o' art teacherin' moments: we learned how to use the elements of art to create pattern, we learned how to make both marker and ink prints, we learned how to create a tint of blue and print snowflakes in the background, how to draw selfies and design a pleasing composition. In short, we was busy.
Lemme break it down for you:
Day #1: Intro to carving a print. We used Scratch-Art Foam Board but styrofoam plates would work in a pinch. I had created hat and mitten templates so that we could move on to the pattern designing and printmaking faster. I have 30 minutes art classes so I have to take the guess work outta some things. After the first class, most of us had this:
Day #2: On the second day, we continued our pattern design with ink pen. I encouraged the kids to go over their lines more than once just to make sure they'd have a successful print. Early finishers colored with marker and we started to pull marker prints. You can see that in the video...if you've never done it, it's magical!
Day #3: We are ready to use brayers and ink to pull prints! I like to use water soluble Speedball ink because it's the jam. I usually lay out a couple of colors and the kids rotated creating two different color prints on colorful copy paper. (This video was created for my third graders but it's the same idea so I thought I'd share!)
Day #4: We learned how to create a tint of blue and painted a piece of construction paper. We also used cut pieces of mat board to dip into white paint and print snowflakes. It was fun to introduce the kids to a coupla printing processes.
Day #5: Selfie time! The kids had mirrors, this idea sheet and sketch paper. They had to create three thumbnail selfie sketches before moving on to drawing on their final paper. Pink chalk was used to show just how cold it was outside!
Day #6: Time to start assembling our collage. We had a long chat about composition and balance before going on this adventure. The kids could use their favorite prints, whether that was their marker or ink prints (we'll use the extra prints for another project, stay tuned!). I happened to have a ton of scrap paper from another project so many of the kids used oil pastels to create scarves!
Some of the girls used chalk for their long hair.
So in love with this self-portrait! I love how vibrant the marker prints are, it made my happy when the kids chose them.
Several students decided to arrange their composition on a horizontal format.
Last thing added was the pompom! For that, have the kids wrap an 18" long piece of yarn many times around a 2" piece of cardboard. Carefully slide it off and double knot tie another string around the middle. Trim the loops of yarn and you have a pompom! Now...maybe sharing these snowy selfies here will get me one more snow day, eep!
A coupla weeks ago my first graders came into the art room full of questions about forms. They'd been learning about cylinders, spheres, cubes and the like in science and had a curious question: Can you make ANY shape into a form?
I explained to 'em that yeah, you could. Geometric shapes become geometric forms. Circles become spheres, triangles become cones, pyramids or triangular prisms. Then our discussion turned to organic shapes and I just knew we'd be chatting forever. We were midway through this fun printing project and I knew if we kept talking, we'd never get them finished.
"Tell you what. Our next art project will be all sorts of science experiementy. Sound good?!"
Well, today my first graders wrapped up this project and it's been so much fun that I just had to share right away. I can't take much credit for this project at all as it was a montage of ideas from fab-o art teacherin' types. I've seen the beaker bottle project shared many times on pinterest. I decided to add the color-mixing/wet-on-wet painting portion to add more science to the mix. The bubble idea came from one of my all time favorite art teacherin' blogs. I always love everything that Natalie shares on her blog, she's the art teacher that I wanna be when I grow up! Make sure you visit her post to see the bubble videos she shared with her students...I know my kids loved viewing them!
Because this project took us a coupla days (I see these dudes for 30 minutes at a time so we work in baby steps) and involved so many introductions to science and technique, I created a lil how-to video for you. The instructional portion is in kid-friendly speak so you can feel free to share it with your students. Tell 'em Mrs. Stephens said hi.
In case the sound of my voice is akin to nails on a chalk board, I thought I'd also jot down the daily steps of this here project!
Day #1: After chatting about shapes and forms, we drew them together! We looked at beakers and talked about measurements and added those lines and numbers to our beakers.
Day #2: We did a color mixing science experiment!
After we got the experiment started, we set to painting our beaker bottles using the primary colors and the wet-on-wet method.
Day #3: We watched the bubble videos from Natalie's blog. I also blew bubbles and we looked at them and pointed out what we saw: that they were different sizes, sometimes they were connected, they overlapped, they were transparent and reflective. Using black paper, we started our chalked bubbles.
Day #4: We finished off our bubbles and chatted about composition. After the beakers were cut out, the kids had to arrange them in a pleasing composition on their bubble paper before gluing them down.
Day #5: We had a bubble printing party! It was so much fun, just check out this short clip:
To make the bubble printing paint use the following: aluminum pie pans, dish soap, water and paint. I add about two table spoons of soap to the pan with nearly a 1/4 cup of paint. Then stir in about 1-2 cups of water. There really isn't any exact science to it, I just dumped stuff in but for those of you that like measurements, there you go. Stir it around and it's ready! I had four students at each table with four different colors in each spot: red, blue, black and yellow. The kids were armed with a straw and a piece of construction paper (any thicker stock paper would work).
I then told the kids our routine. When I hit my chime once, they place their paper in the corner of their table and blow into the pan in front of them. When I hit the chime again (10 seconds or so later), they were to "Smash Them Bubbles!" which quickly became our new chat. Then I would say, "Move to the right, move to the right, take your paper and your stray and move to the right, show me you're ready!". The kids would place their paper in the corner of their table again, bend down in front of their new pan and wait for the chime. It worked great! The next day, I spent about 10 minutes gluing their artwork to their new frames. They look fab, says moi!
Until next time, hope all y'all have a bubbly week!