Tuesday, August 30, 2016

In the Art Room: You Be You Collaborative Project!

Sometimes I do believe I am my own worst enemy. Despite the fact that the Monochromatic Self-Portrait mural is not up (and by "not up", I mean I've yet to even mount it!), I decided to plan another collaborative piece for the kids. Crazy? Def. Nobody ever said teaching art was for the sane. 

Y'all might recall that my theme this year is kindness which I believe begins with a love for oneself. After all, you cannot be a loving person without loving Numero Uno, right? And that's what I really love about You Be You by Linda Kranz
It's a beautifully colorful book (where the fish are actually painted on rocks!). Not only do I love the message and the illustrations but I love that I can (re)introduce my students to the elements of art with this fun lesson. Originally I was only going to do this project with my third grade. However, it was such a hit with them (and such a fast project), I decided to have second (and possibly firsties!) create a fish as well. The more fish the better our collaborative mural, says the crazy art teacher. Here is the instructional video I shared with my students:
Feel free to use it in your art room! My students had idea sheets on their tables that really let them explore a variety of possibilities. 
I encouraged them to come up with their own ideas. They are used to having "idea sheets" on their tables for inspiration. And, since there were a lot of directions given, I also provided a review of the steps on the tables as well...
In the video, I used oil pastels because that was all I had on hand at home. However, my school oil pastels are down to stubs so I gave the kids construction paper crayons to use. My third graders whizzed thru their drawing and coloring so fast that I decided to bust out the puffy paint because...PUFFY PAINT RULES.
These took us our entire hour with a little time left over to check out everyone's fish. Next up: painting the large mural that the fish will be placed in! I'll definitely share a follow up post as we work on that in the next week.
By the way, if you are curious about the circles the kids painted on...they were painted by first grade! First grade is wrapping up a dreamcatcher project where they had to use a paper plate (details on THAT project in tomorrow's Art Teacherin' 101 titled WHAT NOT TO TEACH IN THE ART ROOM. Spoiler Alert: it's dream catchers). The first grade painted paper plates and then the center was cut out to make room for their 'catcher. Instead of recycling them, I decided to have the kids use them for this project!
Let's talk about how cute and original these fish are, can we? This boy LOVED that his fish looked just like him, complete with glasses and missing teeth.
And this new student really surprised me with his level of detail. I thought for sure he'd color over all of his lines. I was happy to see that he took the time to color each section. This project served as a great assessment tool. 
This project was so fun that I'm thinking of having the kids do a follow-up project that involves them painting their own rock a la Linda Kranz. 
 By the way, I know I recently shared my I Can board on instagram and had some inquiries...here's a close up. I don't get too specific on my board because I ain't got time for that. I do find it's helpful both for me and the students to have this visual. 
By the way, the pencil and the notebook came courtesy of the Target Dollar Spot. I just used black acrylic to paint the grade level and puffy paint (again, because PUFFY PAINT RULES!) on the felt notebook paper. 
And there you have it, You Be YOU! Stay tuned for our completed mural...and be sure to pop by tomorrow for Art Teacherin' 101. 
 photo signature_zpsd10b3273.png

Thursday, August 25, 2016

In the Art Room: Tissue Paper Relief by Third Grade

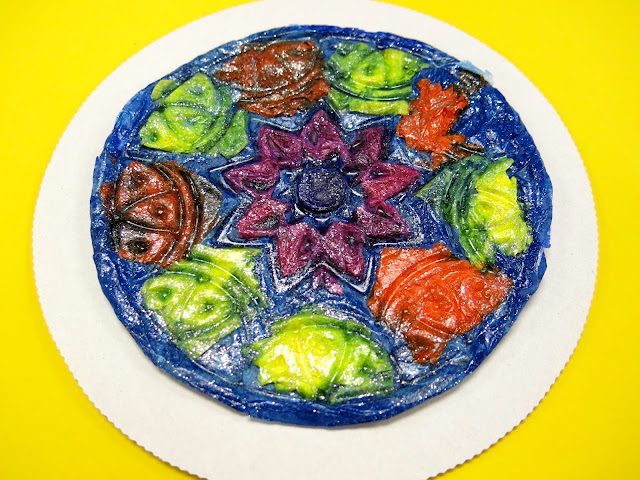
Now that our Monochromatic Selfies are complete, the third grade was ready to spend their third day in the art room creating tissue paper reliefs! I've been looking for a different spin on Dot Day and when I saw Blick present this at the AOE Now summer conference, I knew I had to give it a go!
This project took us the hour to complete and made for so much prettiness (not to mention educatin'). I created the video to share with my students...but you are welcome to share it with yours! 
Now, the relief might be finished but the project isn't complete yet! Our next step will be to adhere them to 10" cardboard rounds found on Amazon (I just have them sitting on 8" rounds for the photo) and continue our study of radial balance. I'll be sure to share that with you when they are complete. I was just too excited by these lovelies not to share right away!
 I mean...so fun, right?
 For this project, you'll need some of the following:
* Texture plates I used the ones that was recommended by Blick at the AOE conference. I liked the circle design as it went perfectly with our Dot Day lesson. However, they have a ton of cool texture plate designs to chose from. I purchased thirty plus because that's how many third graders I have in a class...and the artwork will need to remain in the texture plate until completely dry. 
 * Tissue paper squares These small squares are PERFECT if the kids are wanting to create a design. I left that completely up to the students. Many chose to create a radial design on their plate while some did a random one. I was cool with both. 
I was DREADING the idea of cutting tissue paper. I was so excited when I found these at the Dollar Tree! I purchased one for each table of four students and it was more than enough. It is a bleeding tissue, however...so some designs may get a little fuzzy around the edges. I was willing to take that as opposed to cutting thousands of squares.
* Large Tissue Paper This is where all of your scraps come in handy. The kids were instructed to use the smaller pieces for their design portion. When that was complete, they were to put AT LEAST three layers of large tissue on the back to strengthen the tissue design. 

* Watery Glue...with GLITTER! I just put white glue and water in a cup and sprinkled glitter into that. The kids also used soft brushes to apply the glue. Anything bristly tour the tissue more than normal. 
The kids put a piece of tape on the back of the plate with their name and teacher code. Here's what they look like as they are drying...not so interesting as the cool design is underneath!
 Not even gonna lie: the big draw back to this project was popping the creations out of the plate. Because the tissue is pretty fragile, I knew the kids might accidentally tear their work and become frustrated. It took me about 10 minutes to bust all of these bad boys out of the texture plates. I did crack a few of the plates while doing so...but they're fine to use again. 
Once popped out, the kids will trim around their circle design, cutting off the excess. 
 I know they'll be thrilled to see them when they get them back!
 Next up: add to a cardboard round and continue the radial design! 
This was such a fun and unique project that the kids really enjoyed. I don't often repeat projects but I can see this one happening again in the ole art room sometime soon!

 photo signature_zpsd10b3273.png

Wednesday, August 24, 2016

Art Teacherin' 101: Episode 16

In last week's Art Teacherin' 101, when I chatted about my favorite way to get kids to retain information, I mentioned that I use a lil sing-song and hand-jive to teach the kids the Element of Art. Several of you asked just what that was (and what it looked like) so I thought I'd share it with you today. It's nothing hard or complicated...in fact, it's so easy you can start using it in your art rooms tomorrow! 
Like, right? Super easy!
I like to use a lot of movement with my students because, well, they're kids. They like to move. Instead of fighting the wiggles, you sometimes gotta find a way to ride that wave. Like I said in the video, big shout out to my friend Erica for the idea! 
"Why teach kids the Elements of Art?" 

I've heard this question asked by art teachers and I'm usually all, uh...is that really a question? The E's and The P's (that'd be Principles of Design) are what you use to create a work of art. Not knowing what they are, why they are used, when to use them and how makes for a rocky art making journey. I was much too lazy when I was in high school to be bothered with learning them. I thought that my natural talent was enough. Once I hit college, I realized that my arrogance put me at a disadvantage with my fellow artsy buds as they were fluent in the tools of creating and how to best implement them. I don't want to deprive my students of this knowledge! Tis the reason I teach The E's and The P's...not to mention, it's in our curriculum, y'all.
AND if you are in need of a little line poem, allow me to introduce you to Larry the Line, an oldie but goodie in my art room. 

Have fun!
 photo signature_zpsd10b3273.png

Tuesday, August 23, 2016

In the Art Room: Texture Relief with Second Grade

Well, now that our Monochromatic Selifes are finished and we are impatiently waiting for that art teacher to hang them up (can I contract out for that? I'm buried under cute and colorful self-portraits!), it's time for us all to move on to our next masterpiece: Texture Relief Dots for Dot Day! 
 Each of my grade levels, kindergarten thru fourth grade, we are creating a dot-based work of art inspired by Peter H. Reynold's The Dot. We're doing all new Dot Day projects this year...if you like to check out all the Dot projects we've done over the years, check here.
This year, for second grade, I decided to give one of my most popular blog posts a reboot and focus on texture.
Filming my lessons over the weekend means I have a shorter weekend...but a much smoother week. I am loving this new method. I actually feel like the kids are learning so much more as I don't forget valuable vocabulary and information. I just hope I have the stamina to keep it up! I also enjoy sharing them with you. Please feel free to use in your art rooms.
 For this project, we used the following:

* 8" Cardboard Circles purchased from Amazon
* 3M Spray Adhesive
* $1 a can matte spray paint from Home Depot. Be sure and get the cheap stuff, it rubs off the best.
* The finest of steel wool, 000 
* Textured items like leaves, burlap, twine, lace, etc.
* Aluminum foil. I found boxes of sheets of foil that worked really well because it was the perfect size. It is then and may tear so tell the kids to be careful.
Before the kids arrived, I sprayed each of their circles with the adhesive. This way, they were ready to start applying their textured items. When finished, they brought them to me. I sprayed again, added the foil and sent them to their seat to rub the foil and reveal the texture.
Once it was rubbed, the kids trimmed off the excess and folded it underneath. That took up all of our 30 minutes of art class.
 I took all of the circles outside today and spray painted them black. 
The kids watched the bit of video about burnishing. We definitely did have some small holes and tears happen. A thicker foil might have helped but it would have given us a less detailed texture design. 
 I mean...
 How cool is that? After the burnishing was complete and our hands were washed, we chatted some more about texture and the difference between real and implied. This was such a fun and quick lesson that gave us beautiful results.
I really like how they look on their messy mats, we just might have to frame them out that way!
I'm interested to know what other textures y'all might recommend we use in the future. I'd love to add more to this fun project!

 photo signature_zpsd10b3273.png

Monday, August 22, 2016

In the Art Room: Fiber Arts Studio Course

Y'all, I've been waiting all summer to share some big news with you: I worked with the wonderful folks at AOE this summer to put together a fibers course just for you! Everything I've learned from teaching art and exploring my love of fiber arts over the past 20 years is packed into this class. AND I'm able to offer you a special discount cuz we're buds and all. More on that in a moment (just scroll downward if you can't wait). Let's talk about what I'll be talking about!
 I'll be covering the following of my faves:

* 2-Dimensional Weaving With fresh fun spins on weaving lessons. I LOVE weaving as it has so many connections: math (measure much?), science (let's dye some fibers to weave with!), social studies (y'all, every culture weaves) and so much more. I secretly think I became an art teacher just to teach weaving.

* 3-Dimensional Weaving Don't even get me started. I know I have shared MANY of my favorite weaving projects here over the years, but I saved some fresh and new techniques just for this course!

* FELTING! Eeep! Y'all know that's my JAM.
 We'll be exploring both wet felting and needle felting techniques. 
 * Sewing and Embroidery Which I learned as a kid and absolutely loved. I so enjoy sharing that passion with my students...and art teacherin' types. 
* Tips, Tricks, Organization and Management Never taught fibers and have a fear of the unknown? Lemme hold your hand and offer you my best tips for streamlining your fiber arts curriculum. 
And now for the best part! I'm able to offer you the course for a 10% discount! Just use the code: SAVE10CASSIEART17. That's almost a $40 discount (you can thank Google for figuring that out...cuz you won't see me leading a math course anytime soon). You can sign up for the class here! AND if you do, please drop me a line in the comments below. I'd love to stay in touch and hear all about your fiber artin' adventures!
 photo signature_zpsd10b3273.png