I feel like I've not chatted with y'all in FOREVER but...if you follow me on Instagram then you know I'm currently BURIED ALIVE under clay projects with no end in site. I'm so excited about the projects they are working on...our theme is Super Heroes and their artwork is so fun. I'll be sure to share them with you super soon. Until then... No need to adjust your T.V., this is not a rerun. I literally just knitted the same cowl twice with a different color of yarn. Cuz why not? Let's face it, what the world needs now are more cowls. Confetti ones to be exact.
Unlike my last knitted cowl, this one required two skeins of yarn. This yarn was thicker and less of it was in a skein. It didn't seem to take any longer than the last. Knitting is my favorite thing to do when we hit the road, travel or late at night when I just wanna watch more stories and relax. Now that we are FINALLY approaching spring, I guess I'll have to put my knitting of cowls aside but I have loved doing it.
Putting them on and taking them off is always an adventure in face-makin'.
My favorite place for late night knitting is the couch in my newly flipped bonus room/art studio. This happy pillow from Target reminded me of Small World and y'all know I love that!
The best part about making a cowl is how easy it is! You literally just knit a short and wide scarf that you whipstitch together. It's a weekend project, really...if you either knit super fast or knit all weekend long.
With our crazy Tennessee spring, I should have plenty of chances to wear the cowl...while it's 70 today, it's supposed to drop down to chilly temps by Sunday. This means I have the perfect thing to keep the chills away. Happy Friday, y'all!
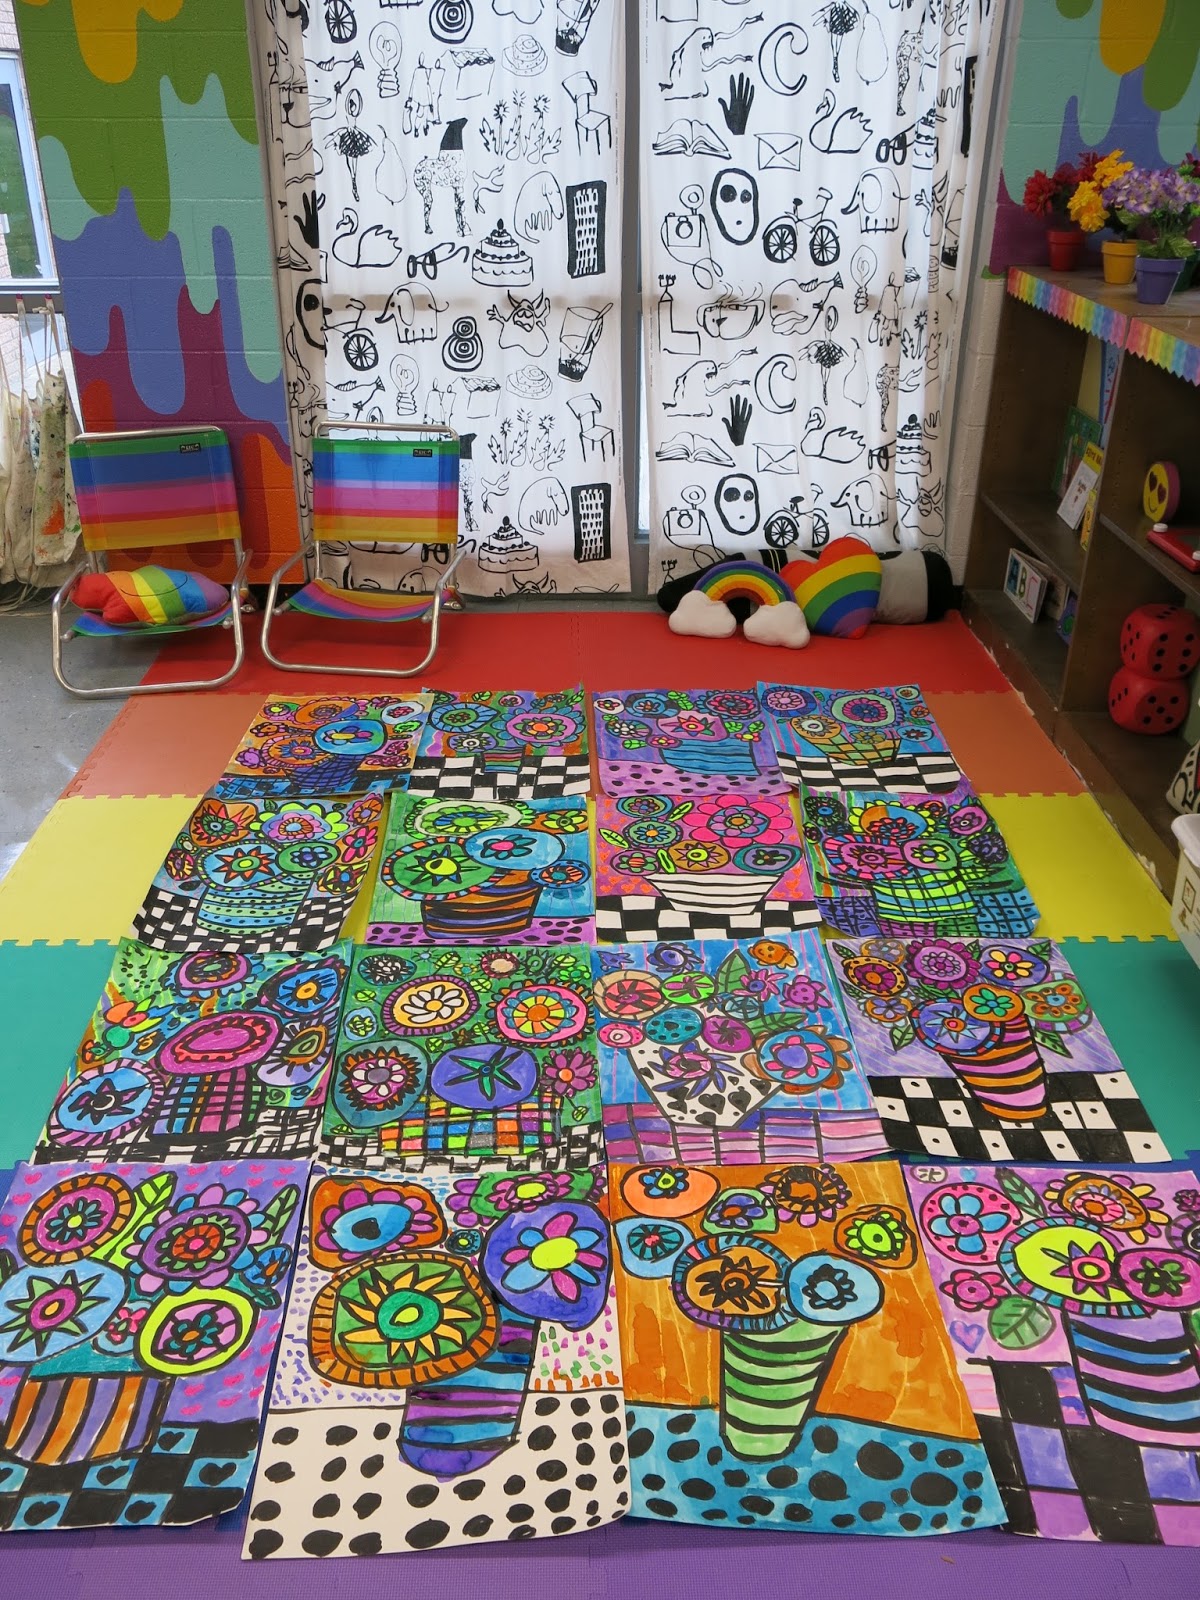
Hello, friends! I'm here today to do some oversharing of my second grade masterpieces as they are giving me so much LIFE! Both my young artists and I are beyond excited with how our Heather Galler-inspired masterpieces have turned out. These works of art are HUGE as we created them on 18" X 24" tagboard. I cannot wait to share them at our upcoming art show. Here's the video lesson I created for y'all to explain the process:
I only see my second grade kiddos for 30 minutes, twice a week. On our first day together, we managed to knock this out:
This lesson could easily be done on a much smaller scale. However, while going through our pieces for the art show, I realized that my students had yet to do a BIG show stopper. Many of the second grade works of art were on the smaller side. I knew I wanted one piece that they would be super proud of. So this big masterpieces were destined to happen.
On our second 30 minute art class, we started to add color to the flowers with both our florescent oil pastels (my favorites are made by Sargent) and liquid watercolor. I don't normally bust out the liquid watercolor but for this big scale, I knew my pan watercolors would just not do.
The following two art classes, we wrapped these bad boys up. The kids were THRILLED with their hard work! And so was I.
But, like I said, this project would have worked out just as beautifully on a smaller scale. In fact, I'm so tempted to do the same lesson with my fourth grade students!
Some of my students decided to leave their tables or vases unpainted and black and white. I loved their work no matter what they decided.
These paintings were so much fun to create....we played loud music and even did a little dancing while painting. Who wouldn't be happy while working on these. If you follow me on Instagram, you've seen my kiddos in action.
Our art show is now a little over a month away. I will be keeping you posted on our progress. These will be such a beautiful addition to our show!
When working so large, my students really had to spread out.
Can we talk paper for a hot second? I LOVE tagboard, it can easily withstand the weight of the ink that we filled the bingo daubers with as well as the watercolor paint.
As did the poster board. The only problem was that the shiny side of the poster board did not take to the paint as well as the matte side. Just something to keep in mind.
Of course, those kind of papers can be costly. So I would recommend 80lbs. paper. That's what I always order in reams of 500.
As far as watercolor paint goes, I have found that the paint I get from Sax works just as well as the other brands...I've yet to find a favorite as each is very vibrant. How about y'all?
I get A LOT of questions about the bingo daubers...y'all! They are my fave but are probably on backorder everywhere as I've told everyone to get some. Try just searching "bingo daubers"on The Google and see what pops up. I fill mine with diluted India ink...I have no favorite brand of ink, they all seem to be great.
LOVE to know if you are doing this lesson. Please be sure and tag me if you share on social media!
Did you know that today is National Walk Around Things Day?! Me neither! That is, not until I checked my calendar. What is this day? Well, apparently, it's open to interpretation...personally, I thought it sounded like a fun way to get the kids up, moving, doing something new AND having them search for mini-masterpieces by the artist we are currently learning about: Vincent van Gogh! Here's how I introduced Walk Around Things Day and this hunt to my first graders:
Y'all, this was so much fun and so interactive! When I explained what they were to do, one of my students said, "like an Easter egg hunt, but for Vincent van Gogh!" My fourth graders are also learning about van Gogh and I did the same activity with them. Because I have doubled up fourth grade classes, I skipped over the "walking around like a giant bit"...I'm certain they would have loved it but I know my crowd: they are a little wild. I can only give the a little bit of leash, if you know what I mean. So, instead, we reviewed what we knew about van Gogh before going on our hunt. I managed to snap one photo of the fourthies as they walked around the art room.
When they returned to the floor with our found masterpieces, We chatted about them. This lead to many more discussions about van Gogh as well as the difference between a still-life, a land and seascape and portrait vs. self-portrait. After this bit of moving around, we were ready to settle in to our lesson for the day. What a great way to get moving, thanks National Walk Around the Things Day! We'll have to do it more often!
The second big project on my Spring Break To Do List was carving out this brand new home studio space! This was the second big endeavor I set out to accomplish over my break (check out the others here and here) and I'm so excited with how it turned out. This room is our bonus room (dubbed the "bogus" room by me for years as I literally just piled stuff in it!) and it sits right above our garage. It's a big space and filled with light and windows. This room serves many purposes: it's my yoga studio on the 3 times a year I decide to practice; it's a book writing space; a lesson planning and video recording spot and where I host Facebook and Instagram LIVE every Wednesday night at 8pm, CST. While it's always had many jobs, I never felt like this space was my actual studio. My drafting table was in another part of our house and my art supplies were scattered about. Over break, I decided to change all of that.
I started by clearing out the accent chairs and the end table that previously sat in this space. If you'd like to take a tour of my bonus room, you can see it all right here. Those chairs are now sitting in a heap in my front room...another space that I've yet to figure out. And, before you ask, no, we didn't just move in to our home. I'm just a VERY SLOW decorator/figure-er out of life-r. I then moved my 1940's drafting table to this space.
Let's talk about my drafting table for a minute. I scored it a couple of years ago from a Craigslist seller. I had always wanted one after I broke mine in college (how does one break an iron drafting table? These are questions only those in college under the influence of Zima can answer). The vintage light was an ebay find.
Despite the fact that I like ALL OF THE COLORS I'm trying to approach decorating my home in a less crazy manner. For that reason, when deciding on framed pegboard and an accent color, despite my knee jerk reaction, I decided to go with ONE accent color...not ALL the accent colors. Yellow was my color of choice. I thought it was bright, happy and would compliment the slate gray of the curtains. My vintage desk lamp was originally gray. After priming it with a white spray paint, I hosed it down with a sunshine yellow. It makes me so happy!
Now let's talk pegboards. After I decided I wanted to hang pegboards up, I thought they would look better framed. Since this in my house and not my garage, I just thought it would elevate the look. I am a hoarder of all things but frames in particular. When I found three in my stash that would work, I took them with me to the hardware store to have pegboard cut to size. Why not just measure them, you ask? Well because the frames are a touch wonky. I wanted them to be certain the pegboard would fit. I'm glad I did...each pegboard had to be trimmed down at least two times before they fit the frame.
While at the hardware, they had a couple of pegboard kits. These came with the supplies needed to hang the boards and the hooks for supplies.
Here's my advice for hanging pegboard...and take this with a hunk of salt as I'm not handy AT ALL: hang the frames with a heavy duty hook. I happened to have these Monkey Tail hooks that could hold up to 20 lbs. They slide right in to the wall and work fabulously.
Now you can't put the frames right up to the wall. You'll need a little bit of space in the back for the backside of the hook. The pegboard kits I purchased came with long screws and a bumper. The bumper goes in the back and forces the frame to sit some distance from the wall.
When putting in the screws, you'll want to be sure to put add them to the stud. This will further anchor your pegboard so that the weight doesn't cause it to simply fall off your wall. I used this cheapo thing called a Stud Buddy (heehee) and it worked great at helping me find the studs. It's really just a high powered magnet that finds the nails in the studs.
The baskets were a purchase from Target and work great at holding my small bottles of paint. I hate having all of those bottles of paint laying around on tables...this seems to be such a colorful solution.
As for the tubes of acrylic, I decided to hang them store-style.
I'm such a visual person who loves to have EVERYTHING OUT so I can see what I've got. These pegboards allow me to do this without having a mess of stuff all over the place.
The added bonus is that I can change the configuration of the arrangement at any time. Now I want WALL TO WALL PEGBOARD: for my jewelry, for my sewing room, for my LIFE.
I also have a stand alone easel that I'm contemplating bringing up to this space also.
I did purchase a drop cloth to go under my table as I really don't want to mess up the hardwood floors any more than I already have (ahem). You can see the drop cloth in the basket I've got hanging from the table.
Eee!! Y'all don't even know how happy this new space makes me!
Do you have a home studio space? In what part of your home is it in? What are your favorite parts of your space? I'd love to hear!
I've been redecorating my art room so much that I've started to feel the itch here at home. Last summer, over on the blog A Beautiful Mess, the author Elsie shared a show stopper of a gallery wall. As soon as I saw that post, I knew I wanted one of my own. We have a very large wall at the top of our stairs between our bedroom and a spare bedroom (that I use as a closet...don't judge). It's been home to these two paintings I created a couple years ago. While I still love those paintings, I wanted something new, big and impactful...like a gallery wall!
I actually purchased the frames way back when I first saw Elsie's post. So for those of you that think I do things overnight...don't be fooled! These frames have been stacked in my bonus room collecting dust for MONTHS. I did wait until they went on sale for $10...you can find the frames I used here.
I then spent a part of my spring break pouring over boxes of photos. I knew I wanted to get photos that meant a lot to me and Mitch so I really took my time. However, I keep telling myself that when I tire of these photos, I can simply print more!
I took the photos to CVS where I scanned them and printed them in black and white. Not all of my photos were originally black and white but that didn't matter, they could still be printed that way!
Then I came home, framed em all up in 30 minutes flat. That was on Monday of spring break and I was feeling mighty accomplished. Knowing that hanging them would take math and measuring, I totally procrastinated until SUNDAY, the last day of my spring break. It was then that I decided "It's now or NEVER" and set about hanging this wall.
I have no idea why I put it off. I mean, it was a COMPLETE pain in the butt but once I had a system, it went pretty quickly. In fact, in the video, you'll see I manage to get that last row up without much effort. I did use my favorite Martha Stewart trick of hanging paper the size of the frames first...this really helped with placement. Also, in the video, you'll see me stop and talk to someone...that someone was my husband offering all sorts of measuring advice. Did he actually help to hang anything? HECK NAW! He just talked to me about math and measuring and y'all already know how I feel about that. I can easily say, after 2 hours, I DID IT MY WAAAAAAAY. (YES, 2 hours. And, YES, that would have taken less time had I done it HIS WAAAAAY...but that would be admitting defeat, y'all!)
I was going to hang another row at the bottom...but in the end, I decided that would be too low. I was going for a museum/gallery vibe and I just didn't think that would look right. ALSO I was so over hanging pictures at that point!
Some of my faves: my maternal grandparents and my mom and her siblings. My mama is the one with the glasses and the big mouth. Pretty sure you figured that out.
My paternal grandma and I with fish that were caught on a fishing trip. My grandpa Hobe LOVED to fish and my grandma did all of the cleaning and frying. We ate a lot of deep fried bass growing up!
Mitch went on an epic Boy Scout adventure when he was 12 and it's one of his favorite memories.
Each photo makes me so super happy!
And now I can say I got at least one of my home decorating To Do's off my spring break list.
Stay tuned because tomorrow I'll be sharing my other big project. I'm so happy to scratch these things off my list!
Thanks for letting me share a little piece of my home with you!