Showing posts with label art class. Show all posts

Tuesday, June 19, 2012

In the Art Room: Weaving, Part 2

Woven pouch created by one of my fantastic fourth graders.
Hello, crafty kids and grown-ups alike! Today I am going to show you how to add a flap to your woven pouch. If you've no idea what I'm talking about, you can quickly get caught up to speed by reading Weaving, Part 1. I do hope you'll join in on this weaving adventure. Ready to start? Okay, let's weave a flap!
You know you are ready to weave the flap when your weaving is at your desired height. I tell the kids that their weaving must be between 4-7", no taller, no smaller. Once there, you might want to trim those pesky pieces of yarn you tied together so your weaving looks a little less, er, hairy. The above is my trimmed-up, desired-height pouch.

For flap weaving, you will only be weaving on one side of your loom, not all the way around as you have been. Your first step will be to pick a side to weave your flap on. It does not matter which.
For pouch weaving, you will need to eat a delicious popsicle, stat. Preferably something chocolate. Rinse well. Weave your popsicle stick into your weaving, making certain to weave the opposite of the previous string. See above.
Now rotate your stick so that it lifts up every other string. Simply slide your needle into this string tunnel. This is where the kids Freak Out:
"What?!"
"Why haven't we been doing this the whole time?!"
"That is sooooo cool!"
Pull your needle all the way through so there is no excess yarn just like above.
Flip the stick down and use it to pack the weaving down. This means no more fork to pack the weaving. The kids like to refer to it as the "weaving guillotine". Where do they get this stuff?
Slide your guillotine, er stick, to the top of the weaving. Do not remove the stick. If you already did (tried to jump ahead, didn't you? Humph!) just reweave the stick back into your weaving. And don't do that again.
Remember, we are only weaving on one side of the loom. This means our needle will be going back and forth across our loom instead of around the loom. So, for this next step, you will not be turning your loom over but making a u-turn and weaving back. Notice I am not using the stick (I'll explain why in a moment). Be certain to weave in a pattern that is the opposite of the previous string.
Pull yarn all the way through at an arch. This will prevent some terrible thing called Draw In. More on that shortly. Slide your weaving stick down and pack the yarn.
Okay, if you smarties haven't figured it out, here is why you cannot use your stick when you are weaving in the opposite direction: you will unravel your weaving. This is why you can only use the stick when you are weaving in one direction. Sometimes the kids will draw an arrow on the stick so they know when to use the stick.


Ewww, this is bad! This is that dreaded thing called Draw In. This happens when the weaver is pulling too tightly. The year before my fourth graders tackle this weaving, we create a tapestry weaving. That's fancy talk for weaving on one side of the loom. This gives them lots of practice at avoiding and fixing draw in. You can see those weavings here.

The best way to avoid draw in: don't draw in. Stop pulling so hard when you are weaving back and fourth. Pull the yarn at an arch, like I showed earlier. The best way to fix draw in: remove it. That's right, unweave the unwanted. This might leave the end warp strings on the left and right loose making it difficult to avoid draw in again. If you notice that, turn your weaving over, pull up the slack on those strings and tape them taunt. Flip your weaving back to the flap side and resume flap weaving. Fleaving. Wlapping. Call it what you like.
And viola! Finished flap! I tell the kids their flap should be around 2" in height.
A sunglasses holder by a fourth grader.
Feel pretty good? Easy enough, right? Feel free to ask questions if you've got 'em. Next week I will show you how to remove your weaving and add a button. From there, we'll weave a cord which is the kid-crowd favorite. Happy weaving!
Read more »

Saturday, May 12, 2012

In the Art Room: Mother's Day Flower Pots

Our kindergarten students have changed so much this year that their growth reminds me of their blooming flower collages.
There are some folks that just don't get paid enough. These people include egg-inspection factory workers (speaking from experience, thank you very much), corn-detasselers (another item on my resume) and kindergarten teachers. Now, don't get me wrong, I enjoy teaching the littles but I only see them in half an hour intervals. And, sometimes, in that half an hour, I can have one empty his bladder, one start to cry for her mama, one step in said bladder-empty-outter's puddle and one decide to smack me on the tooshie on his way out the door with a "bye-bye, Mrs. Stephens!"
Overheard kindergarten convo: "I got a man's haircut yesterday but I'm still a little boy." Such sweetness, sigh.
Despite all of that, I can see why the kindergarten teachers keep coming back for more. No other group of kids is as enthusiastic about everything under the sun as kindergarten. Every new skill taught is met with an "ohhhh" and an "ahhhh" and often awarded an applause.
Take this Flowery Collage, for instance. We used the left over scraps of textured paper we had created for our Mammoth Monet Mural. For the background, we learned all about creating a tint with primary blue and white when sponge printing. Once that was dry, we chatted about our French friends Claude Monet and Henri Matisse and their love of nature and collage, respectively. And their flowers are simply tres magnifique, no?
Pretty as a petunia.
But I'm getting ahead of myself. You see, the wee ones actually painted these here flower pots before creating their collages. Every year our awesome kindergarten teachers help their students celebrate Mother's Day with a Mother's Day Tea. At the tea, each mom is presented with a handpainted terracotta with a lovely little flower inside.
We only used one 1/2 hour class to complete these. It was a whirlwind of painting fun but next year I think two art classes would be better.
I offered to help the kids paint their pots in the art room this year. I demonstrated on a couple of broken pots how to paint the middle of the flower, or stigma. We chatted about pollen (which is why we are all so sneezy) and nectar. I then showed the kids how to add the petals, stem and leaves and grass. We topped it off with some line designs around the rim.
Remember these? I guess you can see where my idea of having them paint flowers on their flower pots came from...
"My mama is going to love my pot. She's gonna say 'Did you really make it?' " ...adorable
Once the pots were painted, the kids had a big time with the collages because they could see the connection. And because we learned the word "collage" and said it in our funniest French accents complete with a "viola!" after every simple task completed. You see, I told you, it's the little things when it comes to the little ones. As long as we're not peein', cryin' or nose-a-pickin', it's a pretty fun group to hang with.


Read more »

Thursday, May 3, 2012

In the Artroom: The Art History Wall

A Rockin' Trip Thru Art History with...Mona Lisa's Masterpieces.
This week in the art room, I thought I'd share with you the backdrop seen in many of my What-I-Wore-This-Week posts. Every school year, I create a theme of study. The year I created the Art History Wall, our theme was Rockin' Thru Art History. I wore this wacky apron and the kids created guitars and rocked their way through the history of art.  I loved the wall too much at the end of the year to take it down. With the exception of a random piece of art falling off the wall, it's held up well through the years and, more importantly, it's proved to be a valuable educational tool in the art room.
Every art room should have a mascot.
I am fortunate in that I have a very large art room. Once upon a time, my art room was the school library. So it is very long with plenty of former book shelves turned cabinets and storage.
The Wall in total. Narrowing down the history of art to fit my wall was the hardest part.
That being said, I have this very large wall space which seemed to be the perfect canvas for a giant display. I began by jotting down the major movements in art history. From there, I rooted through my mountains of visuals: old calendars, postcards, posters -- even cutting up the art history books I'd hoarded since college, to find just the right images.
In the Beginning...we had rock art, no paper, no scissors.
With my art movements and visuals sorted, I began the writing of the Art History Wall. This proved to be difficult as I had to keep it simple and kid friendly. To add a little  three dimensional pop to the wall, I clued a piece of foam to the back of the purple papers as well as some of the visuals.
If you are interested in creating your own wall, feel free to borrow from mine as much as you like. The following are the movements and their simple descriptions:
Rock Painting: The beginning of art...
Ancient Egypt: tombs, pyramids, mummies, OH MY!
Ancient Greece: athletic people that believed in many gods...
Ancient Rome: expanded Greek art ideas (after conquering them)
Middle Ages: Bible stories were told through art
Early Renaissance: Artists learned to paint realistically
High Renaissance: Michelangleo painted the ceiling of the Sistine Chapel and sculpted David; Leonardo da Vinci sketched inventions and painted the Mona Lisa

Dutch painting: Dutch artists painted portraits, still lives and genre paintings
Romantics and Realists: wanted to show emotion in their art
Impressionists: group of artists that wanted to show color and light
Famous impressionists were Monet, Manet, Renoir, Degas, Cassatt
Post Impressionist: artists that created after the Impressionists and expanded their ideas: van Gogh, Seurat, Cezanne
Modern Art: In modern art, artists realized that the possibilities are endless!
The bulletin board beside the art history wall.

What's the point in having a mascot when you don't get to wear a silly costume? I got this idea from one of the most amazing and inspirational art teachers I know, Debi West. You can read more about her and her students here.
And there you have it! We put the wall in action when we are learning about an artist or a certain movement in art. I'll ask the kids to follow me to the Art History wall so they can visually grasp important periods in art. Thanks for reading!
Read more »

Wednesday, April 25, 2012

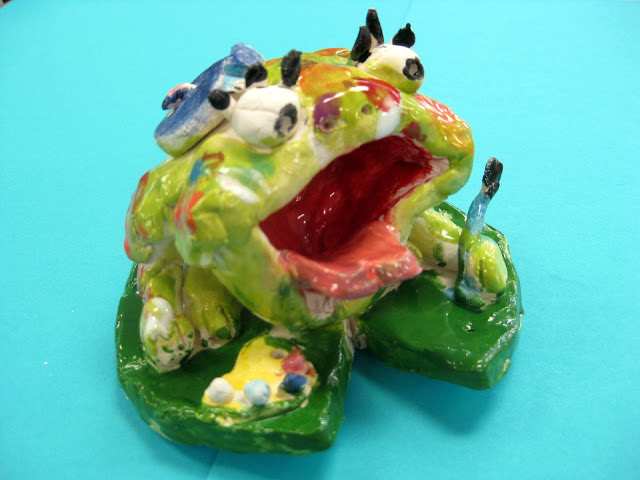
In the Artroom: Fabulous Frogs

Painterly Frog: This here is a froggy artist that really gets into her work. Notice the sweet details like the paint brush, palette, blue beret and, of course, the paint splatters.
I can't tell you how much fun it has been to go to school, open the kiln and be greeted by these guys each morning. While learning about all things Claude Monet, my third grade students contributed to our school's Mammoth Monet Mural with their frog-tastic drawings. When brainstorming their upcoming clay projects, I thought it would be good to continue our Monet theme. So my second graders created ceramic waterlilies and my third, these frogs!
Redneck Frog: Oh my, can you believe those teeth?! I am so in love with this backwards-baseball-cap-wearing, orange-eyebrows-on-the-outside-of-the-baseball-cap wigglin', mysterious-black-bug-eating Hillbilly Frog!
Obviously, the kids really enjoyed creating these unique frogs. They have been so pleased with them, as they should be. I loved this lesson because, once the kids followed the steps of sculpting their frog, they were free create any sort of frog imaginable. And they did.
Fashionista Frog: That was actually the name given to the frog by the artist. Apparently, Fashionista's hobbies include"being pretty, being sassy, hopping and teasing the poor fish." Hmmm, sounds a lot like the artist herself!
For this Fabulous Frog creation, we used the following:
Artistically-Inclined Frog: I was really concerned about the stability of this frogs easel that is precariously straddling the lily pad but it made it out of the kiln unscathed. Notice the little beret, the palette and the paintbrush.
Because I have half hour classes, I taught this lesson in several classes. On Day #1, we:
  1. Twisted our grapefruit sized piece of clay into two equal pieces. 
  2. With one piece, we pounded the clay flat into Oreo-cookie thickness and traced a template that was in the shape of a lily pad. We wrote our names on the bottom of this clay, wrapped it in a wet paper towel and placed it in a zip lock bag with our names written on it.
  3. With the other half of the grapefruit, we created a pinch pot for the frog's mouth and body.
  4. With the leftover clay from cutting out the lily pad, we rolled coils for the legs and attached them to the pinch pot with the toothbrush and water.
  5. The pinch pot with legs was then wrapped in a wet paper towel and placed inside the ziplock bag on top of the lily pad until next time.
As the kids were working, they were constantly coming up with names and quirky stories about their frog. So, once the frogs were out of the kiln, I had them do a little froggy biography.
Day #2:
  1. I demonstrated to the kids how to add eyes and a tongue.
  2. I explained to the kids that all things can be created out of clay with the use of a sphere, a coil or a slab.
  3. We brainstormed different ideas for frogs and froggy accessories and discussed how they could be created.
  4. Students completed their frogs (just barely in a half an hour!) and attached them to their lily pads.
Standardized Test Taking Frog: Yep, it's the time of year. Notice the #2 pencil. What you can't see is that this frog is also wearing a fabulous red and blue backpack.
Day #3 and 4: Once the clay projects have been fired, we begin glazing. I tell the kids I only have two rules for glazing: don't glaze the bottom (it will adhere to the shelf in the kiln) and no glazing your clay projects five thousand colors. We spend one day just blocking in the colors with at least two coats of glaze.
Rock Star Frog: Gotta love a frog that dyes his mohawk to match is guitar.
On the second day of glazing, we use smaller brushes and begin to add details like dots, stripes or just delicate lines.
Special Agent Frog: Ma'am, I believe I found the dragonfly you were looking for...

And here was our final task: writing about our fabulous frogs. The kids don't get to take their frogs home for a couple of weeks due to our school-wide art show. But they were dying to see them and chat about them. So, we filled out this sheet in pencil and traced over our pencil lines in skinny sharpie. This paper is actually a folded card. When we display the frogs at the art show, this little placard will sit next to the artist's frog.

Paint-Brush-in-my-Mouth Frog
This project really brought out the kids artsy side...which is why I think they created so many Artist Frogs! It also brought out more of their crazy humor...I learned that during this exchange:

Me: Hmmm...it says on your sheet that your frog loves to eat "pizza, sushi and ... frog legs?"
Kid #1: Yep!
Me: You do realize that you made a frog. And he likes to eat other frog's legs?
Kid #1: Yep, he's got cannibalistic tendencies.

Ya gotta love 'em!
Read more »

Tuesday, April 17, 2012

DIY: The Rock Star Apron

Dude, am I in tune? Oh, wait, I'm the lead guitarist. I don't have to be for the ladies to love me.
So I was recently asked how I managed to keep my clothes clean in the art room. Firstly, lemme just say that I have a very loose interpretation of clean. As long as you don't get too close to me, I always look relatively presentable. But, just like a specimen under the microscope, up close and personal, it's a whole 'nother dirty, dingy paint-splatterly story.
Hey, man, can we turn down the bass? And the drums? And maybe the vocals? No one can hear my sweet riffs.
Secondly, what I've failed to show you in my outfit posts is that I wear an apron daily. I've been wearing aprons since my first year teaching when one of my sweet hands-covered-in-paint kindergarten friends decided to give me a hug...and left two paw prints on my tooshie.

But I grew tired of the traditional kitchen apron so, several years ago, I made this one. That's right, this is an oldie. But just like Classic Rock, it's yet to go outta style. Says me, anyway.
Wanna make a Rockin' Apron? Just get your groupies to collect the following:
  • Pair of old jeans (I thirfted these little girl jeans...in my rock star fantasy, I got the hips like Jaggar)
  • 1/2 yard of felt for the guitar
  • 1/4 yard of felt for the guitar
  • A heavy cotton fabric for the apron itself
  • Buttons for the guitar
  • Some sweet rockin' fabric for the shirt
Okay, I didn't go about this sewing project the traditional way. I was too busy at the School of Rock to pay attention in sewing class. So, this is a hot mess of an assembly. Just follow my lead, man.

Puttin' it all together:
  1. Lay your favorite apron on top of the background fabric and trace around it leaving a couple inches for the hem. Fold hem under and stitch around the entire apron.
  2. Using your funkiest fabric, create a shirt. Lay your apron over the shirt fabric, trace around leaving a couple of inches, fold under and sew this to the apron.
  3. Cut off the back of the jeans. Lay this on top of your apron but do not sew yet.
  4. Using a sheet of large thin paper, lay this over your apron and start sketching out your guitar. Once you have that sketch complete, cut it out.
  5. Lay this guitar sketch over your apron (which should still have the jeans on it). Trace where you plan to add the guitar onto the jeans and cut off this portion of the jeans. If you don't do this, you'll end up with a lumpy guitar. Chicks aren't into that. Pin jeans into place.
  6. Trace your guitar onto the felt and pin into place. Do the same with the neck and the white part of the guitar (I'm sure it has a name, but when I asked a guitarist, he didn't know it either). Use a zigzag stitch to attach.
  7. Add the strings with a zigzag. Sew on your buttons.
  8. Sew your jeans to the apron.
  9. Add straps for the neck and waist ties. I used an old belt to give it that guitar strap look.
  10. Now, ROCK THAT APRON.
I added a little flair to my jeans. Notice the paint splatter.

For being several years old, this apron has held up pretty well. I wash it occasionally on a super gentle cycle and allow it to air dry.
What does a lead guitarist use as birth control? His personality.
Well, man, I do hope you'll give this Rockin' Apron a go. It's super easy and very fun to wear. Though I do know what you're thinking...this apron needs more Cowbell.

Rock on, dude!

Read more »

Friday, March 30, 2012

DIY: Conquering the Dynasty Dress

At the Hollywood Drive-In Golf at Universal Studios. I loved their putt putt courses which were based on 1950's B-movies. This one was called The Haunting of Ghostly Green.
While in Memphis last weekend, I was taken to a gem of a place called Park Avenue Thrift. And while it was far from being even remotely Park Avenue-esque, we did make a new friend (one whom attempted to try on her size 20 bathing suit over her clothes, asked us what we thought and paid the cashier with a wad of wet cash brandished from her bra). I also found this lovely floral dress.
Before hacking into the dress, I thought I'd give it one last hurrah in all of it's shoulder-pad, big-hair-with-bow, blue-eye-shadow, and-pointy-shoe glory.
As soon as I slipped the dress on, I immediately had images of Dynasty pop into my head. The shoulder pads were mammoth. It's no wonder we did our hair up so big in the eighties. If we didn't, we'd look like a shrunken head between those pillow-sized pads.
As a kid, my cousin, my aunt and I used to watch Dynasty, Falcon Crest and Dallas curled up with my grandma in her bed. The plot was over our heads so we usually had our noses stuck in some Sweet Valley High book.


More pictures from the putt putt. I've not putt putted in ages and we had so much fun. If you've not been lately, I say go.
So, here's a breakdown of how I conquered the Dynasty Dress:
  • Removal of shoulder pads. But I didn't trash them. They'll come back in style someday, right?
  • Removal of 8" from the hemline. I mean really. It was like a floral parachute.
  • Addition of yellow scalloped collar. Seen best in the final photo.
  • Removal of belt. I love it, but you can't see it. So I am wearing my bow belt instead.
  • Addition of matching sandals. I used the excess fabric to create the straps for my Sseko sandals. If you are not familiar with Sseko, you might want to check them out.
Another show we watched with grandma as kids. I always thought of my grandma as being like Dixie Carter's Julie Sugarbaker. Doesn't Charlene look like she's wearing my floral dress?
It's not the biggest dress overhaul but this one didn't really need it. I was sold on the full skirt, the floral and the pockets. It just needed some de-eighties-izing.

Dynasty Dress, consider yourself conquered, bwahaha.
When I asked hubs what he thought of the end result, he said, "It's nice. It looks like an Easter dress. That's the look you were going for, right?"

Erm, yeah. And that's the last time I let him win at putt putt. Enjoy your weekend!


Read more »