Welcome to the 3-Dimensional display of the Johnson Elementary Art Show! Our annual art show showcases all of the artwork that each of our young artists create throughout the school year. In this blog post, I'll be sharing all of the 3-D work that was displayed in my room...but stay tuned! A post about the incredible 2-D display is up next. This art show is a HUGE undertaking as we share all of the efforts of every student. An art show like this would not be possible without the help of some truly AMAZING moms that spend more hours than you could imagine making the art show a memorable one for our artists. I cannot thank them enough...y'all are truly incredible! All of the projects you'll see here are ones that were created by my students while viewing the how-to videos I created for them. I'll be adding those videos for you here. Feel free to use them in your art room! I'll be adding more videos like these over the summer so you might want to subscribe to stay tuned. But enough about that, let's take a tour of the Johnson Elementary Art Show 2017, 3-D Displays!
I hope you liked the tour. If you have any questions, feel free to leave them in the comments!
This project was a hit with the kids...and one that my current third graders are asking if they will get to do next year. I had several kiddos sewing at home and bringing in the pillows and monsters they had created there. It was so fun to teach them this life skill. Here is the video they viewed:
Their creativity really blew me away. By the way, if you teach a fourth grader how to make a pom-pom, it can be a dangerous thing.
By the way, y'all know that big bunned monster is my #lifegoals, right?!
This display is one of my faves. It showcased the sculptural work of my kindergarten, second and third grade students. My kindergarten kids created the monarch butterflies:
That was a one-day project that the kids really enjoyed.
My P.E. buddy Ali Starkweather painted the rainforest backdrop that you see. Isn't it amazing? It went so well with the theme of our exotic birds and reptiles!
Let's talk about these clay projects. The third graders created these clay chameleons which were one of my faves.
We used a combo of Mayco's Stroke and Coat glazes and their Jungle Gems for a speckled look.
I really stressed a three coat minimum for glazing and I think that's why the kids were so successful in having such beautifully glazed pieces. They take so much pride in their clay work that I usually don't have to ask them to redo...they are dedicated to making them awesome!
Also on display were these birds. Y'all, these were the comedic hit at the show, they are so fun and funny. They really came to life when the kids painted them and added the feathers and beads. Here is the video lesson:
A couple of my kindergarten classes had extra days with clay so we made a second clay project: these turtles! Their other project was hung in the hallway, I'll be sure to share that with you in the following blog post.
Those turtles were super fun to create...I loved seeing the glaze effects on the texture.
The first graders created the most incredible fish so they needed a sweet display to show them off. The kids created the painted bubble paper hat covered the tables.
For these, the fish were glazed but the bases were painted with metallic watercolor. Here's the lesson video:
My second graders had just completed their ceiling tile project and had traced templates for that project. I had 65 templates...so, instead of throwing them away, I had the kids paint them as their last project.
We hung them above the first grade fish! Here's the video used for the ceiling tile project:
These might be my favorite ceiling tiles to date!
For the fourth grade bobble heads, these were displayed on my counter. I covered my cabinets with white paper and works of art by both kindergarten and second grade.
Um, that one has a top hat, a bowtie and a monocle. Perfection. Video here:
This is another project I think my younger kids are gonna wanna create. These were so fun!
Sandra Silberzweig is a favorite artist of mine...and my students.
On another set of tables covered in pink, my fourth graders had their plaster candy hearts on display.
Also featured on the pink paper were the plaster candies that my third graders created...they really looked good enough to eat!
Puffy paint for the win, y'all.
The days following the art show, I invite the classroom teachers to bring their students during my planning time. Together, we teachers work in an assembly line wrapping clay projects, stuffing them into the bags and stapling the labels on top while the kids wait on the floor. It usually takes about 7 minutes to get a class done. The kids then take their 3-D work home safely.
Stay tuned for the what's up next: a post and video of our 2-D work...until then, here's a tour of last year's 3-D display, enjoy!
I'm so excited to share with you just how amazingly awesome these exotic birds by my second graders turned out! If you subscribe to my YouTube channel, then you might already be familiar with this video lesson I created (and may have used it with your students!). I was uncertain how I wanted the kids to finish them off (to glaze or not to glaze). In the end, we went with this super fun florescent paint and metallic watercolor for the base. Here's the how-to video!
For our school-wide art show, our clay sculptures will be based on a pet shop theme with each grade level making animals, reptiles and fish for the occasion. Our theme last year was a 1950's diner where the kids all made food...after doing that fun theme, I wasn't sure if we were going to be able to top it. But these birds have certainly changed my mind about that! In the video, I use skewers as the legs but in the end, I was worried that they would not be strong enough to support the bird. So as the kids finished their birds and bases, I had them bring them to me. I used the skewer to write their name and class code on the bottom of each. Then I pushed popsicle sticks into the bottom of the bird and the base just to make sure they would work together. After the kids left, I removed the sticks, wiggling them back and forth. I did this because I know that clay shrinks as it dries. I then allowed the clay projects to dry for a week or more.
Last week, the kids got their birds and bases back and were given bright colors of paint and plenty of visuals to work from. I gently suggested that they might want to make them look like parrots or toucans...but I also wanted them to explore the idea of creating their own idea of an exotic bird. Once the paint was dry, I hot glued the sticks to both the birds and the bases (I had used the stick to add the holes into both before firing). Sparkle ModPodge was added to the finished birds because...SPARKLE MODPODGE. Need I say more?
Today, the kids were given sparkle pipe cleaners, feathers (both of which were found at the Dollar Tree) and beads from my unending supply of beads (seriously...do they multiply?!). I gave them a couple of tips on how to twist the 'cleaner and add the feathers...and then just let them go to town.
They had a blast and are just so super proud of their birds!
I suggested folding the pipe cleaners in half, adding beads if desired and bending the 'cleaners into spirals. Of course, their fave part was digging through the treasures on their tables...
Once complete, they brought their birds to me where I hot glued their feathers and pipe cleaners into place. I found this great resource and asked the kids to do a little bit of research on their birds before our short 30 minutes was up. I borrowed some books from the library to help them with that task. Tomorrow, they'll continue writing, add an illustration and learn even more about exotic birds.
Now that we are closing in on the art show and the end of the school year, I don't plan on doing too many more projects with these guys. We do have this project to finish up next week...but after that, we'll be working on decorating the art room for the art show!
I love all of the creativity that went into these birds! They were colorfully beautiful before...and now they are just fantastic.
Teaching clay is one of my all time favorite things because the kids absolutely LOVE it! Ask them what their favorite medium is and it is always clay. I haven't been able to share some of my fave clay projects with you as they are in THE BOOK and, therefore, owned by the publisher. I was so excited last week to get my copy of it!
Almost all of the projects in the book (with the exceptions of the edible clay {yes, there is an edible clay project!}) can also be created with kiln-fired clay. So it's perfect for those with or without a kiln...really anyone who wants to explore clay with kids! And, in case you are a little intimidated by clay...OR just want a reason to play with the stuff yourself, you might want to join in on my FREE clay workshop! I'll be hosting it on my Facebook page every Wednesday night LIVE for about an hour. I'll be working with Celluclay, air dry clay and plaster wrap. You can use whatever supplies you have on hand OR you can purchase a kit of the supplies to explore and create along with me (and many others!):
I cannot wait. Craft nights on Facebook LIVE have been so much fun!
And, stay tuned...I'm unloading that kiln daily and the clay projects coming out of it have just been so fun to see. I find myself scrambling to get to school just to peak inside.
Here is an accurate portrayal of my face when doing so, ha! Y'all have a great week!
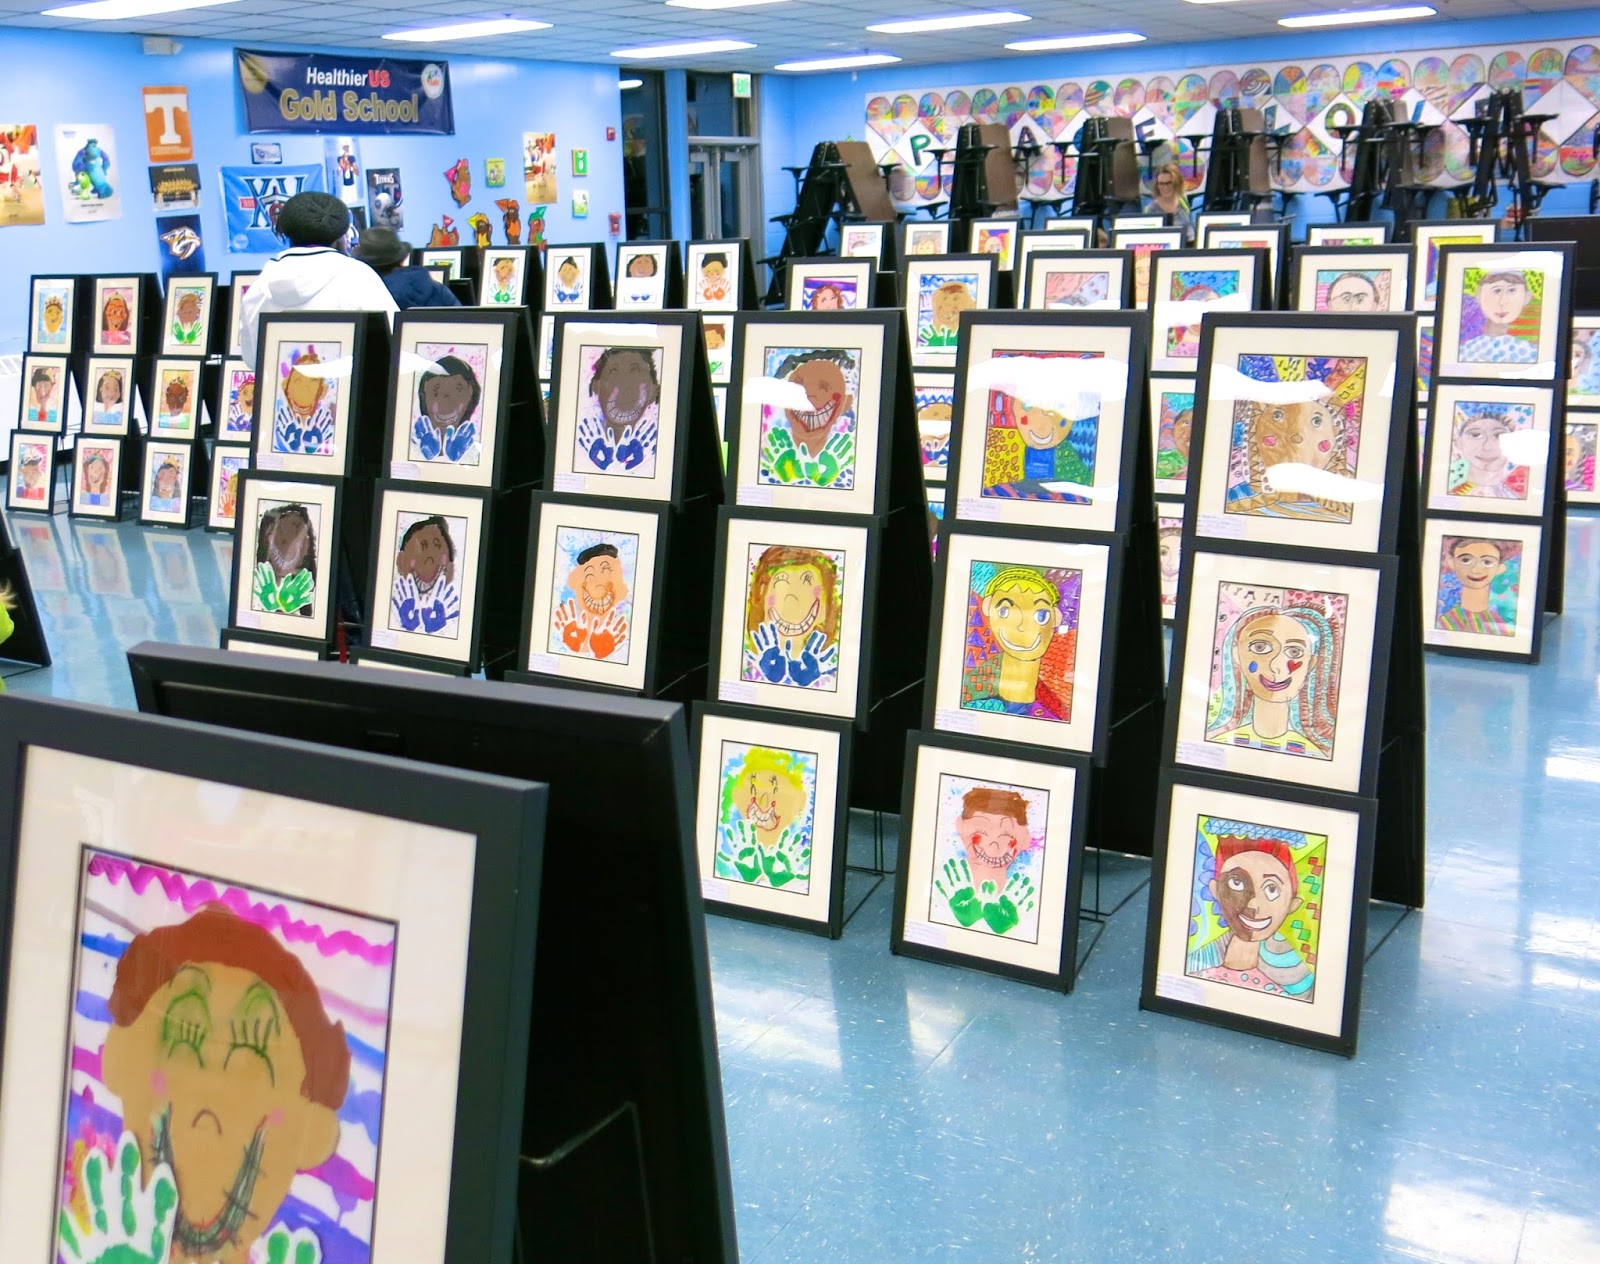
Last Tuesday my school hosted their first ever Artome Art Show and I gotta say, it was FABULOUS! If you are not familiar, Artome is a fundraising company for the arts. To join the fun, you simply call or email Artome and let them know the number of students you have participating. In return, they send large sheets of paper that students can either create directly on or artwork can be added to. Also on the paper is a place for you to add the student's name, artwork title, grade, teacher's name and school. Once artwork is complete and the form is filled out, Artome provides you with a UPS shipping label. Slap that label on your box of artwork and ship it on to Artome. Then, two weeks later, THIS happens!
Two hours before our art show/winter program/book fair (we specials folks like to do ALL THE THINGS, ALL AT ONCE), two sweet Artome dudes showed up and set up our displays. The artwork could be organized anyway I asked...so I decided to mix it up a bit. Instead of having all kindergarten artwork together, I had them mixed with other grades. This added variety and also made it so folks went through the art show more thoughtfully.
Here's how the fundraiser portion works: Artome is paid $19 for each framed piece. Whatever amount you up charge is what you take. For example, we asked for $25 for each piece making our profit per work of art $6. We have about 320 students at my school and sold over half of the works of art. We did really well!
I think next year we will do even better. Our program was for our 2-4th grade kids so many of our younger students were not in attendance. If there were, I think we would have sold even more. And, actually, we have...Artome allows a week of post-show sales for families who missed the show.
Any unsold pieces will be removed from their frame and sent back to me to return to the artists. Also, this was so helpful: any artwork that was not completed in time to be shipped could still be framed the day of. That helped me out tremendously with my friends who were absent on art days. Overall, it was a seamless fundraiser that resulted in happy artists and parents. Who could ask for anything more? Love to hear if you've given Artome a go and what your experience was like.
I'm one of those horribly annoying people that get a whole bunch of ideas at eleventh hour. Prior to said eleventh hour, I tend to suffer from severe Idea Constipation. How do you know if you suffer from Idea Constipation? Warning signs may include: slack-jaw staring at walls for extended periods of time; the watching of exactly three dozen cat videos on YouTube; the sudden urge to clean an entire kitchen just to avoid real work (this is only in the most extreme of cases as everyone knows that cleaning a kitchen is STUPID.) I am a victim of Idea Constipation. Only at the very last minute do I have exactly One Million Ideas and little to no time to bring them to fruition. I like to call this the And-And's (mostly because Idea Diarrhea sounds disgusting) and I suffered a severe bout of both just prior to our thematic school-wide art show.
You see, once I settled on the idea of having a kid-created 1950's diner, I got the idea to have them create diner signs. Of course, this was just mere weeks before the big day and we were in the thick of finishing projects (I seriously had one fourth grade class inform me, "We CANNOT start any new projects, Mrs. Stephens! We have so many to finish!" They are so bossy, y'all). So, like, we had no time atall (please read that last word with a British accent as that's the only way it is meant to be read). Then I got this IDEA...
Due to reasons too boring and annoying to share, our end-of-the-school-year statewide standardized testing was cancelled just days before it was to be given. This meant that our third and fourth grade teachers, who had planned to test all week, now had to scramble to come up with lessons for their students. Well, that's when I stepped in. I volunteered to make them a video of this project for them to show and teach in their classrooms. This benefited me because the kids created these fab-o signs and the teachers because it gave them something fun and educational to do with their students. SPECIAL SHOUT OUT to my awesome colleagues who took on the challenge of being the crazy art teacher for a day. I seriously work with the best people.
And just look at the results! These classroom teachers are giving me a run for the money. I provided them with the supplies and just a day later, they delivered the kids' masterpieces to me.
Of course, we then had to use puffy paint to neon-ize our signs. That final step we did in my art room...because I like to watch the usage of puffy paint like a hawk. Kids love the puff...almost too much.
In the video, I had the chance to chat with the kids about the history of diners and it's influence on artists and their work. We chatted about Edward Hooper.
George Segal and his diner sculpture.
Local and contemporary artist Diane Davich Craig and her paintings of, among other things, diner signs.
Not too far from our school is the world famous Loveless Cafe (those of you that visit Nashville, don't be fooled into thinking that Loveless is in Nashville. It's actually quite far from it and usually has a line that snakes around the building). Many of my students have been there and recognized the sign. The video worked well to introduce the concept of diners to them, artist influence and get them excited about the art show AND making their own sign!
The kids and their teachers were very proud of their work. A couple of the teachers even made their own signs along with the kids.
I kinda wanna make one too.
And I really love how the parent volunteers paired the student's diner signs with the diner ads they created (another eleventh hour idea).
In other news, in order to prevent another bout of Idea Constipation, I've already started plotting and planning the theme for next year's art show!