skip to main |
skip to sidebar
Hey, friends! If the winter weather is causing you to have brain freeze and you are stumped for ideas on art lessons, I've put together this HUGE blog post filled with my favorite winter art lessons. Many of them also include instructional video...this way if you are out sick or find yourself feeling a little under the weather, you can simply have me be your art teacherin' sub. All I ask in return is that if you post projects that your students have created, inspired by my lessons, you give me a shout out. It's always nice to give art teachers credit for their lessons...especially when they share them for free as I'm doing here. I also LOVE to reshare your projects on my Instagram which would gain your more followers. So it's a win-win!
The Heather Galler coffee cups were created by my second graders some years ago and they are still a fave lesson of mine. You can find the details here.
A HUGE hit with my students and other art teachers has been this Jen Aranyi inspired winter landscape. For this lesson, I created a video to share with you. My third graders really loved this project.
I really am a sucker for black glue and chalk pastel, y'all. Each one of these fourth grade pieces was a stunner...and such a great lesson on using a new supply and color theory. Lesson with video here.
This second grade selfie lesson introduced my students to the world of printmaking! We had a blast creating these prints for our hats and mittens. Complete lesson here.
In need of some lessons for the kindergarten crowd? This one was a hit with mine...video lesson here!
Speaking of kindergarten...here is a winter landscape lesson that I've done with them for years. It teaches tint and shades as well as collage. You can find it here.
My first graders were big fans of this project! Video and lesson details right here.
As my fourth graders wrap up this lesson, lemme tell you, the results have been amazing and it's quickly becoming my new fave project! More details with video here!
Mural making is one of my fave things to do during these winter months. It brings us all together! You can find the details on this one here.
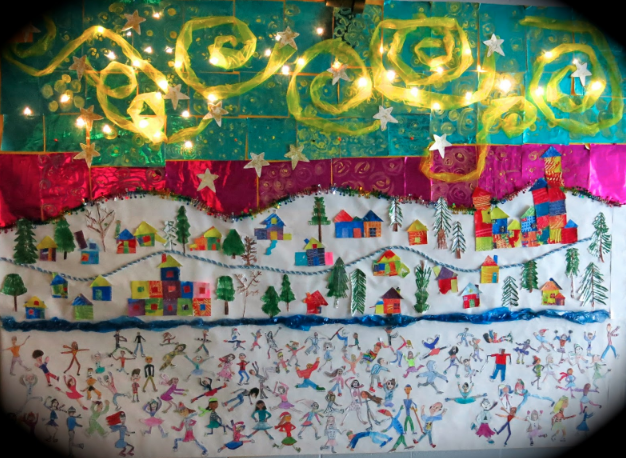
This light up mural with ice skaters drawn by my fourth graders here.
And our very first mural collaboration from a while back, right here!
Printing on fabric, making clay beads AND learning to sew?! YES this was a winner with the kids! All the details here.
I LOVE metal relief projects...they are always a show stopper. I created these with my fourth graders a while back and they were a hit. Lesson here.
Need some more lessons? Check out THIS POST with five quickie winter projects!
Also, be sure to check out this blog post for even more fun winter art lessons. Stay warm out there!

Read more »
I need y'all to say a lil prayer for me...as we are heading into a FULL week next week! That's right. While some of y'all teacherin' friends work a partial week, we are in it to win it, truckin' all the way until 10am on Friday morning. If I make it if the kids make it that long. Every last one of us is runnin' on fumes and hot chocolate at this point. BUT...we still makin' some masterpieces!

None of which I've had two seconds to blog about...so that's super awesome. My goal is to post a bunch of winter-themed lessons on this here blog super soon. AND I do believe I've been saying that for months but things have been cray around here. I'm inching closer to being finished with my new book (preorder here, eep!!) and having some time to actually create and catch up on this here blog is quickly becoming a reality. I'm so happy for it! In the meantime, if you follow me on IG, then you've seen a lotta these lessons already. I've even shared the details in my stories. But the plan is to create real live videos for you to share with your kiddos over my break. So...stay tuned.
One project I'm stoked to share are these here super cute first grade penguins. The kids and I are loving this lesson and learning so much! Bingo daubers were used for both this lesson and the third grade abstract name design shown above.
Since kindergarten is wrapping up their snowmen this week, I had to wear this here snowman dress, right? I found it on Amazon and it was both inexpensive and super cute, if I do say so. And I just did. But not as cute as these guys...
These were all lookin' pretty adorable but adding the chalk around the edge and to the cheeks totally took it to another level.
That night, my good buddy Tamara hosted a craft night...and I made this cute lil toy soldier! She is the most amazing host. We had a wonderful dinner WHILE creating. Thankfully she had the templates for the solider all cut out so it was just a matter of picking my colors, tracing and cutting. She even had a frame for each one of us. I was pretty excited to finish...and have him match my bonus room so well.
Another week, another tree skirt. It's the most tree skirtin'est time of the year!
These second grade chalked background for an upcoming Wolf Kahn-inspired landscape has me really excited. Yet another lesson to share with y'all soon!
I have found that all the shops have the best tacky holiday sweaters right now! Target is where I scored this lil number and I love it.
Speakin' of love, that's what I feel when I stare at these fourth grade beauties. Stay tuned on this one, we'll soon be adding these to our snow globes.
And would you look at that! We got all fancy for our nephew's wedding this weekend and I just had to share...we clean up pretty good.
Read more »
So this lil repousse snowflake by my fourth graders just might be the fastest art project we bust out this year. Not that I'm bragging. I do believe those canvases coulda used a lil more work. However, I needed something short, simple and fun after our super long Mexican Sun/Moon weavings and this did the trick nicely.
Just like this third grade paper cutting project, we discussed Mexico and the art of papel picado. I stumbled upon a couple of prezies on the art form which was great to share with the kids. I also have several examples of papel picado hanging in the art room so they could get the idea. So our first course of action: Cut some paper designs (I hesitate to call these "snowflakes" as they don't exactly meet the criteria but whateves).
Once the kids' designs were cut, they brought them to me where I placed them on a piece of 5" square matte board that I'd ready cut and doused in spray adhesive. Another hit of spray adhesive and a piece of 7" square aluminum foil was placed atop. The kids were instructed to return to their seats, fold the excess foil to the back and massage the surface with their finger tips only (no nails, y'all) until their design appeared. With the long winded chat and all that work, this took us about an hour.

In preparation for the following class, I'd spray painted each of the boards very lightly with the cheapest spray paint I could find (the dollar a can stuff from Home Depot is my jam). When the kids arrived, they were instructed to use 000 steel wool to burnish off the spray paint. They were thrilled when their design started to appear. That took them no more than 7 minutes. If this process looks vaguely familiar, I've done it with leaves as well. If you follow this link, you'll get a better glimpse at the step by step process.

From there, the kids were each given a 6" square canvas. They traced the placement of their piece (I showed them an example of a diamond placement or a square. Guess which one was more popular?) and then commenced painting. I limited their palette to the cold colors (these are kinda sorta snowflakes, y'all. So we went with a winter palette for that reason). The only instructions I gave was a reminder to clean that brush between color switching and to keep the painting abstract (lines, shapes and color). The last 30 minutes of the second art class were spent quietly painting these canvases. Once dry, I added a touch of hot glue to the back of the repousse and attached. Boom! Done! Ready for hall display.

And now, on to the giveaway! Check out this huge pile of packages that I took to the post today. I hope y'all have been enjoying this giveaway as much as I have. It's been super fun. And, to be honest, what I've loved the most is reading all of your comments. So often, it's hard to leave comments on a blog or, quiet honestly, it's just easier not to (I'm very guilty of this so I totally get it). Which means, at times, I feel like I'm talking to myself because I don't often hear from y'all. So having this exchange with you has really meant a lot to me, thank you so very much for playing along.
So, what's up for grabbies today...?
All sorts of glorious vintage goodness! Two lovely vintage alteration booklets, two packets of vintage buttons, a little needle booklet and an iron-on embroidery pattern set. So many pretties in one giveaway, ya'll! Vintage-lovers, this is right up your alley!
Here's how you can enter to win...
1. So, it turns out that A LOT of y'all want that needle felting kit! My question to you is...if I were to sell them, would you be interested? Would there be any other artsy kits you'd be interested in?
2. Don't forget to add that email address, kids. Tomorrow is THE LAST of the giveaway goodness, eeee!
And the winner of that needle felting kit?! Tracy Evans! Congrats, buddy!
Read more »