Showing posts sorted by date for query weave cord. Sort by relevance Show all posts

Monday, July 9, 2012

In the Art Room: Weaving, The Final Chapter

When weaving with children, you might be surprised to find that the boys enjoy this activity the most...as long as you don't call the completed weaving a purse, that is. 
 As I wrap up this weaving mini-series, I thought I'd leave you with the following: a little bibliography, weaving finishing touches and my secret to getting these pouches completed without taking half of the school year. In case you missed, here is Weaving, Part 1: Getting Started; Part 2: Learning to Weave; Part 3: Removing the Weaving and Part 4: Weaving the Cord.
My Weaving Bible: You Can Weave! By the amazing Kathleen Monaghan.
 This week, I'm currently at the world's best arts professional development: Tennessee Arts Academy. Several years ago, the author of You Can Weave!, Kathleen Monaghan, was a presenter and she was incredible. Her book is full of clearly written and photographed projects, tips and tricks. I can't recommend it enough.
The ole standby: Goat in a Rug
 I don't just weave with fourth grade, I begin weaving with first grade. You can see their completed weavings here. And the book I use to introduce them to the world of weaving is this one, Goat in a Rug. It's told from the perspective of the goat whose mohair is used by the Native American, Glenmae, to create a rug. It's the perfect balance of factual and funny.
Sometimes the best books are the ones found in the dollar bin, like this one, Grandmother's Dreamcatcher.
 With my second grade, we create quasi dream catchers. The kids love this book as they sympathize with with the main character who is cursed with bad dreams. The author does an excellent job of explaining the origin of the dreamcather and it's believed powers.
This is like the older kids' version of The Goat in the Rug: Weaving a Rainbow.
 This book is an excellent one in that it re-explains to the kids the process of creating wool yarn. This year, we had fun reading this book and dying our own wool yarn with Kool-Aid ice cubes during our science experiment time.
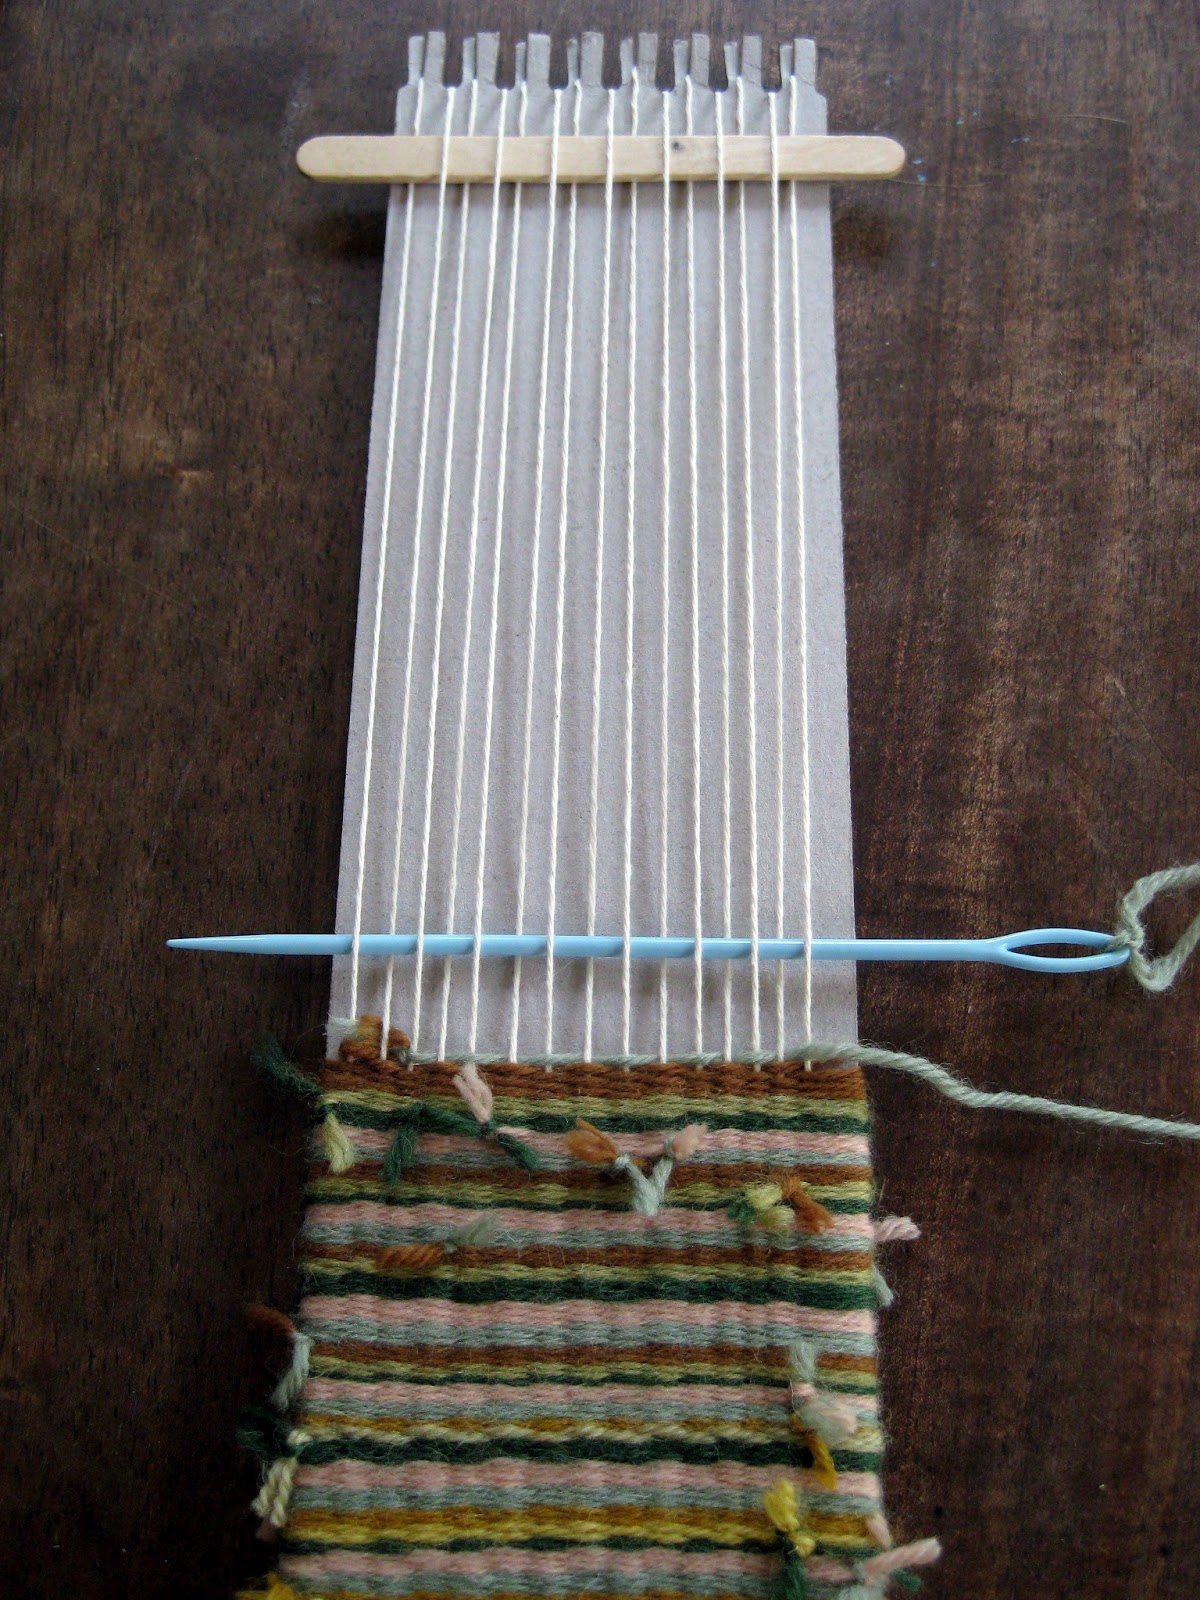
 Now, let's talk weaving finishing touches: Getting rid of that pesky warp tail. To do this, the kids will need a needle (I don't recommend this kind but it's all I had on hand. My kids use 3" plastic or metal needles) and a small folded piece of paper for a needle threader.
 We call the small folded paper the "hot dog bun" and the thread the "hot dog". Put the hot dog in the bun and slide the bun into the eye of the needle.
 Now pull the hot dog bun off of the hot dog thread and, viola!, you have just threaded a needle. No wetting the end of the thread and spreading nasty germs required.
 Now weave your needle in and out of your woven pouch until you run out of warp thread. Pull needle off and you're done. No knotting needed.
 For button sewing, I usually have a sewing circle. The kids pull their chairs up and we sew the buttons on step by step. We begin by threading and knotting our needle. Find a good place on the pouch to pull the needle through like you see in the above photo.
 Slide your button down the needle and thread. Sew a couple of stitches to secure the button. By the way, you'll notice that in the photos of the kids pouches, we use pony beads instead of buttons.
 Now sew a double knot in the back. To create a button hole, just separate the weft threads on the flap and force the button through.
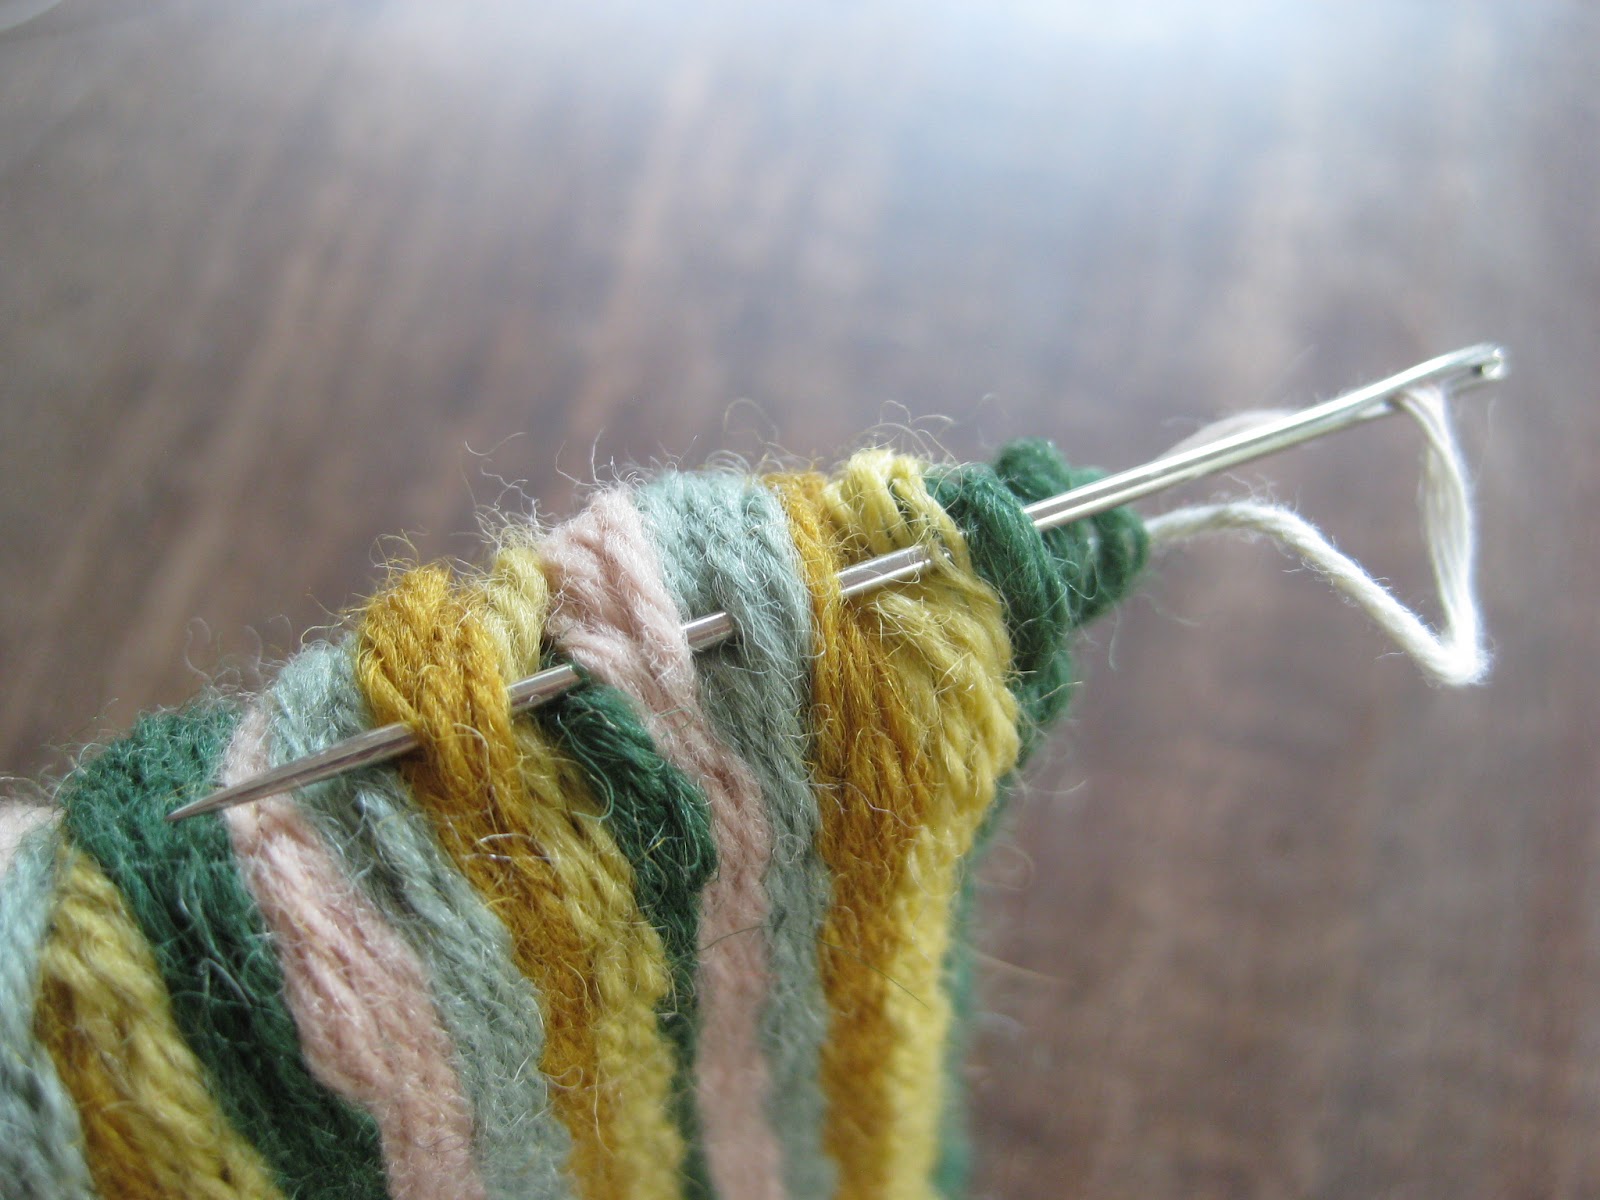
 You can have the kids go about sewing the cord two ways, on the side, like I have done, or across. I began by threading and knotting my needle and pulling the needle through the cord, as shown above.
 Secure the cord onto the pouch with a couple of stitches. If you are sewing the cord across, you'll have a little more sewing to do.

 I will say that the end of this year sneaked up on me and I was in a real bind. The kids did not have time to do the sewing themselves as they had done in the past. Thankfully, I had some very kind parents that took the sewing task on themselves. If you don't have a Mom Army, you need to get one. They have been an incredible source of support in my art room.

Now, just how do we manage to get these pouches woven in 30 minute art classes? After I am confident that the kids understand how to weave, I let them take their weavings home. That's right, they leave my room with a giant zip lock bag with their loom, needle, twenty strands of yarn and a note home that reads something along these lines:

Dear Fourth Grade Students and Guardians, I would not be sending this weaving kit home with you if I did not believe you were mature enough to handle the responsibility. This weaving is not homework so work on it when you have the time. You are to bring this weaving with you each time you have art class. If you forget your weaving, you will receive one reminder before a phone call will be placed. If you lose your weaving, your needle or any part of your weaving kit, it will not be replaced. Have fun and weave!
I know what you are thinking: that would never work for me! Well...it doesn't always work for me either. There's always the kid whose dog devours their weaving, whose kid brother flushes it down the toilet, whose mom accidentally throws it away. So, you make exceptions. You quietly slip those kids a new loom or needle and tell 'em not to spread the word to their buddies that you are actually a softie.

I also promise a grand reward to those that remember to bring their weaving back the following art class (a blow pop is the preferred dangling carrot of choice). But I only do that once. After that, the kids become very competitive. "I have four inches woven, how many do you have?!" Which morphs into, "I finished my flap, what about you?!" This positive peer pressure pushes the kids toward finishing their weavings. 

It's not a perfect system. There are some kids that don't have time or care to weave at home. And that's fine. They can work on their weavings during in-between-project time in art class. As for the early finishers, the kids get to keep their looms and needles, so they can rewarp their looms and begin a second weaving. This year, I had one student that wove five pouches (with cord handles!) in her spare time.

I have been doing this weaving project with my fourth grade students for many years. This is a project they look forward to since the first grade. I believe that excitement is what makes this weaving unit so successful. 

I do hope you've found this weaving series helpful. Thank you so much for sharing your ideas. I look forward to hearing more from you!

Thursday, July 5, 2012

In the Art Room: Weaving, Part 4

Finished weaving, complete with cord and coordinating background.
Now that your weaving is finished (ahem, you did finish it, right?), let's get to everyone's favorite part: cord weaving. My students as young as second grade absolutely love weaving these cords. They weave mounds of them, fashioning them into necklaces, bracelets and belts.

If you need a refresher course on the woven pouch, you can catch up on that with Weaving, Part 1, Part 2 and Part 3.
For this project, you'll need:
  • two colors of yarn, four strands of yarn each, all of them approximately 24" in length. 
  • thick cardboard
  • scissors
  • pencil
Begin by cutting out a circle. I traced around an old plastic lid with a 4" diameter. 
Make four equally spaced marks on your circle like a compass. We do a short geography lesson in class while marking our loom.
Make four more marks in between your North, South, East and West.
Make eight marks in between each of the aforementioned markings. You should have a total of sixteen equally spaced marks. Cut them. 
At this point, I ask the students to bring me their looms and I stab the center of their loom with a pair of pointy-end scissors. While I'm loom stabbing, I send them off shopping (our art room word for supply-gathering) for yarn. Students will need eight strands of yarn, four of one color, four of another.
Have the students tie all eight strands of yarn into an overhand knot like that shown above. Push the knot through the hole in the loom just enough so that only the knot is peaking out from the bottom and the rest of the yarn is on the top of the loom.
With those long strands of yarn coming through the hole in the loom, feed them through the cut notches you made. Set your loom up like a compass. There should be a vertical "X" and a horizontal "X" of yarn.
To weave, you will follow the same three steps over and over. Begin with vertical "X". Using your left hand, remove the bottom left string and place it on the top left side of the loom. Now your "X" should look like a fork.


See the fork? Easy.

Now using your right hand, begin at the top right side and remove the right string. Place it at the bottom on the right side. Now you should see your "X" again.
It should look exactly as it did a moment ago. If the "X" becomes off-center, do not worry. You can correct that by shifting the strings on your loom if it bothers you.
I promise I am not flipping you off, I'm trying to point you in the direction that you will turn your loom: clockwise. Once you have turned your loom clockwise, you will do the same steps over again, this time with the other yarn colors in the "X". And that's it. Really. You'll repeat this pattern continuously until you have completed your cord. We have a little poem in art class that we say to help us remember the weaving instructions: Right string to the top, Left string drops, Turn it like the hands of a clock.


Now let's talk trouble shooting. As you are weaving, your cord will come out of the bottom of the loom, shown in the photo below. The long strings around the loom can sometimes become tangled, shown in the photo above. To prevent tangling, I usually have my students stand while weaving. This allows the long strings to hang straight and not tangle. If they do become tangled, pull one strand of yarn out of the tangled mess at a time. Do not run your fingers down all of the yarn in hopes of combing out the tangles. It will only make it worse.
After just five minutes of weaving, you should see your cord coming out from the whole in your loom. Yippie!
More trouble shooting: if your cord keeps popping out of the hole as you weave, as shown above, tug on it gently from underneath the loom to bring it back down, as shown below.
The entire time you are weaving, it's a good idea to tug gently on the cord to keep it from popping up.
How do you know when you are finished? When the shortest of the eight strings is no longer long enough to make it to one of the notches. You can see my peach colored string at the top is now too short.
Taking it off the loom is very easy. Just remove the strings from the notches and pull it through the hole.
Viola! A finished cord! Often the kids will ask if they can use strands of yarn longer than 24" so they can create longer cords. I have found that this causes a lot of tangling so I try to avoid the question by changing the subject, "Oh, look, a unicorn riding a rainbow!"
Depending on the time, I'll either show the kids how to sew in their cord or have one of my awesome mom helpers give us a hand. Simply feed a knotted strand of yarn through both ends of the cord...
And attach with a couple of whip stitches. The students are give the option of having the cords sewn on the side like mine or across. Most boys tend to go for the cord on the side as the across one looks a little too purse-y for them.
And there you have it! Because I've thrown so much at you today, I thought I'd do one final installment of this weaving series. In that, I'll show you how to sew on a button and hide that pesky warping tail. I'd also love to share with you my favorite weaving books and how I manage to get these pouches woven in the 30 minutes of class time that I have. Yeah. 30 minutes. We have Fingers of Fire! Chat with you soon.

Tuesday, June 19, 2012

In the Art Room: Weaving, Part 2

Woven pouch created by one of my fantastic fourth graders.
Hello, crafty kids and grown-ups alike! Today I am going to show you how to add a flap to your woven pouch. If you've no idea what I'm talking about, you can quickly get caught up to speed by reading Weaving, Part 1. I do hope you'll join in on this weaving adventure. Ready to start? Okay, let's weave a flap!
You know you are ready to weave the flap when your weaving is at your desired height. I tell the kids that their weaving must be between 4-7", no taller, no smaller. Once there, you might want to trim those pesky pieces of yarn you tied together so your weaving looks a little less, er, hairy. The above is my trimmed-up, desired-height pouch.

For flap weaving, you will only be weaving on one side of your loom, not all the way around as you have been. Your first step will be to pick a side to weave your flap on. It does not matter which.
For pouch weaving, you will need to eat a delicious popsicle, stat. Preferably something chocolate. Rinse well. Weave your popsicle stick into your weaving, making certain to weave the opposite of the previous string. See above.
Now rotate your stick so that it lifts up every other string. Simply slide your needle into this string tunnel. This is where the kids Freak Out:
"What?!"
"Why haven't we been doing this the whole time?!"
"That is sooooo cool!"
Pull your needle all the way through so there is no excess yarn just like above.
Flip the stick down and use it to pack the weaving down. This means no more fork to pack the weaving. The kids like to refer to it as the "weaving guillotine". Where do they get this stuff?
Slide your guillotine, er stick, to the top of the weaving. Do not remove the stick. If you already did (tried to jump ahead, didn't you? Humph!) just reweave the stick back into your weaving. And don't do that again.
Remember, we are only weaving on one side of the loom. This means our needle will be going back and forth across our loom instead of around the loom. So, for this next step, you will not be turning your loom over but making a u-turn and weaving back. Notice I am not using the stick (I'll explain why in a moment). Be certain to weave in a pattern that is the opposite of the previous string.
Pull yarn all the way through at an arch. This will prevent some terrible thing called Draw In. More on that shortly. Slide your weaving stick down and pack the yarn.
Okay, if you smarties haven't figured it out, here is why you cannot use your stick when you are weaving in the opposite direction: you will unravel your weaving. This is why you can only use the stick when you are weaving in one direction. Sometimes the kids will draw an arrow on the stick so they know when to use the stick.


Ewww, this is bad! This is that dreaded thing called Draw In. This happens when the weaver is pulling too tightly. The year before my fourth graders tackle this weaving, we create a tapestry weaving. That's fancy talk for weaving on one side of the loom. This gives them lots of practice at avoiding and fixing draw in. You can see those weavings here.

The best way to avoid draw in: don't draw in. Stop pulling so hard when you are weaving back and fourth. Pull the yarn at an arch, like I showed earlier. The best way to fix draw in: remove it. That's right, unweave the unwanted. This might leave the end warp strings on the left and right loose making it difficult to avoid draw in again. If you notice that, turn your weaving over, pull up the slack on those strings and tape them taunt. Flip your weaving back to the flap side and resume flap weaving. Fleaving. Wlapping. Call it what you like.
And viola! Finished flap! I tell the kids their flap should be around 2" in height.
A sunglasses holder by a fourth grader.
Feel pretty good? Easy enough, right? Feel free to ask questions if you've got 'em. Next week I will show you how to remove your weaving and add a button. From there, we'll weave a cord which is the kid-crowd favorite. Happy weaving!

Friday, June 15, 2012

In the Art Room: Weaving, Part 1

Woven pouches created by fourth grade artists. You can see more of their masterpieces at our school-wide art show here and here.

Since I shared with you photos from our art show, I've had several questions about the woven pouches that were featured. Because this project is so easy and fun, I thought I'd share it now that the kids are out of school and getting a little...well...restless. It's the perfect summer what-can-we-do-now-? craft.

In the art room, this project has become a rite of passage for my fourth grade students but can easily be created by kids as young as second grade.  Because this craft involves multiple steps, I've divided it up into four posts: Weaving Part 1: Getting Started; Part 2: Weaving the Flap; Part 3: Removing the Weaving and Finishing; Part 4: Weaving a Cord

Please, fellow art teachers and parents, leave comments below on how you teach this lesson differently. And, of course, questions if you got 'em. Have fun!
 Supplies: 
  • Scissors
  • Tape
  • a loom. I purchase ours through Sax but you can create your own with thick cardboard.
  • Thin cotton string. This was bought for a couple bucks at Walmart but in a pinch, you could use yarn.
  • Big-eyed needles. Again, Walmart would carry these in their craft department.
 Preparing your loom:

These looms that I purchase through Sax have notches in them that are too far apart. When you weave with them like this, it creates a pouch that is a little too loosely woven, in my opinion. So I have the kids cut the part that sticks up (we call them "teeth") in half. It's a struggle because the cardboard is thick and there is some moaning and groaning but they can do it. 

If you are creating your own loom from cardboard, you will want to space your notches about 1/4" apart. I'm not really into exact measurements, so I say just eyeball it. However, make sure that you have the same number of notches on the top as the bottom.
 Warping your loom:

Warping your loom is the process in which you are putting the string on your loom that you will weave over and under. To do this, start at one corner of your loom and tape your warping string into place. I have the kids put the tape at the bottom of the notches. This will prevent the kids from accidentally weaving over or under this small string.
Now begin wrapping the warp string all the way around the loom. For example, from the taped end, go down to the bottom cut notch, wrap string around the back and up to the top notch and then go to the bottom again. You should have strings on both sides of your loom, making certain not to skip any of the pre-cut or notches-you-cut.

While you are warping, keep the string attached to the cone. I do not allow the kids to cut the string from the cone unless I have checked their loom. If they have skipped a notch, this allows them to go back and fix it without wasting any warping string.
 Once you've checked the loom and are certain no notches were skipped, cut the string and tape it down. Again, tape as close to the notches as possible. Use your creepy bending finger (shown above) to scoot those other warp stings over to tape the string underneath.
 Weaving:

The process of weaving is that of going over and under the warp strings in an A-B pattern. The string you weave with is called the weft. No long needle like this one? Tape your string to the end of a pencil or skewer stick.
 Pull yarn through until you have left behind a 1" tail. Turn the loom over and weave over and under on the back. Once finished with that side, turn loom over to the original side.
 Now, this time, weave the opposite of the previous string. For example, in the photo above, I wove over and under because the string underneath was under and over.
 You know you are weaving correctly when you see something like this. Looks a little like the netting of a tennis racket.
 But it's too loose. Do you see all of those white warp strings through your weaving? Well, you don't want to. Use a fork to pack down your weaving until those warp strings disappear and all you see are the weft strings.
 Adding a new weft: 

Okay, this one is debatable. Technically, you are not to tie two stings together but overlap the strings to add another. Or something. But at this point, if I throw one more piece of info at the kids, they are likely to have an aneurysm. So, we simply double knot tie a new string to the old, snip the "tails" and keep on weaving.
 Incorrect weaving: 

How do you know if you are weaving incorrectly? Well, you'll see a lot of vertical warp strings, like you see in the yellow portion of my weaving above. This happens when you are not weaving the opposite of the previous string, but weaving the same over and over again. If you see this, you have to take it out and redo.
 Weaving away...

I tell the kids that their weaving must be somewhere in between 4-7" tall. This allows room at the top of the loom for weaving the flap and tying off the weaving. This should keep those kiddos all tied up (heehee, tempting, right?) until next week. I plan to take mine on an upcoming trip to keep me occupied.

Remember, you are weaving on both sides of the loom, front and back. Ya hear?
 So stay tuned!

Next week, we'll learn how to weave that flap. Again, feel free to leave any questions or comments and happy weaving!