Showing posts sorted by relevance for query bingo daubers. Sort by date Show all posts

Tuesday, March 20, 2018

In the Art Room: Heather Galler Inspired Bouquets with Second Grade

 As we draw toward the end of the school year (okay, I know I'm early BUT in "art teacher years" a couple of months means time for just a handful of projects until the end!), I am thinking about ART.SHOW. Like, 24/7. And my art show isn't until MAY 15TH! I'm trying my hardest NOT to be my usual procrastinating self. So I've been pulling out grade level artwork and seeing what masterpieces we have to hang (we hang everything...if you search "art show" in that search bar on the right, you'll get a taste of our art shows). In doing so, I noticed that my second graders didn't have that one BIG masterpiece. So I pulled out the bingo daubers (yet again) and some huge tagboard and we created these! We did the drawing portion in the first 30 minute art class and we are slowly adding color. These are not finished yet...but the lesson has been so fun that I thought I'd share it with you as we make progress. Here's the lesson video:
For this lesson, we are using our bingo daubers filled with slightly diluted India ink, oil pastels and liquid watercolor. To finish, we'll simply be painting the flowers and the backgrounds...with the option to add color to the vase and table. I rather like the black and white because I find it to be a beautiful balance with all of the color but I'll let the artists decide.
 After our first 30 minutes. It wasn't really a guided drawing...more of a "here's how you can draw some flowers and here's how you can draw some vases and patterns...go to town." We never use pencils first, we just go for it. If they painted something they didn't love, they had to wait until next art class to try again on the back of the paper. This tag board was thick enough for them to do that. The reason I have them wait is because they usually forget about it as they move on. Also...if one kiddo starts over, THEY ALL WANNA START OVER. So, I nip that in the bud.
 Today we began adding color with oil pastels and watercolor paint. It's a big task as the papers are huge. We literally spread all out over the room because only two to three kids can work at a table at a time due to the size. 
 I don't have a favorite liquid watercolor, do you? I find that they are all pretty fantastic. Except the fluorescent ones. They universally stick. 
 I don't dilute my liquid watercolors much...I love how vibrant they are!
I got the great idea from Katie Allain (@mrsallainart on IG) to put my watercolor paint in these color coded cupcake liners to eliminate the guesswork! 
 I'll be sure to do a follow up post on these once complete. I'm so excited! They make my heart happy. 
 Also...this is now my fourth bingo dauber project! The only grade who has not worked with them is fourth and I totally have a project lined up for them using these bad boys. They my fave this year!
 
Are you a bingo-dauber-aholic like me?! I wanna know what you and your young artists have created!

 photo signature_zpsd10b3273.png

Monday, January 2, 2023

Favorite Winter Projects for After Winter Break!

Happy New Year! If you are anything like me, you've spent ZERO time thinking about returning to school next week. Like, I mean, my brain has been switched to ANYTHING-BUT-SCHOOL mode. As it should be, I say. Until, that is, the end of break sneaks up on me!
So to put your cute little head at a tiny bit of ease, I thought I'd share my favorite winter lessons here in this blog post. Be sure and tap the highlighted link to each as many feature the full lesson WITH VIDEO. For free, of course. Cuz I'm a giver, y'all. 

Let's start off with some ambitiousness, shall we? If you are feeling up to it, might I recommend this tree weaving lesson? In my book, Stitch and String Lab for Kids I share how to create the evergreen tree weaving but you can also find the details here, just flip the plate upside down!
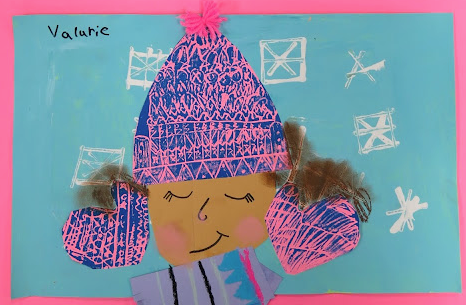
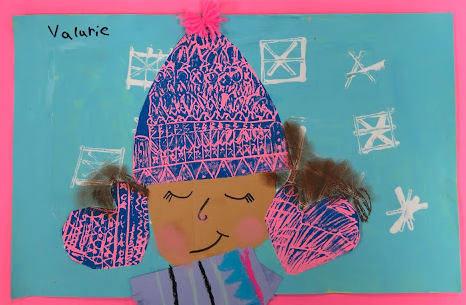
A lesson that my students love (and everyone who gives this one a shot!) is this Jen Aranyi-inspired winterscape! We create ours on cardboard pizza rounds found at Gordon Food Service (I'm lucky to have one down the road) but they could just as easily be created on white paper! If you are on a cart and want less mess, try doing the sky with the marker/water method, found here!
Want to introduce your students to printmaking? I love this printmaking lesson that could easily be done with kids of all ages. Okay, look, I'm not gonna lie: I often do the same lesson with multiple grade levels. It's much easier with my 30 minute classes that come back to back (with up to 8-9 classes a day). So, go easy on yourself! If that's what you do, just know that I'm right here with you! Lesson details here. 
This fun lesson introduces students to a wide variety of media from bingo daubers to chalk to...watercolor! Lesson details with video right here!
I did this project with my first graders and they always love it! We work big, 12X18 paper background but you could definitely work smaller, like even half that size. No bingo daubers? Try Sharpies!
This lesson for my kindergarteners is similar to that of the penguins which leads me to my next idea: do similar lessons! Less supply prep and less worry on your part. This year I have made an effort to clump lessons by supplies. I'm too old to be runnin around like a waitress, y'all. Lesson with video here. 
If you feel like tucking into a long lesson, this one might be for you. You know, there's something to be said for long lessons...it means less planning. You could shorten it, however by just making the snowglobes much smaller! Lesson with video here. 
As soon as we return to school, I plan to have my students dive into clay and create clay mugs! Our tradition has been to drink hot chocolate from our mugs once complete. This was inspired by an art lesson we did where we created hot chocolate collages! If you have no kiln, creating these collages and then celebrating with a hot chocolate party may be an idea for you! 
Here's a look at our mugs! Every grade level, except kindergarten, does this every year...so many of them have a collection of mugs at home! We also do another clay project but this one is easily their favorite. Lesson with a couple of videos here.
It's the year of the Rabbit! Did you know? If you need some quick lessons for your younger students, I piled a bunch of them in this blog post, check it out! 
Need even more cuteness? Here's another lesson that your kids WILL LOVE! My students had so much fun with this one and couldn't wait to take their kittens home. Lesson with video right here. 

Okay, need more ideas? Well, I actually have MUCH more! Just visit here where I did a deeper dive into all of the winter-y lessons on my blog. AND if you want to jump ahead and start working on art for Valentine's day, check out this post. See ya soon!


photo signature_zpsd10b3273.png

Monday, February 5, 2018

In the Art Room: Kindergarten Mo Willems Pigeons!

 Need a fast -n- fabulous kindergarten lesson? You might wanna try these Don't Let the Pigeon Drive the Bus creations on for size. In the following video, I demonstrate using a bingo dauber. I know you might not have those to try using either a black oil pastel or a Sharpie instead. This was a two-day lesson for my 40 minute kindergarten art classes. Here you go:
Super fun and easy, didn't I tell you? I love doing guided drawing every now and again with my students. They LOVE it and are always excited by their results. Kindergarten is especially great at just "going with the flow" and not worrying about being "perfect"...but there are always some kids who do stress. That's why, before doing a guided drawing, we always chat about how we are unique people which means we are unique artists who create uniquely! We also love to give a shout out to Barney's book Beautiful Oops.
Y'all know I had to wear my Don't Let the Pigeon Drive the Bus dress
 Each little squawky bird was so different, funny and cute. 
 After reading the book, this was as far as we managed to get. I've gotten a lot of questions on where to find bingo daubers and what to fill them with. I got mine from my art supply catalogs but I've also seen them on the Oriental Trading website. I fill mine with India ink...I don't use any particular brand as all the India ink I've ever purchased has been fine. 
 My go-to oil pastel for projects like this are Sargent's florescent brand. They GIVE ME LIFE. I love how creamy, bright and bold they are. And so do the kids. 
 As for watercolor, you'll see in my video how I set up my trays. Every two kids gets a sponge, a non-spill cup of water (art supply catalogs!!) and my Crayola Mixing Colors watercolor paint. I always order: magenta, red, red-orange, yellow, green, turquoise, blue, blue-violet and purple. 
 I cannot wait to get these hung in the halls!
 I've also been asked a lot recently about what kind of paper we use. I ALWAYS order 80lbs paper and we use it for EVERYTHING. It can take a lot of art: paint, watercolor, collage, you name it. This paper is strong stuff. 
We called these our Party Pigeons...I like how hard some pigeons partied! 
 photo signature_zpsd10b3273.png

Monday, February 26, 2018

In the Art Room: Kindergarten Alphabet Paintings

This kindergarten lesson was so fun for my students that I wanted to share! I even created a video of the process. The beginning of this video will show you how to create your own Texture Rubbing Plates with simple supplies like tagboard and hot glue! Here's the video:
I will tell you some things that I did in preparation for this lesson:

* I made a set of texture rubbing plates, about 6 for each pair of students to share. Having a variety really helped them stay engaged in this portion of the lesson.

* With the help of a fellow specials teacher, I folded the paper and created the grid. This took time but I did it well in advance and I'm so glad I did. 

* When we did the alphabet, I did have "cheat sheets" for them at their tables to share with their neighbors. This way they could look at the sheet as a reference for writing their letters of the alphabet.

* I prepped the bingo daubers with ink. That's what the kids are using...and a lot of my lessons are currently filled with bingo dauber drawings. I'm addicted!

* For oil pastels, we used Sargent's florescent colors and for water color, we used Crayola's mixing colors. In the video, I am using Jack Richeson watercolor as that's what I had on hand at home.
I see my kindergarten for 40 minutes at a time. For the first class, we talked all about texture and added textures to our squares with the rubbing plates.

For our second class, we painted. This was a review as we do a lot of watercolor paint in art with kindergarten.
 On our final art class, we watched a great video on YouTube of the story of Chicka Chicka Boom Boom in song form. It's so cute and the kids loved it. After that, we created two paintings. Our first being these! We simply added our alphabets to our painted papers, so pretty!
 My favorite part was hearing the kids sing the alphabet song as they worked. 
 As soon as they finished, they placed these works of art on the drying rack and got a square paper from the store (what I call my supply gathering area). Then they painted a Chicka Boom painting of all the upper and lower case letters in a heap.
Stay tuned for what we do with these...I'll post a video and lesson right here on Wednesday!
 Just loving these and cannot wait to get them up for Read Across America Week. So time to stop blogging and start hanging!
You'll have to let me know if you give this lesson a go!
 photo signature_zpsd10b3273.png

Thursday, May 30, 2019

2019 Art Show: Glow Gallery!

Hey, friends! Last week, I shared with you the Pirate Gallery, which was one of the three galleries where my student's work was featured at our school wide art show. Today I'm sharing with you our Glow Gallery, the HIT of our art show. Each student had at least one work of art on display with my kindergarten friends having THREE works of art featured. Whew! Here is one side of the gallery with the lights off and the black lights on.
 And here it is with the lights on. Still just as beautiful, says me! I thought I'd take you on a tour of this gallery, complete with lights we used, projects each grade level did and supplies that work the best for black light. So, let's go!
I LOVE going through art shows, don't you?! So much happiness and color, baby, color!
 Full disclosure: This is a spare classroom. I had the luxury of having an entire room to dedicate to the gallery. I spent one entire day with the help of a parent covering the window and setting up the displays. The artwork was simply hot glued to the wall. The best way to do that without damaging the artwork or the walls is to add a flat bit of masking tape to each corner of the artwork on the back. Then add a small dot of hot glue to the tape and stick to the wall. When taking the art down, simply give the work a gentle tug and it will pop right off the wall. 
 My kindergarteners created three pieces of art for this gallery. The first were these clay slab fish. You can find this lesson here and in my clay book
They also made these fun snails from cardboard pizza rounds. They started by painting a spiral with a bingo dauber. Then they added color with fluorescent oil pastels and fluorescent paint (details on supplies in a moment). From there, they were attached to a paper towel tube and antennae were added. So cute! More details on this lesson soon, I hope!
 Some of my third graders made these amazing plaster and paper parrots! I think they are one of my favorite projects from the show.
 Another lesson which I hope to share with you soon...the kids loved making them!
 And they were so striking in the black light. 
But also great with the lights on.
Let's talk supplies for a minute because it's important you use the right stuff. 

* Sargent Brand Fluorescent Oil Pastels
* Jack Richeson Fluorescent Tempera Cakes
* Fluorescent Liquid Watercolor (optional)
* Fluorescent Tempera Paint (optional)

The last two we didn't use...we just stuck with the oil pastels and tempera cakes. But I will be getting the other paints for next year.

In a pinch, when time was running short, we did use fluorescent poster board and bingo daubers for some of the drawings. We did this because I only had one 30 minute art class with the kids before the big day...so we worked with the time we had. I wanted to insure that every kiddo had a work of art in this special room.
On the night of the art show, we did have a couple of teachers at the door to act as Black Light Bouncers as I knew this room would be busy. I didn't want a crowded room to ruin the experience for the kids or have any artwork potentially be damaged. We did have some glow face painting happening which was also fun for the kids. More details on all of the crazy things we had happening at our art show in a future post.
 Let me walk you thru who made what! By the way, each of these 2D works of art took only an hour (or two 30 minute art classes for me) to complete. 

Some first graders created the octopus (by following along with here) while some of my first graders drew the crab...a guided drawing lesson of mine. I'll be sure to share that with you too. I have a lot of sharing to do! 

Some second graders created the GIANT angel fish by following here while others created the octopus on the neon paper due to time limitations. 
My third graders made the sea turtles and my fourth graders made the sea horses.
 Now, let's talk lighting because that is the true key. It's the reason I avoided doing a gallery like this for so long because I just didn't have a clue what lighting to get. We ended up purchasing three kinds and I'll tell you, this one was easily my fave. Starting out, one is all you need IF you block out all the light in the room, making it completely black. 
We left the gallery up for several days because my admin loved it so much, she called in nearly everyone in the district to drop by and see it. Even with the lights on, it was stunning.
Have you done a black light gallery before? What tips do you have? This was my first so I'm sure I have A LOT to learn. I would love to hear from you!
 Super excited to start our black light gallery projects next year...even if it's MAY and I'm on summer break, ha!
 photo signature_zpsd10b3273.png