Showing posts sorted by relevance for query plate weaving. Sort by date Show all posts

Wednesday, April 24, 2013

In the Art Room: Tree Weaving with Third Grade

Every year I do a weaving project with my students, kindergarten to fourth grade. And when asked at the end of the year what their fave art project in the universe is, weaving always ties first place with clay. 
And who can blame them? Digging ones hands deep into clay or entangled in a bundle of yarn is just about the best feeling ever, says the art teacher. However, I've grown a little tired of the usual weaving project my third grade students create. So when I saw these amazing tree weavings on pinterest, I was inspired to have my students create one of their own.

Stunning, right? And if you know Russian (at least that's what I think it is) then you'll totally understand the directions. I'd click the "translate" button but I guess you gotta know the Russian word for that to make it happen. All kidding aside, the website does an excellent job of demonstrating the process. For headache-free purposes, I decided to forgo the bent twig option and have the students craft their loom from a Chinet plate.
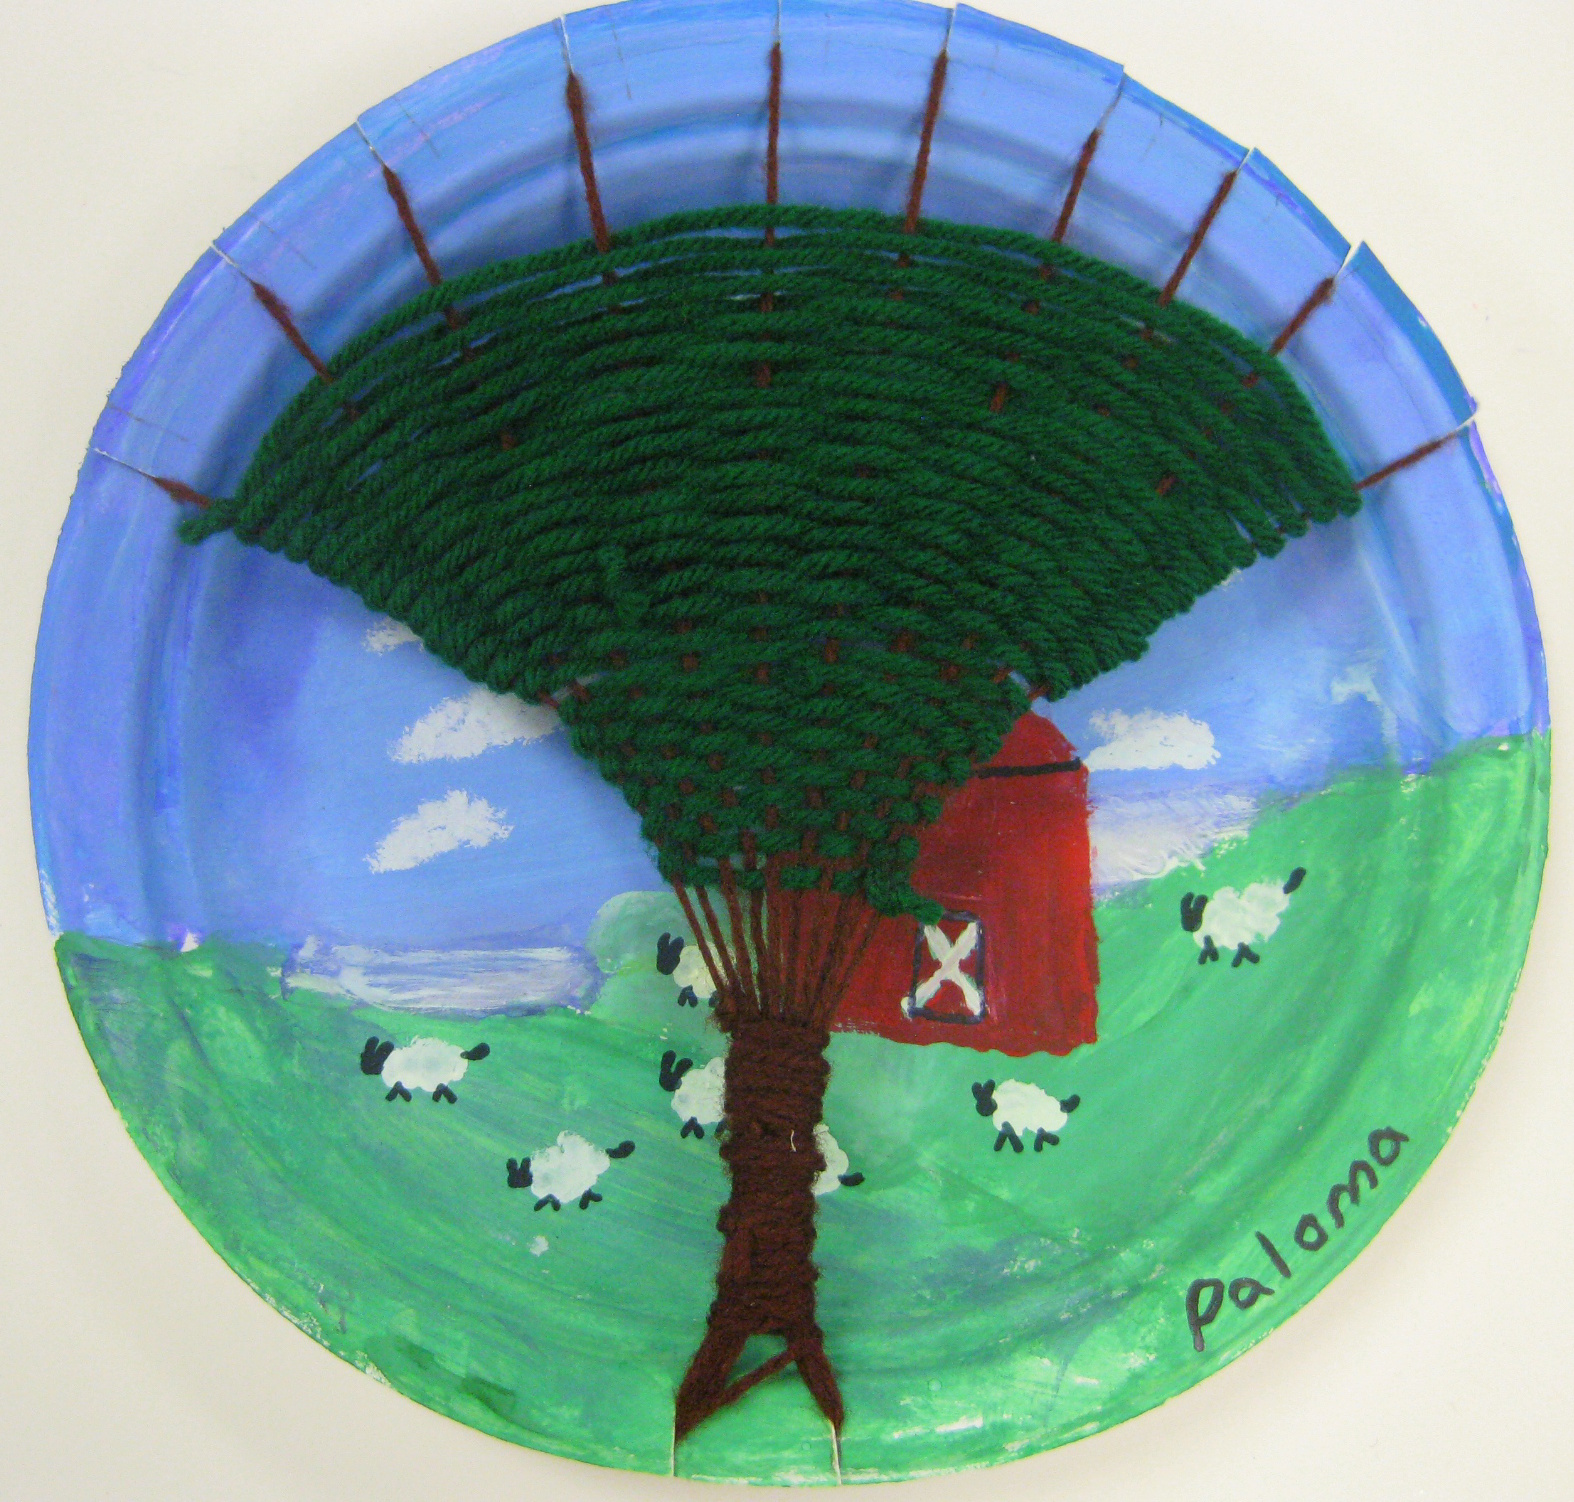
This weaving lesson was also apart of our study of the United Kingdom. We studied many landscape photographs and paintings of the countryside of such places as Northern Ireland and Scotland. Our first day was spent painting a sky on our plate. If you recall, these kids have plenty of experience with sky painting as they are the ones who created these German Gnome Landscapes. The following art class, we chatted about how to create a fore-, middle- and background in our landscapes.
 Students were encouraged to mix three different values of green to create a sense of depth. From there, they were given the option to enhance their landscape with what they'd imagine a countryside in the United Kingdom to look like. As you can see, we were feeling mighty sheepish.
Once our landscapes were complete, we were ready to begin the process of creating and warping our loom.
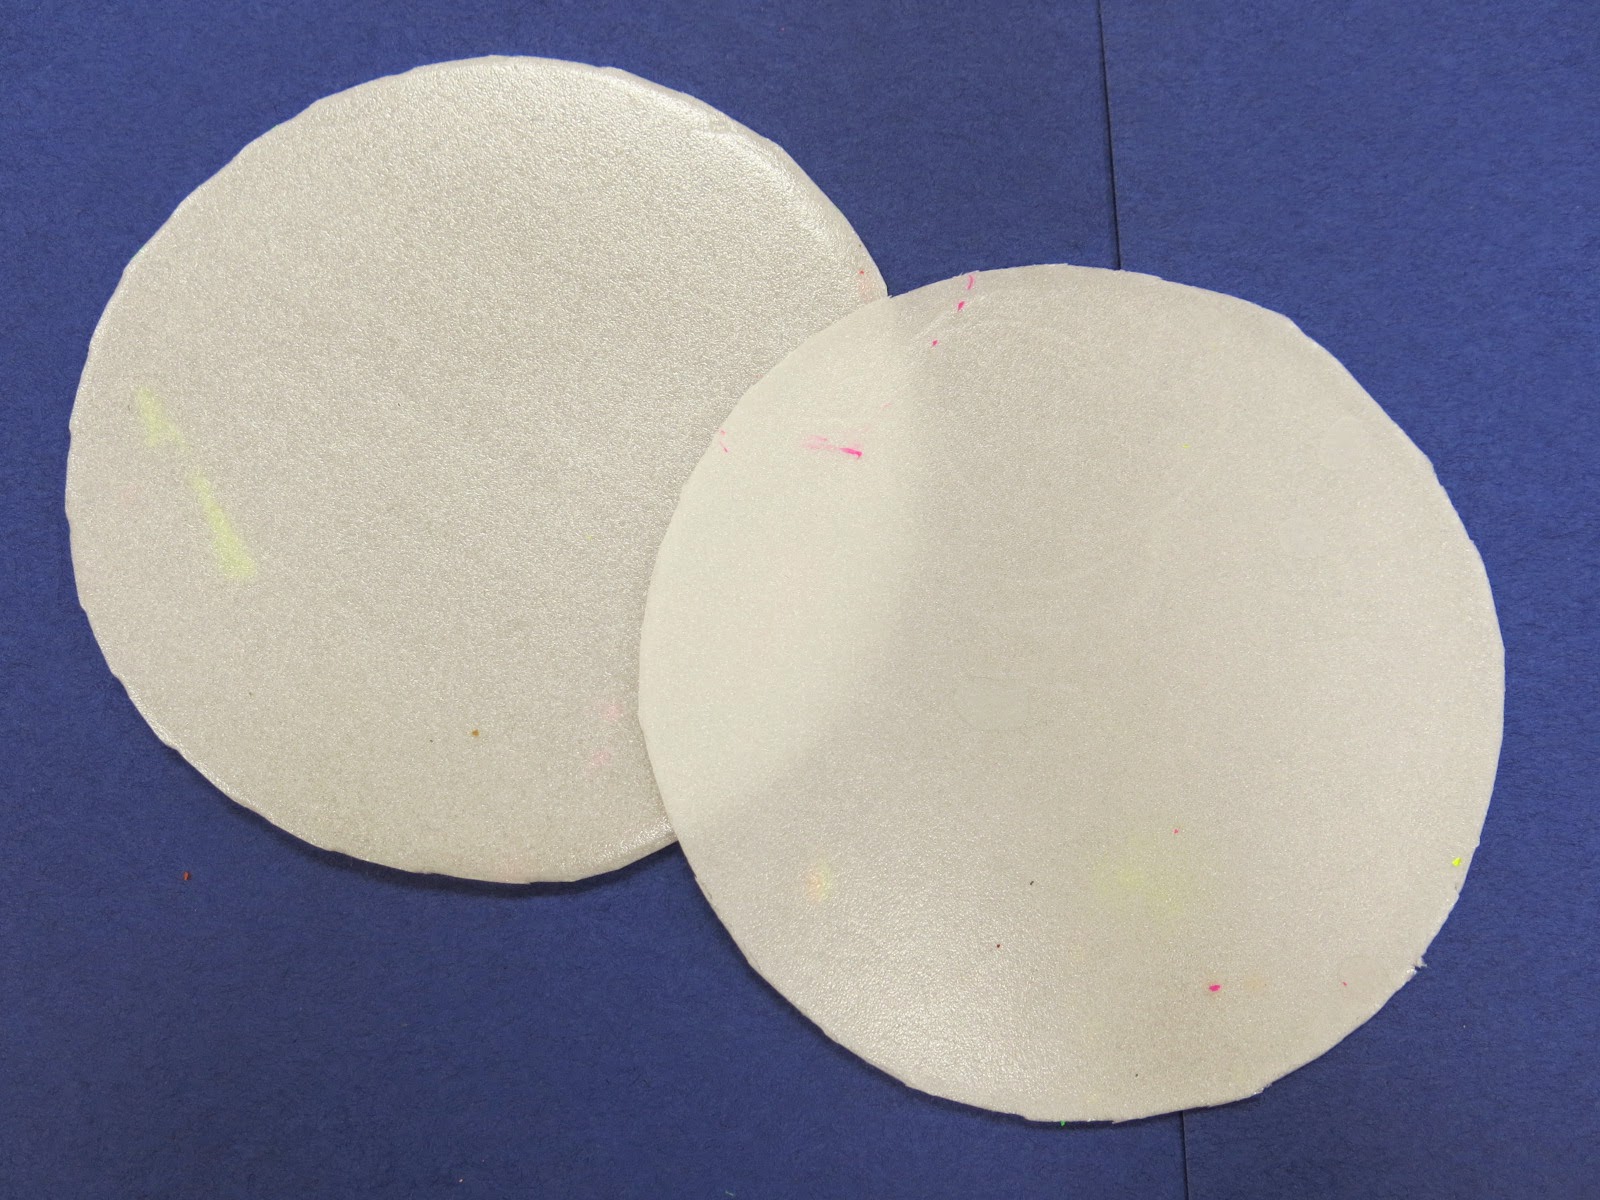
 By placing a Tree Weaving Template over their plate, students could draw the correct number of notches on the top (10) and the bottom (2). These notches were cut to the inner edge of the plate.
With notches cut, the students met me on the floor with their plates and about a yard and 1/2 of pre-cut yarn. Our first step was to wedge the yarn into the bottom left hand notch as seen above.
With the long end of the yarn, we put the yarn into the far left top notch, out the notch beside it, into the bottom left, out the bottom right and back up to the top. This process was repeated until all top notches were filled in. We ended by going in the bottom left notch, coming out the right. At this point, we were ready to create our tree trunk.
Which is super easy. With the end of the yarn, begin wrapping it around the yarn at the bottom, tugging gently as you go. If you run out of yarn, simply double knot a new piece to the old. Once your trunk is tall enough, tie it off to a tree branch.
Some bare trees ready for weaving.
To begin, we double knot tied our chosen color to one of the tree branches on the end. From there, we began the process of weaving over and under. One thing the students struggled with was weaving loose enough. You see, they wanted to pull tightly which caused the weaving to slide down the branches and pull the warping threads inward. However, once they got the hang of it, it was smooth sailing.
 When we first began this lesson, we chatted about wool and where it came from. I passed around some natural wool roving, some cream colored some brown. We chatted about how different colors of wool come from different color sheep. I guess that inspired the sheep in this landscape.
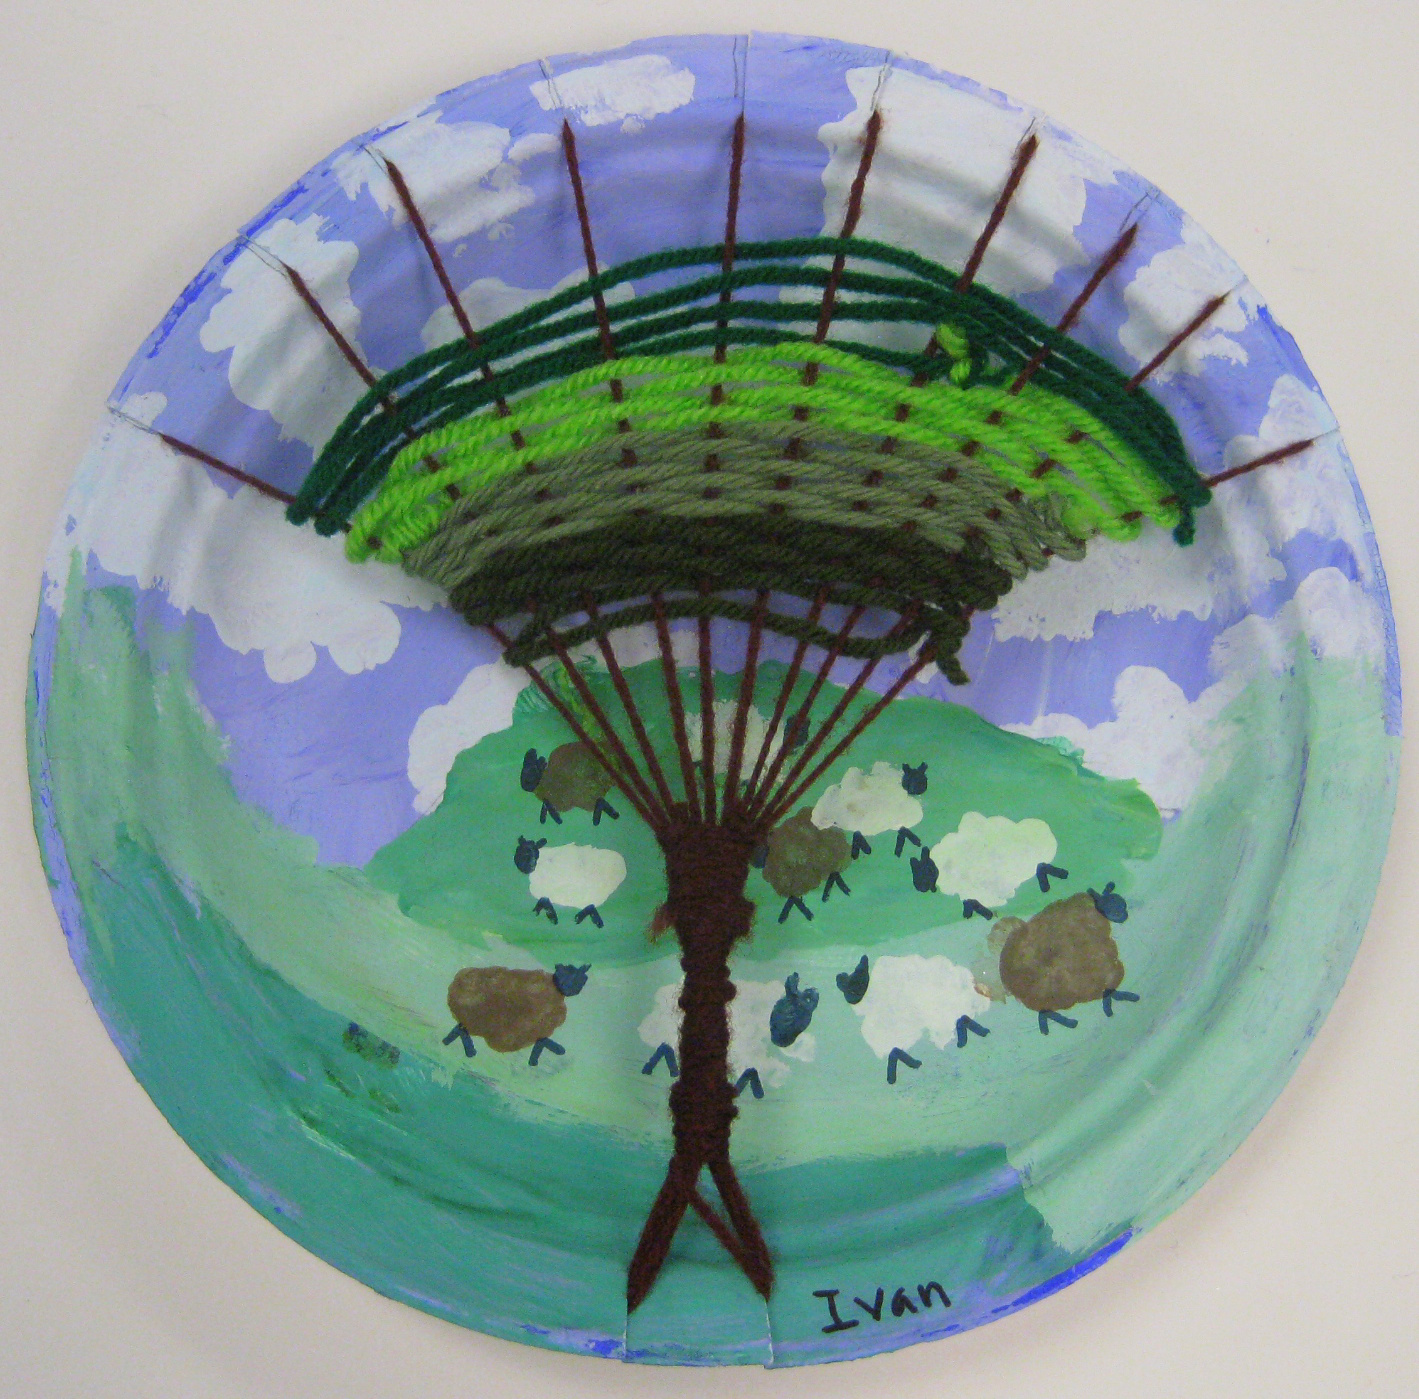
New colors were added with a double knot tie. Weavings were ended with a double knot tie off as well.
So that we could hang these for our upcoming art show, students tied a piece of yarn to the backside of the plates.
And that's it. Honestly, the warping/weaving portion took no time at all. And I foresee so many variations of this project in the future: a woven peacock, a turkey...okay, that's all I've come up with. But I'm sure to think of some more (your input would be greatly appreciated and promptly stolen as an idea of my own!). 

I do hope my explanations helped and that you're encouraged to try this lesson with your students. If you're still not gettin' it, just translate it into Russian and it'll all become crystal clear. And if you'd like some more weaving projects, you can check here. Chat with you soon!

Thursday, January 8, 2015

In the Art Room: CD and Embroidery Hoop Loom Weaving

I hope this blog post finds you either A. Experiencing a Snow Day; B. Enjoying an electric blanket/hot chocolate combo or C. Somewhere other than the subzero temperature land the rest of us seem to be enduring. As for me, I'm enjoying myself a two-hour school delay with a cat on my lap and a cuppa hot tea. And weaving. Because that's what days like this are perfect for!

In case you didn't know, I've declared January the Wonderful World of Weaving month (or something like that). Here's what I've shared so far:

The Weaving Series: Paper Loom Weaving (perfect for first grade)
The Weaving Series: Straw Weaving (second grade and up)
The Weaving Series: Circle Loom Weaving (second grade and up)

In my last post, I shared with you Circle Loom Weaving which, if you go about it like I do by having the kids spend a couple of classes painting their plate, can be a long project. If you don't have that much time to invest in a project, then this CD weaving is just the thing for you and your kids. It's fast and fun and teaches the same weaving skills learned in circle loom weaving!

Now, I gotta tell you, everything I learned about CD loom weaving came from my friend Julie O'Brien who has the super fab art teacherin' blog Art Matters. In this particular post, she does a great job walking you through the steps of CD weaving. I'll be sharing with you a coupla short clips today but go to her post for detailed photos and printable step-by-steppies. 
Supplies:

CDs: Send out a school-wide email and you'll end up with more than you could ever image.

Yarn: A lil for warping and a lil more for weaving.

That's it! Let's get started:
In this short clip, I'l show you how to warp you loom. I always avoided CD weaving because I thought the warp strings would move around on the circle of the CD. Surprisingly, it doesn't! Well, not much anyway. And if it does, you can easily just slide it back into place. 
And there you go! Please feel free to ask any questions in the comments. I'd also love to hear some alternatives to teaching CD weaving you might have. Or what you've done with the finished result!
Another alternative to circle loom weaving would be weaving on an embroidery hoop! I shared this technique this summer if it looks kinda familiar to y'all. 
I think this project would be great for an art club since it would require each kid to have an embroidery hoop. Again, ask around. I bet you'll have embroidery hoops comin' out yer ears. 

I made a bunch of these guys this summer and currently have them hanging like a mobile in my art room. I'd love the kids to weave a collection of them and hang them in front of my school's large bank of windows. Wouldn't a bunch of these kind of weavings in a variety of sizes look great? Here's the method I use to create these weavings:
Very similar to circle and CD loom weaving, right?
And there you have it! Stay warm, kids. Looks like my two hour delay is just about up, time to get ready for the day. Enjoy yours!

 photo signature_zpsd10b3273.png

Thursday, November 13, 2014

In the Art Room: Mexican Sun/Moon Weavings

You know, as an art teacher, I just can't seem to teach short and simple lessons. I ain't braggin'. It's a real problem. I mean, what you are looking at here took us 4 weeks of art class to complete (that'd be 4 hours). What with the metal relief, the coloring, the puffy painting, plate painting and weaving, I thought the entire thing would never end. However. Looking through the stacks of these masterpieces and reading the kid's artist statements about their work (as well as the sweet notes that my second grade kids wrote them about their artwork), I like to think it was all worth it. That being said, you had better believe our next project is gonna be, well, less than four weeks. Like, maybe three and a half.
So just how did this whole project come to be? Well, I go the idea for the metal design from Denise Logan in her book and on her website, she shares the lesson of creating a Mexican sun. I love her lesson but decided to take the process one step further by adding the woven edge. This is the same group of fourth graders that created these stitched creations. Their fingers were itching for more fibers arts so I thought, why not give the kids what they want?
The process for the sun/moon plate was much like the one my third grade students created for their dots. To begin the project, on our first day, we reviewed what we new about Mexico with this prezi. Then, I introduced the ceramic work of the artists in Metepec, Mexico with this prezi
After that intro, the kids were given this sketching sheet to hash out some ideas. I set my Time Timer for 7 minutes and told them to meet with me again when the timer went off. 
 By the way, here's a lil shopping list for you:

  • Cheapo Styro Plates. I mean the really cheap kind. Two for each kid.
  • Cheapo Foil.
  • Spray Glue. 3M's my jam.
  • Ink Pens. They work best on styro as they don't cut into it like pencils.
  • Face Template. Hate me if you wanna, we used facial parts to trace for those who didn't feel confident in drawing their own facial pieces.
  • Circle Temple. 

Once the timer went off, we met again to talk about how to make our sketch a reality. First step, cut out two circles. One will be for the face the other, the parts.
Trace template pieces or create your own template pieces on your sketch paper. Cut those out and trace around them. I discouraged the kids from sketching directly on the styro as they couldn't erase those lines.
 Start gluing those pieces in place. By the way, I don't use glue bottles in my art room as they are the Root of All Evil (I remember the moment I saw a child attempt to use the blade of a brand new pair of scissors to unclog a bottle whilst another proceeded to bust off the tip of his pencil lead during his stabbing/unclogging attempt. Forever after that, it's been glue in a cup and paint it on.) 

This was about all we managed on that first day. Each kid was given an envelope to put their pieces in for the following art class.
 During our second art class, the kids finished cutting out and gluing pieces. The kids could decide if they wanted to make a sun, a moon or a combo of both. When they were finished, they came to see me at the Super Amazing Spray Glue Table where I spray glued their work and placed foil atop. IF they wanted a sun/moon, I sprayed their styro face and gave them yarn to lay on top however they wanted it.
Massage the plate but do not use your fingernails. That will tear the foil and make for a super sad art teacher. 
From there, color was added with Sharpie. Now, I did have to make one muy importante rule: The background of the face needs to be ONE color (unless it's a sun/moon). Here's why I did that: I noticed the kids were picking colors at random and they were losing the face completely. I told them that the raised pieces could be any color they wanted but that the background was to be one solid color. No one's creativity appeared to be crushed during the enforcement of that thar rule. 

Once coloring was complete, the kids entered Puffy Paint land. WHICH they loved, according to their artist statements. 
 During our next art class, the kids painted the outer edge of a large Chinet plate (I suppose if you wanted a shorter project, have the kids create smaller faces and use smaller Chinet plates? Just a thought). That only took them 15 minutes which gave them more time to finish their coloring and puffy painting from the previous class. I did have a couple early finishers who began our next project: Ojos de Dios!
 The following class, the paint had dried so the kids cut their plates and started weaving. I gave the kids a template with 19 notches cut into it. They laid the template on their plate, cut the notches and started to weave. I do a weaving project every year with my students so a quick reminder that weaving is over and under and they were off running.
Me: Oh my goodness, I love your sun/moon! Can I ask what's on her lip?

Student: She has one of those sores that I get in the winter.

Me: Um, like, a cold sore? 

Student: Yeah, that's it! I wanted her to have a cold sore.

(OMG, I die.)
Once the kids wrapped up their weaving, they were to write an artist statement. We chatted about how we could either write about the process, the product or something we learned. Once those were complete, they were glued to the back of the weavings. Reading those statements was hilariously enlightening.


So apparently the kids like puffy paint. I did have several kids write about something called "puppy paint". Um, what?! Do they think I'm so cruel that puppies were harmed in the making of said paint?! Guess we need to have a chat. OR I need to do a better job enunciating. 
My school district is joining in on a Be Nice Campaign. The kick off was this week. So I decided to have a weekly Give Nice a Try post in my art room. Sometimes we'll have time to give it a go in the art room...however, often times, I'll be counting on the kids to do this on their own time. This week, it worked out for my sweet second graders to write a nice note to the fourth grade about their finished pieces. 
Here are the second graders writing their nice notes to the fourth grade.
 
I double checked all notes before giving them out to the fourth grade. I wanted to be sure they were nice. This one was especially sweet.

The fourth graders were pretty stoked to get feedback about their artwork. I had them write thank-you notes to their new second grade friends. This note really showed the impact of our letter writing campaign. 
And there you have it! Even though this project took us forever, did involve relief sculpting, Sharpie coloring, painting and weaving (oh, and puppy paint, ha!) all while learning the history of the Metepec suns of Mexico. What's your fave long-winded art project? Please tell me I'm not the only one with million-year art projects, y'all!
 photo signature_zpsd10b3273.png

Saturday, October 1, 2022

Favorite Fall Lessons!

It's the time of year, my very favorite time of the year: fall! We are gearing up for some fun fall art makin' stations and I thought I'd share a bit about that as well as my favorite fall lessons. Many of these links include videos for you to share in your art room. Let's start with this one, a fourth grade favorite: Spooky Starry Nights!

Now I just mentioned art makin' stations which has become my new favorite thing of late! With 30 minute art classes, it's been a fun way for my students to really roll up their sleeves, move around the room and explore several different art makin' activities. You can find out how we did stations for Dot Day here and here and how we are doing it for learning the elements of art LINE here and here...all with videos for you to share in your art room and some videos that are just my tips and tricks for YOU! Here's a blog post about the stations I did on Halloween in my art room here.  I plan to do a week long stations this year so all of my classes can experience the fun. The above pumpkin prints is one I will be adding to the mix. I can't wait!

Monsters are always fun to do during this season and my students LOVE creating them! This lesson, with video, is one I know your students will love!

This one is fun for all ages especially if you want to introduce color mixing, painting, printing and collage. Another lesson with video right here!

Speaking of fall trees, check out this amazing weaving lesson! If you've never woven with your students, I recommend doing a short paper weaving first before diving into this activity. I would give this a go with fourth grade and up if students are new to weaving. Lesson and video here!
Speaking of weaving, my students love this weaving project! All the weaving details can be found in this blog post!

Wanna do printing with your students but don't want to deal with the mess? This leaf printing lesson with just markers and water is sure to be a hit! Here's more.

Speaking of printing...check out this Warhol-inspired sunflower print idea! You'll love it!

How about more monsters? Maybe even ones that glow under black light? All the details and videos can be found here!

Need more monsters? Look no further...than here!
Before Gelli-Plates and the like, we had to make our own sort of gelatin printing plate. 10 years ago, I posted this lesson and it's still one of the most visited on my blog. However, I no longer make the stinky gelatin (not to mention, it's not vegan friendly...I'm not a vegan, but I don't like using it) so you may want to try the same method but with the longer lasting plates. Here's the details.
Another super popular lesson that always yields amazing results is this one! I've done a variation of this type of lesson with students of all ages. More info here. 

Have fun, friends!


photo signature_zpsd10b3273.png