Saturday, December 3, 2016

In the Art Room: Sound Effects!

Hey, kids! In lieu of Art Teacherin' 101, I'm hanging out with The Art of Ed this week talking about how I love me some sound effects in the art room. I actually have a slight sound effects addiction (yes, that is a thing and no, I've not been to my last coupla meetings). The Dollar Tree is one of my fave places to find fun stuff like that hand clapper and a service bell, to name a few. Here's more:
So, yeah, funny story about how I acquired the gong: I was at a musical instrument store with Mitch (the hubs) and I remarked how much I dug the gong. I vaguely remember saying, "I need one of these for my art room!" Fast forward to our 10 year wedding present and THIS was gifted to me, "wrapped" with a sheet thrown over it. The kids LOVE this thing! I'll occasionally get the overzealous kid who hits the gong hard, gives us all a fright and has us falling out of our chairs in laughter. For the most part, it's got a great calming effect. Now, if only I could get the kids to remember that it is a GONG not a DONG or a BONG, that would be fabulous (that time my principal walked in and a kid was shouting across the room to the gong-hitter, "HIT THE BONG! IT'S TIME TO HIT THE BONG!" was not my finest hour).
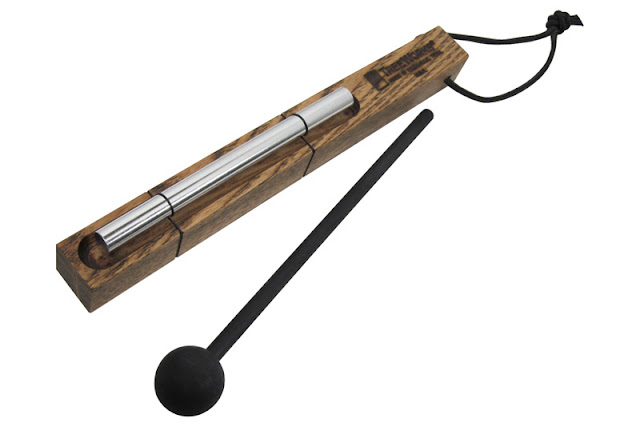
One thing I use multiple times daily is that energy chime. Shameless-husband-plug: these are handmade in Nashville (and signed by the artist) by my husband's company Treeworks Chimes! You can find them for under $12 and you won't regret it. Mine is covered in paint and well-loved. 
I love these little red guy. I've seen these guys at shops like Old Navy, Target and Kolh's...but if you need one in a pinch, there is always this place. I mentioned us playing this during the Smartest Artist which is a favorite wrap-up game for my kids. 
In other news, I'll be apart of The Art of Ed's Winter 2017 conference! I'm sharing my tips and tricks on making fun video content for your art rooms (trust me, it's easier than you think. I can't even open my email but I can make a video...so there's that). Here's a better description of my chat: 

Recording Instructional Videos with Personality and Flair


Creating filmed lessons for your students is a wonderful way to insure that each of your classes receive the same quality instruction every time. But what if you want to take those videos one step beyond instruction and make them fun and entertaining for you students to view? In this presentation, I’ll share with you how to film and edit videos that will have your students learning, laughing and excited to create. You’ll even find out how to rope your coworkers into the art teacherin’ film makin’ mix. AND, action!
Until the end of this month, use the code SAVE10WITHCASSIE to save 10%! With that savings, you can go invest in some fun sound effects, right?
 photo signature_zpsd10b3273.png

Wednesday, November 30, 2016

In the Art Room: Faux Stained Glass Winter Scene

I don't know what y'all call that time between Thanksgiving and winter break but I have been known to call it a naughty name or two. It's that weird in-between time where we are all comin' down from our vacation high and are so exhausted that we need another one. And just knowing that winter break is on the horizon can sometimes just be more than I (and the kids!) can handle. 

This week, so far, back to art teacherin' town has been a good one. I'm happy to be back making big messes with little people. One project that seems to have the fourth grade really excited is this Faux Stained Glass Winter Scene.
 I used black glue for the very first time in my teaching career last month and I (as well as the third graders) was all WHERE HAS THIS BEEN MY ENTIRE LIFE?! It is so much fun to create with! While they were working with it, I got the idea to introduce my fourth graders to the same media. With my Field Trip! series, I've been introducing the kids to contemporary creatives. Unfortunately, I don't personally know any local stained glass artists to film (any leads would be much appreciated!) so I created this introduction to the art of stained glass with a little iMovie wizardry. The fourth grade watched the first half of the video today and got a good start on their faux stained glass. 
The kids were SUPER bummed when I said that we weren't going to work with cut glass (really guys?!) but were excited when I mentioned black glue. I had them move to their seats and silent sketch several ideas for 5-7 minutes.
I really emphasized not creating a Christmas tree knowing that this project just might not be completed until after the holidays. However, I didn't want to limit the kids so I made it optional. Personally, I love that skull tree on the left! 
After our sketch time was up, we regrouped on the floor and watched the part of the video where I talk about drawing on large paper and using the puffy paint or black glue.
Puffy paint leaves a better, crisper line but it does take a little extra work to squeeze that bottle. The black glue (made with one part black tempra and two parts Elmer's Glue All) comes out faster but leaves behind a wider, flatter line. I shared with the kids the pros and cons and let them decide which they wanted to use. 
All but a handful of kids got to the black glue on the first day. I did change the size of the paper from what was in the video as I thought a 12" X 18" would be easier to manage. 
 One thing I had to really emphasize was keeping the drawing large. Showing that clip of the stained glass artist really did help them conceptualize the idea of large and enclosed shapes. 
 Of course, it wouldn't be black glue painting if we didn't have the occasional smearing. We learned to just let it go. The chalk can hide any imperfections. 
Gotta love a tree of Hershey Kisses! I'll keep you posted on the progress of this project. I see so many variations: landscapes, abstract designs, etc. I'd love to know if you have used this method. If you do, please drop me a line and share. 
 photo signature_zpsd10b3273.png

Monday, November 28, 2016

In the Art Room: First Grade Bebo Birds!

Today a couple of my first grade classes finished off their Bebo-inspired birds and the kids were so pleased with themselves. Each masterpiece was as colorful, unique and fun as the wee artist who created it. If y'all recall, I had the opportunity to visit the folk artist Bebo, watch him create and film him doing so. I have been calling these filmed clips of visits to art's studios Field Trip! Here is what our Field Trip! to Bebo's home studio looked like:
After watching the video, we stood, stretched and moved around the room pretending to be some of the animals that Bebo created (this helped get our wiggles out...and was a fun review!). From there, we watched the first half of this video to learn about creating our textured paper for the background of our masterpiece.
That was our first day! The following art class, we got to do the fun part: paint our birds!
We chatted about making just one bird or two. We discussed having our paper go vertical or horizontal. The elements of art like line and shape were our big focus in this lesson. Finally, we talked about creating a pattern for a "frame" around our birds and in the background.
 The kids were so thrilled with their results. Each was so eager to share their work with their friends...but with 30 minutes in art, we didn't have time. So we placed them on the drying rack with the promise that I'd show them on the Big Screen T.V. (by placing them under the Elmo) tomorrow. 
Gotta love it when an artist requests a small brush "so I can do some detailed hearts"...well, okay then!
This artist was certain his would be going off to an art museum, it's just that good, y'all. 
 What I loved about this project was that it only took two art classes, which, in my world equals two thirty minute classes. Most of my lessons take much longer...I loved how short and sweet this one was. And the kids loved learning about Bebo. In fact, they want to create more animals inspired by him. How can I say no to that?!
 I would love to paper the halls with these happy dudes.
Until then, have a fabulous week back, y'all!
 photo signature_zpsd10b3273.png

Sunday, November 27, 2016

Field Trip! A Visit with Camilla Spadafino

For the second installment of my Field Trip! series, I was excited to sit down with the amazing artist and art teacher Camilla Spadafino. Long before I ever met Camilla, I had heard all about her: what a wonderfully kind and warm person she is and what an incredibly inspiring teacher. My best friend Mallory put it best: she's the kind of person who makes you feel good just being around her. So y'all can imagine that I was thrilled when she agreed to take part in our Field Trip! 
With this Field Trip! series, I want my time with the artist to feel natural. I also want the artist to feel comfortable so I have been letting them decide on the format. With Bebo, we watched him create one of his fun and funky sculptures. Being a teacher, Camilla suggested walking us through how she created the portraits for her Miss Camilla's Neighborhood Coloring Book
In the video, Camilla chats about what initially inspired her portraits. Since then, she's created over 100 portraits of friends and family in her east Nashville neighborhood. What I love about her process are the endless ways they can be used in our art rooms. 
While she was sharing her method, I got the idea that my Gallery of Gratitude project could be updated. Instead of the kids drawing the portraits, we could use Camilla's process, thus making the portraits more realistic and, if on canvas, more permanent. Also, the kids could interview the person to find out their interests and their dreams for the future. How fun would a wall of the faculty and staff of our schools be?! 
I learned so many new tips and tricks by hanging out with Camilla. I love how she talks about working quietly to let the art speak to her and finding magic in what she is creating. I also love when she chats about respecting art supplies. Doesn't she do a fabulous job including vocabulary? The perks of interviewing an art teacher.
I love what she had to say about using certain colors and how that is a form of branding. I had not thought of that! But what a wonderful way for the kids to think more carefully about the colors they use. 
Another idea I had came when Camilla was talking about her pet portraits. This year, my school is reaching out to the local animal shelter and working with them on several projects. I have been trying to come up with a way for my students to create portraits of the adoptable pets. With this method, I can drop by after school, snap photos and have the kids use these. I know they will LOVE this project. 
Having the kids create coloring books of the portraits would be a wonderful fundraiser as well. I'm telling you, when I walked outta Camilla's house, my head was spinning, I had so many ideas. She truly is magical.
 When Mitch came home from work that night, I was so excited to tell him about my experience with Camilla. Every sentence started with, "...and then..." 
Camilla also shared her latest project called Paint the Town by Numbers. I learned so much about the back story behind this new endeavor including how she dreamt up this project and is bringing it to fruition. I'll be certain to share that with you in a follow up blog post and video. She was even kind enough to give me one of her paint by number kits which I enjoyed on Thanksgiving, in between plates of food. 
What a wonderful time I had hanging out with Miss Camilla! I'll be certain to share my video'ed lessons to company my visit here. I often update my YouTube channel before I share here so subscribe to stay tuned! 
Special thanks and a warm hug to Camilla for being so open to an interview and being a lovely host. Have fun, y'all!
 photo signature_zpsd10b3273.png

Wednesday, November 23, 2016

Art Teacherin' 101: Episode 24


Let's face it, we can't always be "on" for each and every kiddo and each and every art class. And that's okay. It's perfectly fine to every now and then be the World's Okayest Art Teacher.
The key is to realize that being an "okay" art teacher is only okay if it's temporary. You can only scoot by at level 3 for so long before you and the kids start to lose interest. That's when you gotta punch that art teacherin' energy level back up to a 10 (okay, let's be honest, a 8.25 will do).
In all seriousness, if you are feeling meh, try not to beat yourself up over it. Just the fact that you are aware of it means you care. If you are experiencing guilt-free meh, then, yeah, you might wanna hang up the apron and call it a day. I remember I used to come home and tell my husband that I felt like I wasn't doing my best, that I was doing a disservice to the art education of my students. He said that even on my worst days, what those kids are getting is better than no art at all. 
So on those days that you are feeling just okay, you might wanna focus on accentuating the positive at both the beginning and end of your art classes. Like I said in the video, I start each class with that little "Hello, my most amazing artists!" call and response. I also love ending it with a little "I love you" send off. It helps to bookend my classes on a happy note even if what happened during our art time was just okay. Listening to this song, a fave of mine, always lifts me outta my okayest funk. Because you ARE awesome, bringing creativity and light to your students!

I hope y'all have a wonderful Thanksgiving! Know that I think you are much better than Okay, but seriously The Best. 
 photo signature_zpsd10b3273.png