Last night, over here, we had a fun live chat titled: What I Wish I Knew as a First Year Teacher. We chatted for nearly an hour and so many of you contributed to a wonderful chat. Thank you! If you'd like to view the chat or learn from the awesome comments, the chat is still archived here. I did go ahead and condense the chat into my Top Ten Things I Wish I Woulda Known. Here are the Cliff's Notes: 1. Befriend your custodians. They are one of your biggest allies. 2. You ARE NOT the following:
* A Craft Supply Store. Share your supplies sparingly. * Support Staff. You have your own curriculum. You were hired to teach art...when you can squeeze in other subject areas, AWESOME! But don't build your curriculum around anything other than the art education of your students. * The School Sign Maker. Do those favors sparingly, your time is precious! 3. Test Drive ALL of Projects. Make examples...not to necessarily show your students but so you can troubleshoot any issues they might have along the way. 4. Don't Sweat the Verbage. There is gonna be so much stinky-smelly edu-talk that it will make your head spin. Don't get caught up in worrying too much about the latest edu-trends. Because just when you think you have it figured out, they'll switch the script. 5. Keep the Peace. Stay away from Negative Nancys, Patty Pot-stirrers and Glinda Gossips. Nothing good can come from those friendships. 6. Nail that Classroom Management. That should really be rule number one. You got that on lock-down and you can do anything. Not sure how to get your management under control? Then... 7. Seek a Mentor. Find a fellow art teacher and ask them for tips. See if you can go and observe them. Find a teacher in your building who you admire for his/her teaching style and seek their guidance. 8. CREATE! Make time to make stuff. This is what you teach! You gotta practice what you teach. 9. REST! Take time to unplug from school. You'll be a better teacher for it. 10. Reach Out. Attend your state and national art education conference, professional development opportunities and art classes. You can learn so much from other artists and teachers, reach out and find them! Love to hear your tips, y'all. Let's share with those newbies what we wish we would have known.
GOING LIVE TONIGHT, JANUARY 4TH AT 8PM CST RIGHT HERE. We'll be chatting about What We Wish We Knew our first year(s) teaching. Chat soon! Until then... How about a fun heart sculpture project where kids discover an artist and use them as their inspiration? That's exactly what I had in mind when I came up with this simple and effective project using papier mache pulp and plaster! My buddy Natalie Waggenspack over at smART Class (one of my favorite art teacherin' blogs!) inspired this lesson. Here is the process video with an introduction to the artists I found inspiring:
Originally I was calling this project the Jim Dine Hearts Sculpture...but I didn't want my artists to feel limited to one artist. Shoot, they don't even have to use an artist's style as their inspo, they can come up with their own. But if you are looking for a project where your students do a little bit of artist investigation, I think this would be super fun.
I think this project would best be suited for students from third grade on up. I'll be doing the Candy Heart Sculpture with my fourth graders so I might either reserve this lesson for next your or try it with my younger kids. Here are the supplies needed: * Aluminum foil. I really liked using the sheets of foil as they were precut and just the right size. * Activa Product's Celluclay or Fast Mache. Both are very similar and work great. If I were doing this with my kids, I would definitely premix the clay. * Activa Product's Rigid Wrap Plaster. Used for the wings. * Tempra or acrylic paint.
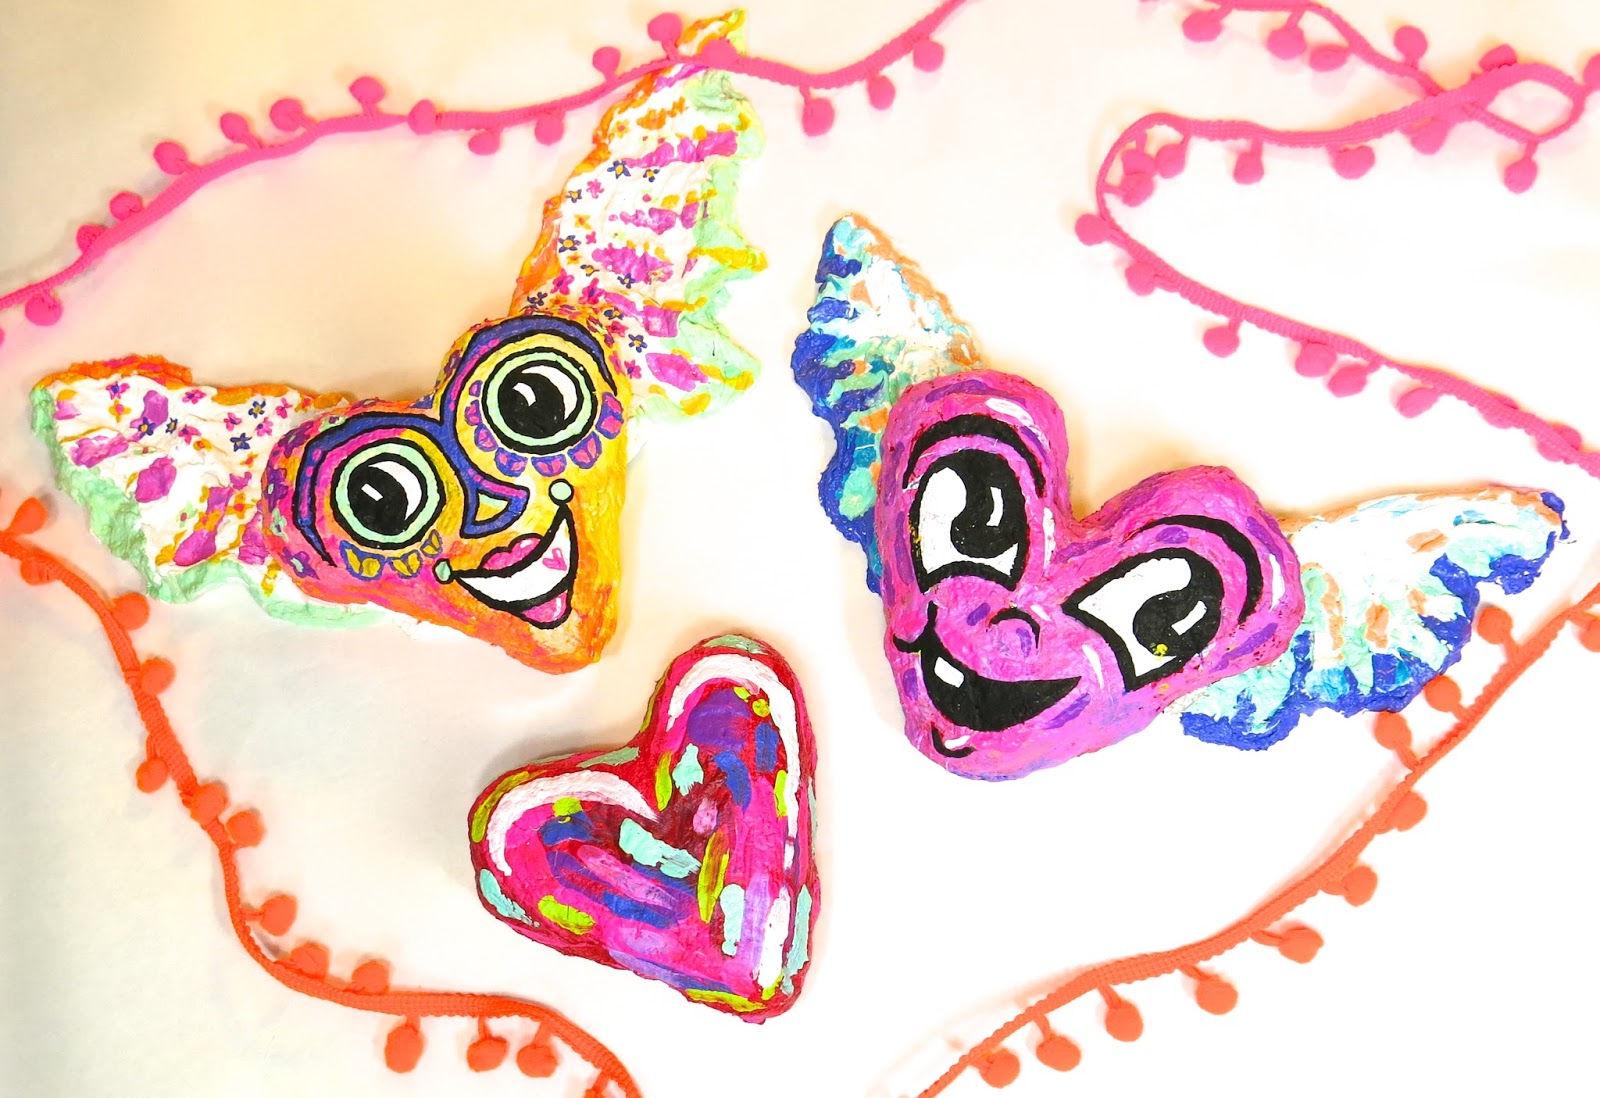
I love the work of contemporary artist Chris Uphues (I know my students will as well...check out his street art, so fun!) and he inspired this heart.
And I had Frida in mind when I painted this heart. I really loved creating these hearts and see so much potential with this project.
Love to hear from you if you give this project a try! Don't feel limited to the sculpture supplies I used. I really think a variety of mediums could be used to create these fun hearts. Full disclosure: Activa Products and I are working together to create fun projects with their products. I received these sculpture supplies from them. Thank you, Activa Products!
Hello, Cutie Pies and Love Bugs, won't you Be Mine on this Candy Heart Sculpture adventure? I'm so excited (and maybe a pinch sugar'ed up from one too many candy hearts) about this project I've got planned for my fourth graders. I've been kicking this idea around for sometime...but there were some issues I thought the kids might struggle with. After finding solutions that will make their sculpture making adventure a little easier, I put it all together in this here video.
To make your own Candy Heart Sculpture, you'll need the following: * Tag or poster board, one 2" X 24" and two 8" squares * Scissors * Stapler * Tape * Rigid Wrap Plaster Cloth from Activa Products Approximately 24" of wrap per student. The wrap comes in a width of 6" so I cut it in half for this project. My plan is to have the kids do the cutting when they finish their armature. * Tempra paint
I played around with a couple dimensions with the heart and decided that the 2" edge would be the best. It's the most accurate appearing ratio and it requires a lot less plaster wrap. Having the kids create those tabs of tape and fill in the gaps with excess tape will really help when they are creating their armature.
I also played with several ideas for putting the wording on the heart. I first toyed with the idea of just letting them write on their hearts but my students do not have the best of handwriting, not even gonna candy coat it for ya (pun intended). Giving them a guide like the sheet which will ultimately become their carbon copy paper seemed like the best solution.
I will definitely keep y'all posted on how my fourth graders do. While their projects dry, they'll be working on another sweet project that I'll be certain to share with you soon. Check ya later, Love Bugs!
I am a complete, total and utter procrastinator. I always have the best of intentions in mind but I rarely follow through with my ideas. I have this habit of psyching myself out that a task is too daunting; too difficult for my skill set (or lack thereof); too time-consuming; you name it, it's an excuse I've put to good use. One of my resolutions over my break has been to do the following: relax (things have been too crazy for me and I don't handle crazy well) and stop putting things on the freaking back burner. That burner is boilin' over! If you follow me on Insta, you know I've been hitting the sewing machine hard with that crazy eyeball dress (and matching jewelry, stay tuned!), a Mary Blair-inspired quilting project and this here Marimekko wall hanging. I've had the idea to create this bad boy since I scooped up all things Marimekko this spring at Target. Well, I can finally scratch this one off my To-Do!
I have a habit of buying frames whenever I find unique ones at the thrift store. I always spray paint them a satin black so they create the illusion of matching. I have an enormous stockpile which comes in super handy when I get an idea like this one. I remember picking up this one a couple of years ago because I liked the rectangular shape and the angle of the frame edge. You can see it better below.
If you go here, you can see what used to hang in this place at the end of our upstairs hallway.
When Target was selling all things Marimekko this spring, I'm not ashamed to admit that I went bananas. Marimekko has been my muse since I discovered the fabric design company many years ago. If you know anything about the brand then you know their prices are pretty steep. So when a place like Target partners with them and sells their wares at affordable prices, well, you go bananas. I scooped up a couple of these memory games. One I gifted to my best bud and the other I kept.
But what to do with the game? Selfishly, I didn't want to take it to school and chance it getting ruined (sorry not sorry). And the hubs and I are more of a Cards Against Humanity and Exploding Kittens kinda card game playing types, not memory games, no matter how cute. So I got pulled all of my thrift store frames outta the closet and found one that seemed to work the best. And that was last spring. Did I mention that I have issues with procrastination? Yeah. Obvi.
So the other night, I decided to scratch this one off my list. I had a large sheet of cardboard in the garage that I cut to fit the back of the frame. Then I started to lay out the design.
Once I got it all in place, I started to hot glue the back of the pieces. Purists will not be happy with me about this one...but I will get so much more enjoyment out of my memory set now that it is out of the box and up on my wall.
To secure the cardboard in place, I did add hot glue but I also added tape. Then I hammered in one of those wall-hanger-thingies and was ready to put it up! I hung it at the end of the hall that leads down these steps to our bonus room...which has become my crafting and recording-of-lessons area.
For a more thorough tour of this room, visit here. And, yes, my Christmas decor is still up. I don't like to take things down until after the first. The sparkle makes me so happy!
The large painting on the left was created by me years ago and is a direct copy of a Marimekko design. In fact, you can see my much loved copy of a Marimekko book on the far right under the lady vase.
Yesterday, before heading out to catch up with a long lost friend, I realized I even match my decor. Wow.
Speaking of thrift stores, it's there and estate sales where I find my favorite things. Oh and the sale room at Anthropologie (I don't even bother with the rest of the store!).
Speaking of Marimekko, these large plates are from the Target line as well. I waited until they were half off and I'm so glad I scooped them up. I need to eventually hang them but for now they are happy to be propped right here...just above the map I trash picked from school (which hides all of my hubs drum gear and our big-butt television. Yes, we still have one of those).
And there you have it! I'm so glad I stopped putting at least one thing off, I'm so happy with how this turned out.
Hey, y'all! I'm taking a break from tonight's usual Facebook LIVEsession as the husband has requested a night out. Which will probably involve dining at the fine Southern establishment known as Cracker Barrel (who can deny those biscuits, I ask you, WHO?!) which I ain't above passing up. But I'll be back next Wednesday, 8 pm CST to chat about all things First Year Art Teacher-y! You can still catch our past couple of LIVE chats here. This week, I thought I'd chat about how to do something you'd think is basic but is actually pretty stinkin' tough: speaking your mind. It's one thing to do it...and it's another thing to speak your mind in such a way that folks are open enough to listen. Even if your opinion isn't a popular one. Here are my suggestions: * You can say anything, ANY-STINKIN'-THANG, if you just choose your words wisely. It's funny, I'm super duper non-confrontational but have noticed of late that if I don't speak my mind (nicely) and stand up for myself (calmly) no one else will. It's time to wo-man up and say what needs to be said...in a way that will be listened to. * Speak with your end goal in mind. This is directly from my extremely wise husband. Do you want your end goal to be that folks pause, listen to what you have to say and give it some thought? Of course you do! So don't offend them with your words. Use words that will get you to your end goal: a conversation. * Say it with flowers. Does anyone else remember that old ad? I'm not saying send folks flowers, I'm just saying use words that are pretty and smell good not ones that stink and are offensive. Put yourself on the receiving end. Is that a bouquet of words you'd wanna hear? * Start with "I feel..." No one can argue with your feelings. Unless you are irrational and crazy. In which case they will just say, "well, she is irrational and crazy, so it would make sense she feels that way..." Be honest without don't be a drama queen. * Don't yuck someone's yum. This is a direct quote from my buddy Patty Palmer. I love it so. Say what you need to say but don't yuck someone's yum while doing so. Sigh. If only doing such was this easy, right? Practice makes us better, y'all. I find that being honest with your feelings and open enough to listen to other side of any conversation is the very best way to go. Love y'all!