Happy fall, y'all! Last week I shared with you MY favorite fall crafts...today I thought I'd share my Top Ten Fave Fall Projects for kids! Let's kick it off with this weaving project because it's one of my very faves.
1. Tree Weaving Lesson I usually do this lesson with my students in third grade and up. I developed this lesson after being tired of the same old weaving projects I'd done for years. This video was created for you, as an instructor...but you could totally use it with the kiddos!
You can see more of this lesson in my first blog post right here.
2. Fall Landscape Collage This lesson I just recently shared and I'm really excited about it. The kids learned so stinkin' much and had a blast while doing so. I cannot wait to display these in the hall. Here's the instructional video:
My other first grade classes are wrapping these up this week. I am looking forward to seeing what they create!
3. Positive and Negative Gelli Prints When I initially did this project, I made my own gelli-plates. You can find the recipe here. What I don't love about making these plates is that, well, you have to make them and it's labor-intensive. Not only that, but if you are a vegetarian or a vegan, you will definitely be opposed to using the gelatin that goes into the making of these plates.
The good news is that if you own GelliArts printing plates, you can get the very same effect. And it's so much fun!
4. Sunflower Gelli Plates Prints with Puffy Paint Nothing says fall to me like Sunflowers. I loved this Andy Warhol inspired project and so did my second grade kiddos...although I think it could have easily been down with my older students as well.
When we displayed these in a square kind of Warhol-style.
5. Leaf Relief Another great fall project that introduces kids to texture is this leaf relief project. This is a project that I've done successfully with kids of a variety of ages from second grade on up!
It looks really fabulous with a painted and textured canvas background!
6. Painted Fall Landscape Landscapes are always a fave in the fall and this one is no exception. You can find a video with more details of this project right here:
Here's a little more about this landscape here as well:
These were a crowd pleaser and really introduced the kiddos to so stinkin' much that's important to art makin'.
7. Van Gogh-inspired Haunted Mansion True facts: I LOVE Disney's Haunted Mansion and so do my students. I have a 1969 Disney CD that is the telling of the story of the Haunted Mansion. It's like riding the actual ride: it takes you thru the tale of the mansion. Last year, I had a fourth grade class that was so interested in the story that I based an art project around it! You can check out the details here and the instructional video right here:
The kids had the best time creating these Spooky Starry Nights!
8. Printed Fall Leaves Discovering the magic of marker printing was pretty much a game changer for me and this project makes it so simple and fun. Let's talk about it:
So easy! And one way to use those pesky markers (am I the only art teacher who hates markers?! UGH.)
9. Fall Trees with Warm and Cool Skies So this project was actually done during a study of Asian art...but could so easily translate to fall! You can check out more of these beauties here.
10. Collage Landscapes of Fall My sweet second graders are getting ready to embark on this project next week. I've not done this one in a couple of years and I'm ready to bring it back...they are so beautiful! This time around, I'll be creating a video so you can stay tuned for that...or just check the blog post here. Wow! I'm so excited for all, these pretties have me inspired! What are your fave fall projects? LOVE to hear about them.
My first grade artists finished off these fall landscape collages inspired by the artist Eloise Renouf...and the artists (along with this art teacher) couldn't be more proud. In this lesson, we learned how to mix a tint of blue, create textures in wet paint, print with a variety of tools, learn the parts of a landscape, use proper scissor use, collage and more! The kiddos were sad to place these on the drying racks as they were so excited to take them home. Not until a display in the halls for all to see, says me!
These pieces were created on 12" X 18" pieces of paper. My students spent the first couple days of art class this year creating a variety of painted and textured papers. I do this in a similar manner as my friend Laura at Painted Paper Art. In case you are curious how I go about doing it, as I don't cover that in the video, I thought I'd share: 1. I start with giving one grade level (I see two first grade classes back to back in 30 minutes, no break between) one color and white. I focus on the words TEXTURE and TINT. I tell the kiddos that they are to apply the color to their paper in large plops. Then they clean their brush on their messy mat by sweeping it back and fourth.
2. White plops are then added and mixed with the color. Viola! Now you have a tint! Let's create a texture.
3. Using a variety of scrub brushes, dusters, paint scrapers and more (most found at the Dollar Tree), the kids then add texture to their tinted papers. Once finished, they place it on the drying rack and grab another sheet to more more papers. No names need to be written on the papers as they are going in a communal stack to be used later.
4. The following glasses are given a different color and white...this makes it so we end up with a rainbow of papers!
Hopefully that makes sense and helps clarify the painted and texture paper making mayhem. The kids LOVE making the papers and creating with the results. Here's the instructional video I created to share with my students:
Week One: Like I said, I have 30 minute art classes, twice a week...and those minutes go by in a blink. So, on our first two days together, we spent one day cutting ovals and talking scissor safety. It seems silly...but it was necessary. Ovals cut were placed in a community stack for the following day's printing activity. Here's a video of me teaching the first day portion:
From there, we printed! One day we printed with white paint and the next, black paint.
Week Two: After another day of printing, we had a nice stack of painted trees. Those we kept for our own, we did not share. We learned all about landscapes, horizon likes and collage the following day. We then cut a piece of land and added it to our chosen sky background.
Week Three: We talked a lot about overlapping, variety and composition the final day before we glued our trees down. I did alter the lesson in that, after the kids glued the trees down, I had them use black and white oil pastels to add the trunks, not paint. Less mess on our last day.
I've not matted and framed them for the halls yet, hence the curled edges. I'm looking forward to popping all of our landscape projects up in the halls very soon. Now that these guys are finished, we can move on to our next big undertaking. Just don't ask me what that is yet!
I'm just gonna sit back and admire the view.
I was so excited with how these turned out (and now excited the kids were) that I immediately popped them up onto my IG page.
Imagine how excited I was when our artist inspiration, Eloise Renouf, posted below...it seriously made my day! I cannot wait to share her message with the kiddos!
I love how social media makes our world just a little bit smaller...
What's the worst thing about taking time off from school? Say it with me: SUB PLANS. Well, I thought I'd share a couple of sub plannin' tips with y'all today along with my most recent sub plan video! Let's kick it off with that, shall we?
My super fabulous sub will be hanging out with my artists for a couple of days. Most of my classes are just 30 minutes long...so, for that reason, I've left my sub this video and some instructions: just have the kiddos create the houses and begin the coloring portion. I learned my lesson the hard way my very first year teaching: don't leave a sub anything complicated. Granted, my first year teaching, all I left out were markers (brand new ones, mind you) only to find them scattered about with their caps off when I returned. Needless to say, I'll be handling the painting side of this project when I return. Speaking of, here's why I like having ALL of my grade levels work on the same project AND have them continue to create when I return. It means that, come Monday, I'm not running around, scratching my head wondering what we are working on. Instead, I can take it easy, set out one supply: watercolor, and know that it will be a calm way to return. Not only that, but we'll have a beautiful masterpiece to show for our efforts even if the art teacher had the day off. Before we continue chatting about this project, I thought I'd share some of my other fave sub plans that resulted in beautiful creations. Feel free to use these sub plans in your art room!
I have to say, whenever I can, I call upon the same subs. My subs LOVE these videos...at least that's what they tell me. It makes their life so much easier and the kids are actually creating! Not just watching a video (well, they ARE but you know what I mean) or doing busy work. The kids are engaged and that makes the subbie's job so much easier. Complete version of this sub plan can be found here.
This sub plan was a fun one...I could tell the kids had a blast based on the monsters they created! Find the complete details of this sub plan right here.
While prepping for the sub, I created an Art Teacherin' 101 all about planning for a sub. This is what I can accomplish in an ideal situation: when I know I'm going to be away and I have plenty of time to prepare. Not all of us have this luxury. But, when I do, this is what I do.
Holy Moly, this has been one of THEE most popular lessons I've shared on my blog: The Wings Mural! I've seen so many versions of this lesson and I LOVE it! This all started out as a sub plan and grew much bigger than I ever imagined. I'm so thrilled so many of y'all have found it useful. Here's the link to the original blog post.
My very first sub videos were created when I had to be gone for...jury duty. Boy, that was a good time. Let me tell you, nothing makes you happier for your chosen profession than...JURY.DUTY. Anyway! My sweet artists created these happy hearts while I was away jurying.
Alrightie, now let's return to the sub lesson at hand, shall we?
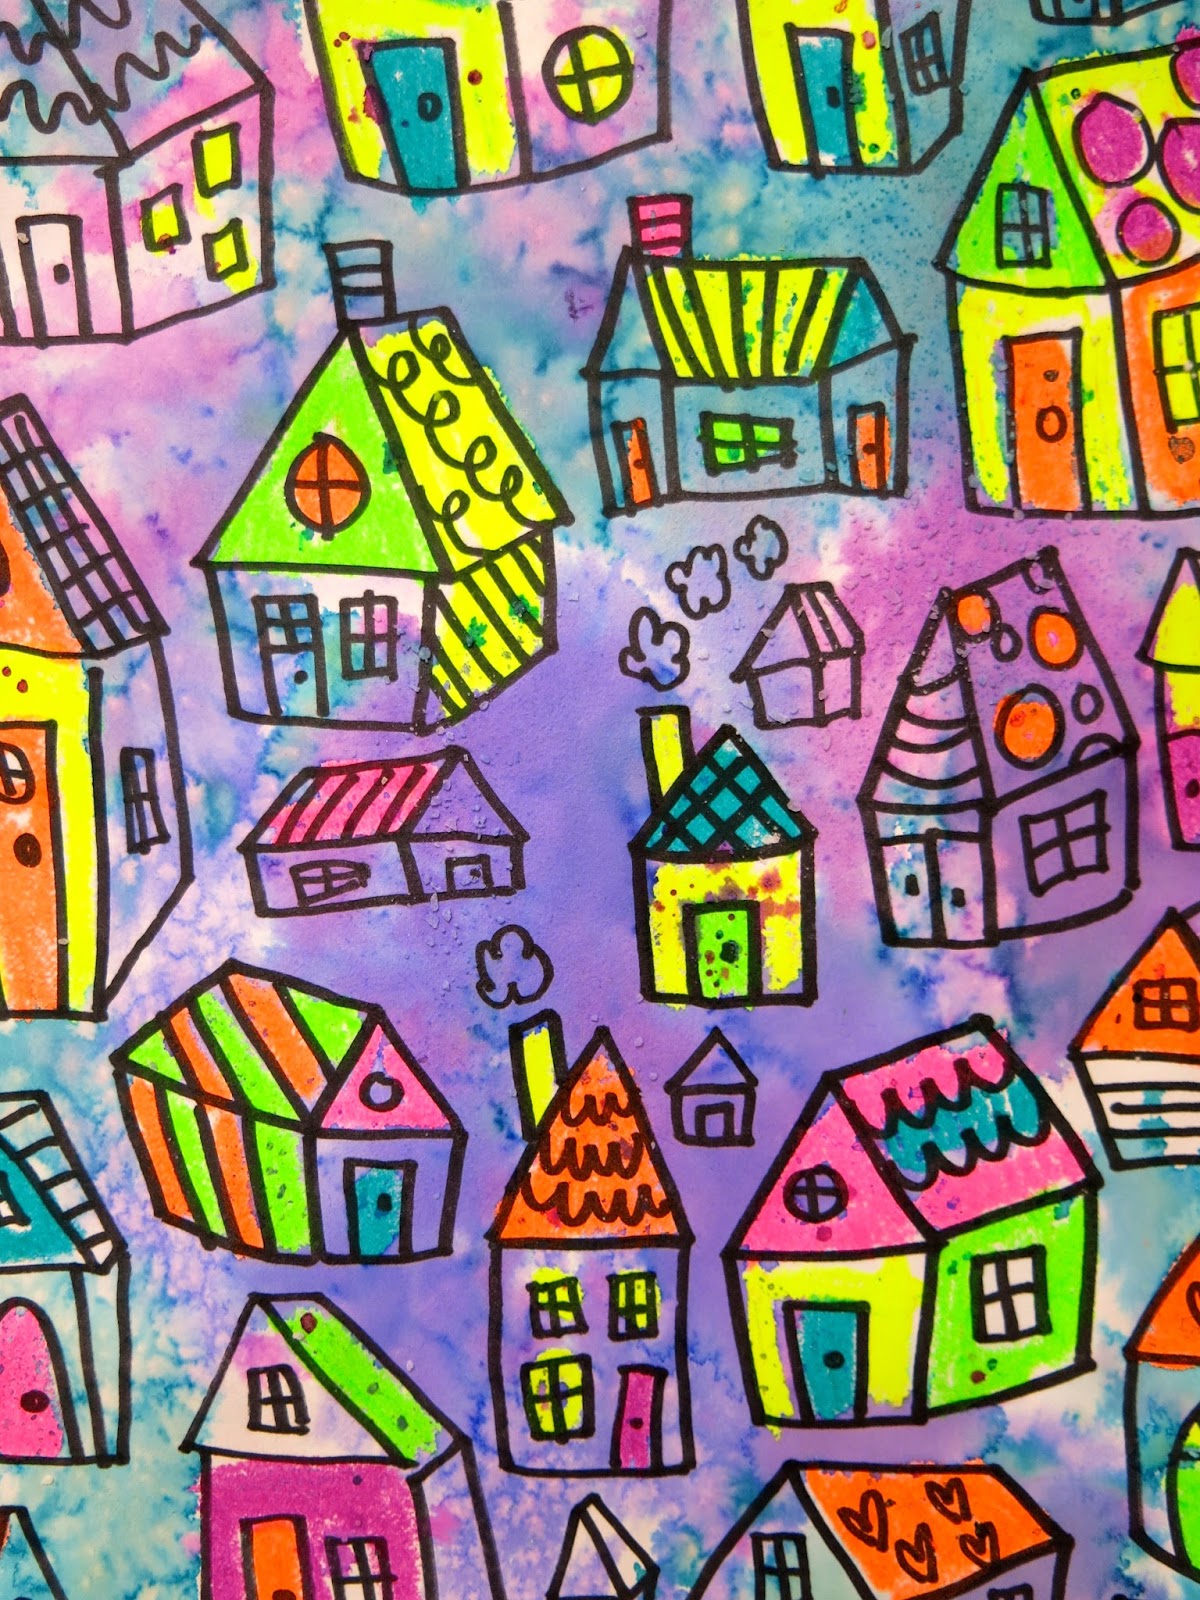
As I was sayin', with my sweet sub, my artists will be learning how to draw a 3-D house. I'm encouraging them, via video, to create a variety of houses embellished with patterns. As inspo, I'll be leaving my sub the book The Big Orange Splot to read to the kids if time allows.
If this book is not in your library, it totally should be. AND, if it is, can we PLEASE talk about what Mr. Plumbean is serving over at his house during those late night talks with the neighbors? I'm thinkin' it's pretty good stuff to inspire those wild houses created!
AND now let's talk oil pastels. THESE ARE MY FAVORITE ON THE PLANET! I keep referring to them as Galaxy in my IG feed because I'm completely ignorant. Sorry, my bad. They are GALLERY (I get points for staring with the same letter, don't I?!) and they are by Sargent. They are also sent from Art Teacherin' Heaven and I cannot recommend them enough.
When I return, the kiddos will add a splash of liquid water color paints and return to their usually scheduled program. I'll be happy they continued to learn and create in my absence and they'll be thrilled not to have watched a mindless vid and drawn all over a worksheet. Winner-winner, Chicken Dinner!
LOVE to hear your fave sub plans! AND, if you give this project a-go, I'd love to see the results. Be sure and tag me on Instagram, Facebook or where ever you get your social media on.
Those who are unfortunate enough to have to work with me know that I'm a bite-off-more-than-I-can-chew/start-now-figure-it-out-later/wild-and-crazy kind of gal. Thankfully, I work with The Best folks who not only tolerate my silliness but, I daresay, encourage and facilitate my weird ways. All that jib-jab to say this: look what the kiddos created for our 2017 collaborative! Learning for All with a contribution from each of my first through fourth grade artists and a whole lotta blood, sweat and (after misfires of the staple and hot glue gun) tears on behalf of me and my P.E. teacherin' buddy Ali Starkweather!
Ah! This 5' 6" mama weighs in at just over 15 lbs and is every bit of awesome, if I do say so. I've had the itch to create something in our foyer every since the kiddos created our Johnson Elementary sign a couple of years ago. And, with the successful creation of this massively heavy mosaic beast, I KNEW the custodians and maintenance dudes could make hang the monster...but how to create it?
I originally got the idea this summer while I was at the hardware store and spotted paint stirring sticks. Before I knew what was happening, I was taking the folks at Home Depot into donating a ton of sticks to me for the cause. I was inspired by the Color Wheel Clock I created some years ago and just kind of went from there.
With this inspo in mind, the first days of school, I had my first through third grade kiddos paint a stick with a color and white. This was easy: after going over the rules, routines and whut-nots of the first day, I was like, here, let's paint a stick, doesn't that sound fun?! After a resounding NO!, I chatted about creating a collaborative and a legacy piece to leave behind. That was a little more inspiring. With our leftover paint, we created painted papers for future projects.
My fourth grade kiddos were given the large paint stirring sticks. Those I did have to pay for as Home Depot decided they had to draw the line somewhere. I didn't mind. The kids were given baskets of analogous colors and requested to "leave their mark". They happily did so. After a wee sword fight with the sticks.
Once all the sticks were complete, the MASSIVE assembling began. I'm not even gonna lie: I hardly snapped any photos as I wasn't sure if this was even going to be possible. In fact, it wouldn't have been possible had my buddy Ali not stepped in. She was determined this was gonna work. I'm so thankful she helped me...otherwise it would still be in bits in the art room!
I just so happened to have the large round canvas at my house, sitting around, collecting dust. Ali and I began by laying out the colors of the shorter sticks and deciding how they would go together. When someone asked how it was assembled, I believe Ali put it best, "Lots of hot glue, gorilla glue, and a staple gun....and then LOTS of hot glue, gorilla glue and a staple gun!!! lol..." She says LOL but what that really means is for real tho. There's a reason we didn't snap any photos of the assembly.
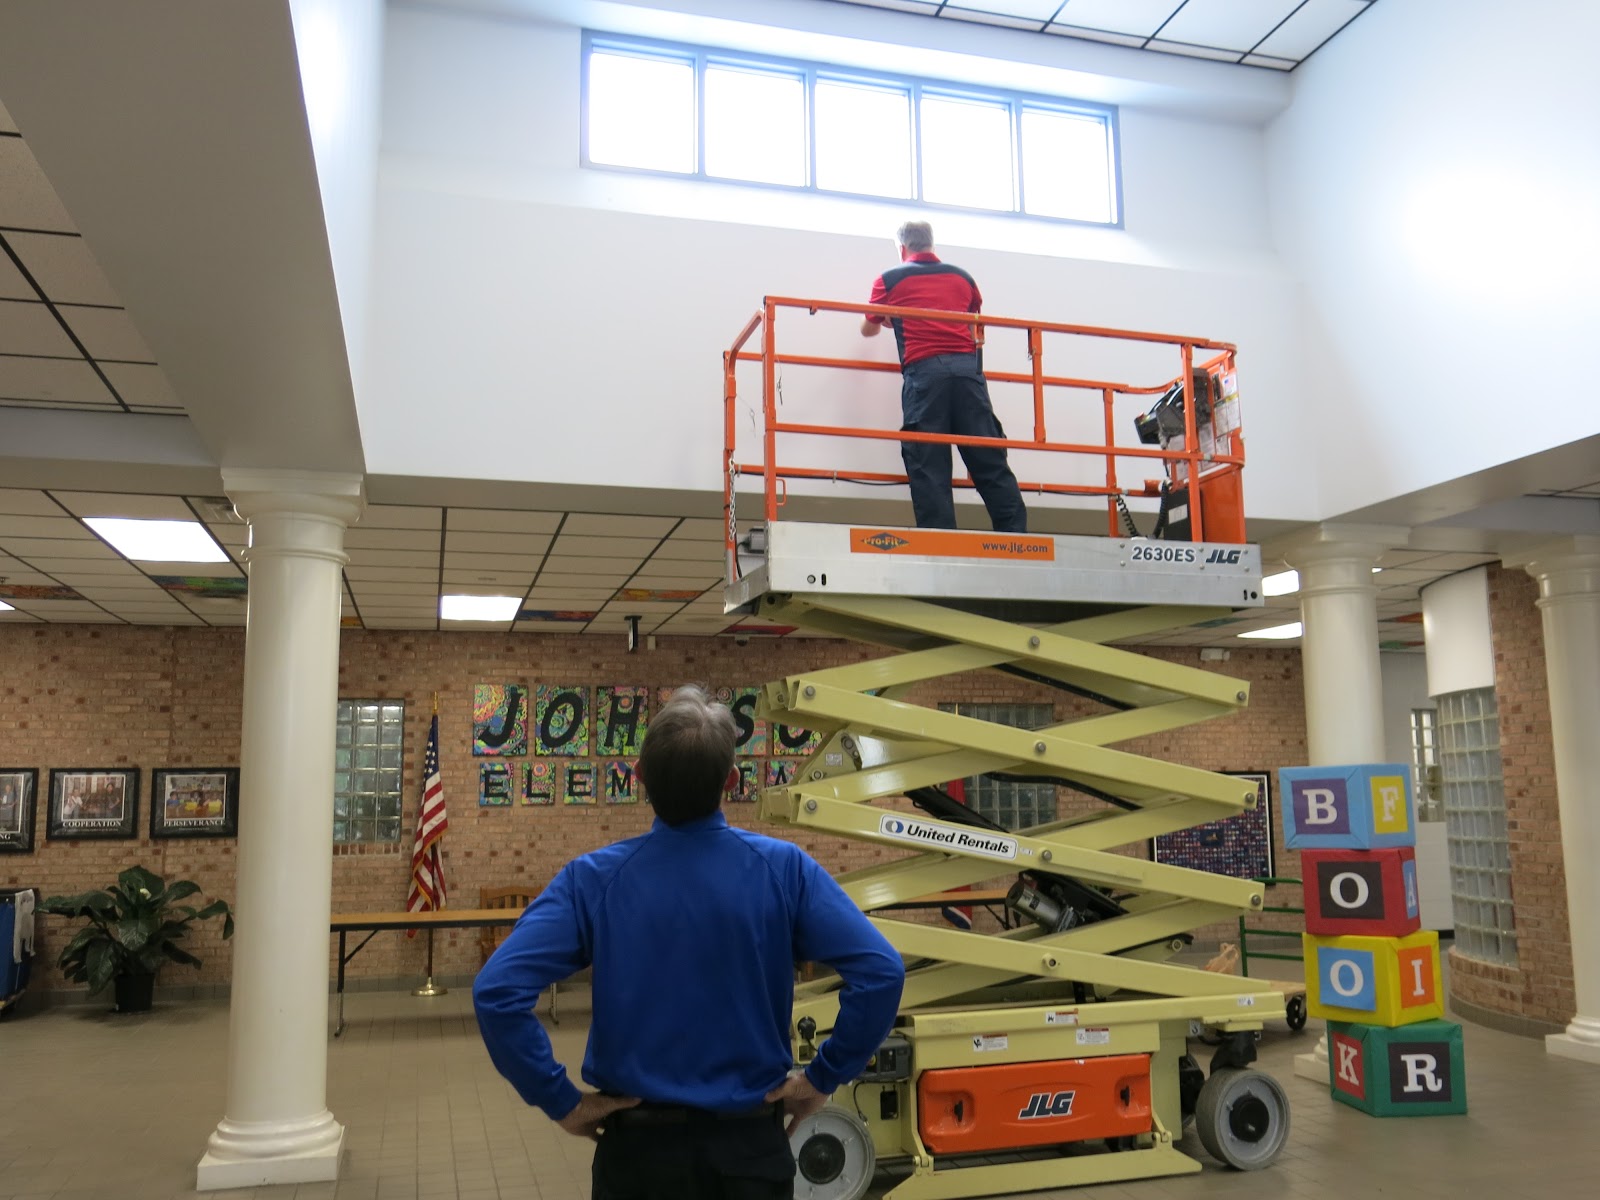
Y'all better believe I wanted this bad boy up in time for Open House. And all y'all better also believe it was only finished the day of. In fact, these sweet fellas had to wait a pinch as the wording I had JUST painted needed to dry.
And then, of course, the domino effect of disasters transpired: the lift stopped working; I didn't paint the wording to align with the hanger on the back (no surprise there)...but there was no need to worry. By some miracle of miracles, the lift was fixed the so was my hanger malfunction. And, viola! Masterpiece hung in time for Open House!
High five to these handsome devils!
Every morning, when I do morning duty, I've been pleased as punch to see this happiness greeting our kiddos as they enter our school. This mantra is a portion of our school motto...and I believe everyone who loves to teach at Johnson Elementary agrees.
Even if some of 'em are a wee bit crazy. But I'm in such good company!
Thanks for letting me share! This was a fun collaborative...and one that my wee artists and I (as well as all who were involved!) are mighty proud of!