Saturday, January 21, 2017

In the Art Room: Happy Hearts Inspired by Chris Uphues

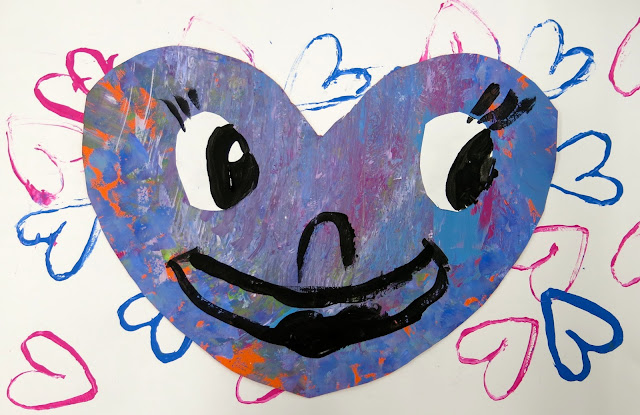
Hey, friends! Second grade-land has just finished off a fun project with a strong focus on LOVE. My theme this year has been kindness and with Valentine's Day right around the corner, I really wanted to focus on all things love-y. Because, let's face it, the world could use a whole lot more love right now! 
And if these happy hearts don't help spread the love, I don't know what will! 

Another focus this year has been to introduce my students to more contemporary artists and also street artists. During my search, I discovered the artist Chris Uphues and completely fell in love (sorry, I had to) with his work, especially his happy hearts! 
If you aren't familiar, Chris is an artist based out of Chicago whose heart murals can be found there as well as in New York and Los Angeles. When I discovered his work, I was immediately struck by how happy it made me! I knew the colors, energy and joy in his work would really resonate with my students. Y'all should really check out his website...I love that his hearts can be purchased in the form of reasonably priced prints, patches and pins. I've got a cart full! 
I would totally cover a wall in my house in these! I mean, who wouldn't?! 
For the Happy Hearts pieces that my second graders created, we used the following:

Day 1:
* Black and white paper, 12" X 18"
* Tag board heart stampers
* Paint in yellow, magenta and turquoise

Day 2-3: 
* Painted papers, construction paper, scrap papers for hearts
* White paper for eyes
* Black paint
* Scissors and glue
Day 1:

I see my second grade kiddos for 30 minutes, twice a week. On our first day together, we chatted about Chris and his work. I introduced the kids to printing and we printed a black paper and a white paper full of hearts. To see how the heart stampers were created, watch the first 5 minutes of this video
On day 2, students learned how to cut out hearts. Many students knew how to do this already...but I had several that didn't. This was a great introduction to symmetry! I also offered them oval, circle and other shaped templates for the eyes. Once those were glued down, black paint was available for the artists to paint the faces. I had printed off several sheets of Chris' hearts to give the kids ideas for expressions. 
By the end of the second day, we had a ton of these! I love how happy and fun they are. 
Over the next couple art classes, the kids created more hearts and began adding them to the printed backgrounds. They so enjoyed creating these expressive heart faced characters. This project was a huge hit with them! 
Each kid was super engaged in creating their heart collages. When I told them that we'd be moving on to another project next week, each class shouted "WHY?!" They couldn't stop making these hearts! I just might have to give them one more day to keep on heartin'. 
As they worked, the kids had stories about each heart and how they interacted with each other. We had heart moms, dads, babies, grandparents, you name it! 
As they worked, the kids laughed at their hearts, showed them off to friends and pulled ideas from one another. 
Before gluing, we did chat about composition, overlapping, emphasis and scale. I wanted to remind the kids of these thoughts as they worked...but made sure not to weigh in too much as I really wanted to see where their ideas would take them. 
 Because, I mean...look at how fun and funny they are!
I'm so looking forward to showcasing these throughout our school along with all of our other LOVE-based projects. Just a quick scroll through this blog and you'll find half a dozen love-based projects we are currently working on in the art room. 
The best part is, I've tagged Chris Uphues on several posts showcasing the kids' hearts on my Instagram and he's been so sweet to respond! The kids have loved hearing his positive feedback. 
It's made us feel all...happy! Like this. 
 
If you are looking for a fun lesson for your students that introduces printing, symmetry, expression, collage and the amazing contemporary artist Chris Uphues, I strongly recommend this fun lesson! Love to hear from you if you give it a go!
 photo signature_zpsd10b3273.png

Wednesday, January 18, 2017

In the Art Room: Valentine Animals!

JUST A REMINDER! Join me this evening over on Facebook LIVE at 8pm CST. We'll be sharing ideas on what to do with those kiddos who finish early. Come with your tips and tricks and I'll share mine as well. Looking forward to chatting with you tonight!

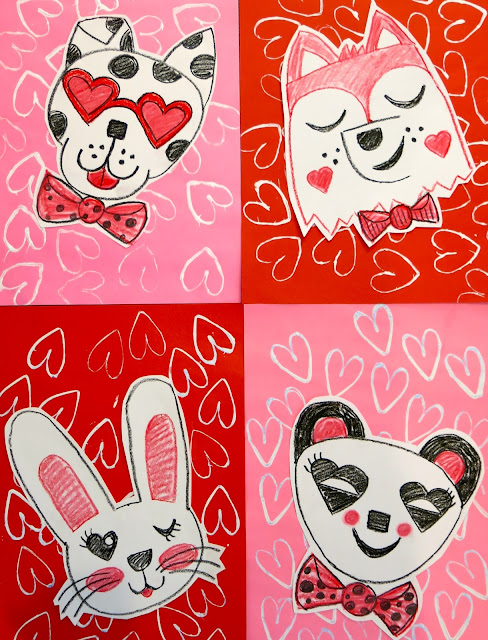
In an attempt to introduce my younger students to printing, reinforce the elements of art, work on our fine motor skills (we really need it, y'all!) and spread a little LOOOOOVE, I created a series of videos called Valentine Animals! Initially, I was going to put all of the How-to-Draw tutorials in one video but there were a couple of problems with that notion. First, the video would have been close to an hour! Long vids take too long to upload (and download when you want to use them in your art room). Second, I wanted to be able to find particular How-to's easily and having them in separate videos proved to be the best way to make that happen. 

So I present to you a series of four Valentine Animal videos. Feel free to use them in your art teacherin' world. I'd love to hear from you (and see your students' work) if you do!
This really started when the first grade team at my school approached me about doing a 101 Dalmatians art project for the 100 days of school. I came up with the project on the left. The firsties had just finished their weaving project so it was the perfect time to start something new. I thought the project brought so many elements together that it would be a perfect fit as a lesson for my kindergarten friends as well. 
The panda video is the only one where I walk you through the steps to creating the heart stamps for printing. It's also the only video that I share how to carefully cut out and adhere the animal to the background paper. I didn't want each video to repeat so I only put those directions in this video. 
Because my students are starting these this week, I don't have any finished ones to share...but I'll make sure to share when they are complete!
 So the fox might be my fave. Here's the video:
As I mentioned in my previous post, I'm currently working with Faber-Castell so you'll see me using their supplies quite a bit. I'm excited to work with this company because I love their products. You can check out my review of their oil pastels here
Did I mention that I've been recruited to dress as Cruella Deville for the 100th day? Oh yea, buddy! Here's the puppy video:
In case you are wondering why I did so many different animals, I am planning to have each kinder class do a different one. This will add more variety to our hallway display. 
 And last, a bunny!
This one is probably the easiest. 
And there you have it! Have fun!
 photo signature_zpsd10b3273.png

Monday, January 16, 2017

In the Art Room: Candy Heart Drawings

Just a note: I'm constantly updating my YouTube channel with new lessons that y'all are free to borrow. The lessons don't typically make it to a blog post until several days or weeks after I've shared them there. To keep updated on those videos, y'all might wanna subscribe here. And please let me know if you use the videos in your art teacherin' world, I'd love to see what your kiddos create!

Currently, my fourth graders are creating large scale candy hearts (shown below, lesson here). Because my students work at different speeds, I wanted to have an additional project that they could work on if they finished a phase in the sculpting project early; would tie-in with their sculpting project; would introduce drawing three dimensionally and would be fun...and that's how this Candy Heart Drawing lesson came to be!
I did something very similar to this idea last year when my fourth graders created these large scale crayons and pencil sculptures and worked on these collaborative crayon drawings in addition. This Candy Heart Drawing project could easily be a collaborative drawing project as well...which was originally my intention. But with some kiddos still sculpting while others were ready to draw, it just didn't work out that way. But, if you do this lesson with your students, it would be something that you could definitely try! 
Complete lesson video with tons of technique and vocabulary for your students!
Full Disclosure: I am currently working with Faber-Castell and creating lessons using some of their art supplies. I agreed to do so after testing their supplies out personally and with my students. I feel very confident in the quality of these oil pastels. 

Here is what I found: 

* There is less breakage. Often the oil pastels my students use crumble and break. These did not nor did they produce as much "oil pastel crumbs" as the brands I have used in the past.

* They don't roll off the tables! I love the hexagon shape of the pastel.

* The pack I had didn't have a huge assortment of color...but we don't need it! With the baby oil trick, you are blending the colors and producing a wider range of color and value. 

* They are bigger and will last longer. I used to order a different brand that was about half the size and we wore those out. These are definitely going to last. 
 If you decide to do this lesson and you want to have visual steps for your students, here you go. I having the visuals up as well as the video rolling (on silent, if it has already been played once) can be a helpful reminder of the steps. 

Supplies:

* 12" X 18" watercolor or heavy stock paper. Because you'll be using baby oil, thin paper will not work. 
* Oil pastels
* Baby oil
* Q-tips
* Heart-shaped templates (not necessary but helpful)

1. Trace several hearts all over the paper using the template. Think about a spilled box of candy hearts. Have some hearts overlap, other only partially on the paper.

2. Create the illusion of three dimensional hearts by drawing only on the right or left side of the heart. 
 3. Using an oil pastel, outline your heart and then color in one direction. 
 4. Cross-hatch over that with a white oil pastel. 
5. Using a Q-tip and baby oil, blend the colorful oil pastel and the white together to create a tint, or a light color. 
 6. To create depth, color only the top and bottom of the side of the heart in color and the middle in white.
 7. Blend with Q-tip and baby oil.
 8. Think of what you'd like your Candy Heart to say. Write it out on a piece of paper the same size as your heart. 
 9. On the reverse side, color very hard with a pencil using cross-hatching. Place the paper heart over the oil pastel heart and trace your words. 
 A copy will appear!
 10. Go over your words again in red oil pastel or a color of your choice. Continue with this process until your masterpiece is complete!
 My students have already started their hearts and they are looking fabulous! I'll be sure to share a follow-up post when they are complete. 
Feel free to share this lesson and video with your students! I'd love to hear from you (and see the amazing work of your kiddos!) if you do. Have fun!
 photo signature_zpsd10b3273.png

Saturday, January 14, 2017

What the Art Teacher Wore #172

Allow me to just kick off this here What the Art Teacher Wore by saying No, I did not create that AMAZING felt flower Frida-esque crown I am wearing. It was created by art teacher Linda McConaughy who was so sweet and kind to send it to me. You can check out and purchase Linda's designs here. If there is something you have in mind, message her! And, if you've ever been to NAEA, you might also know Linda by her paint brush crown pieces (you can see me wearing mine here!). In fact, she'll be at NAEA in NYC this March (as will I, so excited) so you can check out more of her wares there. Thank you so much, Linda, I LOVE my flower crown and my students did as well. Matched my color wheel shirt completely!
 Target, You have the Best Kid's Clothes: I ain't ashamed to admit I just about purchased the entire Cat and Jack line at Target...for myself. Yes, it's kids' clothes. No, I don't care. That color wheel shirt is currently on clearance for something crazy like $2, y'all! top and skirt: Cat and Jack for Target

So. Did y'all survive Friday the 13th, the full moon and Mercury Retrograde (I'm not exactly sure what that is but if it had anything to do with the painting of one's hands and then licking it off episode I witnessed this week, I ain't down with it)? Thankfully, I have a long weekend to recover. It was my first week back after the break and we hit the ground running: weaving, sculpting, painting, printing. You name it, we were doing it. And all of it was in the name of LURVE...
 Before break, my firsties had finished these weavings. Honestly, I had NO idea what we were going to do with them until Monday morning. I remembered that before break, these kids had whizzed through weaving. So I decided to see if they could handle a little bit of hand stitching. Y'all, they rocked it! You can check out the complete lesson here
With all the possible bad luck floating around, I decided to ward it off with some freaky evil eyeball jewelry. You can see more of this craziness here. I'm so on a 80's kick right now, y'all. I've had a hair crimper in my Amazon shopping cart for a week now. 
 The Problem with Wearing Kid's Clothes: Is that half of your students wear them too. I was told that I match several kiddos in our school, a couple in kindergarten and a few in first grade. Yep. I've got the fashion sense of a 6 year old. Sounds about right. top: Cat and Jack; skirt and tights: Target; boots: Frye
Second grade printed this week and learned about the artist Chris Uphues. I love his artwork but his street art hearts are my faves. The kids really got into his work. Lesson to come!
 Wonderful Wednesday: I was so excited about Wednesday because my fourth graders started on their Candy Heart Sculptures! sweater: thrifted; pins: vintage; top: JCrew; skirt: resale find at Buffalo Exchange (I knooooooow!); yellow tights and hot pink fishnets: who knows
We got out armatures complete and started on the process of cutting the plaster into strips. I wasn't about to do that myself so I put the kids on that one. Next week, we cover in plaster!
 When You Look as Ridiculous as You Feel: All day long. That's what happens when you dress like a kid, y'all! top and skirt: more Cat and Jack. I done told you I bought everything they had. Gift cards from Christmas came in mighty handy; shoes: Aldo
Second grade had so much fun printing hearts that I decided to create more stampers and have kindergarten do it as well. You can see how I made the stampers here. More to come on this lesson! 
All Eyeballs on Me: Yep, I had to. Details on this dress here. Shoes from Modcloth
 photo signature_zpsd10b3273.png