Showing posts with label valentines art. Show all posts

Monday, December 30, 2024

10 Lessons to Ease into the New Year, Valentine's Edition

Okay, listen, I get it. We're still in December and you may not want to be thinking about what's gonna go down in your art room next week (or this week? Do you return to school on Friday?). Regardless, I thought I'd help you out by offering some of my favorite EASY and engaging lessons that will allow you to ease your way back to the art room. Most of these lessons have a video so you can play that for your students while you grab your coffee and try to remember what day it is.

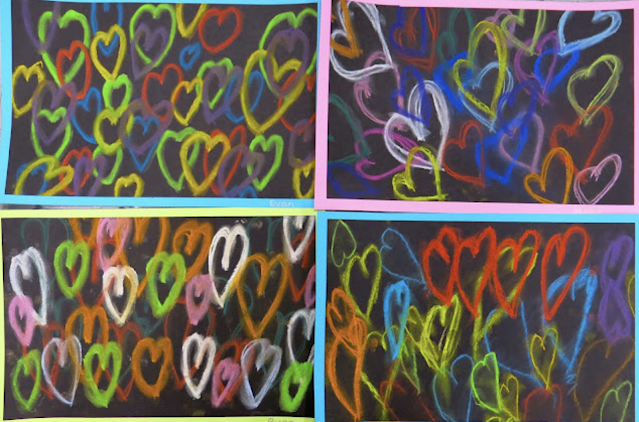
Let's start here! This lesson is ALWAYS a hit and, believe it or not, I do it with kindergarten. HOWEVER...when I return to school after a  long break, the last thing I wanna do is prep like mad for 5 different grade levels. It stresses me out and, because our students our little mirrors who reflect us, it stresses the kids out. SO! I often do this lesson with EVERYBODY, kindergarten through 4th. Does it make for a lotta messy paint trays, paintbrush washing and overflowing drying racks? YES. But does it also make for a gorgeous display of hearts created by the whole school that is ready to be hung BEFORE Valentine's Day (always the goal, right?!). Yes! So, let's go. Full lesson here.
This is a fun one and totally addictive so...beware! 
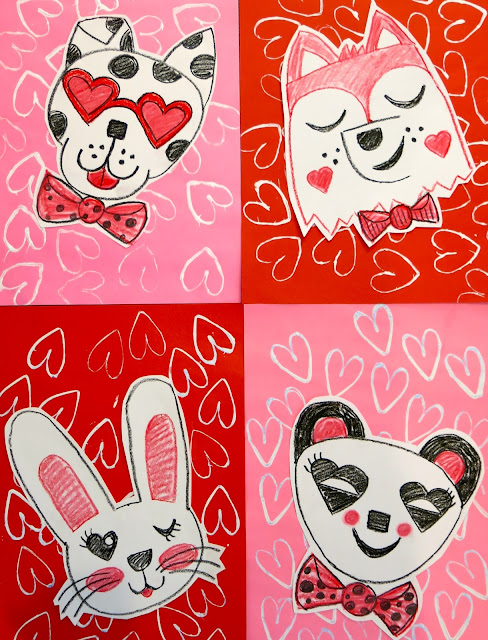
If you want to start with a little less mess, then just bust out the black, red and white oil pastels and get the kids drawing! They adore drawing cute stuff and these little Valentines critters are perfect for that. I created a video for each. You can check out the blog post with all the info here. We also did a stamped background that is totally optional. Here's the video for the bunny:

Now, if you want a demo on how to create the stamped heart background, be sure and check out the panda video (below) as I walk you through those initial steps. 
Here's how you can draw a long with me to create this fox:

And here's how to create the background and draw that panda:
Here's the video for that:

And last but not least!

Let's draw this cute Valentine's Pup!

For your older students, third on up, they may enjoy creating this 3-D heart!
This one is super low-mess as all it requires are markers, water and a paintbrush (and an oil pastel once dry, but that's totally optional). I share the details in this blog post. 


This project was done in just 30 minutes (the length of my art classes) and only uses chalk! I was also able to introduce my students to a contemporary artist for the process. Details here!


This is probably one of my all-time fave kid-approved lessons: this Chris Uphues-inspired heart art! 

If you need a line review lesson, you might want to try these Romero Britto-inspired hearts on for size! 
Of course, you should definitely share my book Larry the Line which also has two printable pages of line-inspiration in the back! 


And if you are looking for a lesson that packs a powerful contemporary artist punch, then THIS lesson with an introduction to four artists who use hearts in their art is the one for you! I did this on a half day with fourth graders and they knocked it out in one class period! 

Of course, since we are going to be talking about hearts, now is also a great time to either introduce or review SHAPES! Don't forget...Alfred can help you with that!
Remember: take it easy as you ease on in to this new year! Have fun!

photo signature_zpsd10b3273.png
Read more »

Wednesday, January 18, 2017

In the Art Room: Valentine Animals!

JUST A REMINDER! Join me this evening over on Facebook LIVE at 8pm CST. We'll be sharing ideas on what to do with those kiddos who finish early. Come with your tips and tricks and I'll share mine as well. Looking forward to chatting with you tonight!

In an attempt to introduce my younger students to printing, reinforce the elements of art, work on our fine motor skills (we really need it, y'all!) and spread a little LOOOOOVE, I created a series of videos called Valentine Animals! Initially, I was going to put all of the How-to-Draw tutorials in one video but there were a couple of problems with that notion. First, the video would have been close to an hour! Long vids take too long to upload (and download when you want to use them in your art room). Second, I wanted to be able to find particular How-to's easily and having them in separate videos proved to be the best way to make that happen. 

So I present to you a series of four Valentine Animal videos. Feel free to use them in your art teacherin' world. I'd love to hear from you (and see your students' work) if you do!
This really started when the first grade team at my school approached me about doing a 101 Dalmatians art project for the 100 days of school. I came up with the project on the left. The firsties had just finished their weaving project so it was the perfect time to start something new. I thought the project brought so many elements together that it would be a perfect fit as a lesson for my kindergarten friends as well. 
The panda video is the only one where I walk you through the steps to creating the heart stamps for printing. It's also the only video that I share how to carefully cut out and adhere the animal to the background paper. I didn't want each video to repeat so I only put those directions in this video. 
Because my students are starting these this week, I don't have any finished ones to share...but I'll make sure to share when they are complete!
 So the fox might be my fave. Here's the video:
As I mentioned in my previous post, I'm currently working with Faber-Castell so you'll see me using their supplies quite a bit. I'm excited to work with this company because I love their products. You can check out my review of their oil pastels here
Did I mention that I've been recruited to dress as Cruella Deville for the 100th day? Oh yea, buddy! Here's the puppy video:
In case you are wondering why I did so many different animals, I am planning to have each kinder class do a different one. This will add more variety to our hallway display. 
 And last, a bunny!
This one is probably the easiest. 
And there you have it! Have fun!
 photo signature_zpsd10b3273.png
Read more »

Monday, January 16, 2017

In the Art Room: Candy Heart Drawings

Just a note: I'm constantly updating my YouTube channel with new lessons that y'all are free to borrow. The lessons don't typically make it to a blog post until several days or weeks after I've shared them there. To keep updated on those videos, y'all might wanna subscribe here. And please let me know if you use the videos in your art teacherin' world, I'd love to see what your kiddos create!

Currently, my fourth graders are creating large scale candy hearts (shown below, lesson here). Because my students work at different speeds, I wanted to have an additional project that they could work on if they finished a phase in the sculpting project early; would tie-in with their sculpting project; would introduce drawing three dimensionally and would be fun...and that's how this Candy Heart Drawing lesson came to be!
I did something very similar to this idea last year when my fourth graders created these large scale crayons and pencil sculptures and worked on these collaborative crayon drawings in addition. This Candy Heart Drawing project could easily be a collaborative drawing project as well...which was originally my intention. But with some kiddos still sculpting while others were ready to draw, it just didn't work out that way. But, if you do this lesson with your students, it would be something that you could definitely try! 
Complete lesson video with tons of technique and vocabulary for your students!
Full Disclosure: I am currently working with Faber-Castell and creating lessons using some of their art supplies. I agreed to do so after testing their supplies out personally and with my students. I feel very confident in the quality of these oil pastels. 

Here is what I found: 

* There is less breakage. Often the oil pastels my students use crumble and break. These did not nor did they produce as much "oil pastel crumbs" as the brands I have used in the past.

* They don't roll off the tables! I love the hexagon shape of the pastel.

* The pack I had didn't have a huge assortment of color...but we don't need it! With the baby oil trick, you are blending the colors and producing a wider range of color and value. 

* They are bigger and will last longer. I used to order a different brand that was about half the size and we wore those out. These are definitely going to last. 
 If you decide to do this lesson and you want to have visual steps for your students, here you go. I having the visuals up as well as the video rolling (on silent, if it has already been played once) can be a helpful reminder of the steps. 

Supplies:

* 12" X 18" watercolor or heavy stock paper. Because you'll be using baby oil, thin paper will not work. 
* Oil pastels
* Baby oil
* Q-tips
* Heart-shaped templates (not necessary but helpful)

1. Trace several hearts all over the paper using the template. Think about a spilled box of candy hearts. Have some hearts overlap, other only partially on the paper.

2. Create the illusion of three dimensional hearts by drawing only on the right or left side of the heart. 
 3. Using an oil pastel, outline your heart and then color in one direction. 
 4. Cross-hatch over that with a white oil pastel. 
5. Using a Q-tip and baby oil, blend the colorful oil pastel and the white together to create a tint, or a light color. 
 6. To create depth, color only the top and bottom of the side of the heart in color and the middle in white.
 7. Blend with Q-tip and baby oil.
 8. Think of what you'd like your Candy Heart to say. Write it out on a piece of paper the same size as your heart. 
 9. On the reverse side, color very hard with a pencil using cross-hatching. Place the paper heart over the oil pastel heart and trace your words. 
 A copy will appear!
 10. Go over your words again in red oil pastel or a color of your choice. Continue with this process until your masterpiece is complete!
 My students have already started their hearts and they are looking fabulous! I'll be sure to share a follow-up post when they are complete. 
Feel free to share this lesson and video with your students! I'd love to hear from you (and see the amazing work of your kiddos!) if you do. Have fun!
 photo signature_zpsd10b3273.png
Read more »