Showing posts sorted by relevance for query Clay. Sort by date Show all posts

Tuesday, June 6, 2017

In the Art Room: Salt Dough Sunflowers!

Here's a way to introduce your kiddos to clay even if you don't have a kiln: Salt Dough Clay! Last summer, when I was writing my book Clay Lab for Kids, I had to come up with kid-friendly clay recipes. You see, the book is divided into three parts: projects created with air dry clays available at craft stores; polymer clay projects and clay projects created with homemade clays. There are several clay recipes in my book (including an edible clay!) and this salt dough clay is one of my favorites. Here's how to make it and create a Salt Dough Sunflower (a project not found in my book, just for you!):
Here's the recipe which would be enough clay to create a half dozen flowers:
(Allergy warning! If you are allergic to gluten, this is not the project for you.)

* 2 cups all-purpose flour
* 1/2 cup salt
* 3/4 cup water

Mix all of the ingredients together in a bowl. Dump out ingredients onto wax paper or plastic and continue to knead until a soft dough forms. When creating, be sure to work on a plastic covered surface as this stuff is sticky! Also, when making this flower, use a styrofoam bowl or a bowl covered in plastic wrap so that the flower pops out easily when dry. 

Also, any clay not used, simply wrap in plastic wrap and store in the refrigerator for later use. 
I placed my flower in front of a fan to dry overnight. Just so you know: this is a dough so it will rise a bit! Don't be surprised if your flower looks a little fluffy once dry. 

Salt dough can also be cured by baking in the oven at 200. Keep an eye on it as the goal is simply to dry it out, not burn it. I have cooked mine for 15-30 minutes depending on the dampness of the clay. 

I painted my flower with acrylic paint but tempra could also be used. Be sure to cover with a coat of ModPodge to insure that it will not break. 
If you don't subscribe already, I update my YouTube channel with videos like this and all things art teachery pretty frequently. You are always welcome to use my videos and lessons...I just always appreciate a shout out. 

In other news, I'll be presenting at Art Ed NOW on August 3rd on...you guessed it, all things clay! I'll be sharing a TON of no-kiln clay projects for the elementary and middle school set. 

And if you've picked up my clay book and you have a spare moment, a review here would be so very much appreciated. Thank you so much, y'all!

 photo signature_zpsd10b3273.png

Monday, February 25, 2013

DIY: Ceramic Gnome Homes

A neighborhood of gnome homes.
 My hubs and I've been married for something like a dozen years. Not sure exactly because I lost our marriage certificate long ago. It wasn't a day that stands out in my mind because it was simply a fifteen minute session with the judge at the courthouse. I don't remember much except that I wore this horrible cornflower blue two-piece suit dress from Talbots thus making me look like Barbara Bush. Hawt.

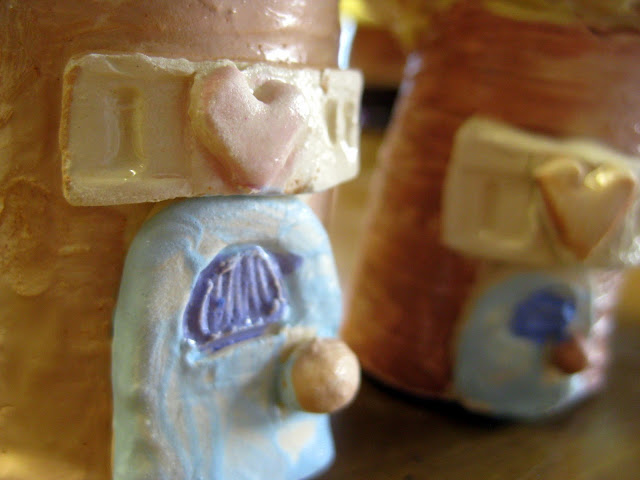
Details of adorableness. You sure you can handle this much cute?

Wait. Where was I going with this? Ah, yes, married life. In the beginning, hubs and I were never apart. And it was lovely cause we didn't wanna be. This changed over time (like six months in) and I began to kinda-sorta freakin' love my alone time. You see, hubs has to go on these occasional work trips and when he does, I likes to party. And by party I mean invite a buncha buddies over for grown-up drinks, laughs and gnome-home making. Exactly what the Beastie Boys were talkin' about during their fight for the right to party.
Textures for clay: lace, crochet bits, burlap and plastic doilies. Although texture possibilities are endless. My personal fave: the bottom of my shoe.
 Let's say you wanna indulge in your own gnome home making merriment. Well, this here clay project is so easy you can still be successful after a grown-up drink or three. Here's what you'll need:
  •  clay (I use a low-fire clay like cone 04-06)
  • rolling pins
  • textures
  • cornstarch (clay can often be too damp and stick to your rolling pin and textures. Cornstarch makes it less sticky without removing too much moisture)
  • old toothbrushes and cups of water
  • wooden skewers (for cutting the clay)
I swear to you my hands are not this skin-removed pink. Although maybe they are. The kids can hardly focus when I demonstrate on the elmo (not the doll, you silly, the piece of electronic equipment). My favorite kid comment of late: (whispering) ewww, did you see her hands?!
 To begin, I create the bottom of my home. Pick a texture and place it on a non-sticky surface. Place your clay on top of that. If your clay is sticky, sprinkle it with cornstarch and set to rollin' wit your pin. Not your homies. Keep you clay at a 1/4" thickness. Any thicker can cause explosions in your kiln while any thinner can be too weak. You gots to get this just right, Goldie Locks.
 Peel your clay off and viola! You've got texture. Now let's roll it up and make it into the base of your home.

 Now you could just roll it up as-is as shown on the left. Or you could cut one end of your rolled slab with an interesting line to jazz of the piece. It's up to you. Whatever you decide, use your old toothbrush to scrub one side thus gluing the connected pieces together.
 For some variety, I opted for a different texture for the roof. Crocheted bits like this can be purchased at your local craft store or pinched from your grannies house. You know, that lady who dresses like Barbara Bush.
 Roll this up waffle cone style. Again, toothbrush before you attach one side of the cone to the other. It might stick while you work but there's a chance that without using the toothbrush and water to attach it might not remain stuck for long.

 Set the roof on your house and pray you made it the right size. And if you didn't then you just messed the whole thing up. Aw, just kidding. But you did kinda mess up. Sorry. Make your waffle smaller/bigger and try to get it right this time, would ya?

My other favorite textures? Stamps! The larger stamps could also be used for the base or the roof.
I decided to use the stamps for details like this little faux wooden door. Clay loves to adhere to stamps so go all cornstarch on it and you'll be fine.
 My fave finishing touches are doors, windows, flowers and hearts. There are endless possibilities. I mean, just take a look at this cuteness:

 Aww! Add a couple hearts to the top for you and that special guy you hope goes out of town. These were done with stamps but you could also use alphabet pasta. Just leave the pasta in and let it fire off in the kiln.
 Sweet little ladder. It's always good to have a fire escape.
 It's so adorable it's burning my eyes. Seriously.
Because I knew I'd have a hard time getting all these ladies back at the same time, I opted to have them make and glaze their houses in one sitting. For that I used The Clay Lady's Clay Paint. Her "paint" is an engobe (which is dried clay with pigment added). This can be painted directly on to wet clay. Once dry, these pieces were dunked in The Clay Lady Glaze. Because I love vibrant colors, I use Mayco's Stroke and Coat with the children.
I'm thinking that the creation of these homes just might have gotten the gnome bug outta my system (as evidenced by this gnome dress, my students gnomies and my own gnome homes). In fact, I think I'll turn to my longtime fashion consultant and ask her opinion. What say you, Barb?
Hey! That's my wedding dress!
Geez, so many caption options with this photo:

"Shhh! You'll wake the gnomes!"

"Smell my finger. Does it smell like Cheetos to you?"

"I know where your marriage certificate is but I'll never tell!"

Wow, Barb. Just, wow.

Merry gnome-home making to you! Until next time, enjoy your week.


Sunday, June 9, 2019

DIY: Polymer Clay Earrings

What lengths will you go to in order to avoid unpleasantries? Me, I go to great lengths to dodge sewing. 

The thing is, I get myself into this sewing pickle every single time. It always starts with the super cute fabric. Currently, I'm in to BIG AND BOLD prints that I usually score at IKEA. Case in point: that bold orange print you see in the background there. I'm currently working on sewing it into a dress but I'm closing in on zipper and hem time and I REALLY don't like zipper and hem time. 

So, I made earrings to go with my yet to be complete dress!
Polymer clay (I like to use the brand Sculpey) is a clay that comes in a variety of colors and you bake in the oven to harden. I used it a lot in this book. When I wrote that book, I really wanted to include that kind of clay because my students and I love it so much. I keep a stash at home for when I want to work with it because it's so stinkin' fun.
 If you are new to polymer clay land, I thought I'd make a little video to walk you through how I made these earrings. Really the only supplies you'll need are the clay, some jump rings, French hook earrings and jewelry tools. 
 When making polymer clay earrings, just a couple things to remember:

* Polymer clay is self-adhesive. Meaning you don't have to use glue to get the pieces to stick together. Just press and go!

* Keep them light! You wouldn't think these would make for heavy earrings but they can if you aren't careful. In fact, the palette ones below, while my fave, are the most heavy and can only be worn for a short while.

* Don't put the hole too close to the edge of the design. I learned this the hard way. If you make it too close, the clay just might break when you are sliding the jump rings in.

* Don't make the clay too thin. Okay, it's a balance...light enough to be wearable, but not so thin that they break when adding the earrings.

* Allow the clay to cool completely. I have noticed that when I take the clay out of the toaster oven, it tends to still be a little bendy. It will harden as it cools.

* Bake at a lower temp than suggested if using a toaster oven. I like to use a toaster oven because they heat up faster and require less energy than my oven. That being said, they do tend to bake stuff a lot hotter...and I've burnt my share of polymer creations because of it. For that reason, I'd say bake at 200 for about 5-7 minutes.
 My little stash of polymer clay earrings.
I also dig using paint pens on them when they come out of the oven...although I have noticed that the paint does tend to rub off over time.
By the way, this here dress was made by me a while back and you can read all about it right here. And if you wanna see more polymer clay jewelry creations, you can go here to see some wild and wacky necklaces!

 photo signature_zpsd10b3273.png

Monday, December 24, 2012

In the Art Room: Kindergarten Reindeer

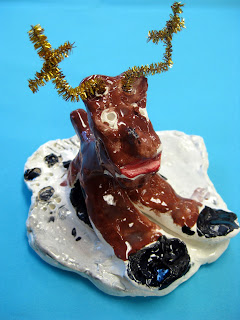
Have you ever seen a reindeer that A.) Resembles Jay Leno and B.) Looks this cute resembling Jay Leno? I didn't think so.
Happy Christmas Eve to you! So the story goes that if you've been well-behaved, you'll be getting a visit from some chubby dude and his entourage of reindeer this evening. Lead by the one and only Rudolph, of course.

My kindergarten artists spent several art classes sculpting these reindeer masterpieces that, despite leaving me feeling as though it was not Grandma that got run over by reindeer but the Art Teacher, made me seriously proud. And, after one told me, "My mom is going to be so happy about my reindeer that she is going to say, 'Oh! Goodness that is the best little reindeer ever!'", I knew they were proud too.
How on earth did these five and six year olds create such amazement? With a half an hour, it really was nothing short of a Christmas Miracle. This lesson had some serious "Okay! Plan B!" moments so I thought I'd share with you how they were created. 
Our inspiration, of course. I've had this book since childhood. In fact, it even has my name written on the inside in my five year old handwriting.

For this lesson, we used the following:
  • Low fire clay
  • A stencil for the base
  • Brown, clear, white, black and red Stroke and Coat Glaze
  • Clay mats
  • Skewer sticks
  • Toothbrushes and cups of water
  • Ziplock bags and damp paper towels
  • A mountain of baby wipes
Several of my students put their reindeer together just as they would draw them: with their legs all in a row. 

I broke this lesson down in many days after trying to cram too much in during one class. When that lesson ended in tears (I managed to dry up before the fourth graders walked in), I decided to drag the lesson out even further. I'd rather give the kids too much time then to rush them. Being a super slow processor myself, I understand the need for lots of time. And tissues. Here's how I broke it down, yo:

On the First Day of Reindeer Clay, I gave to them one grapefruit sized piece of clay. I told them something crazy like, "hold your clay in front of your chest above your clay mat, drop it and pound it flat as a pancake." For a full minute the art room sounded like an elephant stampede with kid giggles throughout. Once flattened, the kids flipped their clay over to the smooth, not-pounded-on side and used their skewer sticks to trace the base shape. And that took us the entire art class, believe it or not. Each child was given a damp paper towel and a ziplock bag with their name on it. They were to "wrap their clay up in its blanket, put it in it's sleeping bag and say 'nightie-night'" until next time.
On the Second Day of Reindeer Figurines, I gave to them one piece of clay the size of a tangerine. We chatted about how many legs a deer has and I showed the children how to divide their clay into fourths. Twist sphere of clay in half and Viola! two pieces of clay. Twist other two pieces and Double Viola! now you have four. From there, they learned how to roll their clay into coils the length of their finger.
On the Second Day of Reindeer Clay, that really wasn't all, for the head I gave them one small ball. Once their coil legs were complete, they created a head. For one class, I tried to have them create all the coils, the head and assemble. That proved to be a reindeer train wreck. We just didn't have the time. Plan B for the following classes was to create all of the parts, wrap them up in a paper towel, gently place them on the base and place the base back into the bag until next time.

On the Third day of Reindeer Crazy, we had zero time for being lazy. The kids assembled their reindeer by "gluing" with the toothbrush and some slip to legs together for the front and two legs together for the back. These two sets were then glued together. Hooves were bent outward and assembled to the base. Lastly the head was added and our reindeer were kiln ready. Once dry, of course.

While the reindeer were drying, my other classes would come in and notice the reindeer. Except they didn't take them for reindeer. They'd say, "Oh! What cute dogs! Who made them?!" It reminded me of the story I read to the kindergarteners while we waited for some of our friends to finish sculpting, Olive the Other Reindeer. Like Olive, our little reindeer just needed some antlers to complete their look.
On the Fourth Day of Reindeer Craze, my little artists were ready to glaze! And I was so proud of their careful attention to detail.
"My Rudolph is a girl and she likes to wear a lot of red lipstick."
On the Last Day of our Reindeer Critter, our reindeer received his antlers made of pipe cleaner glitter! Now I was down to the wire on this, time wise. Normally, I'd expect the kids to create their own antlers, but between programs, field trips and assemblies, we just ran out of time. Thankfully, a very kind aide (thank you, Heidi!) and I managed to get them hot glued in just in time to send them home with the artists.
 I love the unintentional resemblance to Beaker on the left. Notice the sweet little black foot prints in the snow on the one on the right.

And there you have it! Just in time to guide someone's sleigh tonight. I hope you have a wonderful Christmas Eve and Day tomorrow. Enjoy!


Wednesday, April 13, 2016

In the Art Room: My Favorite Clay Lessons

Well, y'all, I gotta tell ya. It's been a long, exhausting but super fun and exhilarating week. Which can only mean one thing: Clay Week! I started doing a week of clay for the entire school a coupla years ago and now that we have it all down pat, we ain't never going back. The only thing I plan to change for next year: do two separate clay weeks, one in the fall and one in the spring. The kids love clay so stinkin' much that I want to give them more opportunities to explore! 

I spent this past weekend filming clay demo videos that I've been sharing with each of my classes. I did this for a couple of reasons: 1. it's so hard to demo clay and insure that each child can see. 2. I don't forget any of the details or get distracted by raised hands, talker-outers or whatever randomness that causes me to get off track and 3. the kids pay so much more attention to Television Stephens than Fur Realzies Stephens (which I take offense to but whateves). I've not added these videos to my YouTube channel yet because I'm too tired, y'all! Instead I thought I'd share with you my favorite clay lessons (with links to each lesson!) of all timez.

IN OTHER NEWS (by the way, if you know me even for a second, you know that "in other news" is my fave segue to totes off-topic-town), I've been keeping secrets from y'all. It's time I let the big ole cat outta the bag: I've been working with Quarry Books...and I'm writing a book! That's right! AND it's all about...clay! So...in case you noticed that the DIY's on this here blog have pretty much dried up to nothing that's because my weekends have been spent working on el book-o. I've been keeping it kinda on the down low because I didn't want to get too excited lest Quarry find out what a crazy I am and back outta the deal. But it would appear that they are in it to win it and so am I. I'll keep y'all posted...but I just had to share. 

AND NOW, back to my fave clay projects!
When it comes to Clay Week, I do love to have a theme. This helps with the teaching as I can reference the same visuals. It also helps when we put together the art show as there is a real cohesiveness to it all. The clay display is always in my art room. It looks so nice to see all of these thematic projects together! One of my favorite lessons for an Asian theme were these Painted Indian Elephants inspired by my art teacherin' buddy Debbie Flynt. Each one was so colorful and unique!
Another hit, especially with the kids, were these Chinese Dragons by my third grade students! So much creativity and imagination went into each and every one that this was def a kid fave. 
Pandas are so stinkin' cute. We've taken to watching Animal Planet's Panda Cam in my art room (along with puppy, kitten and otter cam...y'all, it's seriously the best thing ever). My fourth graders had a blast making these Pandas with Personality for our Asian theme. 
Because our art show is in the spring, I settled upon spring with an emphasis on Monet's Waterlilies one year! My fourth graders created these frogs with so much spunk and personality that they really were a true reflection of the young artist! 
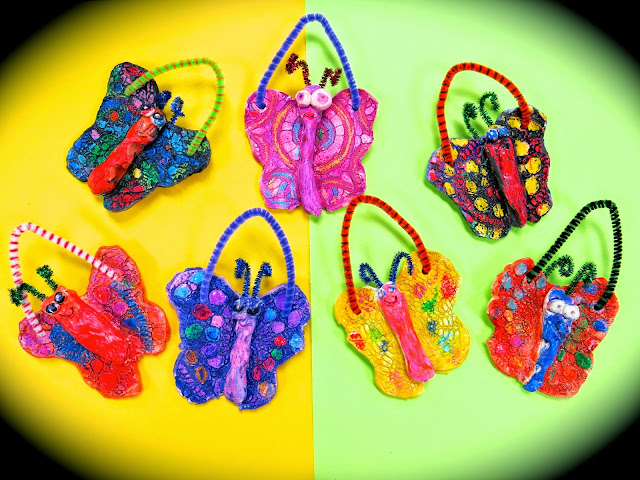
Kindergarteners are a freakin' joy to do clay with as they absolutely love every minute of it! While we were working today, I heard so much laughter, happiness and discovery that it just made my day. We created these textured butterfly wallhangings to go along with our spring theme. 
Opening my kiln to these pretties, I remember letting out a squeal! They were so colorful and spring-like and the third grade had a blast making them. 
My favorite projects are the ones where the kids just go bananas with little details and creativity. That's what my second graders did with these cute and fun waterlilies.
One year, our theme was animals because we "sold" our creations back to our parents (for a donation) which we turned over to a no-kill humane society. This was a fun experience for the kids to see the power of being kind and art! My kindergarten and first graders created these sweet Pinch Pot Pets
My second graders used two pinch pots to create their own version of Pinch Pot(s) Pets! I love all the variety of ideas in this lesson. 
My fourth graders created these fun cat and dog sculptures. I love to encourage silliness and imagination in their works so that they really explore making a simple idea like a cat or dog their own. Again, this was a hit with kids and parents! 
Second grade created these tigers one year that double as a container. There's a pinch pot on the back of each tiger that was flipped upright to be used as a bowl! Our mascot is the tiger so this was a great tie-in with school pride as well as keeping with our animal-loving theme. 
And now for a batch of randoms. These fish were not tied to a theme but super cute. I love that clay can be a great vehicle in teaching texture. Such was really emphasized in this textured fish lesson for first grade!
Wall hangings can be a fun alternative to sculpture when working with clay. It's often difficult for the young kids like kindergarten town to create standing sculptures. So, with a focus on texture, my wee ones last year created these textured birds! This blog post has a how to video if you are interested.  
This is one of my tried and true favorite lessons that I used to do every year with second grade until I grew tired of it and moved on. I brought it back for an after school group last year and they loved their textured initial wall hanging!

What are some of your fave clay lessons? I am SO EXCITED about our clay theme this year and cannot wait to share it with you...it's gonna be the best one yet!
 photo signature_zpsd10b3273.png