Showing posts sorted by relevance for query line sculptures. Sort by date Show all posts

Friday, August 29, 2025

My Top 10 Favorite Line Lessons!

Welcome to my Top Ten Line Lessons!
Since I have been sharing so many LINE lessons on my blog lately (with more to come, yay!), I thought I'd create a blog post with ALL of my very favorite lessons on line. Consider this your one-stop-shop for all things Line-Lesson-y!
Of course, we have to kick things off with The Man, The Myth, The Legend: Larry the Line! All my line lessons begin with Larry so if you'd like to get yourself a copy of my book, you can do so here!
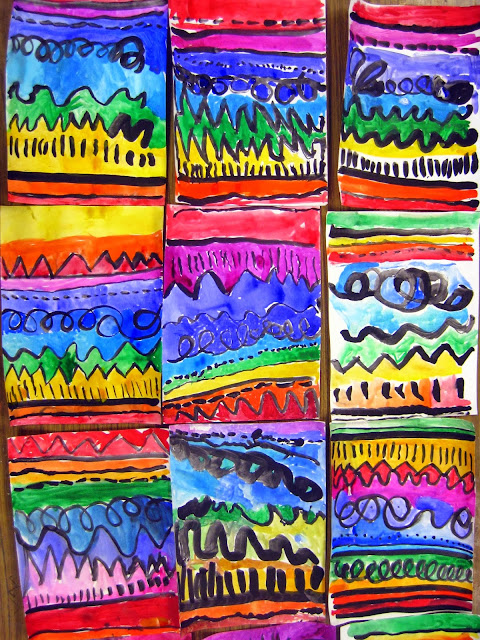
To kick things off, let's start in kindergarten! Right away, we dive into all things LINE by create a line sculpture on the very first day! By the third day, we are ready to put our line knowlege to work with these lines paintings. 
Did you notice in the photo how nicely the artist was holding their paintbrush?! That's because they know all about The Paintbrush Ballerina! This method of teaching painting will totally change how your artists handle their brushes and paint. 

After these structured paintings where we paint lines across out paper, we dive in with either watercolor or tempera cakes to add color. You can find this line unit here!
This line sculpture lesson is one of my all-time faves AND it's what I teach on my first day with kindergarten artists! I also recommend this lesson if you have to do a teaching demo for a job interview. It's always a hit with kids of all ages!

To take a look inside my art room on that very first day of art, you can watch me teach! Check it out here!
Of course, if you are on a cart or simply don't feel like busting out the paint at the start of the school year (don't blame ya!), you could always do a variation of the line lesson with tempera sticks!
Then you can finish 'em off with these wild and wacky line monsters! For that lesson, visit here.  
And, of course, if you are doing collage with your students, you DEFINITELY need my new book Scissors, Glue and YOU

One of my FAVORITE ways to teach lines is with Line-Making Stations! My artists CRANKED out so much artwork in just a couple of 30 minute art classes. Not only did they learn all about lines but a variety of ways to create them! You can read all about that and check out the video and handouts I created for the occasion here. 
Printed lines was a fave! They really popped with black and white paint on black and white paper. Stay tuned to how we used all of these pieces of art!
All ya need is cardboard and some paint! Visit the link for the handout!
I did these stations with my first through fourth graders. Even this cutting station because, let's be honest: they all need the practice!
Here we used our ink-filled bingo dauber. If you aren't familiar, visit this link and I talk all about 'em!
For details on how these looked when finished and for some trouble-shooting tips, visit this blog post!

One year, I did a variation on the kindergarten line sculpture and made it into a school-wide project! We called them our Getting-to-Know-You sculptures!
I created a couple of totally free downloads and my students used them to create a coded work of art! These were so fun to have on display for open house. 
Here's a little look at what the finished display looked like! Tips and tricks for this lesson can be found here.
You could also...turn that sculpture into a HAT! I did my sculpture on a paper plate and then wore it like an artsy thinking cap! For the lesson video, visit here!
Once the paper sculptures are complete, your artists could try their hand at these super fun cardboard line sculptures!

Keep the line sheet in a sheet protector and it's perfect as a center for those early finishers or for a line making station!
Looking for a Larry-themed lesson?! Then this new one from my blog is sure to be a hit! You can check it out (with video, of course!) here!

Whatever you do, I hope you have fun AND I hope you have a wonderful long weekend. You've earned it, friends!


photo signature_zpsd10b3273.png

Sunday, August 23, 2015

In the Art Room: Teaching Line with Larry the Line!

Hi, friends! Well, it's been one of those Wild -n- Crazy art teacherin' weeks and I didn't manage to snap a single What the Art Teacher Wore photo (tho, if you follow me here, you'll see what I'm wearin', what I'm making and what's goin' down in the art room, daily). However, if YOU did, please be sure to send it my way at cassieart75@gmail.com for the What the Art Teacher Wore/Back to Art Teacherin' Contest! You're good-looking face will not only be featured here but, if chosen, also in School Arts Magazine. AND the winner-winner-chicken-dinner will get a free subscription to School Arts. So get dressed, snap a pic and send it to moi, s'il vous plait. Gracias! 

In other news, if you are an art teacher with other art teacherin' buds on Facebook, then I bet your feed is just blowing up with photos of back-to-school/freshly-deocrated art rooms. I absolutely love it because it is art teacherin' eye candy! I've shared several snaps of my art room (with a blog post about my first days here) and was asked about my Line poster. If you've been around this blog for a pinch then you know that I use this poster with my kindergarten friends in my unit on line. I created this and accompanying poem years ago. It's been a great tool for me to teach line with a bit of rhyme and a whole lotta fun. So, without further ado, here's the Larry the Line poem! 
So that you don't have to watch this video a million times, here's the Larry the Line poem in it's entirety. 

NOTE: This poster and poem were both created by me. Please feel free to share this with your students and colleagues (credit thrown my way would be greatly appreciated). This may not be reproduced by you for profit. I feel sad that I have to add this disclaimer...but I do. 

Larry the Line
Is a friend of mine
(creating a snake by opening the fingers of your hand, puppet style and there's your snake!)
He can make three
(hold up a three with your fingers)
Straight lines for me!
Ver-tickle
(create a vertical line with your forearm)
Diagonal and horizontal!
(pantomime each)
Any curve, he can learn
With a twist and a turn.
When he's out of his tangle
he makes a great...angle.
(created by placing your hand on your hip and pointing to your elbow)
Any line, he can make
After all, he's a snake!
And here's how I go about teaching the creation of line sculpture to the kids! 
From there, my kindergarten friends create line sculptures like this. I have a super silly way of teaching this which I will share on my youtube channel this week. By the way, if you subscribe to my channel, you'll see my videos before I share them here!
I'm not gonna lie, sometimes after the whole Larry thing, the kids are bananas. To bring them back down, I'll often do this activity called palming. It works magically! 
I love this unit on line and it's made so much more fun with this goofy poem and carnival snake! What poems and songs do you use when teaching? I'd love to have a whole collection! Too bad my songwriting skillz are seriously lacking. 
 photo signature_zpsd10b3273.png

Tuesday, October 15, 2013

In the Art Room: A Unit on Line for Kindergarten

Completed kindergarten masterpieces. That's right, I said kindergarten. The under-6 set is knockin' it outta the park, er, art room so far this year and I couldn't be more thrilled.
What I'm about to present to you right here is one Big Fat Hairy kindergarten unit on line. And color. Oh, and shape, sculpture and good craftsmanship, i.e. how-not-to-drive-the-art-teacher-crazy(-er)-by-not-grinding-your-paintbrush-into-the-paper. Because she no like-y. And, in my art room, keeping me sane-ish is at the top of my Learning Targets. Which is way harder than you could ever imagine. Just ask the kids.
Do you recall those wild and wacky paintings created on the first days of school in this post? Those large paintings have come in very handy as backdrops for our displays as you can see here.
Without getting into all of that, let's chat about the aforementioned Line Unit, shall we? I'm not gonna lie, I do this same ole project with kindergarten at the beginning of every year. Which is unusual for me because with all the other grade levels, I love to change things up. Not so with kinder'town for a coupla reasons: A. they love it; B. it covers a whole batch o' skills/techniques/vocabulary/routines and C. let's be honest, coming up with projects that the little ones can master is not my forte. So when I find something that works, I stick with it.
So on our very first day of art, after introducing ourselves to one another and an abbreviated discussion of rules and consequences (because, after all, these kids are five. They still have baby fluff, suck their thumbs and wet their pants routinely. Rules and consequences mean nada. A wicked stare and a "we don't do that in kindergarten" usually does the trick), I like to dive head first into the art-making swimmin' hole. Which means we create our very first sculpture.
Now if you're an old warhorse at this art teacher game, this lesson is nothing new to you. You might wanna skip on down to the bottom where I discuss such things as pinwheel portrait painting and bottomless basket weaving (don't worry newbies, they'll be gone a while. I don't even know what that stuff is!). For the rest of ya, lemme tell you how I go about teaching this line sculpture lesson: 
  • First of all, we have a little chat about the difference between flat two-dimensional artwork and sculptures. After looking at some images of sculptures, we chat about the ones we are familiar with (ole Lady Liberty almost always comes up) and discuss how a sculpture is something we can see (rotating body at waist for emphasis) all...the way...around.
  • I then tell 'em that we are going to create a sculpture with a bunch of straight lines (strips of paper cut 1" X 9" but sizes can vary). I ask them how to make a flat piece of paper pop out of their sculpture base (aka the bottom paper) to which they usually answer "glue!" It's at this point that I tell 'em that if they want their sculpture to stand, just like us, it must have feet.
  • I demonstrate creating a small fold at the ends of the strip of paper thus creating feet. It's there that glue is applied (to which the strip of paper always responds, "oohh, that tickles my feet! Ohhh, that glue is soo cold!" Yes, the paper talks to us. It's kindergarten, people. They eat this stuff up). Once the glue is applied, I show the kids how to hold the paper in place on the base for about 10 seconds. 
  • From there, I demonstrate adding more paper strips to the sculpture base on top, below, behind or beside the first strip. Then I turn the kids loose on their on sculptures. 
  • The following art class, I introduce more lines. I demonstrate folding a zigzag line, wrapping a strip of paper around my pencil to create a spiral and creating a loop de loop. 
  • I also chat about how lines create shapes and demonstrate creating a circle by gluing one end of the strip to the other. With that circle, so many other shapes can be created with a pinch. Pinch the circle once and you have a teardrop! Pinch it again and you have an ellipse! One more time, it's a triangle! Anther pinch and you have a square.
  • From there, the kids go nuts on their sculptures creating lines, shapes and whatever else they can dream up.
Here! Lemme walk you through it.
On the third day of art class, I get real serious about the whole line thing. We look at each of these snake-y lines on the poster I created way back in first-year-art-teacher-land and then locate them on works of art. Any ole Kandinsky works great for this. It's at this point I introduce to the kids a lil poem I wrote some years ago about a snake named Larry that can morph his body into any line he likes. It goes a lil sumpin like this (complete with hand motions, you better believe it!):
Larry the Line
Is a friend of mine
(creating a snake by opening the fingers of your hand, puppet style and there's your snake!)
He can make three
(hold up a three with your fingers)
Straight lines for me!
Ver-tickle
(create a vertical line with your forearm)
Diagonal and horizontal!
(pantomime each)
Any curve, he can learn
With a twist and a turn.
When he's out of his tangle
he makes a great...angle.
(created by placing your hand on your hip and pointing to your elbow)
Any line, he can make
After all, he's a snake!
After learning the Larry the Line poem, I bust out this huge cheesey carnival snake I got years ago that happens to have a little rattle in his tail. I convince the kids that he's real (they're kindergarten so they totally buy it) and maneuver him around to create a variety of lines. If the kids guess the name of the line correctly, I let them "rattle" Larry's tail. They eat it up and learn the names of lines to boot.
After that, I give a little demo on painting. If you've read this blog for five minutes, you know that when painting, I liken the bristles of the paint brush to a ballerina: It always dances on it's toes, it never scoots around on it's bottom. After I demonstrate painting each of Larry's lines, the kids go to their seats and we do a little guided painting. Meaning, I paint and they follow along.
This school year, I have my kindergarten for 45 minutes every six days (which is different than my usual 30 minute classes, twice every six days...confused yet? That makes two of us). That slightly longer block of time makes a world of a difference in that we can accomplish so much! On the fourth day of this unit, we examine Kandinsky again and this time chat about how influenced he was by music. The kids were told that they were going to be painting a nonobjective picture of lines while listening to Peter and the Wolf by Sergei Prokofiev. If you're not familiar, this piece of music introduces each character of Peter and the Wolf with a different instrument. Each character really comes to life with the music and makes for great line paintings.
On that day, the children were only given black paint. As they painted to the music, you could see them trying to capture each character in line. Once a painting was finished, I'd take it from them and hand them a new sheet of white paper. By the end of art class, each child had painted about three black and white line pictures.
The following art class, I introduced the kids to tempra cakes which you can see best a coupla photos ago. My focus was on using the art materials properly and exploration of color. I wrote about this particular painting lesson pretty extensively last year in this blog post. In that lesson, we didn't paint to music and we focused some on pattern in a follow up lesson.
Here's a collection of their finished pieces. I love how wild, bright and unique each one is, just like the artists themselves.
On the sixth and final day of this unit, the kids were introduced to Roy G. Biv and watercolor paint. Since the last lesson had just been about exploring with color and proper use of painting supplies, I really wanted to focus on the order of the colors in the rainbow. My hat helped them remember the order (even if it is missing the "B" in Roy G. Biv) as did the large rainbow I have mounted on my easel. And in case you're dying to get a rainbow hat of your own, mine is from amazon. Yes, really.
Have you read this book? I picked it up years ago at the thrift store and it's pretty cute. As you turn each page, an additional color of ribbon is added to the ribbon rainbow in the book, hence the "Magic Ribbon Book" label at the bottom.

After that chat, I demonstrate to the children how to use watercolor paints. This is an easy transition from the tempra cakes as the cleaning-your-brush-before-getting-another-color is exactly the same. We do chat about the differences between the two mediums (you know, watercolor being more translucent) and also discuss painting in Roy G. Biv order. After that demo, the kids returned to their seats with their paintings created on that third day of art class and rainbow-ize the thing. This is the first year I've added this portion to the line unit and I love the result.

And there you have it. One Big Fat Hairy line/shape/color/RoyG.Biv/sculpture/abstract Unit for the wee ones. I know these lessons are nothing new...so I'd love to hear how you approach teaching line. Also, for the sake of space, I may have not answered all of your how-you-teach-that questions, so feel free to email me or leave a comment. I may or may not get back to you. Just sayin'.

Sunday, August 24, 2025

Let's Create Line-Inspired Cardboard Sculptures!

The other day I was brainstorming LINE-themed lesson ideas because I know so many of us use line as our inspiration for our first lessons of the new year. AND I GOT SO MANY IDEAS! I'll be sharing them over the next couple of days so be the first to see them, you might want to subscribe to my email list! 
This project was inspired by one of my VERY favorite lessons: Line Paper Sculpture! I've done that project every year with my kindergarten...and one year, did it with the whole school. It's always a hit!
They always look so amazing. I love having these big, colorful sculptures all over the hallway walls. It's perfect for Open House.
It's made even more fun with a Getting to Know You sheet on hand so parents and family can 'read' the artists sculptures! You can find these free downloads here!

Now for this sculpture, you'll be using cardboard, ink-filled bingo daubers and pipe cleaners. There is a little bit of cardboard cutting that will need to take place on your end...so for that, at the start of the video, I chat you through the process and the tools I recommend:


The first thing you may want is one of these badboys. They are not cheap BUT...I use mine all the time and wish I would have gotten it sooner! It's a cordless cardboard cutter and I love the thing. You can find it here.
I love these cardboard scissors for cutting the notches. In my art room, I was able to get one pair per table. This would mean less notch cutting for you! But it really does go by quickly.
If you can't get your hands on that cordless cardboard cutter, than this Canary knife cuts through cardboard VERY well. I have one of these and love it!
Bingo daubers are my favorite art room tool. I talk about them and all of the lessons I use them with here. To find these, you can visit this link.

And any ole India ink will work. I found this one to be priced well. 
Of course, the inspo for this lesson was my book Larry the Line! You can find it as well as the downloads featured in the video here

I can't wait to see what your students create. I know they are gonna love these sculptures. So save those boxes...if your school is like mine, they are all over the hallways this time of year!

photo signature_zpsd10b3273.png