As I've mentioned, I'm slowly "remodeling" my art room. I've been in this space for close to 15 years and I'm just so TIRED of looking at the same decor, store-bought posters, same hot -n- stinky messes. I'm super proud to say that I'm turning my life around (bwhahaha, let's be honest: no.) Okay, what I am doing is trying to get organized for the first time ever. And I feel like it's working and feelin' great BUT organizing is NOT my idea of a party. So, for that reason, I do have to hit the pause button every now and then and do something fun, wild and crazy (according to me, this is my idea of a good time, y'all!). Case in point: This new wall display!
So I've been spray painting and color coding nearly everything in my art room...I think that was fresh on my mind when I ventured into Michael's and spotted these 4" X 12" canvases. I scooped 'em up and immediately started painting them. That was on Monday. By Sunday, I had them up and the wall painted. Now, before y'all tell me how fast I work and question whether nor not I have some sort of time-freezing machine (that would be my super power, honestly!), lemme tell you what I DID NOT do last week: write up my lesson plan for an upcoming evaluation, clean the house, do laundry, fill the 30 glue bottles with black glue for 3rd grade and, oh, countless other things. Y'all wanna know where I find the time? It's by shirking all other adult-type duties. I'm simply a 12 year old in a 42 year old body.
So whilst all y'all were cookin' home cooked meals, we were dining on hummus and crackers last week so I could crank these out. My hubs is a saint. Who really likes hummus, thank goodness.
What in the world was I thinking, spray painting my wall? I blame the paint fumes. I used acrylic paint on the walls...and plan to go over it with a sealer but not sure if it's necessary.
I got labeled bins of art supplies FOR DAYS, y'all! So much happiness. Also, side note, I think I'm gonna extend my tape lines to the paint cans. I started to with the purple...and then found some other shiny object to fool with. You can read about the Color and Line Wall here.
Did I ask my admin if I could paint my wall? Nah, not really. I mean, I might have kinda "asked"...meaning I said something like, "I'm gonna paint my wall, just wanted to let you know." They, of course, were not at all surprised.
The kids sure were! They loved it so I count that as a win. Every time they come in my art room, it's something different. It's fun for us both.
I was asked why I didn't just paint the cans on the wall also...great question. I have no answer other than I really liked those canvases! That size was super cute AND I do love the 3-D element of them popping out of the wall.
Okay...now that this is complete, back to organizing. Insert unenthusiastic "yay" here.
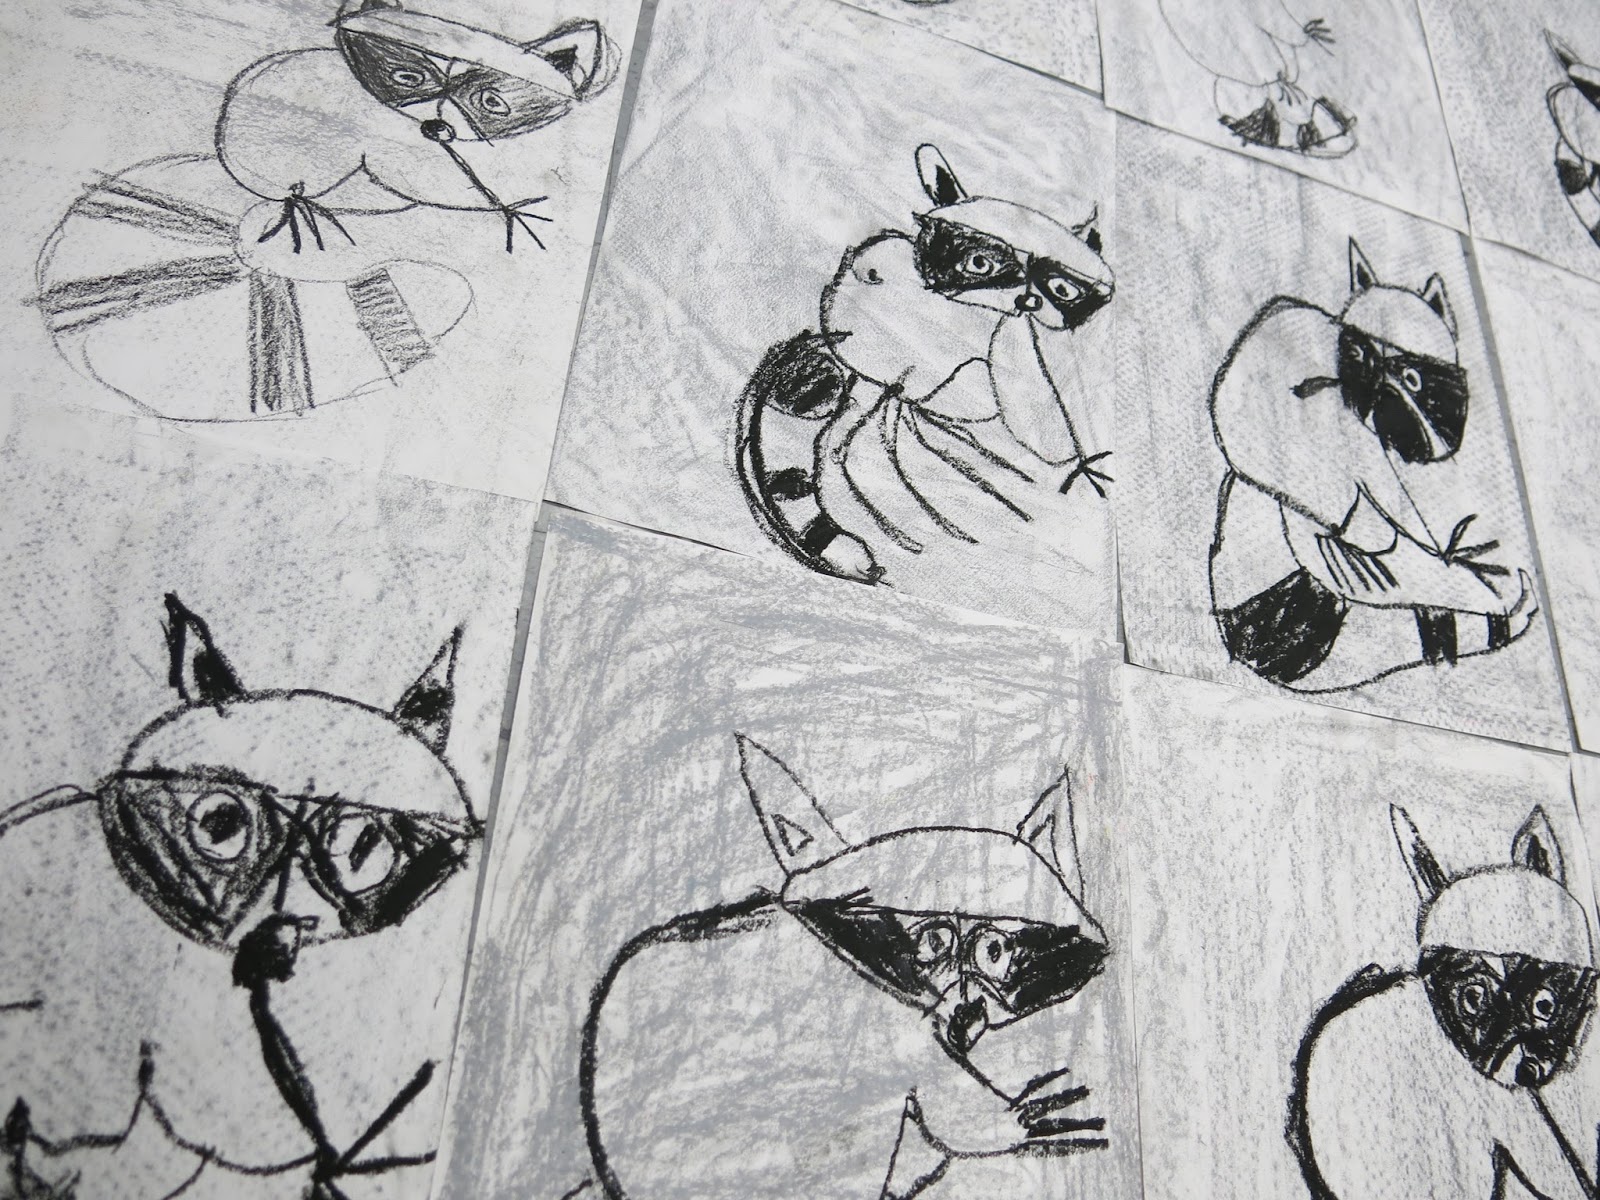
Hey, friends! I'm excited to share this fun lesson that I've started with my sweet second grade kiddos. Before fall break, I had a couple of classes that were ahead of the pack so I decided to introduce them to Charley Harper (a fave of mine) and a little guided drawing. THEY LOVED IT! They were so excited about their wee raccoons that I decided to create a lesson from their drawings. Feel free to use this lesson in your art teacherin' and creating world...all I ask is that you give me a shout out when you share on your favorite social medial. This helps folks find their way back here to enjoy the lesson as well.
For this project, we are using a ton of different media! Here's what we are using: * Faber-Castell Oil Pastels Full disclosure: I work with Faber-Castell frequently and create lessons for them using their supplies. That being said, I do enjoy their oil pastels for a couple of big reasons: they are sturdy. Unlike many other oil pastels I use, they don't break as often. They don't roll! I love that we aren't constantly chasing after them rolling off the tables. AND they are big...some oil pastels are very small and hard to hold for my students. Not to mention, they wear through them quickly. For all those reasons...and the fact that the colors are fabulous...I would definitely recommend these oil pastels. * Brown Watercolor Paint This is for the light wash used on the raccoon. * Texture Rubbing Plates or Burlap Don't have texture plates? Burlap makes for a great rubbing surface! * Construction Paper I love Tru-Ray because the paper doesn't fade and seems stronger than most. * Tempera Paint * Tempera Cakes My new favorite discovery: painting with tempera cakes on construction paper. Like, whut?! The colors stay true and I just love it!
I will say this about my latest videos: I'm trying ot make them shorter. For my second grade, I only see them for 30 minutes so I need to keep instructional time brief.
Here's a breakdown of the lesson in 30 minute increments: Day #1: Drawing the raccoon together. After enjoying some fun Nat Geo videos about raccoons, of course! Day #2: Light wash over raccoon and paint scrapping for the tree. Day #3: Creating the sky background. Rubbing and painting with tempera cakes. Day #4: Assembling our collage!
By the way, I am thinking of having each of my four second grade classes create a different woodland animal collage inspired by Harper. So stay tuned for more! I'll be certain to keep you posted on how these beauties turn out.
So far, so cute! And what a fun way to review the elements of art.
Sharing with the kids information about raccoons also got them inspired to create. I'm telling you, Nat Geo is where it's at!
One of my sweet students did tell me at the end of art class that her raccoon was "not my best work". Bless. The beauty of having a recorded video is that the kids can follow along and make another one the next art class! When drawing together, I very rarely let them start over...it's an important time to teach about a Beautiful Oops! And for them to let go of the notion that their artwork must be perfect. I always tell them that the following art class, if they are still unhappy, they can try again. Often times, they keep their original creation.
Hello, party people! I'm excited to share with y'all today some things that are goin' down in the art room...namely, just how my students are using their sketchbooks! I see my third and fourth grade students for an hour (my other classes are 30 minutes in length). For that reason, I decided to introduce them to sketchbooks this year. We created our own sketchbook covers on the very first day of art and had a big time doing so.
Here's a blog post explaining how they are created. We did these a couple of years ago...and while the kids loved making them and sketching...I dropped the ball. I wasn't super sure how I wanted the kids to use their sketchbooks. Here was my initial thought a couple of years ago:
This time around, I decided to make some changes to how we use our books. Here's the plan: * We will be taking a journey through art history with our sketchbooks! Every other week, my students will sketch in their books. We will do this every other week so as to not eat into regularly scheduled creative time. To make this process of distributing and collecting sketchbooks easier (because I have two classes at once and things can take a little longer/get a little hairy if I don't have a solid system), I created this video with the help of my awesome co-workers. My kids FLIPPED when they saw their teachers cutting up for the cause. Here's the Do's and Don't's of Sketchbookin':
* On sketchbook days, my students will watch two 1-minute videos. The first one will be a Hot Minute of History (which I've shared here before) and the other will be a sketchbook prompt based on that history. Here's our first installment!
* As they view the videos, students are to silently take their sketchbook from the bin and pass the bin. They did this beautifully. Here's their sketching prompt video:
I made my rules very clear: Silent Sketch Time and One Page at a Time. I then set my timer for 7 minutes and the kids went to work. I was so loving their first sketches! I thought I'd share...
We used texture plates and fabric for the rubbing. I did end up swapping out the vine charcoal for black oil pastels as the charcoal did not work very well on the oil pastels.
I had one student say they had "messed up" and that they wanted to start again on another sheet. I said, "If you were a cave artist, you wouldn't ask for another cave wall...you would make that drawing work!" And they did. It was a fun lesson on beautiful oops'ing!
One of the main reasons I thought it would be good to sketch through Art History is that it is one area that I often fail to teach. There are SO MANY THINGS TO TEACH IN ART that I find I have to squeeze in as much as I can. This is one way I hope to do that.
I introduced A Hot Minute of Art History before (more details here) but then it was just me chatting...and I tend to be long winded. Not only that but it didn't really resonate with the kids as they didn't have a creating-connection. So, hopefully, this will help. I am showing the one minute videos to my first through second grade students...they just don't do the sketching portion.
I also created a song to go along with this journey. You can find the song here (it's a work in progress). Here's a clip of me teaching it to a group of third graders a couple of years ago:
We still get up and sing the song...but now we do it with a before video and a sketching intro!
I was so excited by the sketchbook drawings and I know the kids were too. I can't wait to share our next Art History video with them!
I also loved the variety of drawings. I did do a quick google search of cave paintings and placed a couple of simple sheets on each table for inspiration. My students are used to these Idea Sheets, as we call them. I know that I work best when I have some inspiration so I always provide that for my students.
As I create the lyrics to the song, I've been working on paintings myself. Here's my take on Cave Painting:
These paintings will later become posters to hold the lyrics of our Rockin' Art History song!
You can find the pdf for this here if you are interested! Feel free to use in your art room. All I ask is that you share your source when other's ask. I would rather not post what I share to TPT...I would like to continue sharing. However, it is sometimes sad to see folks not give credit where it is due...especially when they got the information for free. So I ask politely and say thank you!
Getting back into sketchbooks with the kids meant finding a place to store them. Earlier this year, I found this great bookcase that was in an abandoned classroom. After a little bit of paint, I was happy with the result.
My bins from Target are the perfect fit! It really helps to have the folders divided by class and gender as that makes passing the sketchbooks our much faster and easier.
I'll be sure to share our sketchbook adventures as they continue!
Happy fall, y'all! Last week I shared with you MY favorite fall crafts...today I thought I'd share my Top Ten Fave Fall Projects for kids! Let's kick it off with this weaving project because it's one of my very faves.
1. Tree Weaving Lesson I usually do this lesson with my students in third grade and up. I developed this lesson after being tired of the same old weaving projects I'd done for years. This video was created for you, as an instructor...but you could totally use it with the kiddos!
You can see more of this lesson in my first blog post right here.
2. Fall Landscape Collage This lesson I just recently shared and I'm really excited about it. The kids learned so stinkin' much and had a blast while doing so. I cannot wait to display these in the hall. Here's the instructional video:
My other first grade classes are wrapping these up this week. I am looking forward to seeing what they create!
3. Positive and Negative Gelli Prints When I initially did this project, I made my own gelli-plates. You can find the recipe here. What I don't love about making these plates is that, well, you have to make them and it's labor-intensive. Not only that, but if you are a vegetarian or a vegan, you will definitely be opposed to using the gelatin that goes into the making of these plates.
The good news is that if you own GelliArts printing plates, you can get the very same effect. And it's so much fun!
4. Sunflower Gelli Plates Prints with Puffy Paint Nothing says fall to me like Sunflowers. I loved this Andy Warhol inspired project and so did my second grade kiddos...although I think it could have easily been down with my older students as well.
When we displayed these in a square kind of Warhol-style.
5. Leaf Relief Another great fall project that introduces kids to texture is this leaf relief project. This is a project that I've done successfully with kids of a variety of ages from second grade on up!
It looks really fabulous with a painted and textured canvas background!
6. Painted Fall Landscape Landscapes are always a fave in the fall and this one is no exception. You can find a video with more details of this project right here:
Here's a little more about this landscape here as well:
These were a crowd pleaser and really introduced the kiddos to so stinkin' much that's important to art makin'.
7. Van Gogh-inspired Haunted Mansion True facts: I LOVE Disney's Haunted Mansion and so do my students. I have a 1969 Disney CD that is the telling of the story of the Haunted Mansion. It's like riding the actual ride: it takes you thru the tale of the mansion. Last year, I had a fourth grade class that was so interested in the story that I based an art project around it! You can check out the details here and the instructional video right here:
The kids had the best time creating these Spooky Starry Nights!
8. Printed Fall Leaves Discovering the magic of marker printing was pretty much a game changer for me and this project makes it so simple and fun. Let's talk about it:
So easy! And one way to use those pesky markers (am I the only art teacher who hates markers?! UGH.)
9. Fall Trees with Warm and Cool Skies So this project was actually done during a study of Asian art...but could so easily translate to fall! You can check out more of these beauties here.
10. Collage Landscapes of Fall My sweet second graders are getting ready to embark on this project next week. I've not done this one in a couple of years and I'm ready to bring it back...they are so beautiful! This time around, I'll be creating a video so you can stay tuned for that...or just check the blog post here. Wow! I'm so excited for all, these pretties have me inspired! What are your fave fall projects? LOVE to hear about them.
My first grade artists finished off these fall landscape collages inspired by the artist Eloise Renouf...and the artists (along with this art teacher) couldn't be more proud. In this lesson, we learned how to mix a tint of blue, create textures in wet paint, print with a variety of tools, learn the parts of a landscape, use proper scissor use, collage and more! The kiddos were sad to place these on the drying racks as they were so excited to take them home. Not until a display in the halls for all to see, says me!
These pieces were created on 12" X 18" pieces of paper. My students spent the first couple days of art class this year creating a variety of painted and textured papers. I do this in a similar manner as my friend Laura at Painted Paper Art. In case you are curious how I go about doing it, as I don't cover that in the video, I thought I'd share: 1. I start with giving one grade level (I see two first grade classes back to back in 30 minutes, no break between) one color and white. I focus on the words TEXTURE and TINT. I tell the kiddos that they are to apply the color to their paper in large plops. Then they clean their brush on their messy mat by sweeping it back and fourth.
2. White plops are then added and mixed with the color. Viola! Now you have a tint! Let's create a texture.
3. Using a variety of scrub brushes, dusters, paint scrapers and more (most found at the Dollar Tree), the kids then add texture to their tinted papers. Once finished, they place it on the drying rack and grab another sheet to more more papers. No names need to be written on the papers as they are going in a communal stack to be used later.
4. The following glasses are given a different color and white...this makes it so we end up with a rainbow of papers!
Hopefully that makes sense and helps clarify the painted and texture paper making mayhem. The kids LOVE making the papers and creating with the results. Here's the instructional video I created to share with my students:
Week One: Like I said, I have 30 minute art classes, twice a week...and those minutes go by in a blink. So, on our first two days together, we spent one day cutting ovals and talking scissor safety. It seems silly...but it was necessary. Ovals cut were placed in a community stack for the following day's printing activity. Here's a video of me teaching the first day portion:
From there, we printed! One day we printed with white paint and the next, black paint.
Week Two: After another day of printing, we had a nice stack of painted trees. Those we kept for our own, we did not share. We learned all about landscapes, horizon likes and collage the following day. We then cut a piece of land and added it to our chosen sky background.
Week Three: We talked a lot about overlapping, variety and composition the final day before we glued our trees down. I did alter the lesson in that, after the kids glued the trees down, I had them use black and white oil pastels to add the trunks, not paint. Less mess on our last day.
I've not matted and framed them for the halls yet, hence the curled edges. I'm looking forward to popping all of our landscape projects up in the halls very soon. Now that these guys are finished, we can move on to our next big undertaking. Just don't ask me what that is yet!
I'm just gonna sit back and admire the view.
I was so excited with how these turned out (and now excited the kids were) that I immediately popped them up onto my IG page.
Imagine how excited I was when our artist inspiration, Eloise Renouf, posted below...it seriously made my day! I cannot wait to share her message with the kiddos!
I love how social media makes our world just a little bit smaller...