Showing posts with label valentines crafts. Show all posts

Thursday, February 22, 2018

How to Make a Paper Heart with Kindergarten!

Teaching kids how to make a paper heart can sometimes make you question your life's choices. And that is ESPECIALLY true if you teach kindergarten. The week of Valentine's Day, I wanted to take a break from our usual projects and teach this skill. Knowing that it might be a bumpy ride, I wrote this poem. It helped me so much, I wanted to share. Feel free to use in your art room with any age group of kids!
So, how does this poem work? I recited it during my demo with the kids and had them repeat after me. I do call and response ALL DAY LONG in my art room so they are used to this routine. Here's a glimpse into my art room with kindergarten:
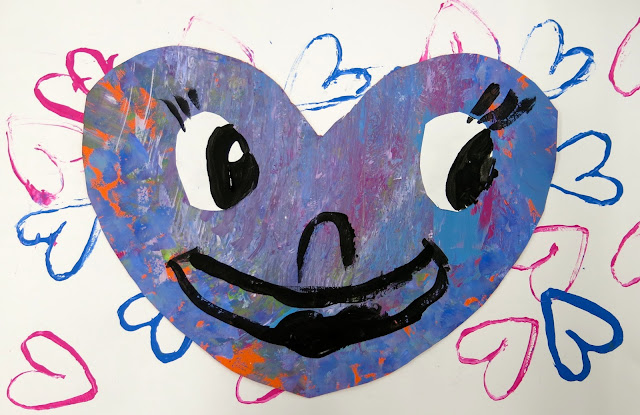
By the end of our 40 minute art class, each student had successfully cut out many hearts. We also chatted about the artist Chris Uphues and added fun faces to these. The kids were beyond excited to create and take these home with them. Just had to share!
 photo signature_zpsd10b3273.png
Read more »

Saturday, February 3, 2018

In the Art Room: Romero Britto-Inspired Hearts in First grade!

Hey, y'all! This blog post is brought to you by my (and my students!) newfavorite things:

* Bingo Dotters (Daubers?) filled with India ink

We had a blast with this lesson. So much so that when I shared on my Instagram, I got lots of questions. I thought I'd create a short video tutorial for your and your kiddos! Here you go:

Please pardon my nasally voice as I'm currently losing a fight with a head cold. I blame the children.
 I have 30 minute art classes with my wee-ones. We managed to crank these out even after watching a video about Britto and reviewing lines, shapes and patterns. I was so loving the direction they were going so far.
 The following art class, we learned all about bleeding tissue paper magic. This had the kids very excited. I encouraged them to use either warm or cold colors in each section. Some did and some didn't. It's first grade, y'all. They do what they want. 

 These hearts are HUGE. We created them on 18" squares. So, by the third art class, some had a little bit more tissue-papering to do and some did not. So I introduced the idea of the paint sticks. I really let the kids do what they wanted in the background...it was a new medium for them and I really wanted to see what they would come up with.
 By our fourth and final 30 minute art class, I still had some kids wrapping up their masterpieces. My early finishers set to work with their paint makers. They added pattern to GIANT hearts that I drew on multi colored bulletin board paper.
 I hot glued their giant hearts together and added them to our heart display!
 Ugh, still need to get some signage up there!
Such a fun lesson, I had to share! Have fun!
 photo signature_zpsd10b3273.png
Read more »

Friday, February 10, 2017

In the Art Room: Candy Heart Sculpture UPDATE!

 My fourth graders are wrapping up their Candy Heart Sculptures and I thought I'd share how they turned out. The kids loved creating these and were thrilled with their work. I'm not much of a project-repeater but this one might have to be done again! Here's the process video I created to share with my students and you:
I know several of y'all did this project with your students and mentioned that paint was flaking off. I only saw a little bit of that...so I'm thinking it might be the paint used. It's a constant search to find paint that is both nontoxic and good quality paint without being super expensive. We used a combination of Blick tempra, Sax Versa Temp and Chroma paint. I did seal the hearts with a quick couple swipes of ModPodge to prevent chipping and add a little shine. 
I knew the struggle would be with the lettering...which is why in the video, I cover it so thoroughly. I'm happy I did, I think they did a great job painting their words on that lumpy bumpy plaster. 
Knowing that I'd have some early finishers, I grabbed four large boxes out of the recycling bin and put those kids on candy box painting duty. I had primed the boxes with white paint the night before and just drew on it in pencil. If I have time, my plan is to grab some laminating film and make it like a window in the box. Early finishers also wrapped up this drawing lesson:
I'll be certain to share their drawings soon!
The sayings the kids picked out was my favorite part. I thought it spoke so much about the kid creating the heart. 
 I had printed out a list of the hundreds of sayings that Necco has used every year on their hearts. I told the kids they could come up with their own saying...or use one of Necco's. All I asked was that I check what they planned to write first. I didn't have any issues with inappropriate sayings...but I didn't want to take my chances. 
Love to hear from y'all if you gave this project a go! I'm off to put these on display in the library. 
 photo signature_zpsd10b3273.png
Read more »

Friday, February 3, 2017

In the Art Room: Recycle Hearts with First Grade

Yesterday, I shared on Instagram (I'm @cassie_stephenz), I shared this fast and furious 2/thirty minute session art project that I did with my first grade students using recycled materials...and I received many questions. I'm MISERABLE at responding to questions on Insta (I dread typing on that tiny phone keyboard with my sausage fingers) so I promised to share this simple project in blog form. So here you go!
 This lesson was created outta the fact that I had two classes that were ahead of the rest (gotta love that!). We've been focusing on the theme of love and last week finished off our 101 Dalmatians. Recently, while second grade was cutting out hearts for this project, I noticed how pretty the negative heart shapes looked when laying on the surface of a messy mat. Later, when I was tidying up, I found a stash of transparency film and had a eureka moment...what if the kids collaged tissue paper onto the film and created a faux stained glass window! I hope that thought process of mine made some sort of sense. Isn't it funny how ideas come to us?
Day 1 of a 30 minute class...

Supplies:

* Transparency film cut into 8" squares
* Warm colors of tissue paper
* Modpodge
* Large brushes
* Paper to write names and transport wet transparency film
We chatted about loads of stuff before starting: warm colors, transparent, translucent and opaque. We also talked about static electricity as the transparency film was so staticky! One kiddo said, "it's art science!" Art is a science, buddy. The kids then went "shopping" for their supplies. They were to coat their transparency in Modpodge, apply whatever colors of tissue they liked and then add another layer of the 'podge. This was placed on a sheet of paper with their name on it and placed on the drying rack. 
The next day, they looked like this coming off the drying rack. So pretty! We had fun holding them  up to the light. This was also a super fun color experimenting activity as many of the students noticed that when certain colors overlapped, they created new ones. 
Day 2 of a 30 minute class...

Supplies:

* Messy mats cut to 8" square (these are the tag board mats the kids use under their artwork when they are painting. I got the idea from my buddy Laura to use them for art projects and I LOVE it!) 
* Black and white paint
* Paint brushes and Q-tips

The next day, the kids were to pick a messy mat which they liked the colors of. They traced a heart template, cut it out (starting at the bottom of the heart to make a clean cut) and bring it to me. While I hot glued their "stained glass" to their negative shape, they worked on painting their positive shape hearts. 
In my room, we talk A LOT about using a paint brush correctly, pretending it is a ballerina who always dances on her tippy toes...and never EVER scoots around on her bottom. This really helps my kids understand how to create delicate lines. Once their hearts were dry, I framed them with more recycled messy mats!
I'm so excited how pretty these turned out. Our halls are looking so LOVEly right now. I can't wait to add these to our displays. 
Hope y'all have a lovely weekend. Stay warm, rest up and take it easy. That's my plan, anyway. 

 photo signature_zpsd10b3273.png
Read more »

Saturday, January 21, 2017

In the Art Room: Happy Hearts Inspired by Chris Uphues

Hey, friends! Second grade-land has just finished off a fun project with a strong focus on LOVE. My theme this year has been kindness and with Valentine's Day right around the corner, I really wanted to focus on all things love-y. Because, let's face it, the world could use a whole lot more love right now! 
And if these happy hearts don't help spread the love, I don't know what will! 

Another focus this year has been to introduce my students to more contemporary artists and also street artists. During my search, I discovered the artist Chris Uphues and completely fell in love (sorry, I had to) with his work, especially his happy hearts! 
If you aren't familiar, Chris is an artist based out of Chicago whose heart murals can be found there as well as in New York and Los Angeles. When I discovered his work, I was immediately struck by how happy it made me! I knew the colors, energy and joy in his work would really resonate with my students. Y'all should really check out his website...I love that his hearts can be purchased in the form of reasonably priced prints, patches and pins. I've got a cart full! 
I would totally cover a wall in my house in these! I mean, who wouldn't?! 
For the Happy Hearts pieces that my second graders created, we used the following:

Day 1:
* Black and white paper, 12" X 18"
* Tag board heart stampers
* Paint in yellow, magenta and turquoise

Day 2-3: 
* Painted papers, construction paper, scrap papers for hearts
* White paper for eyes
* Black paint
* Scissors and glue
Day 1:

I see my second grade kiddos for 30 minutes, twice a week. On our first day together, we chatted about Chris and his work. I introduced the kids to printing and we printed a black paper and a white paper full of hearts. To see how the heart stampers were created, watch the first 5 minutes of this video
On day 2, students learned how to cut out hearts. Many students knew how to do this already...but I had several that didn't. This was a great introduction to symmetry! I also offered them oval, circle and other shaped templates for the eyes. Once those were glued down, black paint was available for the artists to paint the faces. I had printed off several sheets of Chris' hearts to give the kids ideas for expressions. 
By the end of the second day, we had a ton of these! I love how happy and fun they are. 
Over the next couple art classes, the kids created more hearts and began adding them to the printed backgrounds. They so enjoyed creating these expressive heart faced characters. This project was a huge hit with them! 
Each kid was super engaged in creating their heart collages. When I told them that we'd be moving on to another project next week, each class shouted "WHY?!" They couldn't stop making these hearts! I just might have to give them one more day to keep on heartin'. 
As they worked, the kids had stories about each heart and how they interacted with each other. We had heart moms, dads, babies, grandparents, you name it! 
As they worked, the kids laughed at their hearts, showed them off to friends and pulled ideas from one another. 
Before gluing, we did chat about composition, overlapping, emphasis and scale. I wanted to remind the kids of these thoughts as they worked...but made sure not to weigh in too much as I really wanted to see where their ideas would take them. 
 Because, I mean...look at how fun and funny they are!
I'm so looking forward to showcasing these throughout our school along with all of our other LOVE-based projects. Just a quick scroll through this blog and you'll find half a dozen love-based projects we are currently working on in the art room. 
The best part is, I've tagged Chris Uphues on several posts showcasing the kids' hearts on my Instagram and he's been so sweet to respond! The kids have loved hearing his positive feedback. 
It's made us feel all...happy! Like this. 
 
If you are looking for a fun lesson for your students that introduces printing, symmetry, expression, collage and the amazing contemporary artist Chris Uphues, I strongly recommend this fun lesson! Love to hear from you if you give it a go!
 photo signature_zpsd10b3273.png
Read more »