Showing posts with label britto. Show all posts

Wednesday, July 30, 2025

Let's Create a Patterned Self-Portrait with Color Pencils!

Hello, friends!

If you are looking for the perfect Back-to-School art lesson; one that's low-mess and low-stress (because those first days of school are stressful enough!) then have I got the lesson for you! 
Kid-friendly video here! But if you'd like visuals to go along with this or a lesson plan, my friends at Prang have you covered! Check it out here. 

This is a lesson I did many moons ago with my fourth graders as a part of a Romero Britto unit. I decided to redo the video and give it a bit of an update. But if you'd like to view the original as it does introduce Britto, you can find that lesson here. 

On that first day with my fourth graders, we got this far...which is pretty dang good! In that lesson, we were using a variety of color pencils but...what I really wish we would have had were THESE:
Now...I used to be a big fan of the Prisma Color Art Sticks...don't get me wrong, they are so stinkin' good but they are very pricey. These color pencils have that same rich color and buttery feel when you are coloring. They are larger so easier for students to hold and the triangular shape means they aren't constantly rolling off tables. They are larger than the average color pencil so I can't fit 'em in my pencil sharpener. BUT you should never put color pencils in electric sharpeners anyway as they have a fragile core and tend to break easily, regardless of the brand. So...get some of those metal hand-held pencil sharpeners and your students will be good to go!
I will say this: working on a size 9" X 12" sheet of drawing paper does make the drawing time-consuming. And it's exhausting for the hand with all the coloring...I say that from creating the video. My hand was tired! You could make the paper a smaller format for students to work on. This would speed up the lesson and make it so you don't have to hear "my hand is tired" all the time. 
You could try cutting that 9" X 12" in half or just trimming it down a little. These drawings were created on that full sheet of paper...so it's doable! You can check out more details on these finished pieces here. 
For the patterned background, it always helps to have idea sheets. So I created a FREE download just for you and your artists! Here it is:
If you decide to use this sheet in your classroom, I hope you and your students find it helpful. You do not have my permission to copy this sheet to sell it on Teacher Pay Teacher (yes, I have to say that because yes, people do it). Find this free download for you and your artists here!


If you want for your students to create patterns that perhaps symbolize something about them, you might want to share this sheet! Then, when you display their artwork, you can hang this next to their piece. It would be a great conversation starter for parents and family during Open House! Find this sheet here. 
One of my favorite things to do when we return to school is have EVERYONE do the same lesson...it saves my sanity and it makes for an EPIC collaborative display. So put your own spin on this lesson and maybe deck the halls with colorful patterned selfies! You can check out this lesson (with video!) here.

Have fun, friends!
photo signature_zpsd10b3273.png
Read more »

Monday, January 14, 2019

In the Art Room: Top 14 Favorite Valentine's Day Lessons

Well, hello lovies! In this blog post, I thought I'd share with you 14 of my very favorite Valentine's Day inspired lessons...perfect for these chilly and cold months. Let's let warm fuzzies abound in the art room! 

To find the lessons, just follow the link. Many of them have a video to share with your kids. Also...several of them are sub plan videos! Perfect if you have to take a day. I know I could use one. 
First up are these sweet Jim Dine-inspired heart sculptures created by my second graders. We used Celluclay and aluminum foil to make these beauties and the kids loved making them. 
Next up are these amazing LOVE prints created by my first graders. We chatted about Robert Indiana before diving into these. We had a whole lotta printmaking fun with this one. 

Last year, I did this lesson with my second graders. They were able to choose their own "kind" four letter word (we had: nice, kind, love, glow, hope, good, etc.) and used strips of paper to create the letters. Those turned out so fun. 
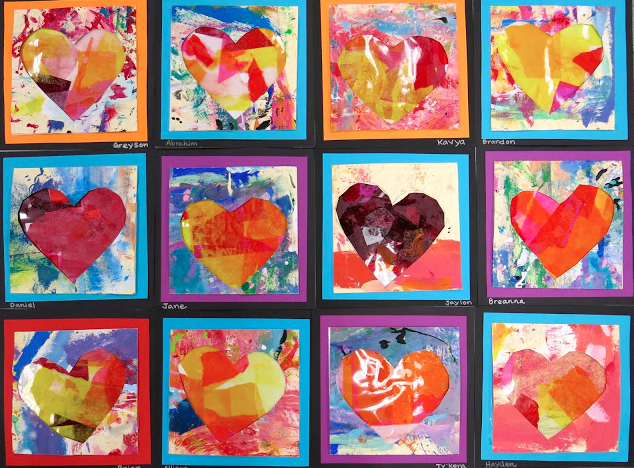
First grade artists created these huge Romero Britto-inspired hearts last year with bleeding tissue paper and paint sticks. We made these on huge 18" square sheets of paper. 
Speaking of first grade, here's a peak at what mine are working on right now...weaving! Heart weavings that we'll put together to create a faux quilt. This is one of my favorite lessons but mostly because I do love to teach weaving. 
Chris Uphues is one of my very favorite contemporary artists to share with my kids because 1. he's the nicest and 2. his artwork speaks to them. It's so happy! My students adored this lesson a couple years ago! 
If you need a quick one-day lesson that will introduce your kids to a new artist, you might want to try this one on for size. It's inspired by J. Goldcrown and all you need is black paper and chalk for amazing results. 
One year, we were inspired by Peter Anton's fake food sculptures to make some box of chocolates of our own. Third grade thought this was the coolest project ever. 
If you are like me, you do long art lessons...and then need a shorter one to pick up momentum again. I think my students might be the same way. This lesson is a quicker with beautiful results. Here's what we did with the paper after we cut the hearts how: filled them with a video of tissue paper!
And here's what we did with the hearts we cut out. So cute, right? 
This lesson is similar to the first I shared except that there are wings added with plaster. I'm thinking of doing this lesson with my third graders super soon...just need to work out the specifics...but I'm sure they will love it. Video details and more here. 
Need a sub plan? I did this Romero Britto inspired collaborative with my kids when I was out on jury duty. Lesson and video right here. 
Need something big and happy to spread the love? My kids EACH contributed to the Our School has Heart mural. Visit this post to see what each different grade level created for this mural from embroidery to painting to sculpture and needle felting! 
My fourth graders tackled this lesson a couple years ago right after they finished the following sculpture lesson...
Boy did we have a ball with this lesson! A super fun sculpture project for the kiddos. 
This lesson I created a little while back for my kindergarten and first graders. We loved the printed hearts and the fun guided drawing animals. Video lessons for each critter. 
Looking for a fun way to introduce your kids to four contemporary artists who use hearts in their work? This video lesson just might be for you!

Oh! And if you are looking for something to do with your faculty and staff to bring the love, you might want to check out these our Clay Hearts with Wings...a huge hit with my coworkers. Video too!

Okay, y'all...that was WAY more than 14 projects so have fun! 

 photo signature_zpsd10b3273.png
Read more »

Saturday, February 3, 2018

In the Art Room: Romero Britto-Inspired Hearts in First grade!

Hey, y'all! This blog post is brought to you by my (and my students!) newfavorite things:

* Bingo Dotters (Daubers?) filled with India ink

We had a blast with this lesson. So much so that when I shared on my Instagram, I got lots of questions. I thought I'd create a short video tutorial for your and your kiddos! Here you go:

Please pardon my nasally voice as I'm currently losing a fight with a head cold. I blame the children.
 I have 30 minute art classes with my wee-ones. We managed to crank these out even after watching a video about Britto and reviewing lines, shapes and patterns. I was so loving the direction they were going so far.
 The following art class, we learned all about bleeding tissue paper magic. This had the kids very excited. I encouraged them to use either warm or cold colors in each section. Some did and some didn't. It's first grade, y'all. They do what they want. 

 These hearts are HUGE. We created them on 18" squares. So, by the third art class, some had a little bit more tissue-papering to do and some did not. So I introduced the idea of the paint sticks. I really let the kids do what they wanted in the background...it was a new medium for them and I really wanted to see what they would come up with.
 By our fourth and final 30 minute art class, I still had some kids wrapping up their masterpieces. My early finishers set to work with their paint makers. They added pattern to GIANT hearts that I drew on multi colored bulletin board paper.
 I hot glued their giant hearts together and added them to our heart display!
 Ugh, still need to get some signage up there!
Such a fun lesson, I had to share! Have fun!
 photo signature_zpsd10b3273.png
Read more »

Monday, November 20, 2017

In the Art Room: Britto-Style Selfies!

I have fur realz been slackin' on this bloggin' thing, y'all! My apologies...I've just become COMPLETELY OBSESSED with flipping my art room around. I know you've seen pics if you follow me here where I have been shamelessly oversharing. However, I'll be posing a pretty big reveal right here on Friday so be sure and wake yourself outta your turkey-day coma and pop back by.
I've also not shared new lessons here lately because I've actually been doing some "reruns" of projects from last year! I don't often do projects more than once (and usually not consecutively) but these selfies are for our Artome art show. They were such a hit last year when my fourth graders did them that I decided to bring it back. And I'm so glad I did, they turned out amazing...even if there were some whining about color-pencil-hand-fatigue! 
Here's the lesson video I created and we used:
The reason I decided to have every kiddo in the school create a self portrait is because I know that's what I would want if I were a parent: a kid created selfie! They are so sweet and fun. You can see what my first graders created here and my third graders made here. I'll be sure to post what kinder and second are working on as they finish them. 

 The kids were super proud of these...I love that with this lesson, the background serves as a way for them to show their interests. I'd also like to add just how much I'm noticing rainbows popping up in my students art work...I take full responsibility
Swoon!
 Now, I will say this: colored pencils...NOT.MY.FAVE. Ugh, y'all. The constant pencil sharpening buzz is enough to make me wanna stab my ears. Please tell me I'm not alone in this. 
 For that reason, I also give my students art sticks to add color. If you are not familiar, art sticks are colored pencils without the wood (heehee). Crayola makes them...but my FAVORITE are by Prisma Color. Of course, they cost one million trillion dollars but they are worth it and they last. We are down to the nubs in my room...hence the Artome fundraiser!
 Eyebrows on fleek, y'all. AND, yes, the S...she managed to get that Sharpied before I could convince her otherwise. Such a beautiful drawing of a beautiful girl. I love seeing the kids write JES...we have such a strong school pride!
 AND can I just point out that this sweet girl made the end of her hair into a paint brush that is painting her shirt?! LOVE! 
 But, back to colored pencils...for the longest time, when I would sharpen colored pencils (btw, do you say "color pencils" or "colored pencils"?) they'd break. Over and over until I was down to a tiny pencil. I used to think it was because the colored pencils were cheap (and that might very well be the case) but now I have a different theory. I blame...THE PENCIL SHARPENER. 
 If you join my FB LIVE chats (you can find them archived here...I go live every Wednesday at 8pm CST), then you've heard my theory on this. A couple of years ago, I splurged and purchased a $50 Exacto electric sharpener. And it's a loud pencil eater. When my mom came to visit recently, she brought me my old Panasonic faux wood, 5 lbs workhorse of a sharpener. Y'all, this thing is BANANAS. It will sharpen anything without breaking it and leaves the pencils FRIGHTENINGLY sharp. Like, I had to establish a rule: Y'all don't have to come up to me and show me how sharp your pencil is every time you sharpen it. I know. It's sharp.
 When I found another Panasonic faux wood sharpener at the thrift store the other day, y'all better believe I scooped it up. So, long story short: if you are tired of your colored pencils breaking in your sharpener, don't blame the pencil...get you a vintage Panasonic sharpener. I just did a quick search on ebay and here she is: 
That being said, do you have a fave colored pencil brand? A long time ago, Ticonderoga made a colored pencil and they were AMAZING. They never broke, the colors were bonkers and creamy. I found them on a clearance aisle at on office store years ago and they were my everything. Sadly, they no longer make them...and I've just been using what I've got since.
 And I kinda made a promise to myself to never EVER order any more. I have 8 tables in my art room with two large trays of colored pencils at each table. I recently had a former student volunteer and she organized all of my EXTRA colored pencils by color...the idea being that my students can go there and get whatever colors that their table tray might not have. Here's what my EXTRA colored pencils look like: 
 Yeah, I'm pretty much set for life. Unless I have either a beaver or a termite infestation, I'll be sittin' pretty with these bad boys for quite some time before I need to reorder.
However, if there is one brand that you think would be worth ordering...despite my clear over abundance, I'd love to hear!
 But, back to the lesson. My kiddos worked on these for about 2-3 one hour sessions. We drew with the video one day, added patterns and designs and traced with Sharpie the next and then spent the rest of time coloring. And coloring. And coloring.
 Oh look, rainbows!
 And more rainbows....ahem. 
 I cannot wait to see these framed at the Artome art show...I'll share with you when the show rolls around!

 photo signature_zpsd10b3273.png
Read more »